-
redisson究极爽文-手把手带你实现redisson的发布订阅,消息队列,延迟队列(死信队列),(模仿)分布式线程池
参考资料 :分布式中间件实战:java版 (书籍), 多线程视频教程(视频)…
项目启动环境
导入依赖
<parent> <groupId>org.springframework.boot</groupId> <artifactId>spring-boot-starter-parent</artifactId> <version>2.3.1.RELEASE</version> <relativePath/> <!-- lookup parent from repository --> </parent> <dependency> <groupId>com.alibaba</groupId> <artifactId>fastjson</artifactId> <version>2.0.7.graal</version> </dependency> <dependency> <groupId>org.projectlombok</groupId> <artifactId>lombok</artifactId> <optional>true</optional> </dependency> <dependency> <groupId>org.redisson</groupId> <artifactId>redisson</artifactId> <version>3.13.6</version> </dependency>- 1
- 2
- 3
- 4
- 5
- 6
- 7
- 8
- 9
- 10
- 11
- 12
- 13
- 14
- 15
- 16
- 17
- 18
- 19
- 20
- 21
- 22
- 23
- 24
添加配置类
从spring容器中获取bean
import org.springframework.beans.BeansException; import org.springframework.beans.factory.annotation.Autowired; import org.springframework.context.ApplicationContext; import org.springframework.context.ApplicationContextAware; import org.springframework.stereotype.Component; @Component public class BeanContext implements ApplicationContextAware { @Autowired private static ApplicationContext applicationContext; public void setApplicationContext(ApplicationContext applicationContext) throws BeansException { BeanContext.applicationContext = applicationContext; } public static ApplicationContext getApplicationContext(){ return applicationContext; } @SuppressWarnings("unchecked") public static <T> T getBean(String name) throws BeansException { return (T)applicationContext.getBean(name); } public static <T> T getBean(Class<T> clz) throws BeansException { return (T)applicationContext.getBean(clz); } }- 1
- 2
- 3
- 4
- 5
- 6
- 7
- 8
- 9
- 10
- 11
- 12
- 13
- 14
- 15
- 16
- 17
- 18
- 19
- 20
- 21
- 22
- 23
- 24
- 25
- 26
- 27
- 28
- 29
- 30
redisson配置类,当然你也可以写在yml里面 或者 是配置集群啥的
@Configuration public class RedissonConfig { @Autowired private Environment environment ; @Bean public RedissonClient config(){ Config config = new Config(); config.setCodec(new org.redisson.client.codec.StringCodec()); config.useSingleServer().setConnectionPoolSize(50);//设置对于master节点的连接池中连接数最大为500 config.useSingleServer().setIdleConnectionTimeout(100000); //如果当前连接池里的连接数量超过了最小空闲连接数,而同时有连接空闲时间超过了该数值,那么这些连接将会自动被关闭,并从连接池里去掉。时间单位是毫秒。 config.useSingleServer().setConnectTimeout(300000);//同任何节点建立连接时的等待超时。时间单位是毫秒。 config.useSingleServer().setTimeout(30000);//等待节点回复命令的时间。该时间从命令发送成功时开始计时。 切记这里要序列化 ,不然 fastjson // 不能反序列化 阻塞队列中的string元素 Codec codec = new JsonJacksonCodec(); config.setCodec(codec); // 你的IP config.useSingleServer().setAddress("redis://***.***.***.**:6379").setKeepAlive(true) ; return Redisson.create(config) ; } }- 1
- 2
- 3
- 4
- 5
- 6
- 7
- 8
- 9
- 10
- 11
- 12
- 13
- 14
- 15
- 16
- 17
- 18
- 19
- 20
- 21
- 22
- 23
- 24
- 25
- 26
- 27
- 28
- 29
- 30
- 31
ok~~,项目环境搭建完了
发布订阅
生产者(消息发布者)
@Slf4j @Component public class UserLoginPublisher { public static final String TOPICKEYLOGINUSER = "UserLoginKey" ; @Autowired private RedissonClient redissonClient ; public void sendMsg(UserLoginDto user){ try { log.info("准备发送消息 ~~"); // TOPICKEYLOGINUSER : 是一个string ,是订阅的主题 RTopic clientTopic = redissonClient.getTopic(TOPICKEYLOGINUSER,new SerializationCodec()); // 消息发布(这里是异步的形式) clientTopic.publishAsync(user); long l = clientTopic.countSubscribers(); System.out.println(l); } catch (Exception e) { log.info("消息发送失败 ~~:{}",e); } } }- 1
- 2
- 3
- 4
- 5
- 6
- 7
- 8
- 9
- 10
- 11
- 12
- 13
- 14
- 15
- 16
- 17
- 18
- 19
- 20
- 21
- 22
- 23
消费者(订阅者)
订阅者的 redissonClient.getTopic(“UserLoginKey”,new SerializationCodec()); 要和 发布者的 topic 一样
import com.alibaba.fastjson.JSON; import com.example.redissiontest.dto.UserLoginDto; import lombok.extern.slf4j.Slf4j; import org.redisson.api.RTopic; import org.redisson.api.RedissonClient; import org.redisson.api.listener.MessageListener; import org.redisson.codec.SerializationCodec; import org.springframework.beans.factory.annotation.Autowired; import org.springframework.boot.ApplicationArguments; import org.springframework.boot.ApplicationRunner; import org.springframework.core.Ordered; import org.springframework.stereotype.Component; @Slf4j @Component //implements ApplicationRunner, Ordered 是实现 线程的一种方式 当然你也可以 继承 runnable // CommandLineRunner也可以在spring启动的时候进行执行 public class UserLoginSubscriber implements ApplicationRunner, Ordered { private static final String TOPICKEYLOGINUSER = UserLoginPublisher.TOPICKEYLOGINUSER; @Autowired private RedissonClient redissonClient ; @Override public void run(ApplicationArguments args) throws Exception { log.info("线程正在运行 ~~"); try { RTopic topic = redissonClient.getTopic("UserLoginKey",new SerializationCodec()); topic.addListener(UserLoginDto.class, new MessageListener<UserLoginDto>() { @Override public void onMessage(CharSequence charSequence, UserLoginDto userLoginDto) { String s = JSON.toJSONString(userLoginDto); System.out.println("收到消息:"+s); } }); } catch (Exception e) { e.printStackTrace(); } } //开局运行 @Override public int getOrder() { return 0; } }- 1
- 2
- 3
- 4
- 5
- 6
- 7
- 8
- 9
- 10
- 11
- 12
- 13
- 14
- 15
- 16
- 17
- 18
- 19
- 20
- 21
- 22
- 23
- 24
- 25
- 26
- 27
- 28
- 29
- 30
- 31
- 32
- 33
- 34
- 35
- 36
- 37
- 38
- 39
- 40
- 41
- 42
- 43
- 44
- 45
- 46
- 47
- 48
- 49
- 50
- 51
测试
@Test void contextLoadsPublish() { UserLoginDto loginDto = new UserLoginDto("cunk", "109922", 1); userLoginPublisher.sendMsg(loginDto); }- 1
- 2
- 3
- 4
- 5
- 6
消息队列
生产者

基于Redis的分布式队列Queue是Redisson提供的又一个功能组件,按照不同的特性,分布式队列Queue还可以分为双端队列Deque、阻塞队列Blocking Queue、有界阻塞队列(Bounded Blocking Queue)、阻塞双端队列(Blocking Deque)、阻塞公平队列(Blocking Fair Queue)、阻塞公平双端队列(Blocking Fair Deque)等功能组件,不同的功能组件其作用不尽相同,适用的业务场景也是不一样的。
在实际业务场景中,不管是采用哪一种功能组件作为“队列”,其底层核心的执行逻辑仍旧是借助“基于发布-订阅式的主题”来实现的
注意这里有个消息重试机制 , 消息的发送和接收需要 是同一个队列里面import lombok.extern.slf4j.Slf4j; import org.redisson.api.RQueue; import org.redisson.api.RedissonClient; import org.springframework.beans.factory.annotation.Autowired; import org.springframework.stereotype.Component; @Slf4j @Component public class QueuePublisher { @Autowired private RedissonClient redissonClient ; String key = QueueConsumer.queueName ; public void sendMSG(String msg){ try { RQueue<Object> queue = redissonClient.getQueue(key); queue.add(msg) ; log.info("消息队列发送消息成功~~"); } catch (Exception e) { log.info("消息队列发送消息失败~~"); // 消息重试 RQueue<Object> queue = redissonClient.getQueue(key); queue.add(msg) ; } } }- 1
- 2
- 3
- 4
- 5
- 6
- 7
- 8
- 9
- 10
- 11
- 12
- 13
- 14
- 15
- 16
- 17
- 18
- 19
- 20
- 21
- 22
- 23
- 24
- 25
- 26
- 27
- 28
消费者
@Slf4j @Component public class QueueConsumer implements ApplicationRunner, Ordered { public static final String queueName = "redssionName" ; @Autowired private RedissonClient redissonClient ; @Override public void run(ApplicationArguments args) throws Exception { RQueue<String> queue = redissonClient.getQueue(queueName); while (true){ String msg = queue.poll(); if (msg!=null){ log.info("消息队列监听到消息:{}",msg); } } } // @Override public int getOrder() { return -1; } }- 1
- 2
- 3
- 4
- 5
- 6
- 7
- 8
- 9
- 10
- 11
- 12
- 13
- 14
- 15
- 16
- 17
- 18
- 19
- 20
- 21
- 22
- 23
- 24
- 25
- 26
- 27
- 28
- 29
- 30
- 31
测试
@GetMapping("/test/{msg}") public String queue(@PathVariable("msg") String msg) { try { queuePublisher.sendMSG(msg); } catch (Exception e) { //发送失败 重试 queuePublisher.sendMSG(msg); } return "ok" ; }- 1
- 2
- 3
- 4
- 5
- 6
- 7
- 8
- 9
- 10
- 11
延迟队列
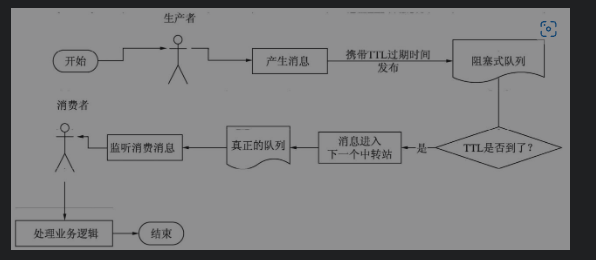
用户的需求是多样化的,永远不会按照程序员的思路走!在实际的生产环境中,仍旧存在着需要处理不同 TTL(即过期时间/存活时间)的业务数据的场景,为了解决此种业务场景,Redisson提供了“延迟队列”这个强大的功能组件,它可以解决RabbitMQ死信队列出现的缺陷,即不管在什么时候,消息将按照 TTL从小到大的顺序先后被真正的队列监听、消费,其在实际项目中的执行流程如图
生产者
import lombok.extern.slf4j.Slf4j; import org.redisson.api.RBlockingDeque; import org.redisson.api.RBlockingQueue; import org.redisson.api.RDelayedQueue; import org.redisson.api.RedissonClient; import org.springframework.beans.factory.annotation.Autowired; import org.springframework.stereotype.Component; import java.util.concurrent.TimeUnit; @Component @Slf4j public class RedissonDelayQueuePublisher { @Autowired RedissonClient redissonClient ; public static final String QUEUE_DELAY_KEY = "delayqueueKey"; public void sendDelayMsg(String msg,Long ttl){ //阻塞队列 RBlockingQueue<Object> blockingQueue = redissonClient.getBlockingQueue(QUEUE_DELAY_KEY); //延迟队列 RDelayedQueue<Object> delayedQueue = redissonClient.getDelayedQueue(blockingQueue); delayedQueue.offer(msg,ttl, TimeUnit.SECONDS); log.info("延迟队列 , 阻塞队列生成"); } }- 1
- 2
- 3
- 4
- 5
- 6
- 7
- 8
- 9
- 10
- 11
- 12
- 13
- 14
- 15
- 16
- 17
- 18
- 19
- 20
- 21
- 22
- 23
- 24
- 25
- 26
- 27
- 28
- 29
- 30
- 31
- 32
- 33
- 34
- 35
消费者
import lombok.extern.slf4j.Slf4j; import org.redisson.api.RBlockingDeque; import org.redisson.api.RedissonClient; import org.springframework.beans.factory.annotation.Autowired; import org.springframework.scheduling.annotation.EnableScheduling; import org.springframework.scheduling.annotation.Scheduled; import org.springframework.stereotype.Component; @EnableScheduling @Component @Slf4j public class RedissonDelayQueueConsumer { @Autowired private RedissonClient redissonClient ; private String delayqueueKey = RedissonDelayQueuePublisher.QUEUE_DELAY_KEY; @Scheduled(cron = "0/1 * * * * ?") public void consumerMsg() throws InterruptedException { RBlockingDeque<Object> blockingDeque = redissonClient.getBlockingDeque(delayqueueKey); Object msg = blockingDeque.take(); if (msg!=null){ log.info("从消息队列中取出消息:{}",(String)msg); } } }- 1
- 2
- 3
- 4
- 5
- 6
- 7
- 8
- 9
- 10
- 11
- 12
- 13
- 14
- 15
- 16
- 17
- 18
- 19
- 20
- 21
- 22
- 23
- 24
- 25
- 26
- 27
- 28
- 29
- 30
- 31
- 32
- 33
- 34
测试
@Autowired private RedissonDelayQueuePublisher redissonDelayQueuePublisher ; @Autowired RedissonDelayQueueConsumer redissonDelayQueueConsumer ; @GetMapping("/delaytest") public void queue() throws InterruptedException { for (int i = 0; i < 10; i++) { Random random = new Random(); int ttl = random.nextInt(10); Long ttlTime = Long.valueOf(ttl); String msg ="这是一条消息,他的延迟时间是:"+ttl ; redissonDelayQueuePublisher.sendDelayMsg(msg,ttlTime); } }- 1
- 2
- 3
- 4
- 5
- 6
- 7
- 8
- 9
- 10
- 11
- 12
- 13
- 14
- 15
- 16
- 17
- 18

分布式线程池
我的思路 1. redisson 延迟队列实现线程池(将普通线程池中的阻塞队列换成redisson的阻塞队列就行)
2.把普通线程池 改造成立 阻塞队列基于 redisson的分布式阻塞队列 , 线程池变成了一个线程不停监听 redisson 。虽然中间有很 多插曲 ,大体设计就是这样线程池代码
建议先看看我的这篇文章 手搓线程池
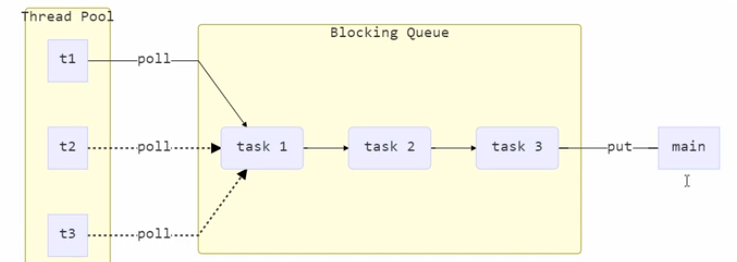
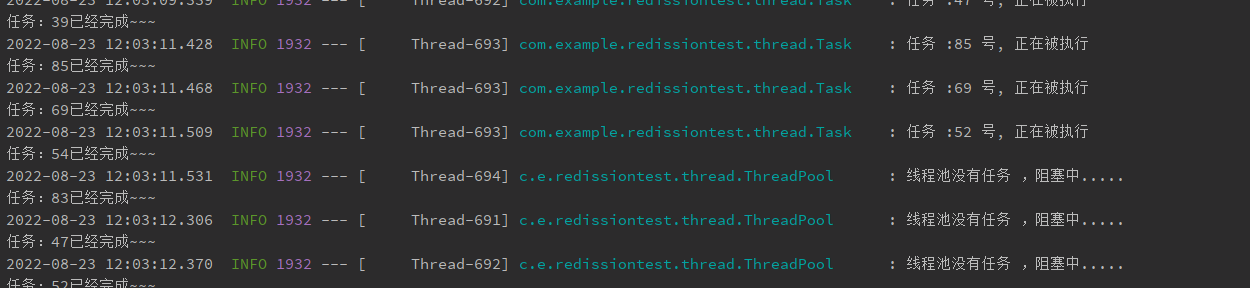
import com.alibaba.fastjson.JSON; import com.example.redissiontest.config.BeanContext; import com.sun.org.apache.xpath.internal.operations.Bool; import lombok.SneakyThrows; import lombok.extern.slf4j.Slf4j; import org.redisson.api.RBlockingQueue; import org.redisson.api.RedissonClient; import org.springframework.stereotype.Component; import java.util.HashSet; import java.util.concurrent.BlockingQueue; @Component @Slf4j public class ThreadPool implements Runnable { RedissonClient redissonClient = BeanContext.getBean(RedissonClient.class); private Boolean flage =false ; private int coreSize ; private long timeOut ; private BlockingQueue<String> blockQueue ; private BlockingQueue<String> blockQueuework ; private HashSet<Worker> workers = new HashSet<>() ; public ThreadPool() { RBlockingQueue<String> blockQueue = redissonClient.getBlockingQueue("ThreadPool"); RBlockingQueue<String> blockQueuework = redissonClient.getBlockingQueue("workQueue"); this.coreSize = 4; this.blockQueue =blockQueue ; this.blockQueuework = blockQueuework ; } //执行任务 public void execute(Task task) throws InterruptedException { //任务数量没有超过线程数量 ,交给 work执行 //else //任务数超过coreSize的时候 加入任务队列暂存 synchronized (workers){ if (workers.size() < coreSize){ Worker worker = new Worker(task); log.debug("新增work",worker); worker.start(); workers.add(worker) ; }else { log.debug("加入任务队列",task); String taskStr = JSON.toJSONString(task); blockQueuework.put(taskStr); } } } //work :线程 ,(用来执行任务的) class Worker extends Thread { private Task task ; public Worker(Task task) { this.task = task; } @SneakyThrows @Override public void run() { //执行任务 //当task不为空 ,执行完毕 //当task执行完毕,接着从任务队列获取任务 while (task!=null ||( task = JSON.parseObject(blockQueuework.take(), Task.class))!=null){ try{ log.debug("正在执行...{}",task); task.run(); }catch (Exception e){ e.printStackTrace(); }finally { task = null ; if (blockQueuework.size() == 0){ log.info("线程池没有任务 ,阻塞中....."); } } } synchronized (workers){ log.debug("work被移除...{}",task); workers.remove(this) ; } } } @SneakyThrows @Override public void run() { while (true){ String take = blockQueue.take(); Task task = JSON.parseObject(take, Task.class); this.execute(task); } } }- 1
- 2
- 3
- 4
- 5
- 6
- 7
- 8
- 9
- 10
- 11
- 12
- 13
- 14
- 15
- 16
- 17
- 18
- 19
- 20
- 21
- 22
- 23
- 24
- 25
- 26
- 27
- 28
- 29
- 30
- 31
- 32
- 33
- 34
- 35
- 36
- 37
- 38
- 39
- 40
- 41
- 42
- 43
- 44
- 45
- 46
- 47
- 48
- 49
- 50
- 51
- 52
- 53
- 54
- 55
- 56
- 57
- 58
- 59
- 60
- 61
- 62
- 63
- 64
- 65
- 66
- 67
- 68
- 69
- 70
- 71
- 72
- 73
- 74
- 75
- 76
- 77
- 78
- 79
- 80
- 81
- 82
- 83
- 84
- 85
- 86
- 87
- 88
- 89
- 90
- 91
- 92
- 93
- 94
- 95
- 96
- 97
- 98
- 99
- 100
- 101
- 102
- 103
- 104
- 105
- 106
- 107
- 108
- 109
- 110
- 111
测试代码
@GetMapping("/threadPool") public void queuePool() throws InterruptedException { RBlockingQueue<String> blockQueue = redissonClient.getBlockingQueue("ThreadPool"); for (int i = 0; i < 15; i++) { Task task = new Task(); String taskS = JSON.toJSONString(task); blockQueue.put(taskS); } }- 1
- 2
- 3
- 4
- 5
- 6
- 7
- 8
- 9
- 10
- 11
- 12
- 13
当然 你也可以使用策略模式增加他的 功能 ,你也实现一下把~~~
而且他的拓展性非常好, 你可以创建更多不同类型的线程池进行粘合进去,反正 所有线程池都是监听的一条阻塞队列 ,当然你还可以
拓展 将 不同类型的任务对象 放入不同类型的 线程池中。

-
相关阅读:
js显示隐藏密码框
3. Nginx 核心功能
c++静态成员
coudn‘t deserialize object in variable ‘entity‘.获取流程变量无法反序列化问题
java数据结构与算法刷题-----LeetCode1094:拼车
一个插件帮你快速、免费下载两个网站的高清无水印LOGO!
什么是Linux?Linux与windows的区别
释放数据的潜力:用梯度上升法解锁主成分分析(PCA)的神奇
[附源码]java毕业设计学生档案管理系统
软件测试: 测试用例
- 原文地址:https://blog.csdn.net/weixin_45699541/article/details/126479146
