-
ElasticSearch安装 &es基本操作& 安装es中文分词& ========= springboot 整合ElasticSearch

Elasticsearch 分布式安装步骤 1
#考虑需要安装elasticsearch-head作为web展示 所以首先安装nodejs 主要是利用npm wget https://npm.taobao.org/mirrors/node/v11.0.0/node-v11.0.0.tar.gz tar -zxvf node-v11.0.0.tar.gz mv node-v11.0.0 /opt/soft/ cd /opt/soft/node-v11.0.0 yum install gcc gcc-c++ ./configure make make install node -v
步骤 2
cd /opt/ tar -zxf elasticsearch-6.7.1.tar.gz mv elasticsearch-6.7.1 /opt/soft/ cd /opt/soft/es671/config/ vim elasticsearch.yml ============== #修改 cluster.name: es-app node.name: es-1 network.host: 192.168.64.128 http.port: 9200 #插入 http.cors.enabled: true http.cors.allow-origin: "*" ============== :wq #创建一个用户 useradd cm passwd cm ok ok su cm su vim /etc/security/limits.conf #文件末尾追加 问题 1 系统最大文件数太低 cm soft nofile 65536 cm hard nofile 131072 cm soft nproc 4096 cm hard nproc 4096 vim /etc/sysctl.conf #文件末尾追加 问题 2 虚拟内存太低 vm.max_map_count=655360 #激活 sysctl -p #授权 chown cm:cm -R /opt/soft/es671/ su cm cd .. cd /opt/soft/es671/bin/ ls ./elasticsearch #浏览器查看 192.168.64.128:9200
步骤 3(开启新窗口)
cd /opt/ #安装zip yum install -y unzip zip #解压 unzip elasticsearch-head-master.zip mv elasticsearch-head-master /opt/soft/eshead cd /opt/soft/eshead/ #告诉系统导包 最后有个文件找不到报错(不重要不影响开发) npm install #开启新窗口 cd /opt/soft/eshead npm run start #浏览器访问 http://192.168.64.128:9100 ElasticSearch02
rowid
用于定位数据表中某条数据的位置,是唯一的、也不会改变
rownum
表示查询某条记录在整个结果集中的位置, 同一条记录查询条件不同对应的 rownum 是不同的而 rowid 是不会变的

启动es
配置环境变量 vim /etc/profile =========================== #Elasticsearch export Elasticsearch_Home=/opt/soft/es671 export PATH=$PATH:$Elasticsearch_Home/bin =========================== source /etc/profile su cm cd /opt/soft/es671/bin ./elasticsearch #启动 ./elasticsearch -d #停止 su cd /opt/soft/eshead npm run start 192.168.64.128:9100 #浏览器访问 #如果要安装集群 记得 vim elasticsearch.yml node.name: es-1 名需要不一样

es创建索引
方法1
put indexTest001 put /my_test_index_004
方法2

es操作基本数据
1创建表

2.增加数据

3.修改数据

4.删除数据

5.批量添加数据


6.按照id查询

7.查询所有

8.模糊查询
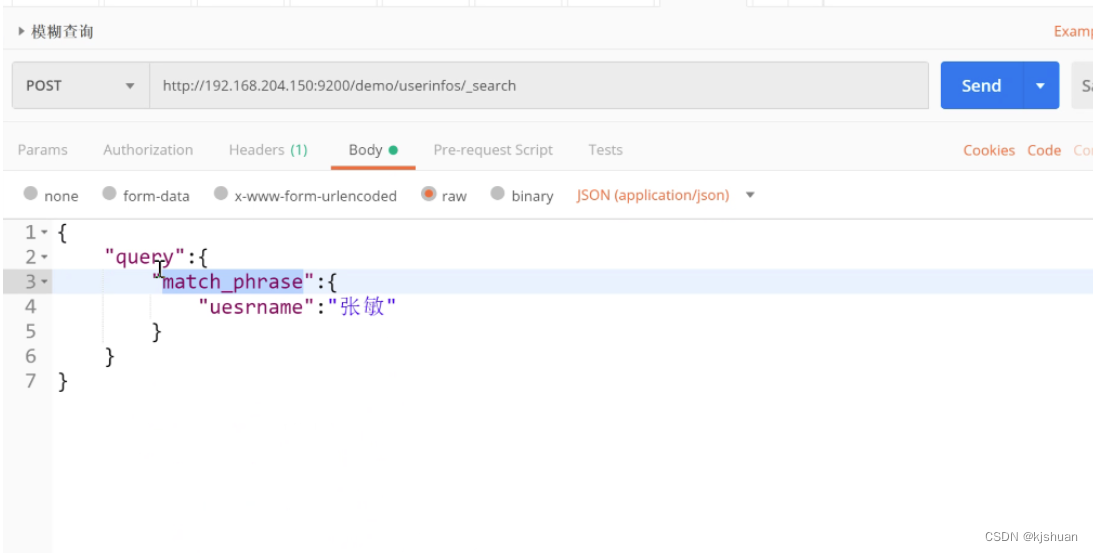

9.短语匹配查询

10.短语前缀匹配

11.多列查询

12.in查询 query-query_string

13.term 查询query-term

14.多词汇查询

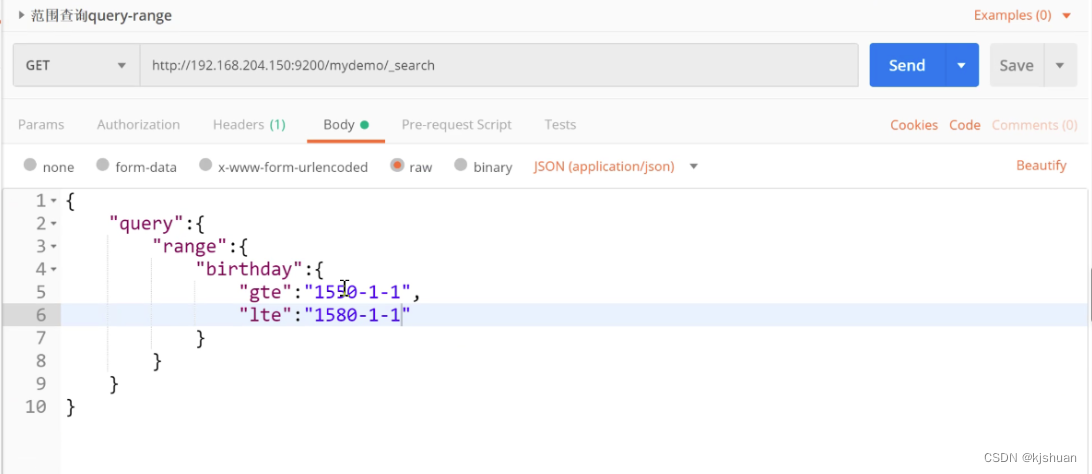
15.范围查询
16.布尔查询
安装


中文分词安装
前提拖入jar包

mkdir ik mv elasticsearch-analysis-ik-6.7.1.zip ik/ ls cd ik/ unzip elasticsearch-analysis-ik-6.7.1.zip cd .. mv ik/ /opt/soft/es671/plugins/ cd /opt/soft/es671/plugins/ ls cd ../.. chown cm:cm -R /opt/soft/es671/ su cm cd es671/bin/ ./elasticssearch -d su cd /opt/soft/eshead npm run start
.ik分词器测试
 .1分词器使用


springboot 整合es

第一步导入pom
    org.springframework.boot
    spring-boot-starter-parent
    2.2.0.RELEASE


        spring-snapshots
        http://repo.spring.io/libs-snapshot


        spring-snapshots
        http://repo.spring.io/libs-snapshot
org.springframework.boot 第二步配置yml
server:
  port: 8001
spring:
  application:
    name: myelastics
  elasticsearch:
    rest:
      uris: 192.168.64.128:9200
第三步配置实体类
@Data
@AllArgsConstructor
@NoArgsConstructor
@Builder
@Document(indexName = "mydemo1",type= "userinfos" )
public class Userinfos {
    @Id
    private String id;
    @Field(type = FieldType.Integer,name = "userid")
    private Integer userid;
    @Field(type = FieldType.Text,name = "username")
    private String username;
    @JsonFormat(pattern = "yyyy-MM-dd")
    @Field(type = FieldType.Date,name = "birthday",format = DateFormat.date)
    private Date birthday;
}
第四步配置mapper接口
public interface UserinfosMapper extends ElasticsearchRepository
第五步配置测试类查询
@SpringBootTest class Es05ApplicationTests { @Resource private UserinfosMapper userinfosMapper; @Test void contextLoads() { //第一种 根据id查询 // Optionalop = userinfosMapper.findById("222"); //如果为空 不报错 // op.ifPresent(a-> System.out.println(a)); // System.out.println(op.get()); //第二种模糊查询 MatchQueryBuilder qbmq = QueryBuilders.matchQuery("username", "张无忌"); Iterable search = userinfosMapper.search(qbmq); //lamda方法引用 遍历结果 search.forEach(System.out::println); } } 查看结果 !

-
相关阅读:
去年十八,初识Java 2
axios配置代理ip
2022Nginx进阶教程,由浅入深
FL Studio21.2.0.3858免激活版安装下载
pytorch预测之解决多次预测结果不一致问题
Java:如何去优雅地优化接口
『牛客|每日一题』有效括号序列
抖音小店最新入驻费用,2023具体费用分析!
SpringBoot 启动流程追踪(第一篇)
SpringBoot学习笔记(项目创建,yaml,多环境开发,整合mybatis SMM)
- 原文地址:https://blog.csdn.net/just_learing/article/details/126440534