-
【数据分析实战】金融评分卡建立
一、导入数据
import numpy as np import pandas as pd import matplotlib.pyplot as plt %config InlineBackend.figure_format = 'svg' import toad from toad.plot import bin_plot, badrate_plot import math from imblearn.over_sampling import SMOTE, RandomOverSampler import seaborn as sns sns.set() # 数据来源:kaggle项目"give me some credit" credit_df0 = pd.read_csv('data/GiveMeSomeCredit/cs-training.csv')- 1
- 2
- 3
- 4
- 5
- 6
- 7
- 8
- 9
- 10
- 11
- 12
- 13
# 查看数据集 credit_df0.head()- 1
- 2

# 查看描述性统计信息 toad.detect(credit_df0)- 1
- 2
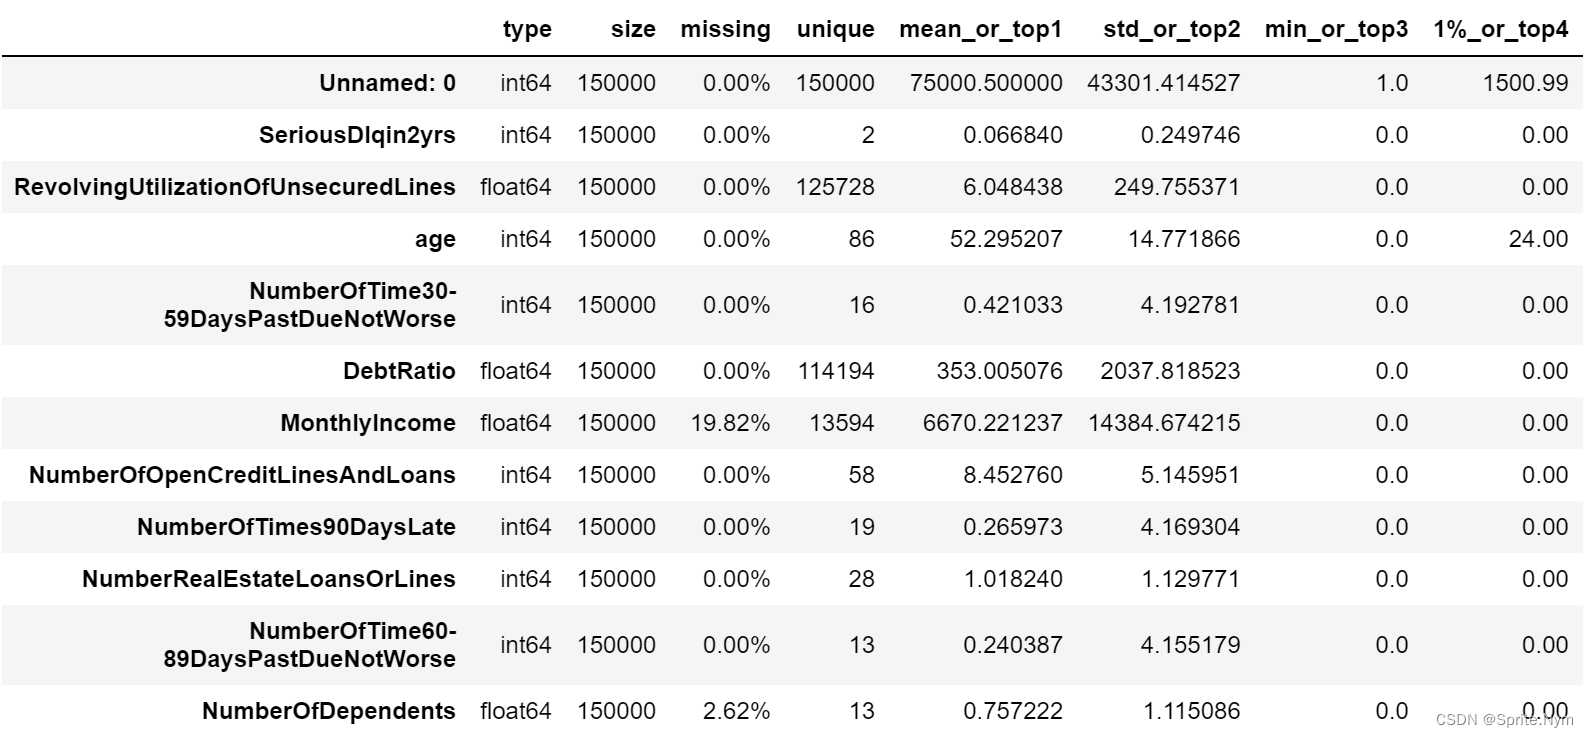
列名含义:- SeriousDlqin2yrs:超过90天或更糟的逾期拖欠
- RevolvingUtilizationOfUnsecuredLines:除了房贷车贷之外的信用卡账面金额(即贷款金额)/信用卡总额度
- age:贷款人年龄
- NumberOfTime30-59DaysPastDueNotWorse:35-59天逾期但不糟糕次数
- DebtRatio:负债比率
- MonthlyIncome:月收入
- NumberOfOpenCreditLinesAndLoans:开放式信贷和贷款数量,开放式贷款(分期付款如汽车贷款或抵押贷款)和信贷(如信用卡)的数量
- NumberOfTimes90DaysLate:借款者有90天或更高逾期的次数
- NumberRealEstateLoansOrLines:不动产贷款或额度数量
- NumberOfTime60-89DaysPastDueNotWorse:60-89天逾期但不糟糕次数
- NumberOfDependents:不包括本人在内的家属数量
二、EDA
# 丢弃编号列 credit_df1 = credit_df0.drop(['Unnamed: 0'], axis=1) # 修改列名 colnames={'SeriousDlqin2yrs':'Isdlq', 'age':'Age', 'RevolvingUtilizationOfUnsecuredLines':'Revol', 'NumberOfTime30-59DaysPastDueNotWorse':'Num30-59late', 'NumberOfOpenCreditLinesAndLoans':'Numopen', 'NumberOfTimes90DaysLate':'Num90late', 'NumberRealEstateLoansOrLines':'Numestate', 'NumberOfTime60-89DaysPastDueNotWorse':'Num60-89late', 'NumberOfDependents':'Numdepend'} credit_df1.rename(columns=colnames, inplace=True) credit_df1.head()- 1
- 2
- 3
- 4
- 5
- 6
- 7
- 8
- 9
- 10
- 11
- 12
- 13
- 14

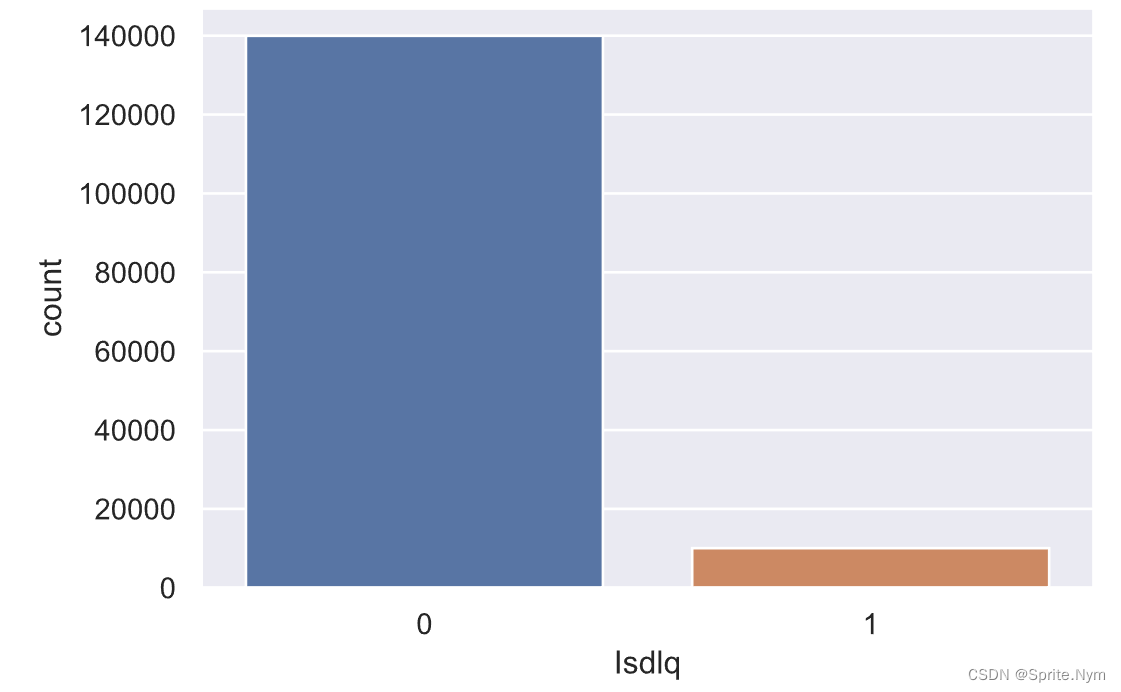
# 查看好坏比 sns.countplot(credit_df1['Isdlq']) print(f"好坏比:{np.round(100 * credit_df1['Isdlq'].mean(), 2)}%") # 好坏比:6.68%- 1
- 2
- 3
- 4
2.1 查看Revol特征
# 查看可用额度比的描述性统计信息 credit_df1['Revol'].describe([0.99, 0.999]) """ count 150000.000000 mean 6.048438 std 249.755371 min 0.000000 50% 0.154181 99% 1.092956 99.9% 1571.006000 max 50708.000000 Name: Revol, dtype: float64 """- 1
- 2
- 3
- 4
- 5
- 6
- 7
- 8
- 9
- 10
- 11
- 12
- 13
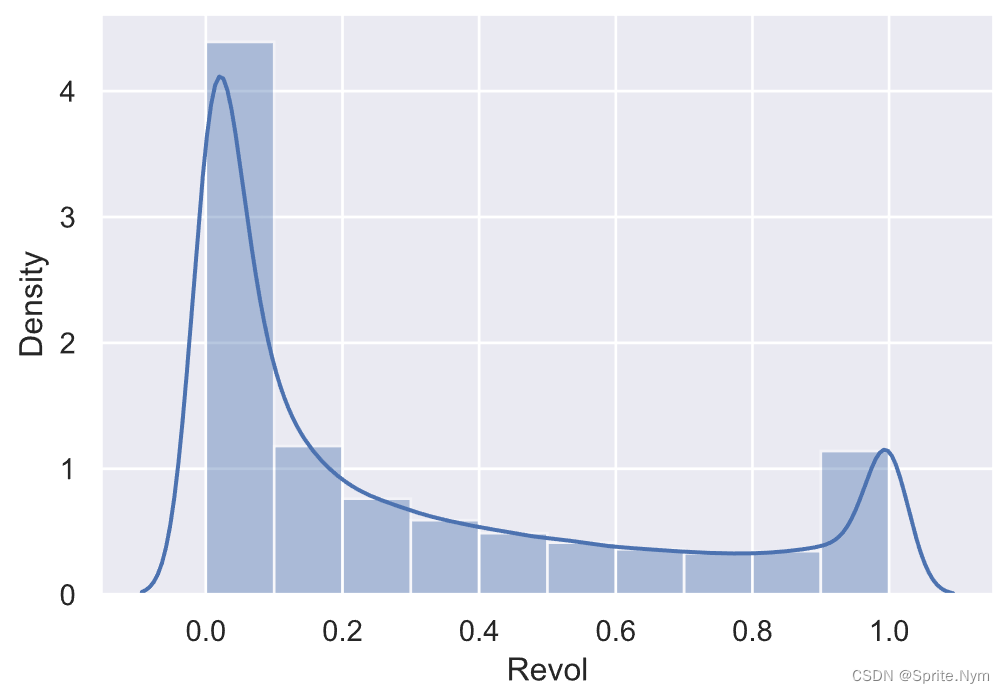
明显分布异常
# 画出Revol小于1的分布图 sns.distplot(credit_df1[credit_df1['Revol']<1]['Revol'], bins=10)- 1
- 2
# 定义一个分箱并统计箱内坏客户率的函数 def show_rate_by_box(df, target_name, feature_name, bins): temp = pd.concat([df[target_name], pd.cut(df[feature_name], bins=bins, right=False)], axis=1) return pd.pivot_table(temp, index=[feature_name], values=[target_name], aggfunc=['mean', 'count'])- 1
- 2
- 3
- 4
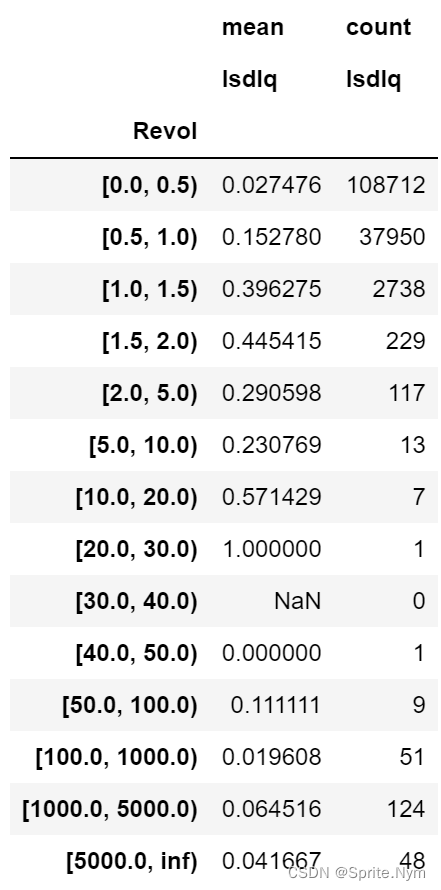
按理说Revol不应该大于1,所以我们重点查看大于1的数据违约率如何
# 初步分箱并查看各区间段的违约率分布,给后续分箱提供参考 revol_bins=[0,0.5,1,1.5,2,5,10,20,30,40,50,100,1000,5000,math.inf] temp = show_rate_by_box(credit_df1, 'Isdlq', 'Revol', bins=revol_bins) show_rate_by_box(credit_df1, 'Isdlq', 'Revol', bins=revol_bins)- 1
- 2
- 3
- 4
# 画成图方便观看 plt.figure(figsize=(15, 5)) sns.barplot(x=temp.index, y=temp[( 'mean', 'Isdlq')])- 1
- 2
- 3
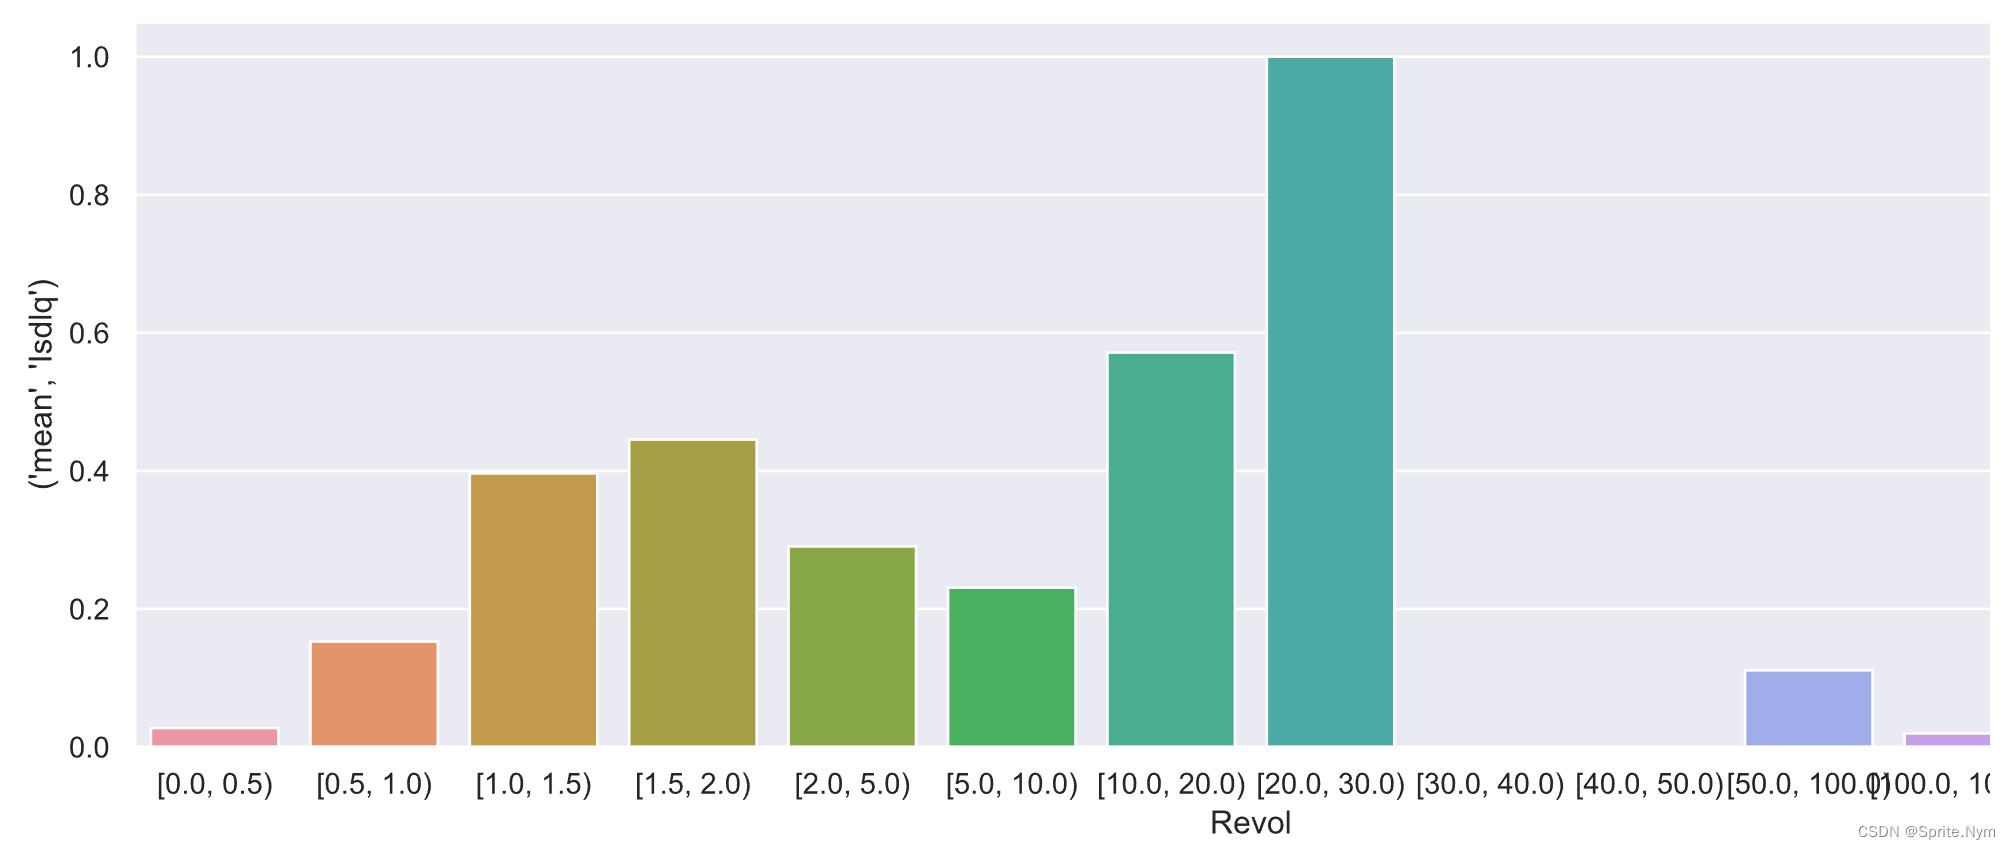
结论:1到20坏客户比率明显上升,20以上又降下来,将异常值阈值确定为20。高于20后续统一删除。
2.2 Age
# 查看年龄的描述性统计信息 credit_df1['Age'].describe([0.01]) """ count 150000.000000 mean 52.295207 std 14.771866 min 0.000000 1% 24.000000 50% 52.000000 max 109.000000 Name: Age, dtype: float64 """- 1
- 2
- 3
- 4
- 5
- 6
- 7
- 8
- 9
- 10
- 11
- 12
年龄小于18岁不符合业务逻辑,后续准备统一排除
# 查看要删除的有几人 len(credit_df1[credit_df1['Age']<18]) # 1- 1
- 2
- 3
# 画出分布图 sns.distplot(credit_df1['Age'])- 1
- 2

2.3 DebtRatio
# 查看负债率的描述性统计信息 credit_df1['DebtRatio'].describe([0.01, 0.99, 0.999]) """ count 150000.000000 mean 353.005076 std 2037.818523 min 0.000000 1% 0.000000 50% 0.366508 99% 4979.040000 99.9% 10613.074000 max 329664.000000 Name: DebtRatio, dtype: float64 """- 1
- 2
- 3
- 4
- 5
- 6
- 7
- 8
- 9
- 10
- 11
- 12
- 13
- 14
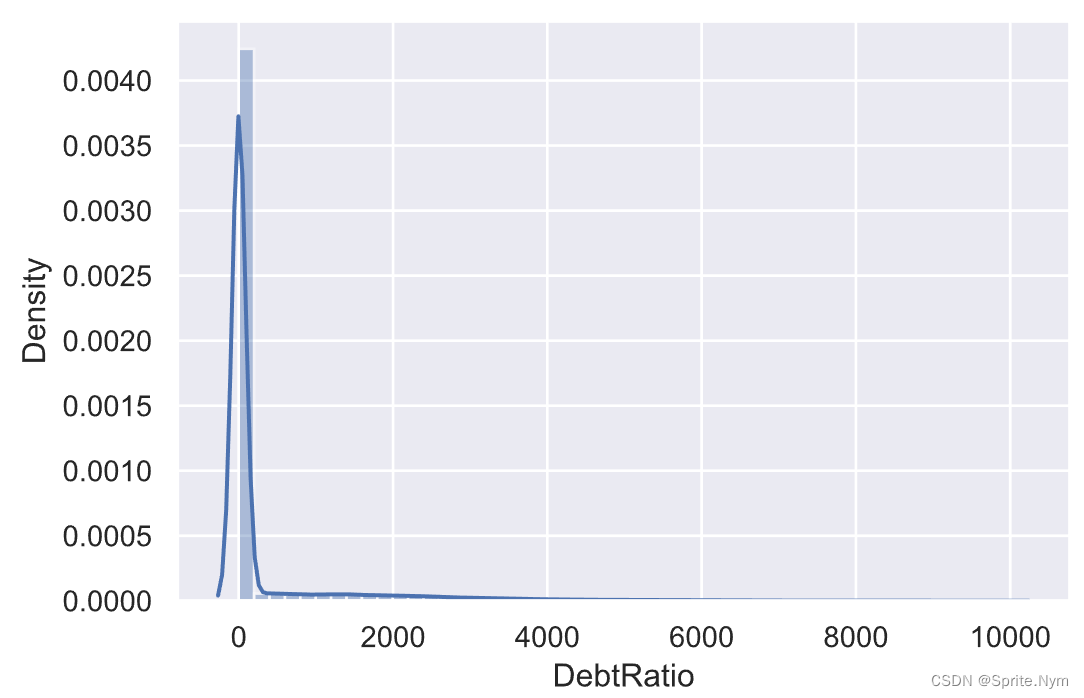
# 画图查看分布 sns.distplot(credit_df1[credit_df1['DebtRatio']<10000]['DebtRatio'])- 1
- 2
# 初步分箱并查看各区间段的违约率分布,给后续分箱提供参考 debtratio_bins=[0,1,2,5,10,100,1000,2000,3000,4000,5000,10000,math.inf] show_rate_by_box(credit_df1, 'Isdlq', 'DebtRatio', bins=debtratio_bins)- 1
- 2
- 3
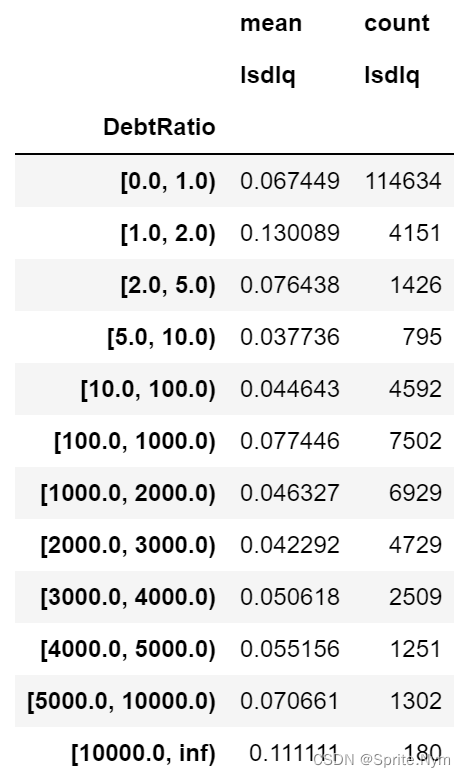
1到2区间违约率较高,其他区间没什么特别。
2.4 Numopen
# 查看开放式信贷和贷款数量的描述性统计信息 credit_df1['Numopen'].describe([0.99]) """ count 150000.000000 mean 8.452760 std 5.145951 min 0.000000 50% 8.000000 99% 24.000000 max 58.000000 Name: Numopen, dtype: float64 """- 1
- 2
- 3
- 4
- 5
- 6
- 7
- 8
- 9
- 10
- 11
- 12
# 查看点分布 plt.figure(figsize=(15, 6)) sns.countplot(credit_df1['Numopen'])- 1
- 2
- 3
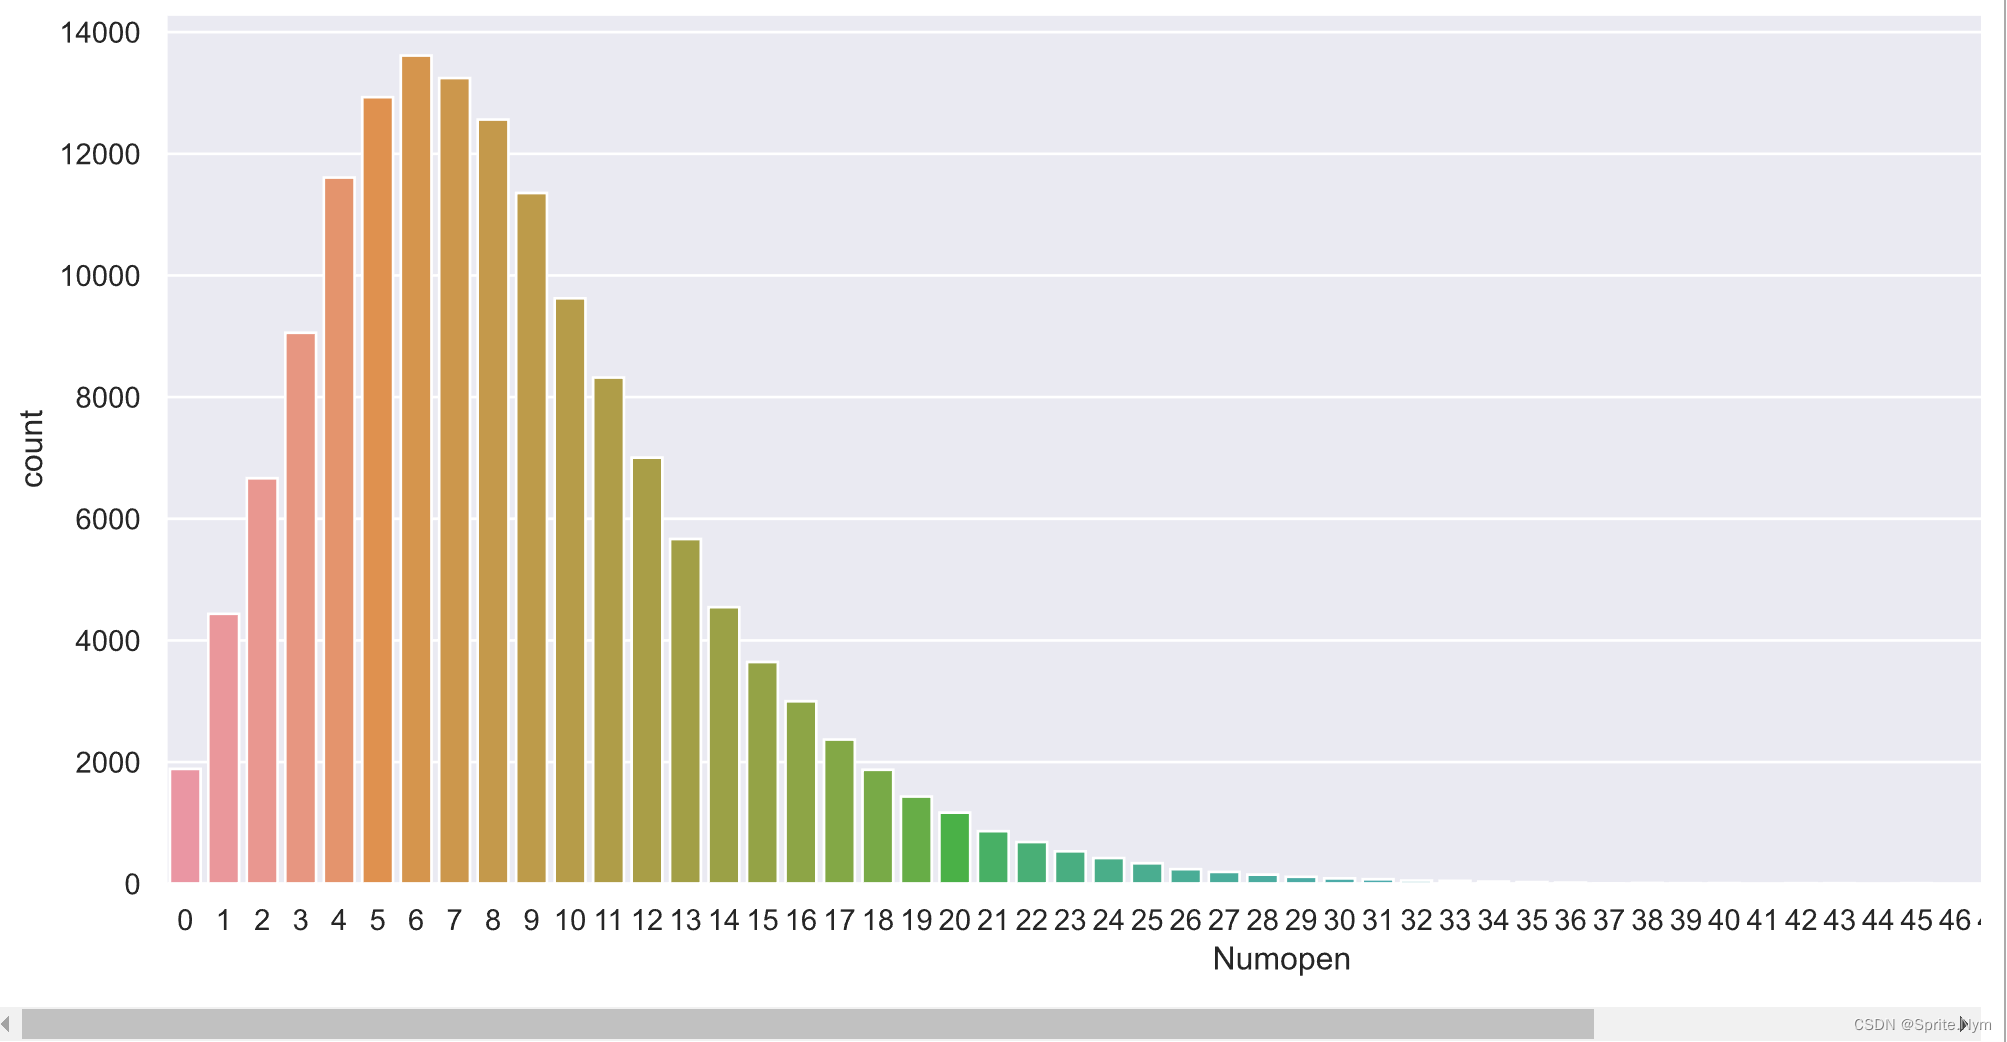
拖尾很长
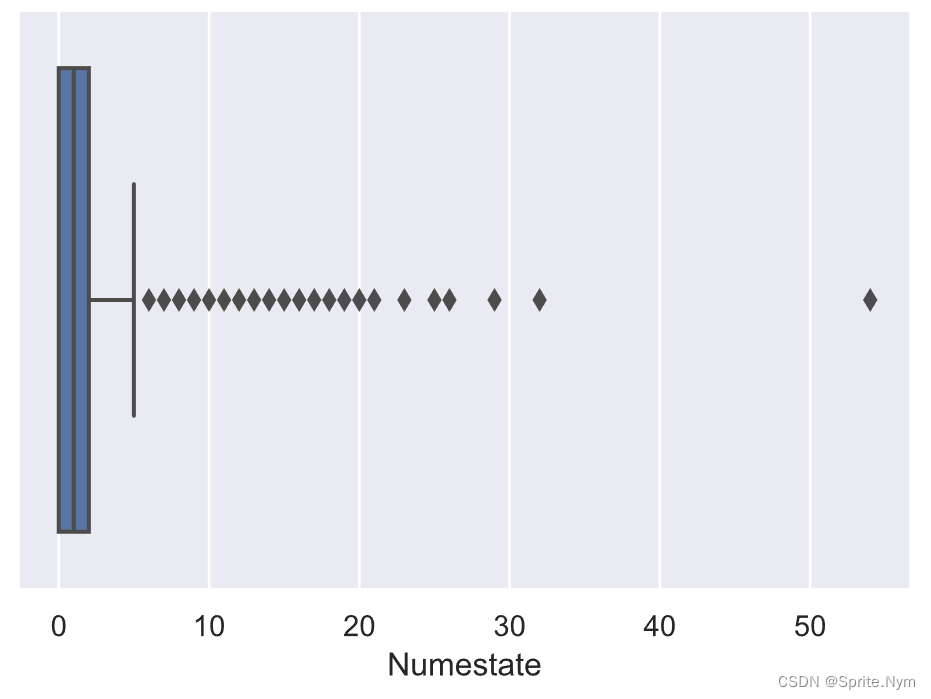
2.5 Numestate
# 查看房产和信用卡额度的数量 credit_df1['Numestate'].describe([0.99, 0.999]) """ count 150000.000000 mean 1.018240 std 1.129771 min 0.000000 50% 1.000000 99% 4.000000 99.9% 9.000000 max 54.000000 Name: Numestate, dtype: float64 """- 1
- 2
- 3
- 4
- 5
- 6
- 7
- 8
- 9
- 10
- 11
- 12
- 13
# 查看数据点分布 sns.countplot(credit_df1['Numestate'])- 1
- 2
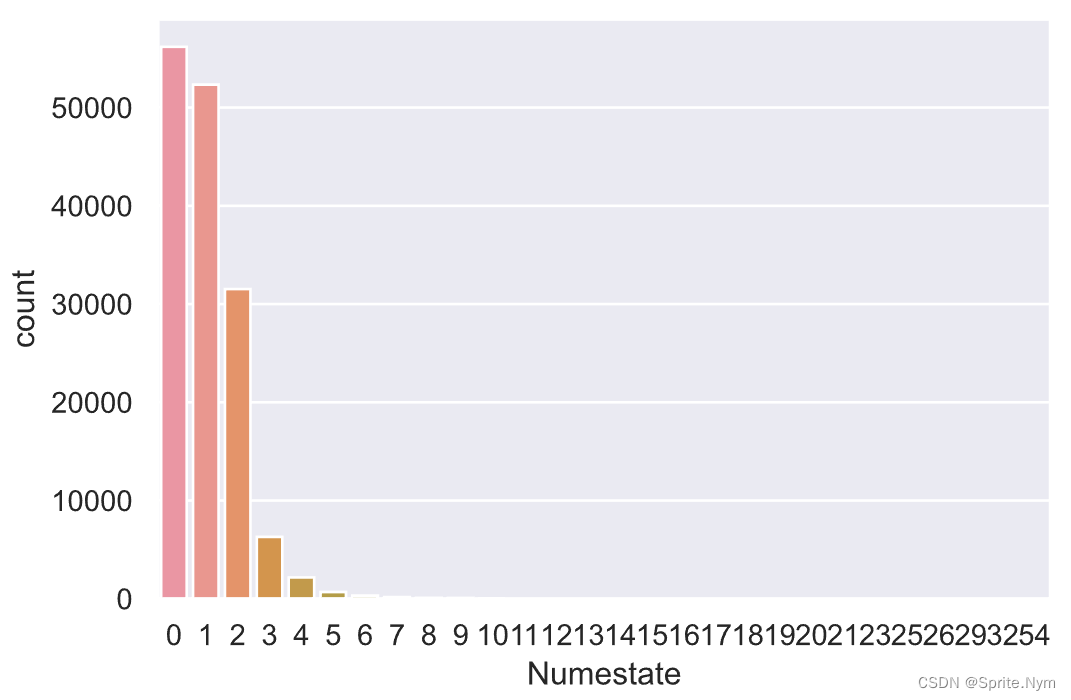
# 箱线图查看数据分布 sns.boxplot(credit_df1['Numestate'])- 1
- 2
2.6 Numdepend
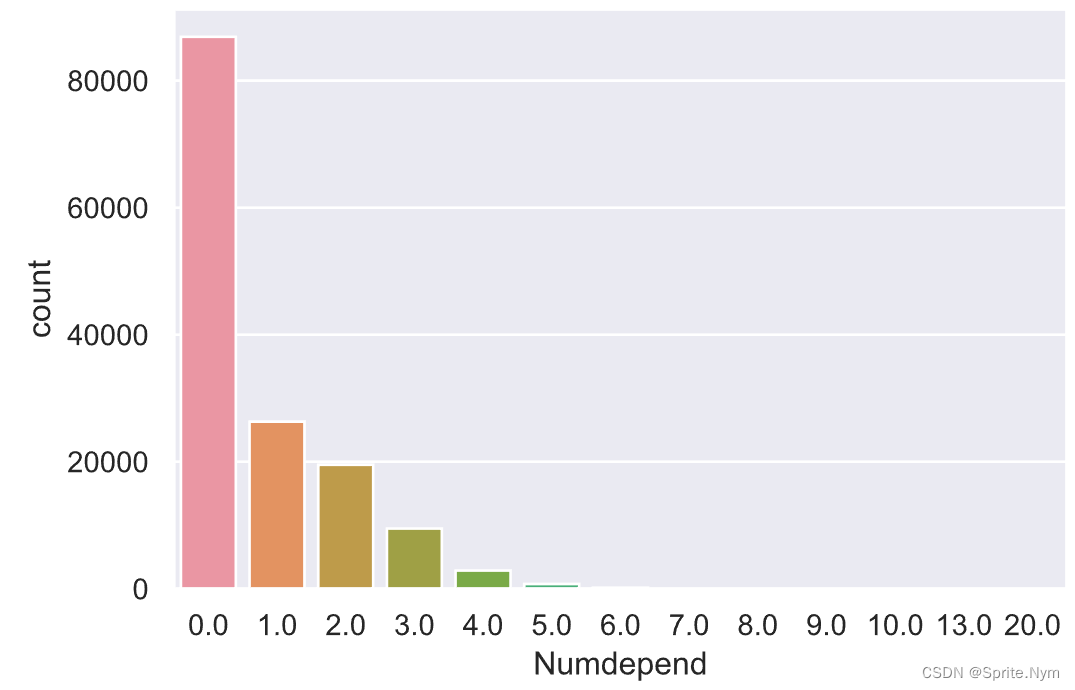
# 查看家属数量的描述性统计信息 credit_df1['Numdepend'].describe([0.99, 0.999]) """ count 146076.000000 mean 0.757222 std 1.115086 min 0.000000 50% 0.000000 99% 4.000000 99.9% 6.000000 max 20.000000 Name: Numdepend, dtype: float64 """- 1
- 2
- 3
- 4
- 5
- 6
- 7
- 8
- 9
- 10
- 11
- 12
- 13
# 画图查看分布 sns.countplot(credit_df1['Numdepend'])- 1
- 2
# 查看缺失值 credit_df1[credit_df1['Numdepend'].isnull()]- 1
- 2
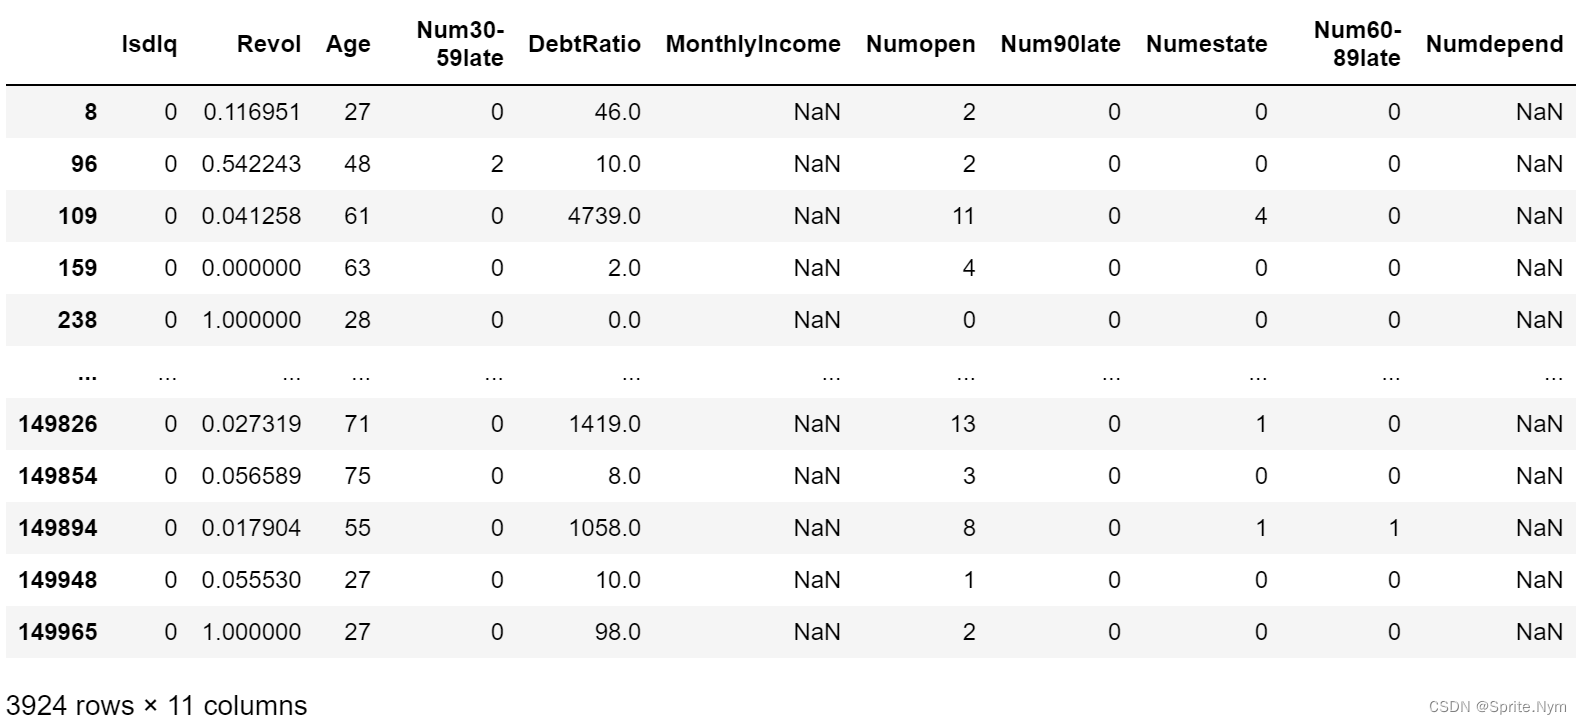
发现家属人数缺失的样本,月收入同样缺失# 确认是否这3924个样本月收入全部缺失 credit_df1[credit_df1['Numdepend'].isnull()]['MonthlyIncome'].isnull().sum() # 3924- 1
- 2
- 3
决定使用月收入缺失,但家属人数未缺失的样本的众数来填充家属人数的缺失值
# 查看众数 credit_df1[(credit_df1['MonthlyIncome'].isnull())&(credit_df1['Numdepend'].notnull())]['Numdepend'].mode() # 0- 1
- 2
- 3
2.7 MonthlyIncome
# 查看描述性统计信息 credit_df1['MonthlyIncome'].describe([0.99, 0.999]) """ count 1.202690e+05 mean 6.670221e+03 std 1.438467e+04 min 0.000000e+00 50% 5.400000e+03 99% 2.500000e+04 99.9% 7.839575e+04 max 3.008750e+06 Name: MonthlyIncome, dtype: float64 """- 1
- 2
- 3
- 4
- 5
- 6
- 7
- 8
- 9
- 10
- 11
- 12
- 13
# 画图查看分布 sns.kdeplot(credit_df1['MonthlyIncome'])- 1
- 2
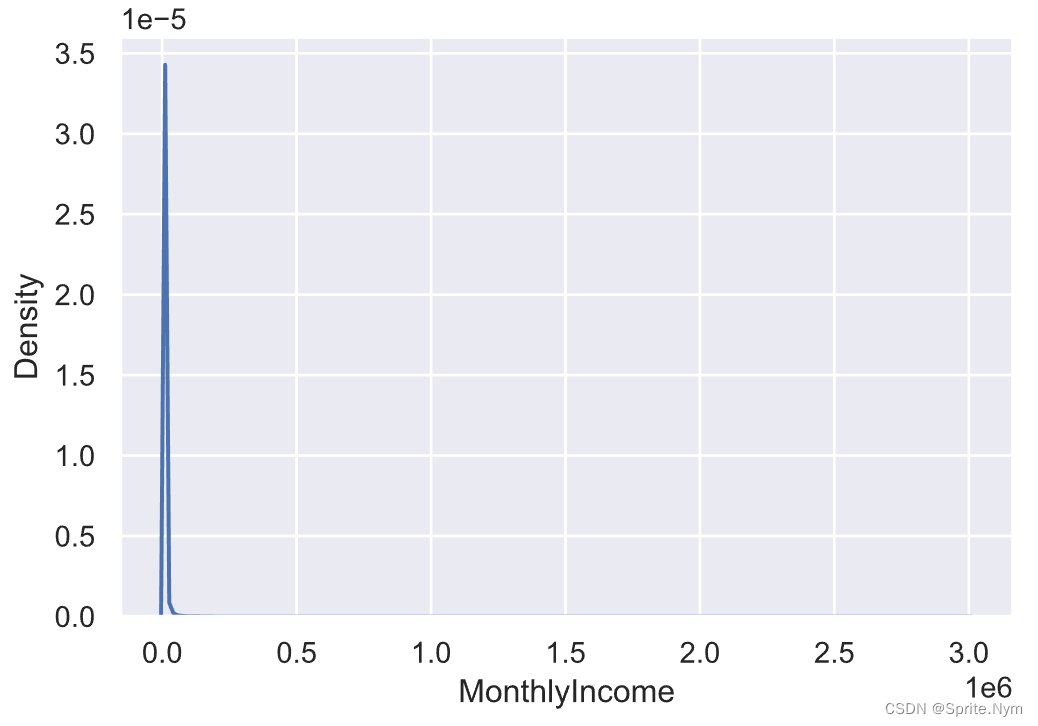
# 继续用箱线图查看 sns.boxplot(credit_df1['MonthlyIncome'])- 1
- 2
缺失值一开始用detect查看时缺失值是19.8%,后期用随机森林填补。
2.8 Num30-59late Num60-89late Num90late
# 查看数据点图 col_list = ['Num30-59late', 'Num60-89late', 'Num90late'] plt.figure(figsize=(15, 4)) for i in range(3): plt.subplot(1, 3, i+1) sns.countplot(credit_df1[col_list[i]])- 1
- 2
- 3
- 4
- 5
- 6
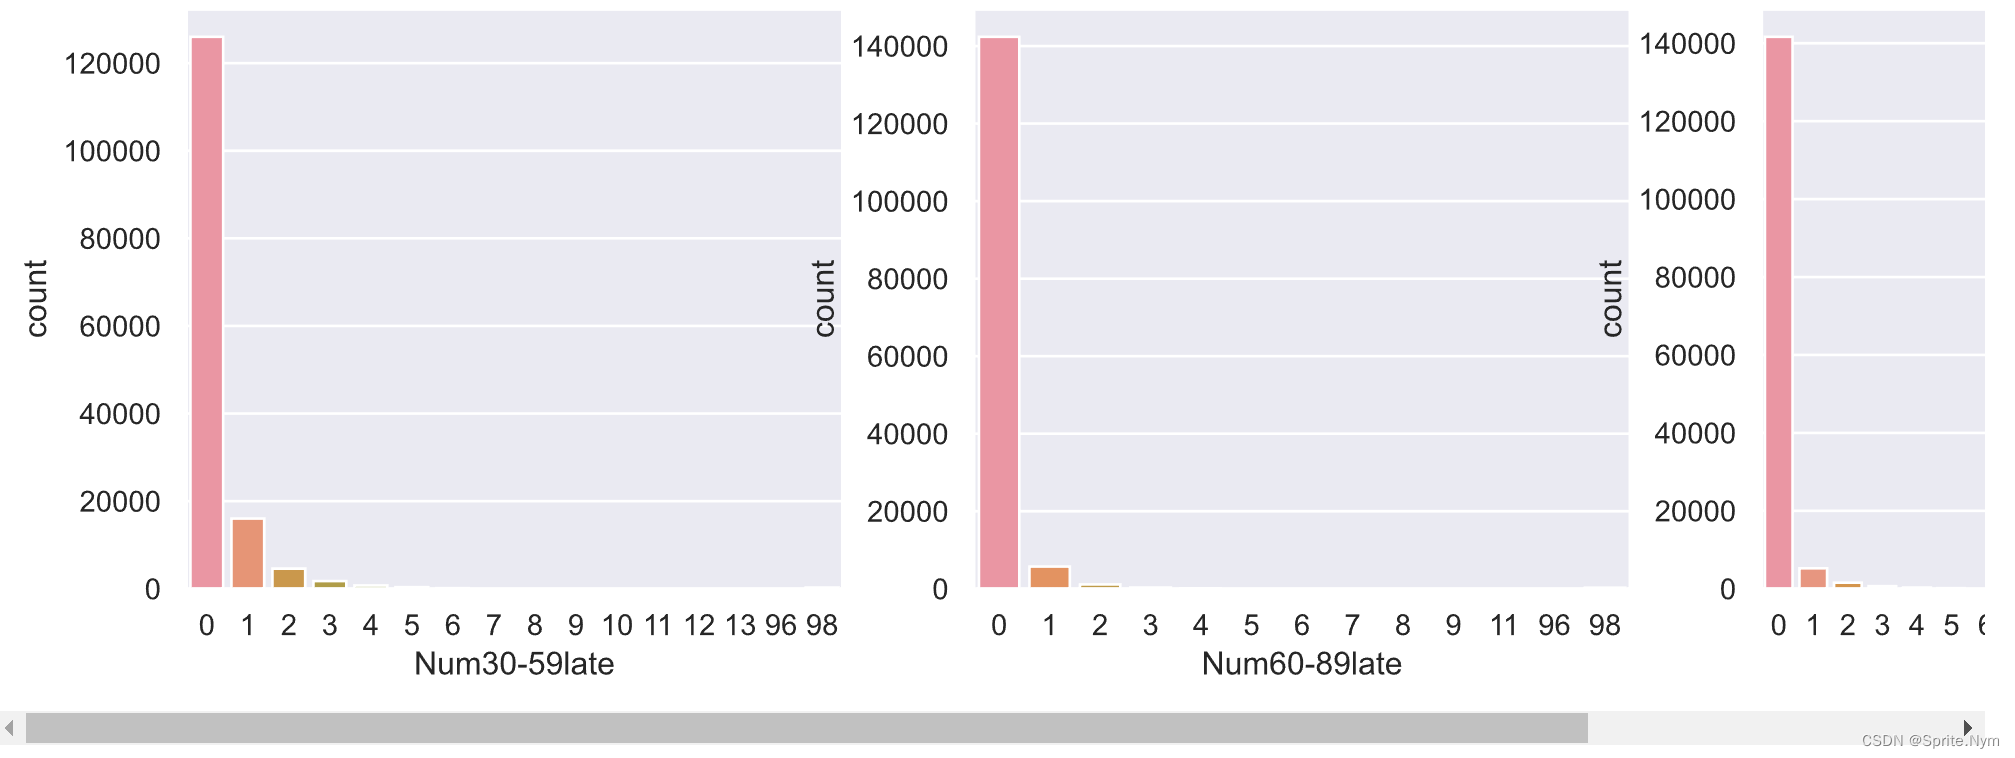
# 查看箱线图 col_list = ['Num30-59late', 'Num60-89late', 'Num90late'] plt.figure(figsize=(12, 4)) for i in range(3): plt.subplot(1, 3, i+1) sns.boxplot(credit_df1[col_list[i]])- 1
- 2
- 3
- 4
- 5
- 6
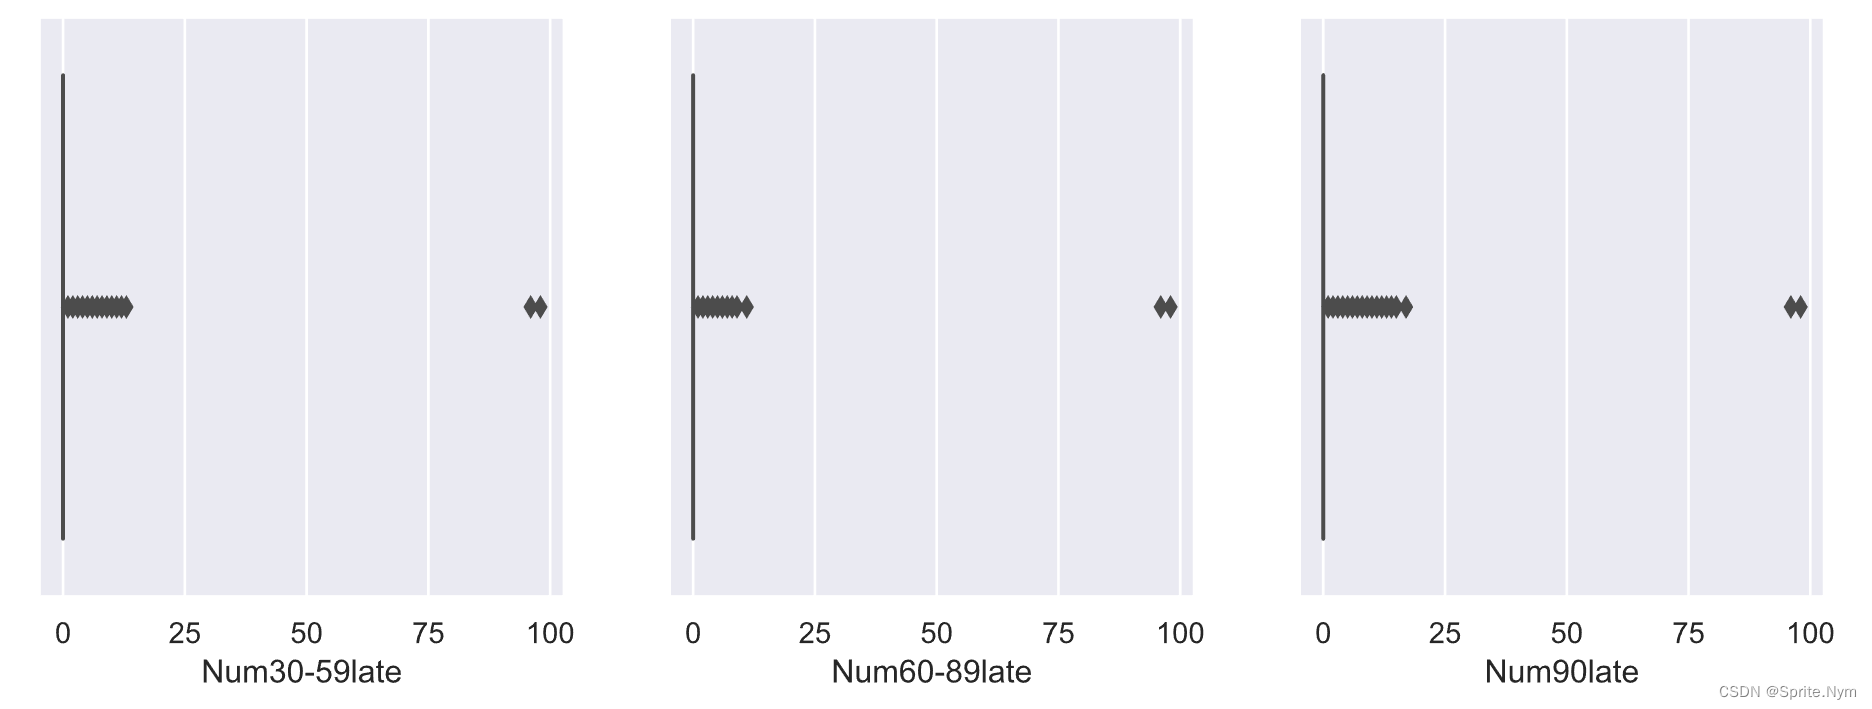
可以看出96、98明显是异常值,后期删除。
三、数据清洗
3.1 异常值
# Revol # 删除之前提到的大于20的数据 credit_df1 = credit_df1[credit_df1['Revol']<=20] # 查看描述性统计信息,现在最高值为18 credit_df1['Revol'].describe() """ count 149766.000000 mean 0.323388 std 0.378382 min 0.000000 25% 0.029788 50% 0.153560 75% 0.555997 max 18.000000 Name: Revol, dtype: float64 """ # Age # 删除18岁以下数据 credit_df1 = credit_df1[credit_df1['Age']>=18] # Num30-59late Num60-89late Num90late # 去除96、98两种异常值 col_list = ['Num30-59late', 'Num60-89late', 'Num90late'] for col in col_list: credit_df1 = credit_df1[credit_df1[col]<90] # Numestate # 删除50以上数据 credit_df1 = credit_df1[credit_df1['Numestate']<50]- 1
- 2
- 3
- 4
- 5
- 6
- 7
- 8
- 9
- 10
- 11
- 12
- 13
- 14
- 15
- 16
- 17
- 18
- 19
- 20
- 21
- 22
- 23
- 24
- 25
- 26
- 27
- 28
- 29
- 30
3.2 缺失值
# Numdepend credit_df1['Numdepend'].fillna(0, inplace=True) # MonthlyIncome缺失值填充 from sklearn.ensemble import RandomForestRegressor from sklearn.model_selection import train_test_split # 先得到训练集特征、标签和测试集 features_df = credit_df1[credit_df1['MonthlyIncome'].notnull()].drop(columns=['Isdlq', 'MonthlyIncome']) target = credit_df1[credit_df1['MonthlyIncome'].notnull()]['MonthlyIncome'] test_df = credit_df1[credit_df1['MonthlyIncome'].isnull()].drop(columns=['Isdlq', 'MonthlyIncome']) # 先看看效果 X_train, X_test, y_train, y_test = train_test_split(features_df, target, test_size=0.3) RandomForestRegressor(max_depth=10, n_estimators=100).fit(X_train, y_train).score(X_test, y_test) temp = pd.Series(data=RandomForestRegressor(max_depth=10, n_estimators=100).fit(features_df, target).predict(test_df), index=test_df.index, name='MonthlyIncome') credit_df1['MonthlyIncome'] = pd.concat([target, temp]) credit_df1.describe()- 1
- 2
- 3
- 4
- 5
- 6
- 7
- 8
- 9
- 10
- 11
- 12
- 13
- 14
- 15
- 16
- 17
- 18
- 19
这里我的MonthlyIncome用随机森林做回归效果很差,不仅R²值非常不稳定,甚至会出现负数,所以直接不处理了,但是为了便于后续的四舍五入,先把空值填充为-10。
credit_df1['MonthlyIncome'].fillna(-10, inplace=True)- 1
3.3 进行过采样
# 写一个过采样函数 def over_sampled(df, target, model): X = df.drop(columns=[target]) y = df[target] X_oversampled, y_oversampled = model.fit_resample(X,y) return pd.concat([X_oversampled, y_oversampled], axis=1)- 1
- 2
- 3
- 4
- 5
- 6
- 7
# 使用RandomOverSampler过采样 credit_df1 = over_sampled(credit_df1, 'Isdlq', RandomOverSampler())- 1
- 2
这里不过采样、SMOTE过采样和RandomOverSampler过采样我都试了,最后效果差别不大。
四、特征预处理
4.1 连续值四舍五入
某些连续值直接交给toad分箱运行时间太久,所以先进行四舍五入处理。
(1)Revol# 再次调用之前的透视表函数查看每个箱内坏客户率 revol_bins=[0,0.1,0.2,0.3,0.4,0.5,0.6,0.7,0.8,0.9,1,1.5,2,5,10,20] temp = show_rate_by_box(credit_df1, 'Isdlq', 'Revol', bins=revol_bins) show_rate_by_box(credit_df1, 'Isdlq', 'Revol', bins=revol_bins)- 1
- 2
- 3
- 4

Revol在1以下坏客户率有明显单调性,Revol在1以上坏客户率普遍挺高的,没有太大区分度,因此小于1的统一保留1位小数,大于1的统一保留0位小数,后续再交给toad分箱
credit_df1['Revol'] = credit_df1['Revol'].map(lambda x: np.round(x, 1) if x < 1 else np.round(x, 0))- 1
(2)DebtRatio
debtratio_bins=[0,0.1,0.2,0.5,0.7,1,2,5,10,100,1000,2000,3000,4000,5000,10000,math.inf] show_rate_by_box(credit_df1, 'Isdlq', 'DebtRatio', bins=debtratio_bins)- 1
- 2

跨度太大,不是很好处理,决定同样进行四舍五入,但规则更复杂
credit_df1['DebtRatio'] = credit_df1['DebtRatio'].map( lambda x: np.round(x, 1) if x < 1 else np.round(x, 1-(len(str(int(np.round(x, 0)))))) )- 1
- 2
- 3
(3)MonthlyIncome
credit_df1['MonthlyIncome'] = credit_df1['MonthlyIncome'].map( lambda x: np.round(x, -1) if x < 100 else np.round(x, -2) if x < 1000 else np.round(x, 1-(len(str(int(np.round(x, 0)))))) )- 1
- 2
- 3
- 4
(4)Numdepend
之前用SMOTE时出现了浮点数,处理一下
credit_df1['Numdepend'] = credit_df1['Numdepend'].map(lambda x: np.round(x, 0))- 1
4.2 创建衍生变量
credit_df1['AllNumlate'] = credit_df1['Num30-59late'] + credit_df1['Num60-89late'] + credit_df1['Num90late'] credit_df1['Monthlycost'] = (credit_df1['MonthlyIncome'] * credit_df1['DebtRatio']).map(lambda x: -10 if x < 0 else x) credit_df1.head()- 1
- 2
- 3

4.3 特征筛选
# 查看iv值 toad.quality(credit_df1,'Isdlq', iv_only=True)- 1
- 2
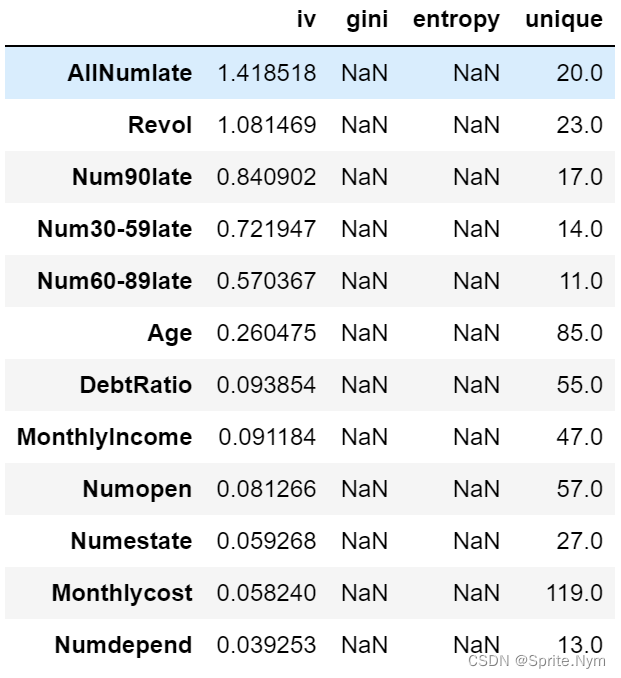
# 特征选择,iv值低于0.03丢弃,相关性高于0.8的两个特征丢弃低iv值特征 credit_df2, dropped = toad.selection.select(credit_df1, target='Isdlq', iv=0.03, corr=0.8, return_drop=True)- 1
- 2
# 查看被丢弃特征 dropped """ {'empty': array([], dtype=float64), 'iv': array([], dtype=object), 'corr': array([], dtype=object)} """- 1
- 2
- 3
- 4
- 5
- 6
- 7
没有被筛掉的,说明都还可以吧,特征数也不是很多,就都留下了。
五、计算WOE值
5.1 特征分箱
def show_toad_box(df, col_list, target, rules): combiner = toad.transform.Combiner() combiner.fit(df[col_list+[target]], y=target, method='chi', min_samples=0.05) combiner.set_rules(rules) return combiner col_list = ['Revol', 'Age', 'DebtRatio', 'MonthlyIncome', 'Numopen', 'Num30-59late', 'Num90late', 'Numestate', 'Num60-89late', 'Numdepend', 'AllNumlate', 'Monthlycost'] rules = { 'MonthlyIncome':[0,2000,4000,5000,7000,10000], 'Monthlycost':[0,100,1000,3500] # 'Numopen':[2,4], # 'Num60-89late':[1], # 'Revol':[0.2,0.4,0.6,0.8,1], # 'DebtRatio':[0.6,0.8,3], } combiner = show_toad_box(credit_df2, col_list, 'Isdlq', rules=rules) credit_df3 = combiner.transform(credit_df2, labels=True) # 出图观察 for col in col_list: bin_plot(credit_df3, x=col, target='Isdlq')- 1
- 2
- 3
- 4
- 5
- 6
- 7
- 8
- 9
- 10
- 11
- 12
- 13
- 14
- 15
- 16
- 17
- 18
- 19
- 20
- 21
- 22
- 23

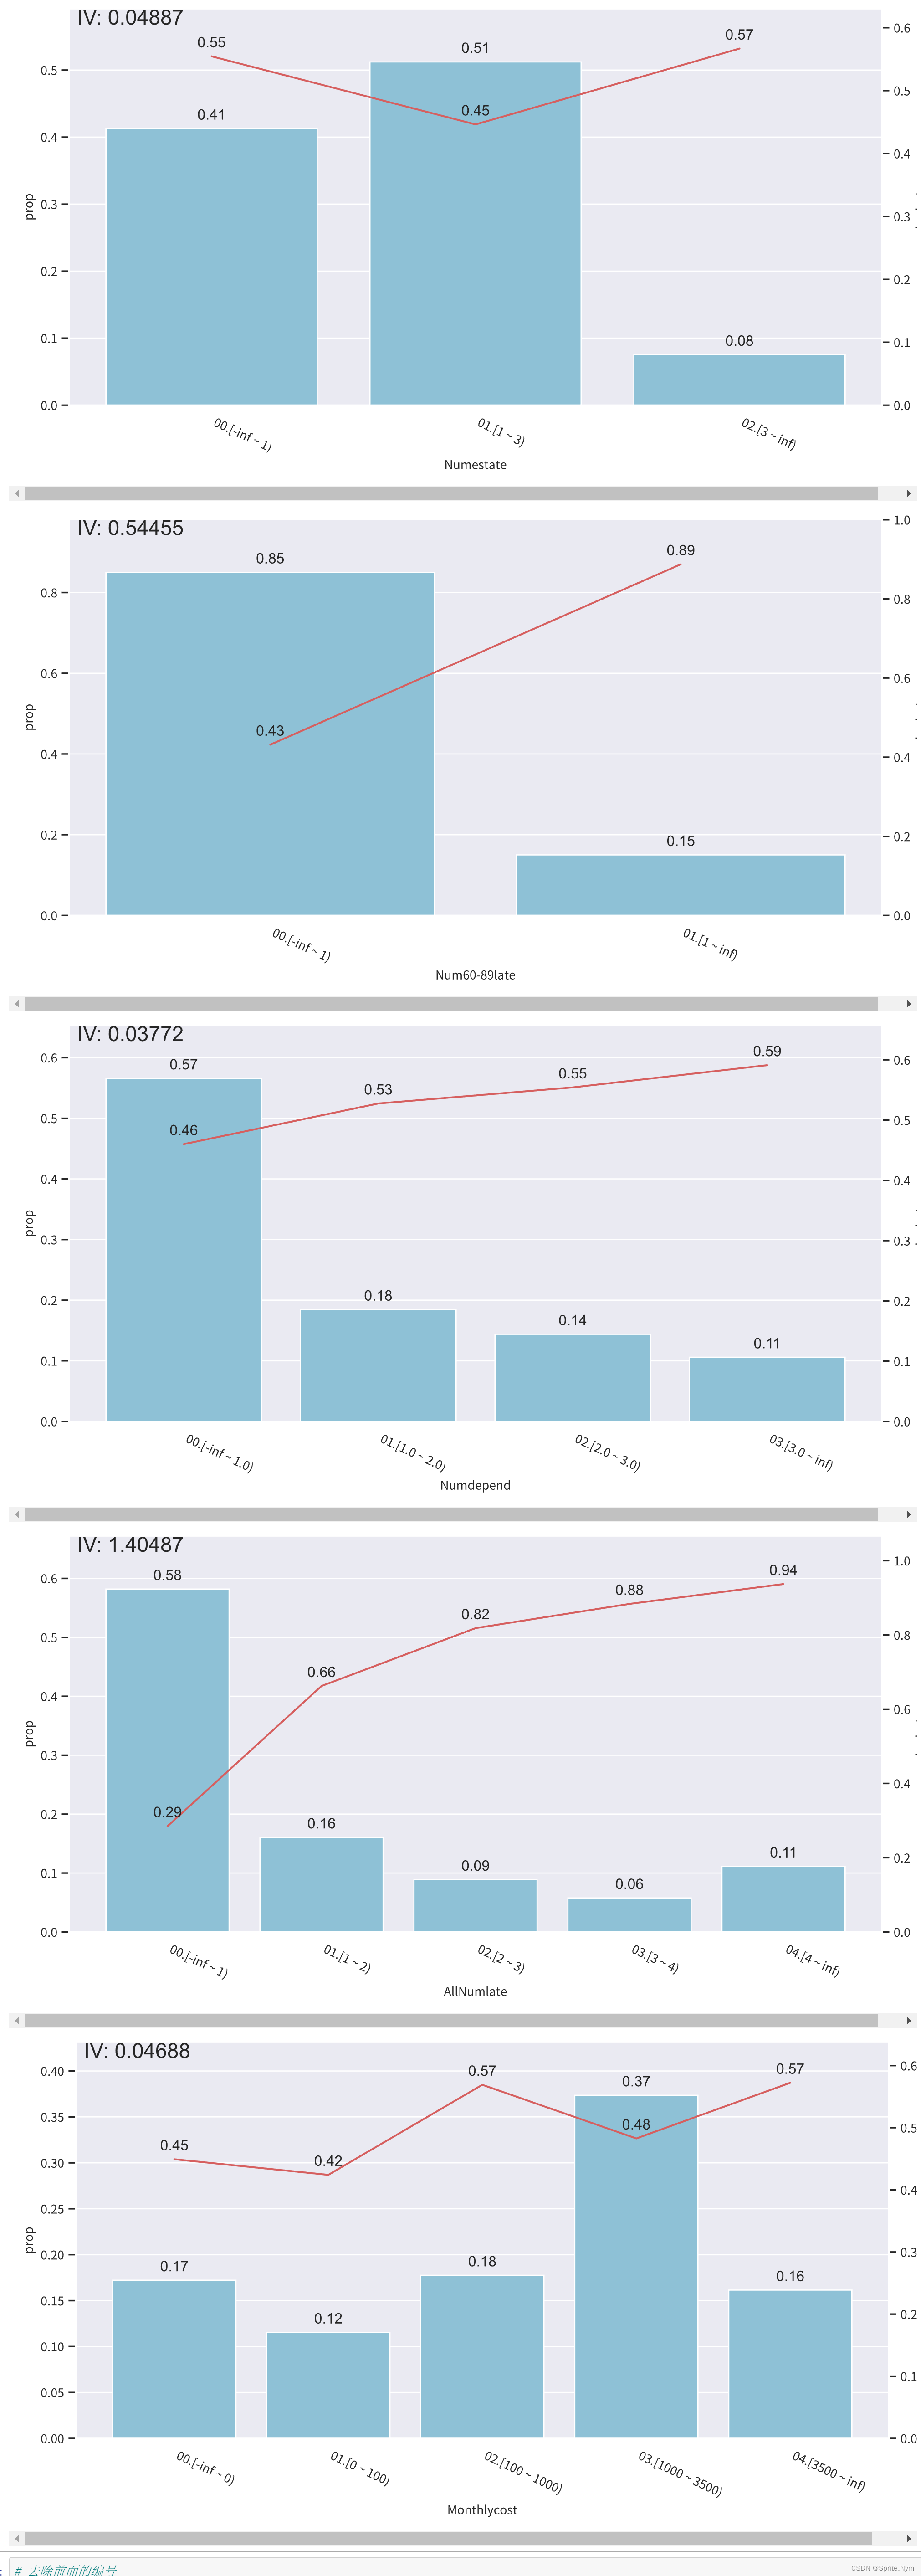
# 去除前面的编号 temp1 = credit_df3['Isdlq'] temp2 = credit_df3.drop(columns=['Isdlq']) credit_df3 = pd.concat([temp1, temp2], axis=1) credit_df3.iloc[:, 1:] = credit_df3.iloc[:, 1:].applymap(lambda x: x[3:])- 1
- 2
- 3
- 4
- 5
- 6
5.2 WOE转化
# 实例化对象并转化 transfer = toad.transform.WOETransformer() woe = transfer.fit_transform(credit_df3, credit_df3['Isdlq'], exclude=['Isdlq']) # 查看WOE值 woe.head()- 1
- 2
- 3
- 4
- 5
5.3 逐步回归
# 使用逐步回归筛选掉一些特征 credit_df4, dropped = toad.selection.stepwise(woe, target='Isdlq', estimator='ols', direction='both', criterion='aic', return_drop=True) # 查看被丢弃的特征 dropped # []- 1
- 2
- 3
- 4
- 5
还是没有被筛选掉的特征。
六、建模和评估
from sklearn.linear_model import LogisticRegression from sklearn.model_selection import train_test_split, GridSearchCV from sklearn.metrics import roc_curve, roc_auc_score- 1
- 2
- 3
# 网格搜索 params = { 'penalty':['l1', 'l2'], 'C':[0.1, 0.2, 0.3, 0.4, 0.5], 'max_iter':[50, 70, 100, 150, 200], 'solver':['newton-cg', 'lbfgs', 'liblinear', 'sag', 'saga'] } gscv = GridSearchCV(estimator=LogisticRegression(), param_grid=params) gscv.fit(credit_df4.drop(columns=['Isdlq']), credit_df4['Isdlq']) # 得到最优参数 gscv.best_params_- 1
- 2
- 3
- 4
- 5
- 6
- 7
- 8
- 9
- 10
- 11
- 12
# 划分训练集和测试集 X = credit_df4.drop(columns=['Isdlq']) y = credit_df4['Isdlq'] X_train, X_test, y_train, y_test = train_test_split(X, y, test_size=0.3) # 使用刚才得到的最优参数重新建模训练 lr = LogisticRegression( solver='liblinear', penalty='l1', C=0.1, max_iter=100 ) lr.fit(X_train, y_train) lr_proba = lr.predict_proba(X_test)[:,1] # 评估 fpr, tpr, threshold = roc_curve(y_test, lr_proba) auc = roc_auc_score(y_test, lr_proba) plt.plot(fpr, tpr, label=f'AUC = {auc:.2f}') plt.plot([0,1],[0,1],'--') plt.axis([0,1,0,1]) plt.xlabel('FPR') plt.ylabel('TPR') plt.legend()- 1
- 2
- 3
- 4
- 5
- 6
- 7
- 8
- 9
- 10
- 11
- 12
- 13
- 14
- 15
- 16
- 17
- 18
- 19
- 20
- 21
- 22
- 23
- 24

AUC值0.86,还可以。# 查看模型报告 bucket = toad.metrics.KS_bucket(lr_proba, y_test, bucket=10, method='quantile') bucket.T- 1
- 2
- 3
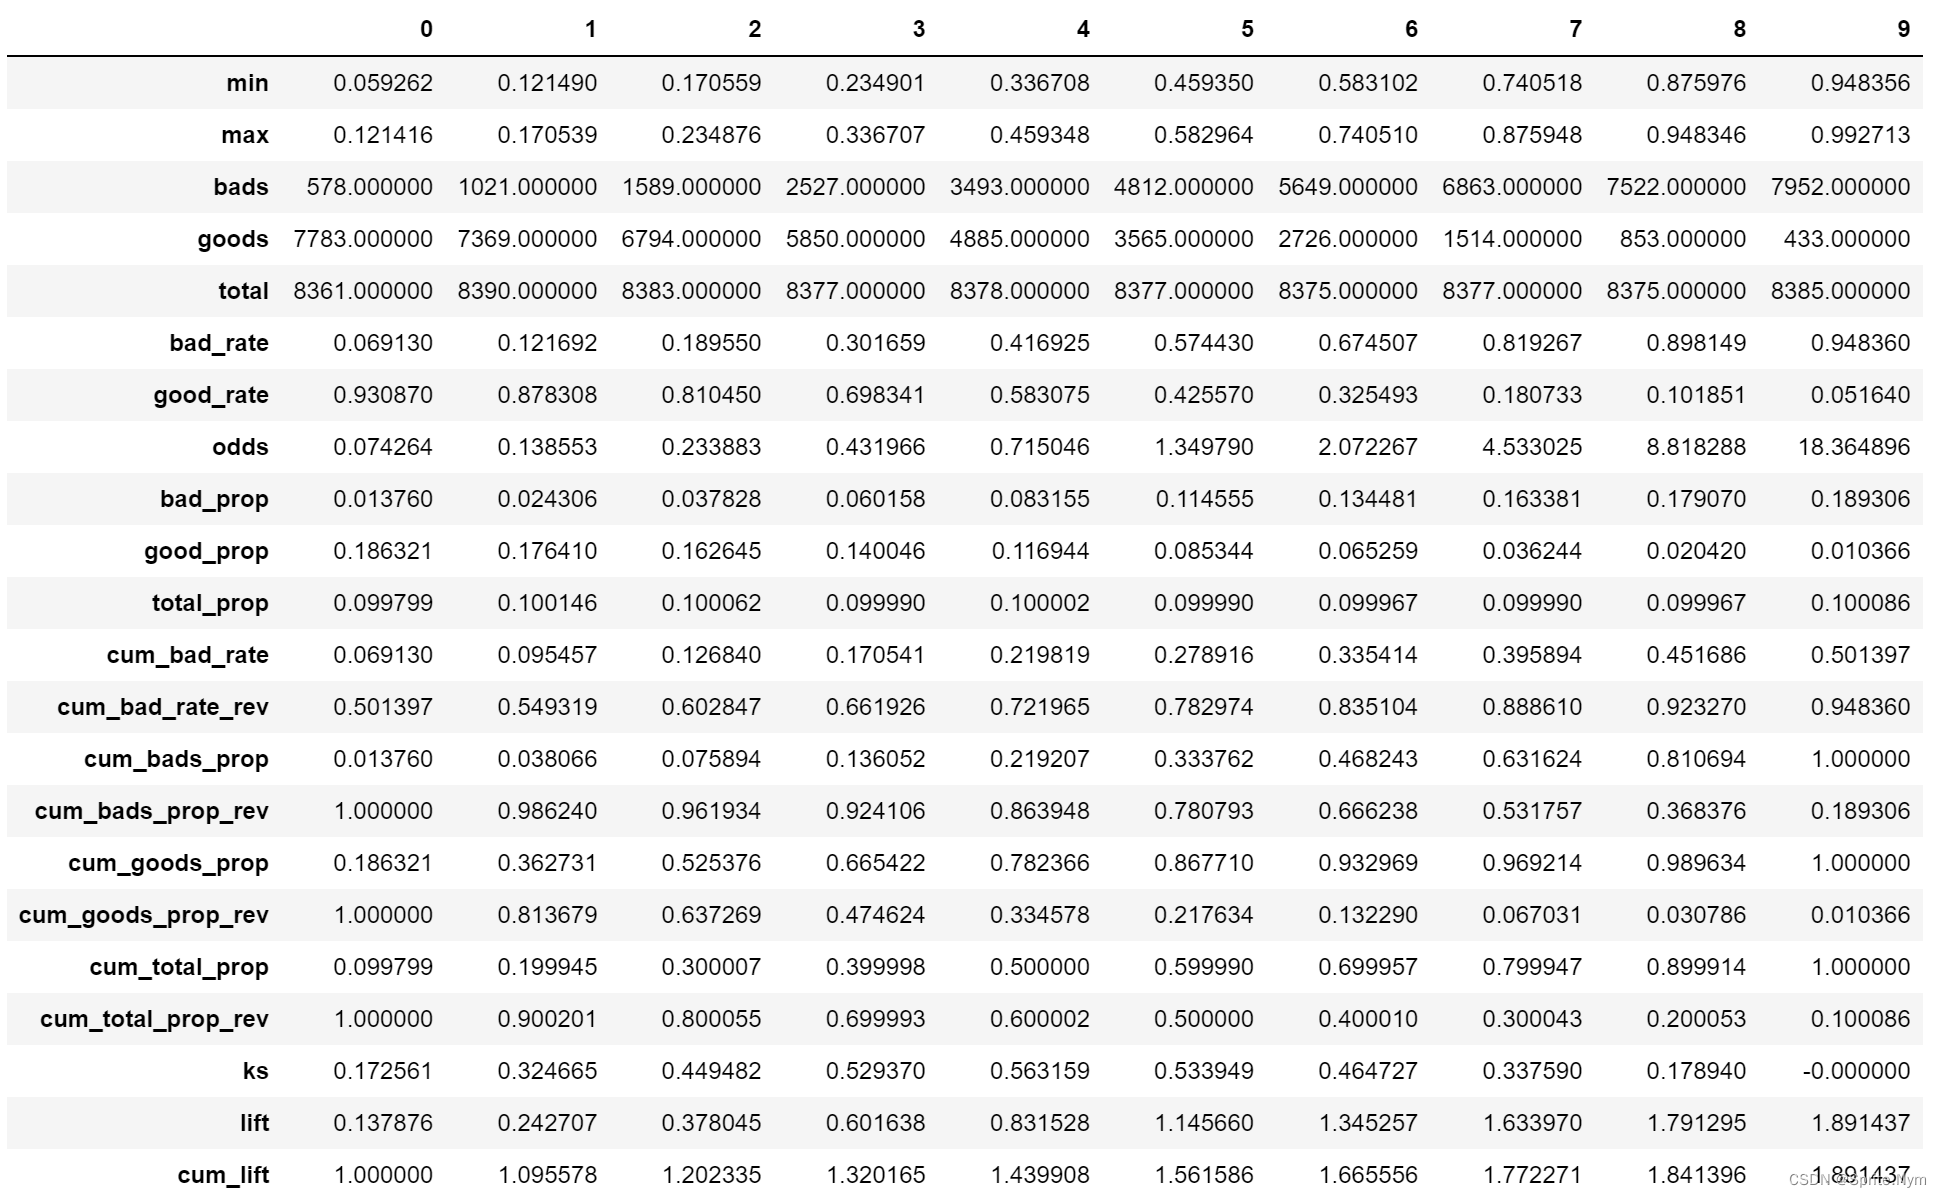
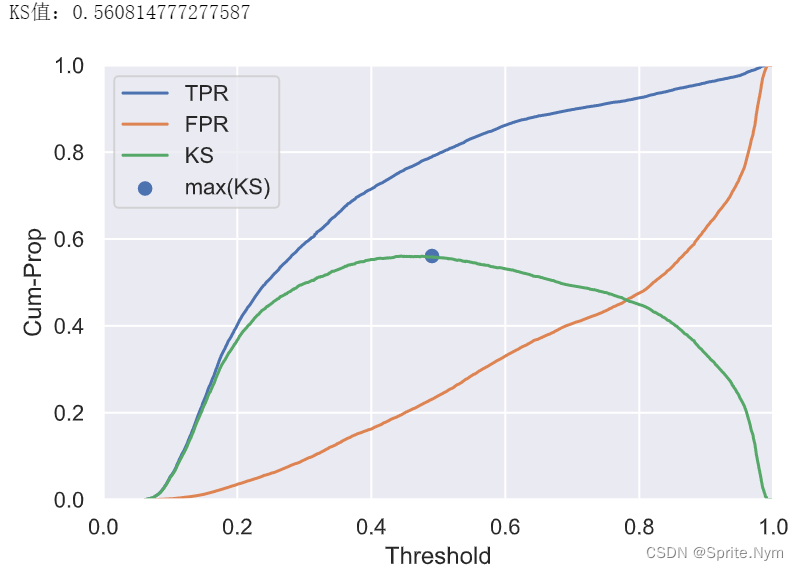
# 计算KS值并绘制曲线 threshold1 = pd.Series(threshold).sort_values(ascending=True) tpr1 = pd.Series(tpr).sort_values(ascending=True) fpr1 = pd.Series(fpr).sort_values(ascending=True) ks = tpr1-fpr1 print(f'KS值:{ks.max()}') plt.plot(threshold1, tpr1, label='TPR') plt.plot(threshold1, fpr1, label='FPR') plt.plot(threshold1, ks, label='KS') plt.scatter(threshold1[ks[ks==ks.max()].index], ks.max(), label='max(KS)', s=40) plt.xlabel('Threshold') plt.ylabel('Cum-Prop') plt.axis([0,1,0,1]) plt.legend() plt.show()- 1
- 2
- 3
- 4
- 5
- 6
- 7
- 8
- 9
- 10
- 11
- 12
- 13
- 14
- 15
- 16
七、评分卡建立
# 实例化card对象 card = toad.ScoreCard( # 使用之前的combiner combiner = combiner, # 使用之前的transfomer transer = transfer, # 使用之前的逻辑斯蒂回归参数 solver='liblinear', penalty='l1', C=0.1, max_iter=100, # 基准分 base_score=800, # 基准好坏客户比 base_odds=20, # 倍率(好坏客户比每翻rate倍,扣pdo分) rate=2, # 扣分 pdo=50 ) # 训练 card.fit(credit_df4.drop(columns=['Isdlq']), credit_df4['Isdlq']) # 查看评分卡 pd.set_option('display.max_rows', None) card.export(to_frame=True)- 1
- 2
- 3
- 4
- 5
- 6
- 7
- 8
- 9
- 10
- 11
- 12
- 13
- 14
- 15
- 16
- 17
- 18
- 19
- 20
- 21
- 22
- 23
- 24
- 25
- 26

# 查看分数分布 pd.Series(card.predict(credit_df4)).describe() """ count 279258.000000 mean 585.138884 std 106.412042 min 320.131615 25% 529.078751 50% 619.335745 75% 678.356577 max 681.166471 dtype: float64 """- 1
- 2
- 3
- 4
- 5
- 6
- 7
- 8
- 9
- 10
- 11
- 12
- 13
-
相关阅读:
R语言ggplot2可视化地图并使用scale_fill_gradient函数自定义设置地图颜色刻度为灰色梯度刻度(grey gradient scales)
Oracle数据泵备份恢复(导出导入)详细语句
精灵图练习---pink老师课程
jQuery学习:jQuery函数的使用
18 【节点的关系和内部操作】
1123. 最深叶节点的最近公共祖先
瑞吉外卖项目开发文档1——基础功能
链接装载与库:第八章——Linux共享库组织
缓存穿透、缓存击穿、缓存雪崩及其解决方案
Spring Boot微服务打包 Docker 镜像发布运行
- 原文地址:https://blog.csdn.net/SpriteNym/article/details/126441740
