-
刘二大人 PyTorch深度学习实践 笔记 P7 处理多维特征的输入
刘二大人 PyTorch深度学习实践 笔记 P7 处理多维特征的输入
P7 处理多维特征的输入
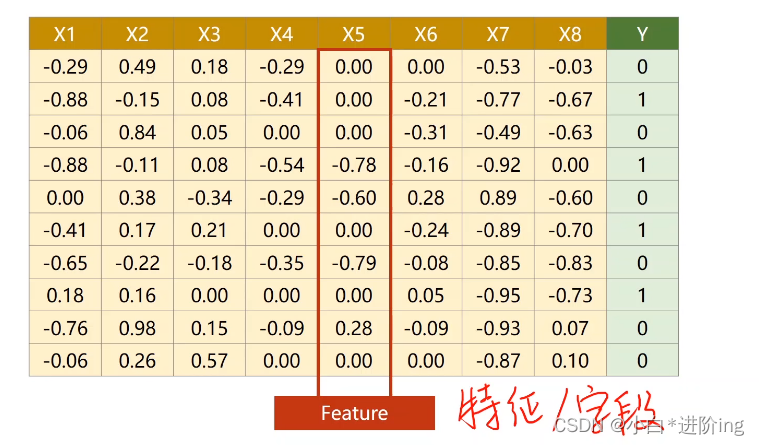
1、行为记录,列为特征
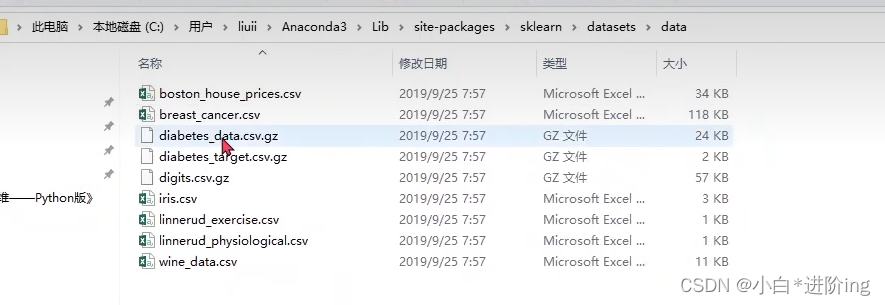
2、Anaconda3 数据存储路径
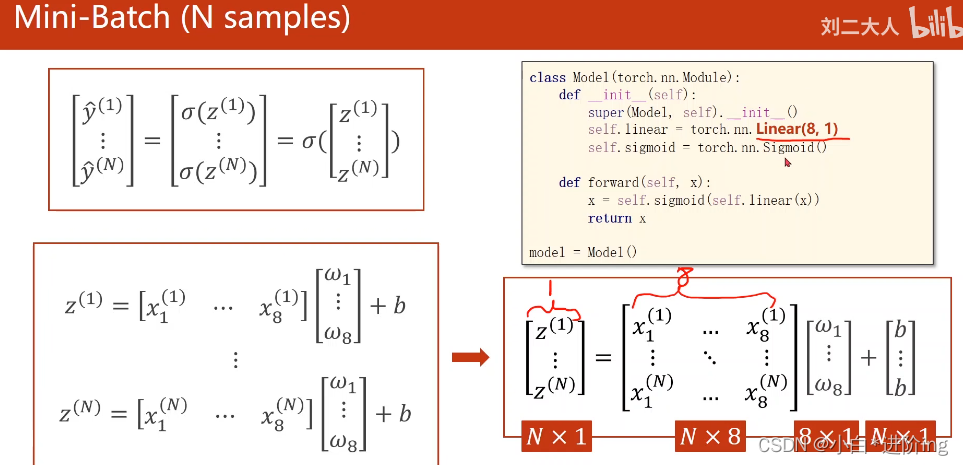
3、转化
转化成矩阵向量化的计算,可以利用CPU等进行并行计算,提高计算的速度
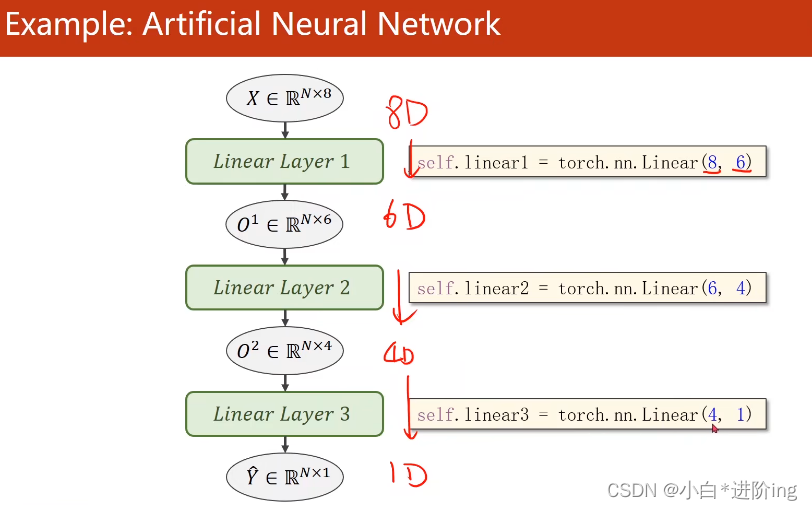
一般来说,中间层数越多,网络对非线性映射的拟合程度越好,学习能力越强,但是学习能力太强可能会将输入的噪声也学习进去,所以网络学习能力太强也不好,学习应该具有泛化能力。
|:😐 学习新知识,提高泛化能力——学会读文档+计算机系统基本架构理解4、代码实现:
import numpy as np import torch import matplotlib.pyplot as plt # gz压缩包里的文件名一样,就可以用loadtxt把数据读出来 # delimiter=',' , 以逗号作为分隔符 # dtype=np.float32 , 数据类型为32位的浮点数 xy = np.loadtxt('dataset/diabetes.csv.gz', delimiter=',', dtype=np.float32) # 该函数会创建两个tensor张量出来 x_data = torch.from_numpy(xy[:, :-1]) # 所有行,除了最后一列 y_data = torch.from_numpy(xy[:, [-1]]) # 所有行,最后一列 转为矩阵而不是向量 class Model(torch.nn.Module): def __init__(self): super(Model, self).__init__() self.linear1 = torch.nn.Linear(8, 6) # 第一层是8维到6维的非线性空间变换 self.linear2 = torch.nn.Linear(6, 4) # 第二层是6维到4维的非线性空间变换 self.linear3 = torch.nn.Linear(4, 1) # 第三层是4维到1维的非线性空间变换 self.sigmoid = torch.nn.Sigmoid() # 作为一个运算模块 def forward(self, x): x = self.sigmoid(self.linear1(x)) x = self.sigmoid(self.linear2(x)) x = self.sigmoid(self.linear3(x)) return x model = Model() criterion = torch.nn.BCELoss(reduction='mean') # loss均值 optimizer = torch.optim.SGD(model.parameters(), lr=0.1) epoch_list = [] loss_list = [] for epoch in range(100): y_pred = model(x_data) # 并没有做mini-batch loss = criterion(y_pred, y_data) print(epoch, loss.item()) epoch_list.append(epoch) loss_list.append(loss.item()) optimizer.zero_grad() loss.backward() optimizer.step() plt.plot(epoch_list, loss_list) plt.xlabel('Epoch') plt.ylabel('Loss') plt.show()- 1
- 2
- 3
- 4
- 5
- 6
- 7
- 8
- 9
- 10
- 11
- 12
- 13
- 14
- 15
- 16
- 17
- 18
- 19
- 20
- 21
- 22
- 23
- 24
- 25
- 26
- 27
- 28
- 29
- 30
- 31
- 32
- 33
- 34
- 35
- 36
- 37
- 38
- 39
- 40
- 41
- 42
- 43
- 44
- 45
- 46
- 47
- 48
- 49
- 50
- 51
- 52
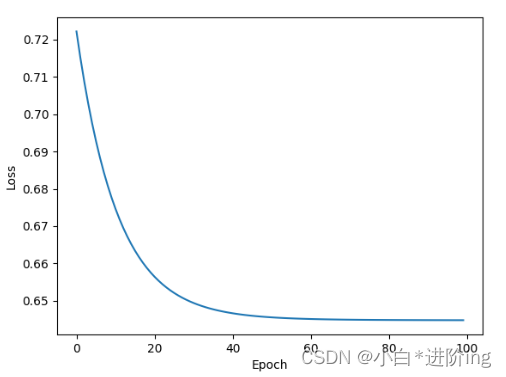
输出:
0 0.7222060561180115 1 0.7151467800140381 2 0.708731472492218 3 0.7029024958610535 4 0.697607159614563 5 0.6927972435951233 6 0.6884285807609558 7 0.6844607591629028 8 0.6808571219444275 9 0.6775842308998108 10 0.6746116876602173 11 0.6719117164611816 12 0.6694590449333191 13 0.6672309637069702 14 0.6652066707611084 15 0.6633674502372742 16 0.6616960167884827 17 0.6601769924163818 18 0.6587962508201599 19 0.657541036605835 20 0.6563997864723206 21 0.655362069606781 22 0.6544182300567627 23 0.6535598039627075 24 0.6527788639068604 25 0.6520683765411377 26 0.6514217257499695 27 0.6508333683013916 28 0.6502977609634399 29 0.649810254573822 30 0.6493661999702454 31 0.6489620804786682 32 0.6485939025878906 33 0.6482585668563843 34 0.6479530930519104 35 0.6476748585700989 36 0.6474213600158691 37 0.6471902132034302 38 0.646979570388794 39 0.6467875838279724 40 0.6466125249862671 41 0.6464529037475586 42 0.6463074088096619 43 0.6461746692657471 44 0.6460535526275635 45 0.6459430456161499 46 0.6458422541618347 47 0.6457502841949463 48 0.6456663608551025 49 0.6455896496772766 50 0.6455196738243103 51 0.6454557776451111 52 0.645397424697876 53 0.6453441381454468 54 0.6452954411506653 55 0.6452507972717285 56 0.6452100872993469 57 0.6451728940010071 58 0.6451389193534851 59 0.6451077461242676 60 0.6450792551040649 61 0.6450531482696533 62 0.6450293064117432 63 0.645007312297821 64 0.6449873447418213 65 0.6449688673019409 66 0.6449519991874695 67 0.6449365615844727 68 0.6449223160743713 69 0.6449092626571655 70 0.6448972225189209 71 0.644886314868927 72 0.6448760628700256 73 0.6448667049407959 74 0.6448581218719482 75 0.6448501348495483 76 0.644842803478241 77 0.6448360085487366 78 0.6448296904563904 79 0.6448239088058472 80 0.6448184251785278 81 0.6448134183883667 82 0.6448087096214294 83 0.6448043584823608 84 0.6448003053665161 85 0.6447965502738953 86 0.6447930335998535 87 0.6447896361351013 88 0.6447865962982178 89 0.644783616065979 90 0.6447808146476746 91 0.6447781920433044 92 0.6447756886482239 93 0.6447734832763672 94 0.644771158695221 95 0.6447690725326538 96 0.6447670459747314 97 0.6447651386260986 98 0.6447632908821106 99 0.6447615027427673- 1
- 2
- 3
- 4
- 5
- 6
- 7
- 8
- 9
- 10
- 11
- 12
- 13
- 14
- 15
- 16
- 17
- 18
- 19
- 20
- 21
- 22
- 23
- 24
- 25
- 26
- 27
- 28
- 29
- 30
- 31
- 32
- 33
- 34
- 35
- 36
- 37
- 38
- 39
- 40
- 41
- 42
- 43
- 44
- 45
- 46
- 47
- 48
- 49
- 50
- 51
- 52
- 53
- 54
- 55
- 56
- 57
- 58
- 59
- 60
- 61
- 62
- 63
- 64
- 65
- 66
- 67
- 68
- 69
- 70
- 71
- 72
- 73
- 74
- 75
- 76
- 77
- 78
- 79
- 80
- 81
- 82
- 83
- 84
- 85
- 86
- 87
- 88
- 89
- 90
- 91
- 92
- 93
- 94
- 95
- 96
- 97
- 98
- 99
- 100
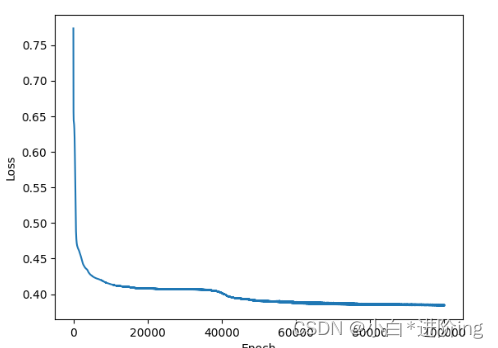
将训练次数提升,精确度明显提升了for epoch in range(100000): y_pred = model(x_data) # 并没有做mini-batch loss = criterion(y_pred, y_data) # print(epoch, loss.item()) epoch_list.append(epoch) loss_list.append(loss.item()) optimizer.zero_grad() loss.backward() optimizer.step() if epoch % 100 == 0: # 三目运算 y_pred_label = torch.where(y_pred >= 0.5, torch.tensor([1.0]), torch.tensor([0.0])) # 计算精确度 acc = metrics.accuracy_score(y_pred_label, y_data, normalize=True) print("loss = ", loss.item(), "acc = ", acc)- 1
- 2
- 3
- 4
- 5
- 6
- 7
- 8
- 9
- 10
- 11
- 12
- 13
- 14
- 15
- 16
- 17
- 18
输出:
... loss = 0.3848259449005127 acc = 0.8287220026350461 loss = 0.3847823441028595 acc = 0.8287220026350461 loss = 0.38398289680480957 acc = 0.8326745718050066- 1
- 2
- 3
- 4
5、练习
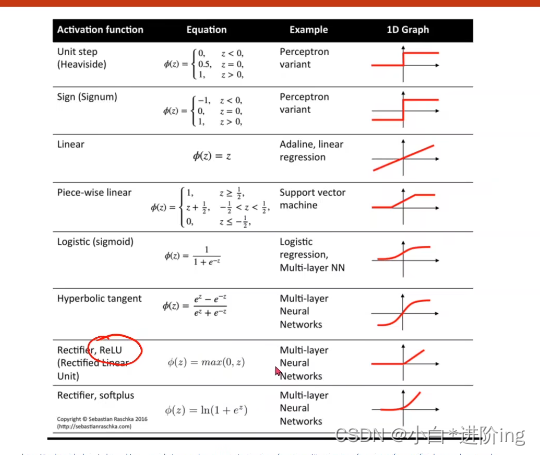
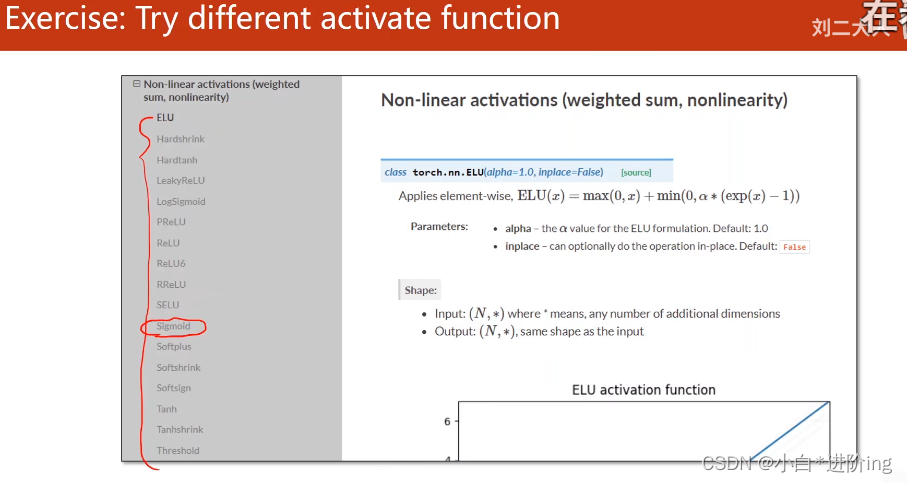
只需要修改如下代码即可class Model(torch.nn.Module): def __init__(self): super(Model, self).__init__() self.linear1 = torch.nn.Linear(8, 6) self.linear2 = torch.nn.Linear(6, 4) self.linear3 = torch.nn.Linear(4, 1) self.sigmoid = torch.nn.Sigmoid() # 作为一个运算模块 self.relu = torch.nn.ReLU() # 作为一个运算模块 def forward(self, x): x = self.relu(self.linear1(x)) x = self.relu(self.linear2(x)) x = self.sigmoid(self.linear3(x)) return x- 1
- 2
- 3
- 4
- 5
- 6
- 7
- 8
- 9
- 10
- 11
- 12
- 13
- 14
输出:
0 0.7885610461235046 1 0.7797487378120422 2 0.7715118527412415 3 0.7638062238693237 4 0.7568893432617188 5 0.750842809677124 6 0.7453811764717102 7 0.7403252720832825 8 0.7355858683586121 9 0.7311105728149414 10 0.726868212223053 ... 90 0.6470083594322205 91 0.6469311714172363 92 0.6468574404716492 93 0.6467872262001038 94 0.6467201113700867 95 0.6466561555862427 96 0.6465951204299927 97 0.6465367674827576 98 0.6464811563491821 99 0.646428108215332- 1
- 2
- 3
- 4
- 5
- 6
- 7
- 8
- 9
- 10
- 11
- 12
- 13
- 14
- 15
- 16
- 17
- 18
- 19
- 20
- 21
- 22
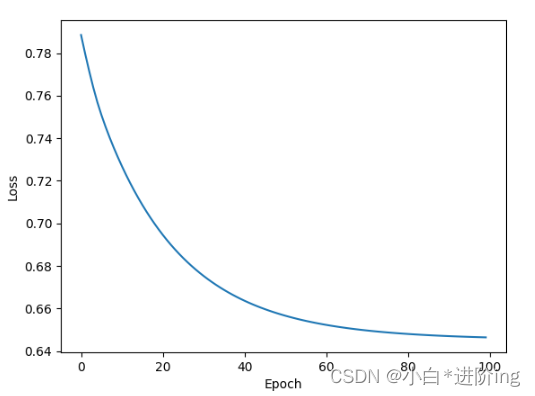
Tanh函数
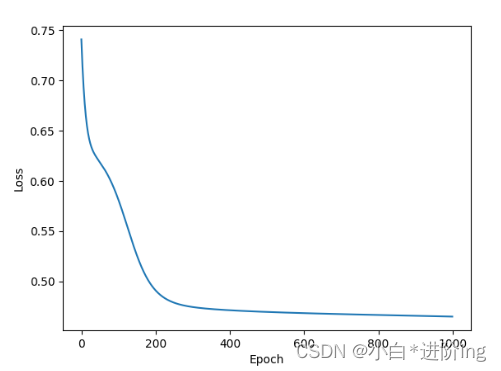
其他大同小异,略,请自行测试。 -
相关阅读:
【技巧】如何保护PDF文件不被随意修改?
CentOS 7离线安装docker
基于JAVA+SpringMVC+Mybatis+Vue+MYSQL的医药销售管理系统
单个Dockerfile合并多个镜像以及docker-compose批量部署
l14 IO模型
[SSM框架]—Spring入门
Vue路由笔记
【Spring Boot】详解restful api
一个64位操作系统设计与实现
太速科技-基于XC7V690T的12路光纤PCIe接口卡
- 原文地址:https://blog.csdn.net/qq_44948213/article/details/126436495
