-
ubuntu环境下基于cerbero构建GStreamer及使用VSCode进行调试
1. 当前GStreamer源码构建的方式
从学习开源项目的角度来看,还是推荐使用源码来构建项目,而不是使用pre-built的库,这样也方便自行修改相关代码来调试和学习;
从官方文档来看,推荐的源码构建方式主要是2种:- Cerbero (https://gstreamer.freedesktop.org/documentation/installing/building-from-source-using-cerbero.html)
- Meson (https://gstreamer.freedesktop.org/documentation/installing/building-from-source-using-meson.html)
2. 使用Cerbero方式构建GStreamer
2.1 拉取代码并选择适合的版本分支:
$ git clone https://gitlab.freedesktop.org/gstreamer/cerbero # 查看一下拉取的代码仓库分支信息 $ cd cerbero $ git branch -av master 6b999a49 recipes: Add patches to fix UWP build remotes/origin/1.0 10009d54 Merge branch 'master' into upstream-1.0 remotes/origin/1.16 08c0440a build-tools: copy the removed site.py from setuptools remotes/origin/1.18 5bc22b21 cerbero: Unpack asyncio queue args as dict, not as list remotes/origin/1.20 d64f3650 Build 1.20 branch again after 1.20.3 remotes/origin/HEAD -> origin/master remotes/origin/main 37125c59 Fix syntax warning when launching cerbero-uninstalled remotes/origin/master 6b999a49 recipes: Add patches to fix UWP build # 切出来一个本地1.20版本的分支,然后我们就在这个本地分支上工作 $ git checkout -b local-1.20 origin/1.20- 1
- 2
- 3
- 4
- 5
- 6
- 7
- 8
- 9
- 10
- 11
- 12
- 13
- 14
- 15
- 16
- 17
2.2 环境及工具部署
bootstrap 会自动根据你当前的host环境和target环境,准备构建中需要用到的工具程序。
因为后续步骤中都会使用APT包管理工具进行源码包的下载,先注意一下2点:
- 保持网络环境的畅通
- 最好替换配置一下ubuntu的源,在国内的话可以配置个国内的源,速度及稳定性有保障
执行如下命令进行 bootstrip
$ ./cerbero-uninstalled bootstrap # 中途会提示输入su密码,因为过程中需要使用安装依赖包 # bootstrap 默认构建步骤如下 [(1/10) ninja -> built] [(2/10) gettext-m4 -> built] [(3/10) intltool-m4 -> built] [(4/10) meson -> built] [(5/10) orc-tool -> built] [(6/10) pkg-config -> built] [(7/10) m4 -> built] [(8/10) autoconf -> built] [(9/10) automake -> built] [(10/10) libtool -> built] All done!- 1
- 2
- 3
- 4
- 5
- 6
- 7
- 8
- 9
- 10
- 11
- 12
- 13
- 14
2.3 构建 gstreamer-1.0 及完整的组件包
$ ./cerbero-uninstalled package gstreamer-1.0- 1
cerbero会自动获取相关源码并构建GStreamer及相关组件,我这边ubuntu环境里,构建步骤如下:
[(1/74) zlib -> already built] ... [(67/74) gst-plugins-base-1.0 -> built] [(68/74) gst-libav-1.0 -> built] [(69/74) gst-plugins-ugly-1.0 -> built] [(70/74) gst-plugins-good-1.0 -> built] [(71/74) gst-plugins-bad-1.0 -> built] [(72/74) gst-rtsp-server-1.0 -> built] [(73/74) gst-devtools-1.0 -> built] [(74/74) gst-editing-services-1.0 -> built] All done! Creating tarballs instead... -----> Package successfully created in /home/lzy/Develop/Sources/cerbero/gstreamer-1.0-linux-x86_64-1.20.3.1.tar.xz /home/lzy/Develop/Sources/cerbero/gstreamer-1.0-linux-x86_64-1.20.3.1-devel.tar.xz- 1
- 2
- 3
- 4
- 5
- 6
- 7
- 8
- 9
- 10
- 11
- 12
- 13
可以看到生成的包名称为 gstreamer-1.0-linux-x86_64-1.20.3.1-devel.tar.xz
当然,如果我们不需要打包或者不需要这么多gstreamer插件时,也可以逐一手动构建需要的recipe。
执行步骤大致如下:$ ./cerbero-uninstalled build gstreamer-1.0 $ ./cerbero-uninstalled build gst-plugins-base-1.0 $ ./cerbero-uninstalled build gst-plugins-good-1.0 $ ./cerbero-uninstalled build gst-plugins-bad-1.0 $ ./cerbero-uninstalled build gst-libav-1.0- 1
- 2
- 3
- 4
- 5
其实,这种单独编译recipe的方式,加上配置相关GST环境变量,可能更方便的进行修改代码及调试。
构建生成的产物(bin及lib等)会统一放置在 cerbero/build/dist/linux_x86_64/ 路径下。2.4 运行构建生成的 gstreamer-1.0 程序
一般ubunut系统中也可能安装过gstreamer程序。
我们需要配置相关环境来使用我们刚构建出来的gstreamer相关程序及gst-plugins组件。# 指定优先检索的PATH,这样可以方便的使用构建生成相关gst程序,例如 gst-inspect-1.0 gst-play-1.0 等 export PATH=/home/lzy/Develop/Sources/cerbero/build/dist/linux_x86_64/bin/:$PATH # 指定gst-plugins的检索路径,如不指定会默认从系统相关路径进行检索 export GST_PLUGIN_PATH=/home/lzy/Develop/Sources/cerbero//build/dist/linux_x86_64/lib/gstreamer-1.0/ export GST_PLUGIN_SCANNER=/home/lzy/Develop/Sources/cerbero/build/dist/linux_x86_64/libexec/gstreamer-1.0/gst-plugin-scanner # 指定程序运行时动态库链接优选路径,比如运行 gst-inspect-1.0 时 export LD_LIBRARY_PATH=/home/lzy/Develop/Sources/cerbero/build/dist/linux_x86_64/lib/- 1
- 2
- 3
- 4
- 5
- 6
- 7
- 8
- 9
测试一下配置是否生效:

如上,gst-play-1.0 及 gst-inspect-1.0 检索出来的 alsa plugin 都是我们构建的版本说明配置成功了。2.5 命令行gdb调试
在前面步骤完成后,已经可以使用gdb方式在命令行下进行gstreamer相关的debug了。
具体操作步骤如下图所示:

3. 使用VSCode进行gstreamer程序调试
使用gdb在命令下进行调试还不是很直观,我们可以使用VSCode来进行调试。
3.1 创建调试配置文件
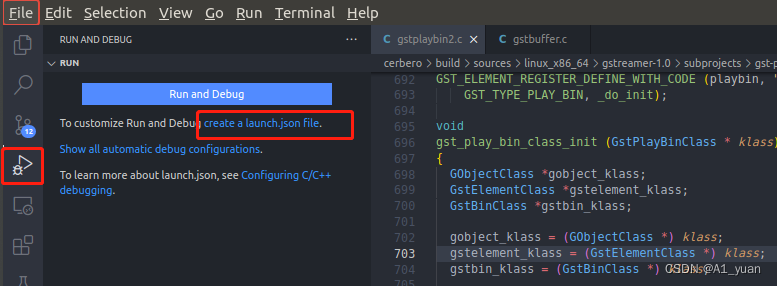
使用VSCode打开cerbero根目录,之后在选取左侧的debug按钮,选择创建一个launch.json文件。

然后会提示选择一个workspace的目录,直接选择cerbero目录即可。

(这里注意一点,新打开目录之后,先选择打开一个C/C++的源文件,否者vscode可能跳出一些和c++无关的debug配置项,这样无法成功创建launch.json文件)
新创建的launch.json文件如下:
![![[外链图片转存失败,源站可能有防盗链机制,建议将图片保存下来直接上传(img-EkpNMbyl-1660962001462)(index_files/fff87dfe-83d6-4af6-b77c-debd402bf201.png)]](https://img-blog.csdnimg.cn/74cdffaf7dd34d34a625b489fcdeff41.png](https://1000bd.com/contentImg/2024/03/29/98d384e949b2baa3.png)
然后增加必要的配置后配置文件如下:
{ // Use IntelliSense to learn about possible attributes. // Hover to view descriptions of existing attributes. // For more information, visit: https://go.microsoft.com/fwlink/?linkid=830387 "version": "0.2.0", "configurations": [ { "name": "(gdb) Launch gst-play-1.0", "type": "cppdbg", "request": "launch", "program": "${workspaceFolder}/build/dist/linux_x86_64/bin/gst-play-1.0", "args": ["./audio.wav"], "stopAtEntry": false, "cwd": "${workspaceFolder}", "environment": [ { "name": "GST_PLUGIN_SCANNER", "value": "${workspaceFolder}/build/dist/linux_x86_64/libexec/gstreamer-1.0/gst-plugin-scanner" }, { "name": "GST_PLUGIN_PATH", "value": "${workspaceFolder}/build/dist/linux_x86_64/lib/gstreamer-1.0/" }, { "name": "LD_LIBRARY_PATH", "value": "${workspaceFolder}/build/dist/linux_x86_64/lib/" }, { "name": "DYLD_LIBRARY_PATH", "value": "${workspaceFolder}/build/dist/linux_x86_64/lib/" } ], "externalConsole": false, "MIMode": "gdb", "setupCommands": [ { "description": "Enable pretty-printing for gdb", "text": "-enable-pretty-printing", "ignoreFailures": true } ], "miDebuggerPath": "/usr/bin/gdb", } ] }- 1
- 2
- 3
- 4
- 5
- 6
- 7
- 8
- 9
- 10
- 11
- 12
- 13
- 14
- 15
- 16
- 17
- 18
- 19
- 20
- 21
- 22
- 23
- 24
- 25
- 26
- 27
- 28
- 29
- 30
- 31
- 32
- 33
- 34
- 35
- 36
- 37
- 38
- 39
- 40
- 41
- 42
- 43
- 44
- 45
可以发现和直接使用gdb是差不多的,只不过通过json配置文件的方式设置了要运行的程序及参数,还有相关的运行时环境变量。
更详细的debug配置相关项可以参考vscode的官方文档:
Configure C/C++ debugging3.2 增加断点并启动程序调试
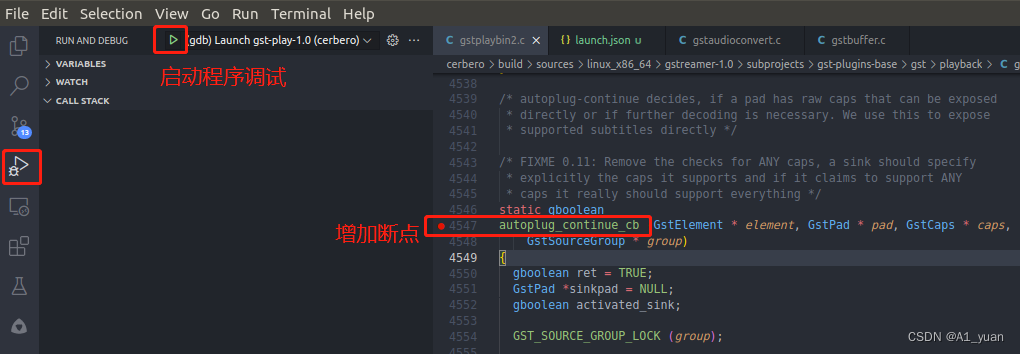
我们还是在 build/sources/linux_x86_64/gstreamer-1.0/subprojects/gst-plugins-base/gst/playback/gstplaybin2.c 文件中的 autoplug_continue_cb() 函数入口处增加断点,之后可以启动程序调试:

vscode中在源码中增加断点的方式和大多数IDE类似,直接在行号左侧点击即可。运行之后可以发现程序很快就停留在我们设置的断点位置,相关信息入如下:

可以发现,比起直接使用gdb在命令行下进行gstreamer的程序调试,使用vscode进行调试要直观很多。
每个线程的栈信息(也可以自己切换线程),断点信息,变量信息都都可以清晰的展现。另外,可以发现GStreamer的核心库中,很多核心基础函数(比如GstPad相关)在运行中都是被反复的迭代调用,如果仅仅依靠源码阅读,有时不是很容易理解其逻辑流程(当然源码阅读大神不包括)。
那么在借助vscode的C/C++程序调试功能后,通过打断点和查看堆栈就更容易帮助我们理解源码和解决一些实际项目中的问题。
3.3 修改GStreamer源码并进行调试
因为cerbero的构建体系中,每个模块以recipe来记录。而cerbero构建的脚本工具 ./cerbero-uninstalled 提供的操作选项中仅有 build 和 buildone 这种可以让我们来单独的构建一个recipe。
cerbero对每个recipe的构建流程都大致分为 fetch extract patch configure compile install package等步骤。如果我们直接修改 build/sources/linux_x86_64/ 下的源码后,直接执行 bulid 操作,那么源码会因为cerbero重新执行 fetch 流程而覆盖掉。
几个思路:
- 修复fetch的流程,直接指定从某个路径拷贝源码
- 看一些fetch流程里是如果通过git方式拉取源码的,直接在源码库里把改动提交到对应分支
-
相关阅读:
功能强大的国产Api管理工具
三维模型3DTile格式轻量化的纹理压缩和质量关系分析
PXF编译安装
iPhone开发--xcode15报错问题
《最游记》游戏全套源码(源码+引擎+文档+客户端+服务端+工具)
根据两向量求旋转矩阵(C++)
Linux系列之重定向操作
使用python给图片加个盲水印
PyTorch包的结构总结
11.NiO多线程优化
- 原文地址:https://blog.csdn.net/Miss_yuan/article/details/126436666
