-
基于springboot构建的mysql接口实现读写,并提供给宜搭使用
构建mysql数据库
首先下载mysql:Windows10 MYSQL Installer 安装(mysql-installer-community-5.7.19.0.msi)
为了更便捷的浏览以及操作数据库,可以安装Navicat for mysql(图形化管理):Navicat for MySQL免费版安装配置教程(超级详细、保姆级)
Navicat for mysql的基本操作可以看:如何使用“Navicat for MySQL
我们这里新建了一个名为test4yd的数据库,并建了一张名为studentsinfo的表,表结构如图所示:

Springboot构建接口
前言
数据库搭建成功后,由于访问数据库实现读写是需要在后端实现的,无法直接通过前端js代码连接,所以我们需要自己搭建一个后端,并提供给宜搭一个接口使用。
(关于前后端的关系:前端与后端的区别(超详细整理-小白必看))
后端开发我们将采用java语言,在IDEA上进行:IDEA安装与破解新建项目
- 新建project

- 选择Spring Initialize
并设置Project Name、Location、Type、Language、Group等,注意SDK以及Java不要设太高,可能版本会不支持
然后点击Next

- 选择Dependencies:
这里先选择一些我们会用到的依赖,主要是Web下的Spring Web以及SQL下的JDBC API 和MySQL Driver,此外,这里我还选了Developer Tools下的Lombok,其中的DATA后续会用到
然后点击Fininsh


Idle将会自动构建好框架如下图所示:

简要介绍:
- src/main/java :Java源代码存放目录
- DemoApplication :主文件
- resources:资源文件
- resources/static:静态资源文件,例如css,js,image等
- resources/templates:视图模板页面
- application.properties:主配置文件,后续将重命名为application.yml文件(树状结构,一目了然)
- test/java:Java测试源代码目录
- pom.xml:依赖管理文件
连接数据库
- 增加连接数据的配置文件
在resources下新建spring目录,并新建spring config文件,命名为application:

打开创建的application.xml,加入数据库连接:
<context:component-scan base-package="com.example.demo(替换成你的项目名)"/> <bean class="org.springframework.jdbc.datasource.DriverManagerDataSource" id="dataSource"> <property name="driverClassName" value="com.mysql.cj.jdbc.Driver"/> <property name="url" value="jdbc:mysql://192.168.40.89:3306/test4yd(替换成自己的主机:端口/数据库名)?characterEncoding=utf8&serverTimezone=UTC"/> <property name="username" value="root"(替换成自己的用户名)>property> <property name="password" value="123456"(替换成自己的密码)>property> bean> <bean class="org.springframework.jdbc.core.JdbcTemplate" id="jdbcTemplate"> <property name="dataSource" ref="dataSource"/> bean>- 1
- 2
- 3
- 4
- 5
- 6
- 7
- 8
- 9
- 10
- 11
- 12
- 13
- 14
- 15
- 16
命名空间依赖型也要增加(即application.xml的开头部分),可以直接替换成下面:
<beans xmlns="http://www.springframework.org/schema/beans" xmlns:xsi="http://www.w3.org/2001/XMLSchema-instance" xmlns:context="http://www.springframework.org/schema/context" xsi:schemaLocation="http://www.springframework.org/schema/beans http://www.springframework.org/schema/beans/spring-beans.xsd http://www.springframework.org/schema/context https://www.springframework.org/schema/context/spring-context.xsd">- 1
- 2
- 3
- 4
- 5
- 6
至此,application.xml内容为:

设计接口
在src.main.java.com.example.demo下新建一个web文件夹,开始设计接口:
- 新建一个Studentsinfo类,由于我们数据表里的结构只有Student、Age,所以这里创建的类也只有两个属性:

这里用到的@Data注释便是lombok中的,会自动帮我们为StudentsInfo类的属性构建get和set方法。 - 建一个Mysql类,用以集成我们想要实现的sql方法

代码:
package com.example.demo.web; import org.springframework.beans.factory.annotation.Autowired; import org.springframework.jdbc.core.BeanPropertyRowMapper; import org.springframework.jdbc.core.JdbcTemplate; import org.springframework.jdbc.core.RowMapper; import org.springframework.stereotype.Component; import java.util.List; /** * Created with IntelliJ IDEA. * AUTHOR: 方缘恒 * Date: 2022-08-19 * Time: 10:28 * Description: No Description */ @Component public class Mysql { @Autowired JdbcTemplate jdbcTemplate; //获取所有StudentsInfo public List<StudentsInfo> getList() { RowMapper<StudentsInfo> RM = (RowMapper<StudentsInfo>) new BeanPropertyRowMapper(StudentsInfo.class); List<StudentsInfo> StudentsInfoList = jdbcTemplate.query("select * from StudentsInfo", RM); return StudentsInfoList; } //根据姓名获取对应Student的Age public List<StudentsInfo> getStudent(String Student){ RowMapper<StudentsInfo> RM = (RowMapper<StudentsInfo>) new BeanPropertyRowMapper(StudentsInfo.class); List<StudentsInfo> StudentsInfoList = jdbcTemplate.query("select * from StudentsInfo where Student ='"+Student+"'", RM); // ListStudentsInfoList=jdbcTemplate.execute("select * from StudentsInfo where Student ='"+Student+"'"); return StudentsInfoList; } //根据姓名获取对应Student,并将其Age更新为传入的Age,更新成功后返回Success public String update(String Student,int Age){ jdbcTemplate.execute("update StudentsInfo set Age ="+Age+" where Student ='"+Student+"';"); return "Success"; } }- 1
- 2
- 3
- 4
- 5
- 6
- 7
- 8
- 9
- 10
- 11
- 12
- 13
- 14
- 15
- 16
- 17
- 18
- 19
- 20
- 21
- 22
- 23
- 24
- 25
- 26
- 27
- 28
- 29
- 30
- 31
- 32
- 33
- 34
- 35
- 36
- 37
- 38
- 39
- 40
- 建立控制类Pages,管理地址

代码:
package com.example.demo.web; import org.springframework.beans.factory.annotation.Autowired; import org.springframework.stereotype.Controller; import org.springframework.web.bind.annotation.RequestMapping; import org.springframework.web.bind.annotation.ResponseBody; import java.util.List; /** * Created with IntelliJ IDEA. * AUTHOR: 方缘恒 * Date: 2022-08-19 * Time: 10:33 * Description: No Description */ @Controller public class Pages { @Autowired private Mysql allStudentsInfo; //访问getList时,后端调用getlist方法,返回所有StudentsInfo @RequestMapping("getList") @ResponseBody public List<StudentsInfo> getlist(){ List<StudentsInfo> StudentsInfoList=allStudentsInfo.getList(); // String res = JSON.toJSON(StudentsInfoList).toString();// 调用fastjson2 return StudentsInfoList; } @RequestMapping("getStudent") @ResponseBody //访问getStudent时,需要传入一个Student参数,将返回对应学生的信息 public List<StudentsInfo> getstudent(String Student){ List<StudentsInfo> StudentsInfoList=allStudentsInfo.getStudent(Student); return StudentsInfoList; } @RequestMapping("update") @ResponseBody //访问update时,需要传入Student以及Age两个参数,如果更新成功,将返回success public String update(String Student,int Age){ String status=allStudentsInfo.update(Student,Age); return status; } }- 1
- 2
- 3
- 4
- 5
- 6
- 7
- 8
- 9
- 10
- 11
- 12
- 13
- 14
- 15
- 16
- 17
- 18
- 19
- 20
- 21
- 22
- 23
- 24
- 25
- 26
- 27
- 28
- 29
- 30
- 31
- 32
- 33
- 34
- 35
- 36
- 37
- 38
- 39
- 40
- 41
- 42
- 43
- 44
- 45
- 配置application.xml
增加myconfig类,链接我们刚刚定义的application.xml文件

代码:
package com.example.sql4yd.web; import org.springframework.context.annotation.Configuration; import org.springframework.context.annotation.ImportResource; /** * Created with IntelliJ IDEA. * AUTHOR: 方缘恒 * Date: 2022-08-18 * Time: 11:41 * Description: No Description */ @Configuration @ImportResource(locations = "classpath:/spring/application.xml") public class Myconfig { }- 1
- 2
- 3
- 4
- 5
- 6
- 7
- 8
- 9
- 10
- 11
- 12
- 13
- 14
- 15
- 16
- 运行
至此,我们切换到DemoApplication,并点击右上角运行:


运行成功!我们可以用postman尝试一下访问我们的网站
(postman使用方法指南,最全面的教程)
输入127.0.0.1:8080/getList,send之后成功获取了所有Studentsinfo:

输入127.0.0.1:8080/getStudent,并设置参数Student为张三,send之后将获取张三对应的信息:

输入127.0.0.1:8080/update,并设置参数Student为张三,Age为10,send之后将返回success:

我们登录navicat for mysql查看一下数据库,可以看到张三的年龄已经被更新为10:

数据库内网穿透(可跳过)
由于我以下测试涉及外网访问本机mysql数据库,所以需要做内网穿透(什么是内网穿透?)
我这里选用的是natapp实现http协议的内网穿透:NATAPP1分钟快速新手图文教程,需要注意的是免费版穿透会不定时强制更改域名,命令行界面可以看到当前域名和访问记录:

宜搭连接接口
构建连接器
在宜搭中选择新建http连接器

设置连接器名称、域名、协议等,此处域名即内网穿透获得的域名:

若在内网穿透时设置了身份验证,则这里也要修改为相应的类型并输入验证信息; 注意域名不需要写协议。新增执行动作,将执行动作与我们构建的接口地址一一对应,如果需要传入参数的同样需要在这里设置:
- getList:

- getStudent

- update

点击保存,可以再点击去测试测试接口是否连接正常:
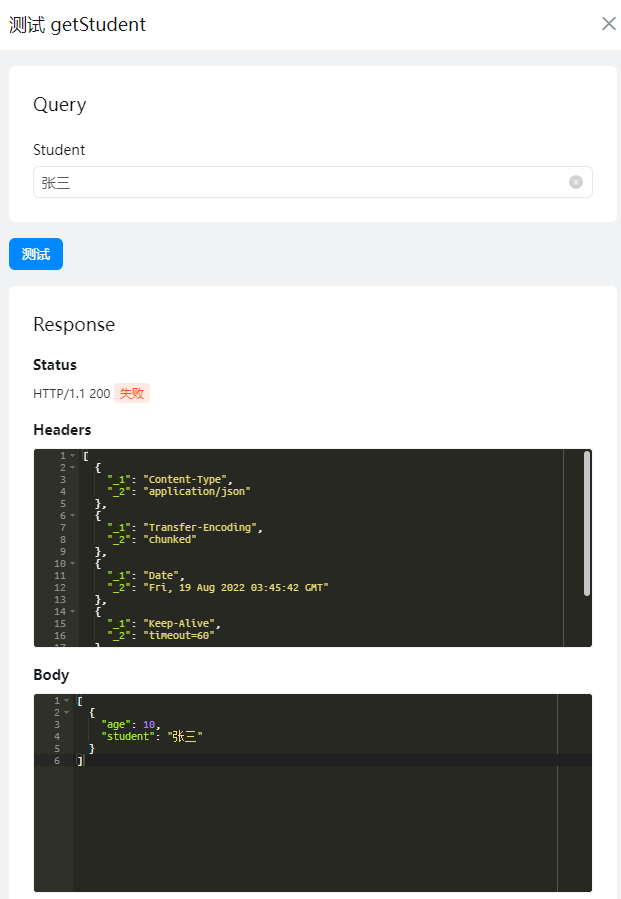
成功
构建表单
在页面管理处新建一个表演页面,并增加学生姓名以及学生年龄两个单行文本框

构建集成&自动化
在集成&自动化处新建一个集成&自动化,并绑定我们刚刚创建的表单:

触发事件设置为创建成功:

新增节点为连接器:

选择自定义连接器update:

利用公式将参数配置为表单提交后的对应数据,然后点击确定:

点击保存:

测试
访问刚刚新建的学生信息表单,提交数据:

可以查看集成&自动化的运行日志,状态为执行成功:

查看数据库可以发现已经更新成功:

至此,基础功能打通,细节及更多要求可进一步细化。 - 新建project
-
相关阅读:
PCIe寄存器之二
Vscode启动uniapp项目报错
vue3+eleement plus日历选择季度
数据结构C语言之线性表
求组合数(笔记)
JSP快速入门
一段程序的穷途一生
CRM系统主要包括哪些功能?
Day 56 | 583. 两个字符串的删除操作 & 72. 编辑距离 & 编辑距离总结篇
Pycharm与Anaconda安装
- 原文地址:https://blog.csdn.net/weixin_45941945/article/details/126400160
