-
2022-04-25-ElasticSearch
layout: post
#标题配置
title: ElasticSearch
#时间配置
date: 2022-04-25 11:55:00 +0800
#目录配置
categories: ElasticSearch
#标签配置
tag: 学习笔记- content
{:toc}
ElasticSearch
1.初识ElasticSearch
1.1 基于数据库查询的问题

- 性能低
- 功能弱
1.2 倒排(反向)索引
倒排索引:将文档进行分词,形成词条和id的对应关系即为反向索引。
以唐诗为例,所处包含“前”的诗句
正向索引:由《静夜思》–>窗前明月光—>“前”字
反向索引:“前”字–>窗前明月光–>《静夜思》
反向索引的实现就是对诗句进行分词,分成单个的词,由词推据,即为反向索引
“床前明月光”–> 分词
将一段文本按照一定的规则,拆分为不同的词条(term)


1.3 ES存储和查询的原理
index(索引):相当于mysql的库
映射:相当于mysql 的表结构
document(文档):相当于mysql的表中的数据
数据库查询存在的问题:
- 性能低:使用模糊查询,左边有通配符,不会走索引,会全表扫描,性能低
- 功能弱:如果以”华为手机“作为条件,查询不出来数据
Es使用倒排索引,对title 进行分词

-
使用“手机”作为关键字查询
生成的倒排索引中,词条会排序,形成一颗树形结构,提升词条的查询速度
-
使用“华为手机”作为关键字查询
华为:1,3
手机:1,2,3

1.4 ES概念详解
- ElasticSearch是一个基于Lucene的搜索服务器

-
是一个分布式、高扩展、高实时的搜索与数据分析引擎
-
基于RESTful web接口
-
Elasticsearch是用Java语言开发的,并作为Apache许可条款下的开放源码发布,是一种流行的企业级搜索引擎
-
官网:https://www.elastic.co/
应用场景
-
搜索:海量数据的查询
-
日志数据分析
-
实时数据分析
2.安装ElasticSearch
2.1 ES安装
1、上传ElasticSearch安装包
alt+p # 打开sftp窗口 # 上传es安装包 put e:/software/elasticsearch-7.4.0-linux-x86_64.tar.gz- 1
- 2
- 3

2、执行解压操作 ,如下图
# 将elasticsearch-7.4.0-linux-x86_64.tar.gz解压到opt文件夹下. -C 大写 tar -zxvf elasticsearch-7.4.0-linux-x86_64.tar.gz -C /opt- 1
- 2
3、创建普通用户
因为安全问题,Elasticsearch 不允许root用户直接运行,所以要创建新用户,在root用户中创建新用户,执行如下命令:
useradd wzk # 新增wzk用户 passwd wzk # 为wzk用户设置密码- 1
- 2
5、为新用户授权,如下图
chown -R wzk:wzk /opt/elasticsearch-7.4.0 #文件夹所有者- 1
将 /opt/elasticsearch-7.4.0文件夹授权给wzk用户,由上图可见,我们的文件夹权限赋给了wzk
6、修改elasticsearch.yml文件
vim /opt/elasticsearch-7.4.0/config/elasticsearch.yml- 1
# ======================== Elasticsearch Configuration ========================= cluster.name: my-application node.name: node-1 network.host: 0.0.0.0 http.port: 9200 cluster.initial_master_nodes: ["node-1"]- 1
- 2
- 3
- 4
- 5
- 6
cluster.name:配置elasticsearch的集群名称,默认是elasticsearch。建议修改成一个有意义的名称
node.name:节点名,elasticsearch会默认随机指定一个名字,建议指定一个有意义的名称,方便管理
network.host:设置为0.0.0.0允许外网访问
http.port:Elasticsearch的http访问端口
cluster.initial_master_nodes:初始化新的集群时需要此配置来选举master
7、修改配置文件
新创建的wzk用户最大可创建文件数太小,最大虚拟内存太小,切换到root用户,编辑下列配置文件, 添加类似如下内容
# 切换到root用户 su root #1. ===最大可创建文件数太小======= vim /etc/security/limits.conf # 在文件末尾中增加下面内容 wzk soft nofile 65536 wzk hard nofile 65536 # ===== vim /etc/security/limits.d/20-nproc.conf # 在文件末尾中增加下面内容 wzk soft nofile 65536 wzk hard nofile 65536 * hard nproc 4096 # 注:* 代表Linux所有用户名称 #2. ===最大虚拟内存太小======= vim /etc/sysctl.conf # 在文件中增加下面内容 vm.max_map_count=655360 # 重新加载,输入下面命令: sysctl -p- 1
- 2
- 3
- 4
- 5
- 6
- 7
- 8
- 9
- 10
- 11
- 12
- 13
- 14
- 15
- 16
- 17
- 18
- 19
- 20
- 21
- 22
- 23
- 24
- 25
- 26
8、启动elasticsearch
su wzk # 切换到wzk用户启动 cd /opt/elasticsearch-7.4.0/bin ./elasticsearch #启动- 1
- 2
- 3

通过上图我们可以看到elasticsearch已经成功启动
2.2 访问elasticsearch
1、在访问elasticsearch前,请确保防火墙是关闭的,执行命令:
#暂时关闭防火墙 systemctl stop firewalld # 或者 #永久设置防火墙状态 systemctl enable firewalld.service #打开防火墙永久性生效,重启后不会复原 systemctl disable firewalld.service #关闭防火墙,永久性生效,重启后不会复原- 1
- 2
- 3
- 4
- 5
- 6
- 7
- 8
浏览器输入http://192.168.149.135:9200/,如下图

此时elasticsearch已成功启动:
重点几个关注下即可: number" : "7.4.0" 表示elasticsearch版本 lucene_version" : "8.2.0" 表示lucene版本 name : 默认启动的时候指定了 ES 实例名称 cluster_name : 默认名为 elasticsearch- 1
- 2
- 3
- 4
- 5
查看elastic是否启动
ps -ef|grep elastic- 1
2.3 ES辅助工具安装
2.3.1 Postman安装
1、什么是Postman
Postman是一个http模拟请求的工具。
官网介绍:“Modern software is built on APIs,Postman helps you develop APIs faster”
看得出来,它是一个专门测试 API 的工具,Postman 提供功能强大的 Web API 和 HTTP 请求的调试,它能够发送任何类型的HTTP 请求 (GET, POST, PUT, DELETE…),并且能附带任何数量的参数和 Headers。不仅如此,它还提供测试数据和环境配置数据的导入导出。
进入官网www.getpostman.com,下载
2.3.2 Kibana安装
1、什么是Kibana
Kibana是一个针对Elasticsearch的开源分析及可视化平台,用来搜索、查看交互存储在Elasticsearch索引中的数据。使用Kibana,可以通过各种图表进行高级数据分析及展示。
Kibana让海量数据更容易理解。它操作简单,基于浏览器的用户界面可以快速创建仪表板(dashboard)实时显示Elasticsearch查询动态。
2、上传kibana
CRT中克隆一个窗口,上传Kibana
put E:\software\kibana-7.4.0-linux-x86_64.tar.gz- 1
2、解压kibana
tar -xzf kibana-7.4.0-linux-x86_64.tar.gz -C /opt- 1
解压到当前目录(/opt)下
3、修改kibana配置
vim /opt/kibana-7.4.0-linux-x86_64/config/kibana.yml- 1
server.port: 5601 server.host: "0.0.0.0" server.name: "kibana-zk" elasticsearch.hosts: ["http://127.0.0.1:9200"] elasticsearch.requestTimeout: 99999- 1
- 2
- 3
- 4
- 5
server.port:http访问端口
server.host:ip地址,0.0.0.0表示可远程访问
server.name:kibana服务名
elasticsearch.hosts:elasticsearch地址
elasticsearch.requestTimeout:请求elasticsearch超时时间,默认为30000,此处可根据情况设置
4、启动kibana
由于kibana不建议使用root用户启动,如果用root启动,需要加–allow-root参数
# 切换到kibana的bin目录 cd /opt/kibana-7.4.0-linux-x86_64/bin # 启动 ./kibana --allow-root # 停止 netstat -anltp|grep 5601 kill -9 xxxxx- 1
- 2
- 3
- 4
- 5
- 6
- 7
- 8
- 9
- 10
- 11

启动成功。
5、访问kibana
1.浏览器输入http://192.168.149.135:5601/,如下图:
http://192.168.149.135:5601/- 1

看到这个界面,说明Kibanan已成功安装。
Discover:可视化查询分析器
Visualize:统计分析图表
Dashboard:自定义主面板(添加图表)
Timelion:Timelion是一个kibana时间序列展示组件(暂时不用)
Dev Tools:Console控制台(同CURL/POSTER,操作ES代码工具,代码提示,很方便)
Management:管理索引库(index)、已保存的搜索和可视化结果(save objects)、设置 kibana 服务器属性。2.3.3 head安装
Tips:
课后扩展内容head简介
ead插件是ES的一个可视化管理插件,用来监视ES的状态,并通过head客户端和ES服务进行交互,比如创建映射、创建索引等。
在登陆和访问head插件地址和ElasticSearch前需要事先在服务器上安装和配置好ElasticSearch以及head插件。安装完后,默认head插件的web端口为9100,ElasticSearch服务的端口为9200,使用浏览器访问head地址,如http://IP地址:9100/,推荐使用Chrome浏览器,head插件对Chrome浏览器兼容更佳。进入head页面后将ElasticSearch连接输入框中填写正确的ElasticSearch服务地址,就可以监控ElasticSearch运行信息
① Node安装
- 什么是Node
简单的说 Node.js 就是运行在服务端的 JavaScript。Node.js 是一个基于 Chrome V8 引擎的 JavaScript 运行环境。Node.js 使用了一个事件驱动、非阻塞式 I/O 的模型,使其轻量又高效。Node.js 的包管理器 npm,是全球最大的开源库生态系统。
- 下载Node
上一节我们已经安装好了Elasticsearch,接下来我们来安装head插件,由于elasticsearch-head插件是由nodejs语言编写,所以安装elasticsearch-head前需要先安装nodejs。
首先,执行以下命令安装nodejs和grunt打开虚拟机,执行wget命令下载Node,如下图:
wget https://nodejs.org/dist/v10.15.2/node-v10.15.2-linux-x64.tar.xz- 1

3)解压Node包
tar xvf node-v10.15.2-linux-x64.tar.xz- 1

4)设置软连接
解压文件的 bin 目录底下包含了 node、npm 等命令,我们可以使用 ln 命令来设置软连接:
ln -s bin/npm /usr/local/bin/ ln -s bin/node /usr/local/bin/- 1
- 2
- 3
在/etc/profile中配置好path环境变量
vi ~/.bash_profile export NODE_HOME=/opt/nodejs/node-v10.15.2-linux-x64 export PATH=$PATH:$NODE_HOME/bin- 1
- 2
- 3
- 4
- 5
保存退出,使文件生效
source ~/.bash_profile- 1
查看node安装版本,执行 node -v 验证安装如下图:

② grunt安装
安装grunt(运行在Node.js上面的任务管理器(task runner)),为了获得Grunt的更多产品特性,需要全局安装Grunt’s 命令行接口(CLI),使用npm进行安装,如下:
npm install -g grunt-cli- 1

查看grunt版本

输出grunt版本信息,表示安装成功。
③ head安装
- 执行命令安装git
git yum install git -y- 1

- 切换到/opt目录下,执行下面的克隆命令
git clone git://github.com/mobz/elasticsearch-head.git- 1

- 进入到elasticsearch-head目录
cd elasticsearch-head- 1
- 运行
在运行之前我们需要修改下elasticsearch.yml,因为ES默认不开启跨域访问,需要添加以下配置:
#开启cors跨域访问支持,默认为false http.cors.enabled: true #跨域访问允许的域名地址,(允许所有域名)以上使用正则 http.cors.allow-origin: "*"- 1
- 2
- 3
- 4
然后开始执行运行命令:
npm run start- 1

- 访问head
浏览器输入ip:port:9100,如下图

看到这个界面说明我们的head插件成功安装并且成功连接Elasticsearch。
后台启动
nohup ../bin/kibana &- 1
3.ElasticSearch核心概念
索引(index)
ElasticSearch存储数据的地方,可以理解成关系型数据库中的数据库概念。
映射(mapping)
mapping定义了每个字段的类型、字段所使用的分词器等。相当于关系型数据库中的表结构。
文档(document)
Elasticsearch中的最小数据单元,常以json格式显示。一个document相当于关系型数据库中的一行数据。
倒排索引
一个倒排索引由文档中所有不重复词的列表构成,对于其中每个词,对应一个包含它的文档id列表。
类型(type)
一种type就像一类表。如用户表、角色表等。在Elasticsearch7.X默认type为_doc
\- ES 5.x中一个index可以有多种type。 \- ES 6.x中一个index只能有一种type。 \- ES 7.x以后,将逐步移除type这个概念,现在的操作已经不再使用,默认_doc- 1
- 2
- 3
- 4
- 5
4.脚本操作ES
4.1 RESTful风格介绍
1.ST(Representational State Transfer),表述性状态转移,是一组架构约束条件和原则。满足这些约束条件和原则的应用程序或设计就是RESTful。就是一种定义接口的规范。
2.基于HTTP。
3.使用XML格式定义或JSON格式定义。
4.每一个URI代表1种资源。
5.客户端使用GET、POST、PUT、DELETE 4个表示操作方式的动词对服务端资源进行操作:
GET:用来获取资源
POST:用来新建资源(也可以用于更新资源)
PUT:用来更新资源
DELETE:用来删除资源

4.2 操作索引
- 添加索引
PUT http://ip:端口/索引名称- 1
- 索引查询
GET http://ip:端口/索引名称 # 查询单个索引信息 GET http://ip:端口/索引名称1,索引名称2... # 查询多个索引信息 GET http://ip:端口/_all # 查询所有索引信息- 1
- 2
- 3
- 删除索引
DELETE http://ip:端口/索引名称- 1
- 关闭、打开索引
POST http://ip:端口/索引名称/_close POST http://ip:端口/索引名称/_open- 1
- 2
4.3 ES数据类型
4.3.1 简单数据类型
long 带符号的64位整数,其最小值为,最大值为。-263263-1 integer 带符号的32位整数,其最小值为,最大值为。-231231-1 short 带符号的16位整数,其最小值为-32,768,最大值为32,767. byte 带符号的8位整数,其最小值为-128。最大值为127. double 双精度64位IEEE 754浮点数,限制为有限值。 float 单精度32位IEEE 754浮点数,限制为有限值。 half_float 半精度16位IEEE 754浮点数,限制为有限值。 scalLd_float 由a支持的有限浮点数long,由国定double比例因子缩放。 - 字符串
聚合:相当于mysql 中的sum(求和)
text:会分词,不支持聚合 keyword:不会分词,将全部内容作为一个词条,支持聚合- 1
- 2
- 3
-
数值
-
布尔:boolean
-
二进制:binary
-
范围类型
integer_range, float_range, long_range, double_range, date_range- 1
- 日期:date
4.3.2 复杂数据类型
•数组:[ ] Nested:
nested(for arrays of JSON objects 数组类型的JSON对象)•对象:{ } Object: object(for single JSON objects 单个JSON对象)
4.4 操作映射
- 查询索引
GET goods_index- 1
- 创建索引
PUT person- 1
- 查询索引
GET person- 1
- 查询映射
GET person/_mapping- 1
- 添加映射
PUT person/_mapping { "properties":{ "name":{ "type":"keyword" }, "age":{ "type":"integer" } } }- 1
- 2
- 3
- 4
- 5
- 6
- 7
- 8
- 9
- 10
- 11
- 创建索引并添加映射
# 创建索引并添加映射 PUT person { "mappings": { "properties": { "name":{ "type":"keyword" }, "age":{ "type":"integer" } } } } GET person1/_mapping- 1
- 2
- 3
- 4
- 5
- 6
- 7
- 8
- 9
- 10
- 11
- 12
- 13
- 14
- 15
- 16
- 17
- 添加字段
# 添加字段 PUT person/_mapping { "properties":{ "address":{ "type":"text" } } }- 1
- 2
- 3
- 4
- 5
- 6
- 7
- 8
- 9
4.5 操作文档
# 查询索引 GET person # 添加文档,指定id PUT person/_doc/1 { "name":"张三", "age":20, "address":"山西太原市" } # 添加文档,不指定id POST person/_doc { "name":"李四", "age":30, "address":"山西运城市" } # 根据id查询文档 GET person/_doc/2 # 查询所有文档 GET person/_search # 修改文档 PUT person/_doc/2 { "name":"张三222", "age":20, "address":"山西太原市" } # 根据id删除文档 DELETE person/_doc/24tQR4ABkV307UtrrGM4- 1
- 2
- 3
- 4
- 5
- 6
- 7
- 8
- 9
- 10
- 11
- 12
- 13
- 14
- 15
- 16
- 17
- 18
- 19
- 20
- 21
- 22
- 23
- 24
- 25
- 26
- 27
- 28
- 29
- 30
- 31
- 32
- 33
- 34
- 35
- 36
- 37
- 38
- 39
- 40
5.分词器
5.1 分词器-介绍
-
IKAnalyzer是一个开源的,基于java语言开发的轻量级的中文分词工具包
-
是一个基于Maven构建的项目
-
具有60万字/秒的高速处理能力
-
支持用户词典扩展定义
-
下载地址:https://github.com/medcl/elasticsearch-analysis-ik/archive/v7.4.0.zip
安装包在资料文件夹中提供
5.2 ik分词器安装
5.2.1 环境准备
Elasticsearch 要使用 ik,就要先构建 ik 的 jar包,这里要用到 maven 包管理工具,而 maven 需要java 环境,而 Elasticsearch 内置了jdk, 所以可以将JAVA_HOME设置为Elasticsearch 内置的jdk
1)设置JAVA_HOME
vim /etc/profile # 在profile文件末尾添加 #java environment export JAVA_HOME=/opt/elasticsearch-7.4.0/jdk export PATH=$PATH:${JAVA_HOME}/bin # 保存退出后,重新加载profile source /etc/profile- 1
- 2
- 3
- 4
- 5
- 6
- 7
- 8
- 9
2)下载maven安装包
cd /opt wget http://mirror.cc.columbia.edu/pub/software/apache/maven/maven-3/3.1.1/binaries/apache-maven-3.1.1-bin.tar.gz # 或 wget http://mirrors.tuna.tsinghua.edu.cn/apache/maven/maven-3/3.1.1/binaries/apache-maven-3.1.1-bin.tar.gz # 设置阿里云镜像 vim apache-maven-3.1.1/conf/settings.xml <mirror> <id>alimaven</id> <name>aliyun maven</name> <url>http://maven.aliyun.com/nexus/content/groups/public/</url> <mirrorOf>central</mirrorOf> </mirror>- 1
- 2
- 3
- 4
- 5
- 6
- 7
- 8
- 9
- 10
- 11
- 12
- 13
3)解压maven安装包
tar xzf apache-maven-3.1.1-bin.tar.gz- 1
4)设置软连接
ln -s apache-maven-3.1.1 maven- 1
5)设置path
打开文件
vim /etc/profile.d/maven.sh- 1
将下面的内容复制到文件,保存
export MAVEN_HOME=/opt/maven export PATH=${MAVEN_HOME}/bin:${PATH}- 1
- 2
设置好Maven的路径之后,需要运行下面的命令使其生效
source /etc/profile.d/maven.sh- 1
6)验证maven是否安装成功
mvn -v- 1
5.2.2安装IK分词器
1)下载IK
wget https://github.com/medcl/elasticsearch-analysis-ik/archive/v7.4.0.zip- 1
执行如下图:
2)解压IK
由于这里是zip包不是gz包,所以我们需要使用unzip命令进行解压,如果本机环境没有安装unzip,请执行:
yum install zip yum install unzip- 1
- 2
解压IK
unzip v7.4.0.zip- 1
3)编译jar包
# 切换到 elasticsearch-analysis-ik-7.4.0目录 cd elasticsearch-analysis-ik-7.4.0/ #打包 mvn package- 1
- 2
- 3
- 4
4) jar包移动
package执行完毕后会在当前目录下生成target/releases目录,将其中的elasticsearch-analysis-ik-7.4.0.zip。拷贝到elasticsearch目录下的新建的目录plugins/analysis-ik,并解压
#切换目录 cd /opt/elasticsearch-7.4.0/plugins/ #新建目录 mkdir analysis-ik cd analysis-ik #执行拷贝 cp -R /opt/elasticsearch-analysis-ik-7.4.0/target/releases/elasticsearch-analysis-ik-7.4.0.zip /opt/elasticsearch-7.4.0/plugins/analysis-ik #执行解压 unzip /opt/elasticsearch-7.4.0/plugins/analysis-ik/elasticsearch-analysis-ik-7.4.0.zip- 1
- 2
- 3
- 4
- 5
- 6
- 7
- 8
- 9
5)拷贝辞典
将elasticsearch-analysis-ik-7.4.0目录下的config目录中的所有文件 拷贝到elasticsearch的config目录
cp -R /opt/elasticsearch-analysis-ik-7.4.0/config/* /opt/elasticsearch-7.4.0/config- 1
记得一定要重启Elasticsearch!!!
5.2.3 使用IK分词器
IK分词器有两种分词模式:ik_max_word和ik_smart模式。
1、ik_max_word
会将文本做最细粒度的拆分,比如会将“乒乓球明年总冠军”拆分为“乒乓球、乒乓、球、明年、总冠军、冠军。
#方式一ik_max_word GET /_analyze { "analyzer": "ik_max_word", "text": "乒乓球明年总冠军" }- 1
- 2
- 3
- 4
- 5
- 6
ik_max_word分词器执行如下:
{ "tokens" : [ { "token" : "乒乓球", "start_offset" : 0, "end_offset" : 3, "type" : "CN_WORD", "position" : 0 }, { "token" : "乒乓", "start_offset" : 0, "end_offset" : 2, "type" : "CN_WORD", "position" : 1 }, { "token" : "球", "start_offset" : 2, "end_offset" : 3, "type" : "CN_CHAR", "position" : 2 }, { "token" : "明年", "start_offset" : 3, "end_offset" : 5, "type" : "CN_WORD", "position" : 3 }, { "token" : "总冠军", "start_offset" : 5, "end_offset" : 8, "type" : "CN_WORD", "position" : 4 }, { "token" : "冠军", "start_offset" : 6, "end_offset" : 8, "type" : "CN_WORD", "position" : 5 } ] }- 1
- 2
- 3
- 4
- 5
- 6
- 7
- 8
- 9
- 10
- 11
- 12
- 13
- 14
- 15
- 16
- 17
- 18
- 19
- 20
- 21
- 22
- 23
- 24
- 25
- 26
- 27
- 28
- 29
- 30
- 31
- 32
- 33
- 34
- 35
- 36
- 37
- 38
- 39
- 40
- 41
- 42
- 43
- 44
- 45
- 46
- 47
2、ik_smart
会做最粗粒度的拆分,比如会将“乒乓球明年总冠军”拆分为乒乓球、明年、总冠军。#方式二ik_smart GET /_analyze { "analyzer": "ik_smart", "text": "乒乓球明年总冠军" }- 1
- 2
- 3
- 4
- 5
- 6
ik_smart分词器执行如下:
{ "tokens" : [ { "token" : "乒乓球", "start_offset" : 0, "end_offset" : 3, "type" : "CN_WORD", "position" : 0 }, { "token" : "明年", "start_offset" : 3, "end_offset" : 5, "type" : "CN_WORD", "position" : 1 }, { "token" : "总冠军", "start_offset" : 5, "end_offset" : 8, "type" : "CN_WORD", "position" : 2 } ] }- 1
- 2
- 3
- 4
- 5
- 6
- 7
- 8
- 9
- 10
- 11
- 12
- 13
- 14
- 15
- 16
- 17
- 18
- 19
- 20
- 21
- 22
- 23
- 24
- 25
- 26
由此可见 使用ik_smart可以将文本"text": "乒乓球明年总冠军"分成了【乒乓球】【明年】【总冠军】
这样看的话,这样的分词效果达到了我们的要求。
执行如下命令时如果出现 打包失败(501码)将maven镜像换成阿里云的
mvn package- 1
/opt/apache-maven-3.1.1/conf/setting.xml
<mirror> <id>alimavenid> <name>aliyun mavenname> <url>http://maven.aliyun.com/nexus/content/groups/public/url> <mirrorOf>centralmirrorOf> mirror>- 1
- 2
- 3
- 4
- 5
- 6
5.3 ik分词器使用
IK分词器有两种分词模式:ik_max_word和ik_smart模式。
1、ik_max_word
会将文本做最细粒度的拆分,比如会将“乒乓球明年总冠军”拆分为“乒乓球、乒乓、球、明年、总冠军、冠军。
#方式一ik_max_word GET /_analyze { "analyzer": "ik_max_word", "text": "乒乓球明年总冠军" }- 1
- 2
- 3
- 4
- 5
- 6
ik_max_word分词器执行如下:
{ "tokens" : [ { "token" : "乒乓球", "start_offset" : 0, "end_offset" : 3, "type" : "CN_WORD", "position" : 0 }, { "token" : "乒乓", "start_offset" : 0, "end_offset" : 2, "type" : "CN_WORD", "position" : 1 }, { "token" : "球", "start_offset" : 2, "end_offset" : 3, "type" : "CN_CHAR", "position" : 2 }, { "token" : "明年", "start_offset" : 3, "end_offset" : 5, "type" : "CN_WORD", "position" : 3 }, { "token" : "总冠军", "start_offset" : 5, "end_offset" : 8, "type" : "CN_WORD", "position" : 4 }, { "token" : "冠军", "start_offset" : 6, "end_offset" : 8, "type" : "CN_WORD", "position" : 5 } ] }- 1
- 2
- 3
- 4
- 5
- 6
- 7
- 8
- 9
- 10
- 11
- 12
- 13
- 14
- 15
- 16
- 17
- 18
- 19
- 20
- 21
- 22
- 23
- 24
- 25
- 26
- 27
- 28
- 29
- 30
- 31
- 32
- 33
- 34
- 35
- 36
- 37
- 38
- 39
- 40
- 41
- 42
- 43
- 44
- 45
- 46
- 47
2、ik_smart
会做最粗粒度的拆分,比如会将“乒乓球明年总冠军”拆分为乒乓球、明年、总冠军。#方式二ik_smart GET /_analyze { "analyzer": "ik_smart", "text": "乒乓球明年总冠军" }- 1
- 2
- 3
- 4
- 5
- 6
ik_smart分词器执行如下:
{ "tokens" : [ { "token" : "乒乓球", "start_offset" : 0, "end_offset" : 3, "type" : "CN_WORD", "position" : 0 }, { "token" : "明年", "start_offset" : 3, "end_offset" : 5, "type" : "CN_WORD", "position" : 1 }, { "token" : "总冠军", "start_offset" : 5, "end_offset" : 8, "type" : "CN_WORD", "position" : 2 } ] }- 1
- 2
- 3
- 4
- 5
- 6
- 7
- 8
- 9
- 10
- 11
- 12
- 13
- 14
- 15
- 16
- 17
- 18
- 19
- 20
- 21
- 22
- 23
- 24
- 25
- 26
由此可见 使用ik_smart可以将文本"text": "乒乓球明年总冠军"分成了【乒乓球】【明年】【总冠军】
这样看的话,这样的分词效果达到了我们的要求。
5.4 使用IK分词器-查询文档
•词条查询:term
词条查询不会分析查询条件,只有当词条和查询字符串完全匹配时才匹配搜索
•全文查询:match
全文查询会分析查询条件,先将查询条件进行分词,然后查询,求并集
1.创建索引,添加映射,并指定分词器为ik分词器
PUT person2 { "mappings": { "properties": { "name": { "type": "keyword" }, "address": { "type": "text", "analyzer": "ik_max_word" } } } }- 1
- 2
- 3
- 4
- 5
- 6
- 7
- 8
- 9
- 10
- 11
- 12
- 13
- 14
2.添加文档
POST /person2/_doc/1 { "name":"张三", "age":18, "address":"北京海淀区" } POST /person2/_doc/2 { "name":"李四", "age":18, "address":"北京朝阳区" } POST /person2/_doc/3 { "name":"王五", "age":18, "address":"北京昌平区" }- 1
- 2
- 3
- 4
- 5
- 6
- 7
- 8
- 9
- 10
- 11
- 12
- 13
- 14
- 15
- 16
- 17
- 18
- 19
- 20
- 21
3.查询映射
GET person2- 1

4.查看分词效果
GET _analyze { "analyzer": "ik_max_word", "text": "北京海淀" }- 1
- 2
- 3
- 4
- 5
- 6
5.词条查询:term
查询person2中匹配到"北京"两字的词条
GET /person2/_search { "query": { "term": { "address": { "value": "北京" } } } }- 1
- 2
- 3
- 4
- 5
- 6
- 7
- 8
- 9
- 10
6.全文查询:match
全文查询会分析查询条件,先将查询条件进行分词,然后查询,求并集
GET /person2/_search { "query": { "match": { "address":"北京昌平" } } }- 1
- 2
- 3
- 4
- 5
- 6
- 7
- 8
6.ElasticSearch JavaApi-
6.1 SpringBoot整合ES
①搭建SpringBoot工程
②引入ElasticSearch相关坐标
<dependency> <groupId>org.elasticsearch.clientgroupId> <artifactId>elasticsearch-rest-high-level-clientartifactId> <version>7.4.0version> dependency> <dependency> <groupId>org.elasticsearch.clientgroupId> <artifactId>elasticsearch-rest-clientartifactId> <version>7.4.0version> dependency> <dependency> <groupId>org.elasticsearchgroupId> <artifactId>elasticsearchartifactId> <version>7.4.0version> dependency>- 1
- 2
- 3
- 4
- 5
- 6
- 7
- 8
- 9
- 10
- 11
- 12
- 13
- 14
- 15
- 16
③测试
ElasticSearchConfig
@Configuration @ConfigurationProperties(prefix="elasticsearch") public class ElasticSearchConfig { private String host; private int port; public String getHost() { return host; } public void setHost(String host) { this.host = host; } public int getPort() { return port; } public void setPort(int port) { this.port = port; } @Bean public RestHighLevelClient client(){ return new RestHighLevelClient(RestClient.builder( new HttpHost(host,port,"http") )); } }- 1
- 2
- 3
- 4
- 5
- 6
- 7
- 8
- 9
- 10
- 11
- 12
- 13
- 14
- 15
- 16
- 17
- 18
- 19
- 20
- 21
- 22
- 23
- 24
- 25
- 26
- 27
- 28
- 29
- 30
- 31
- 32
- 33
- 34
- 35
- 36
ElasticsearchDay01ApplicationTests
注意:使用@Autowired注入RestHighLevelClient 如果报红线,则是因为配置类所在的包和测试类所在的包,包名不一致造成的
@SpringBootTest class ElasticsearchDay01ApplicationTests { @Autowired RestHighLevelClient client; /** * 测试 */ @Test void contextLoads() { System.out.println(client); } }- 1
- 2
- 3
- 4
- 5
- 6
- 7
- 8
- 9
- 10
- 11
- 12
- 13
- 14
- 15
6.2 创建索引
1.添加索引
/** * 添加索引 * @throws IOException */ @Test public void addIndex() throws IOException { //1.使用client获取操作索引对象 IndicesClient indices = client.indices(); //2.具体操作获取返回值 //2.1 设置索引名称 CreateIndexRequest createIndexRequest=new CreateIndexRequest("wzk"); CreateIndexResponse createIndexResponse = indices.create(createIndexRequest, RequestOptions.DEFAULT); //3.根据返回值判断结果 System.out.println(createIndexResponse.isAcknowledged()); }- 1
- 2
- 3
- 4
- 5
- 6
- 7
- 8
- 9
- 10
- 11
- 12
- 13
- 14
- 15
- 16
2.添加索引,并添加映射
/** * 添加索引,并添加映射 */ @Test public void addIndexAndMapping() throws IOException { //1.使用client获取操作索引对象 IndicesClient indices = client.indices(); //2.具体操作获取返回值 //2.具体操作,获取返回值 CreateIndexRequest createIndexRequest = new CreateIndexRequest("zk"); //2.1 设置mappings String mapping = "{\n" + " \"properties\" : {\n" + " \"address\" : {\n" + " \"type\" : \"text\",\n" + " \"analyzer\" : \"ik_max_word\"\n" + " },\n" + " \"age\" : {\n" + " \"type\" : \"long\"\n" + " },\n" + " \"name\" : {\n" + " \"type\" : \"keyword\"\n" + " }\n" + " }\n" + " }"; createIndexRequest.mapping(mapping,XContentType.JSON); CreateIndexResponse createIndexResponse = indices.create(createIndexRequest, RequestOptions.DEFAULT); //3.根据返回值判断结果 System.out.println(createIndexResponse.isAcknowledged()); }- 1
- 2
- 3
- 4
- 5
- 6
- 7
- 8
- 9
- 10
- 11
- 12
- 13
- 14
- 15
- 16
- 17
- 18
- 19
- 20
- 21
- 22
- 23
- 24
- 25
- 26
- 27
- 28
- 29
- 30
- 31
- 32
6.3 查询、删除、判断索引
查询索引
/** * 查询索引 */ @Test public void queryIndex() throws IOException { IndicesClient indices = client.indices(); GetIndexRequest getRequest=new GetIndexRequest("zk"); GetIndexResponse response = indices.get(getRequest, RequestOptions.DEFAULT); Map<String, MappingMetaData> mappings = response.getMappings(); //iter 提示foreach for (String key : mappings.keySet()) { System.out.println(key+"==="+mappings.get(key).getSourceAsMap()); } }- 1
- 2
- 3
- 4
- 5
- 6
- 7
- 8
- 9
- 10
- 11
- 12
- 13
- 14
- 15
- 16
- 17
- 18
- 19
- 20
删除索引
/** * 删除索引 */ @Test public void deleteIndex() throws IOException { IndicesClient indices = client.indices(); DeleteIndexRequest deleteRequest=new DeleteIndexRequest("wzk"); AcknowledgedResponse delete = indices.delete(deleteRequest, RequestOptions.DEFAULT); System.out.println(delete.isAcknowledged()); }- 1
- 2
- 3
- 4
- 5
- 6
- 7
- 8
- 9
- 10
- 11
索引是否存在
/** * 索引是否存在 */ @Test public void existIndex() throws IOException { IndicesClient indices = client.indices(); GetIndexRequest getIndexRequest=new GetIndexRequest("wzk"); boolean exists = indices.exists(getIndexRequest, RequestOptions.DEFAULT); System.out.println(exists); }- 1
- 2
- 3
- 4
- 5
- 6
- 7
- 8
- 9
- 10
- 11
- 12
- 13
- 14
- 15
6.4 添加文档
1.添加文档,使用map作为数据
@Test public void addDoc1() throws IOException { Map<String, Object> map=new HashMap<>(); map.put("name","张三"); map.put("age","18"); map.put("address","北京二环"); IndexRequest request=new IndexRequest("zk").id("1").source(map); IndexResponse response = client.index(request, RequestOptions.DEFAULT); System.out.println(response.getId()); }- 1
- 2
- 3
- 4
- 5
- 6
- 7
- 8
- 9
- 10
2.添加文档,使用对象作为数据
@Test public void addDoc2() throws IOException { Person person=new Person(); person.setId("2"); person.setName("李四"); person.setAge(20); person.setAddress("北京三环"); String data = JSON.toJSONString(person); IndexRequest request=new IndexRequest("zk").id(person.getId()).source(data,XContentType.JSON); IndexResponse response = client.index(request, RequestOptions.DEFAULT); System.out.println(response.getId()); }- 1
- 2
- 3
- 4
- 5
- 6
- 7
- 8
- 9
- 10
- 11
- 12
6.5 修改、查询、删除文档
1.修改文档:添加文档时,如果id存在则修改,id不存在则添加
/** * 修改文档:添加文档时,如果id存在则修改,id不存在则添加 */ @Test public void UpdateDoc() throws IOException { Person person=new Person(); person.setId("2"); person.setName("李四"); person.setAge(20); person.setAddress("北京三环车王"); String data = JSON.toJSONString(person); IndexRequest request=new IndexRequest("zk").id(person.getId()).source(data,XContentType.JSON); IndexResponse response = client.index(request, RequestOptions.DEFAULT); System.out.println(response.getId()); }- 1
- 2
- 3
- 4
- 5
- 6
- 7
- 8
- 9
- 10
- 11
- 12
- 13
- 14
- 15
- 16
- 17
- 18
2.根据id查询文档
/** * 根据id查询文档 */ @Test public void getDoc() throws IOException { //设置查询的索引、文档 GetRequest indexRequest=new GetRequest("zk","2"); GetResponse response = client.get(indexRequest, RequestOptions.DEFAULT); System.out.println(response.getSourceAsString()); }- 1
- 2
- 3
- 4
- 5
- 6
- 7
- 8
- 9
- 10
- 11
- 12
3.根据id删除文档
/** * 根据id删除文档 */ @Test public void delDoc() throws IOException { //设置要删除的索引、文档 DeleteRequest deleteRequest=new DeleteRequest("zk","1"); DeleteResponse response = client.delete(deleteRequest, RequestOptions.DEFAULT); System.out.println(response.getId()); }- 1
- 2
- 3
- 4
- 5
- 6
- 7
- 8
- 9
- 10
- 11
- 12
7.ElasticSearch高级操作
7.1 bulk批量操作-脚本
- 脚本:
测试用的5号文档
POST /person1/_doc/5 { "name":"张三5号", "age":18, "address":"北京海淀区" }- 1
- 2
- 3
- 4
- 5
- 6
- 批量操作文本
#批量操作 #1.删除5号 #新增8号 #更新2号 name为2号 POST _bulk {"delete":{"_index":"person1","_id":"5"}} {"create":{"_index":"person1","_id":"8"}} {"name":"八号","age":18,"address":"北京"} {"update":{"_index":"person1","_id":"2"}} {"doc":{"name":"2号"}}- 1
- 2
- 3
- 4
- 5
- 6
- 7
- 8
- 9
- 10
- 结果
{ "took" : 51, "errors" : true, "items" : [ { "delete" : { "_index" : "person1", "_type" : "_doc", "_id" : "5", "_version" : 2, "result" : "deleted", "_shards" : { "total" : 2, "successful" : 1, "failed" : 0 }, "_seq_no" : 6, "_primary_term" : 2, "status" : 200 } }, { "create" : { "_index" : "person1", "_type" : "_doc", "_id" : "8", "_version" : 1, "result" : "created", "_shards" : { "total" : 2, "successful" : 1, "failed" : 0 }, "_seq_no" : 7, "_primary_term" : 2, "status" : 201 } }, { "update" : { "_index" : "person1", "_type" : "_doc", "_id" : "2", "_version" : 2, "result" : "updated", "_shards" : { "total" : 2, "successful" : 1, "failed" : 0 }, "_seq_no" : 10, "_primary_term" : 2, "status" : 200 } } ] }- 1
- 2
- 3
- 4
- 5
- 6
- 7
- 8
- 9
- 10
- 11
- 12
- 13
- 14
- 15
- 16
- 17
- 18
- 19
- 20
- 21
- 22
- 23
- 24
- 25
- 26
- 27
- 28
- 29
- 30
- 31
- 32
- 33
- 34
- 35
- 36
- 37
- 38
- 39
- 40
- 41
- 42
- 43
- 44
- 45
- 46
- 47
- 48
- 49
- 50
- 51
- 52
- 53
- 54
- 55
- 56
- 57
- 58
7.2 bulk批量操作-JavaAPI
/** * Bulk 批量操作 */ @Test public void test2() throws IOException { //创建bulkrequest对象,整合所有操作 BulkRequest bulkRequest =new BulkRequest(); /* # 1. 删除5号记录 # 2. 添加6号记录 # 3. 修改3号记录 名称为 “三号” */ //添加对应操作 //1. 删除5号记录 DeleteRequest deleteRequest=new DeleteRequest("person1","5"); bulkRequest.add(deleteRequest); //2. 添加6号记录 Map<String, Object> map=new HashMap<>(); map.put("name","六号"); IndexRequest indexRequest=new IndexRequest("person1").id("6").source(map); bulkRequest.add(indexRequest); //3. 修改3号记录 名称为 “三号” Map<String, Object> mapUpdate=new HashMap<>(); mapUpdate.put("name","三号"); UpdateRequest updateRequest=new UpdateRequest("person1","3").doc(mapUpdate); bulkRequest.add(updateRequest); //执行批量操作 BulkResponse response = client.bulk(bulkRequest, RequestOptions.DEFAULT); System.out.println(response.status()); }- 1
- 2
- 3
- 4
- 5
- 6
- 7
- 8
- 9
- 10
- 11
- 12
- 13
- 14
- 15
- 16
- 17
- 18
- 19
- 20
- 21
- 22
- 23
- 24
- 25
- 26
- 27
- 28
- 29
- 30
- 31
- 32
- 33
- 34
- 35
- 36
- 37
7.3 导入数据-分析&创建索引
PUT goods { "mappings": { "properties": { "title": { "type": "text", "analyzer": "ik_smart" }, "price": { "type": "double" }, "createTime": { "type": "date" }, "categoryName": { "type": "keyword" }, "brandName": { "type": "keyword" }, "spec": { "type": "object" }, "saleNum": { "type": "integer" }, "stock": { "type": "integer" } } } }- 1
- 2
- 3
- 4
- 5
- 6
- 7
- 8
- 9
- 10
- 11
- 12
- 13
- 14
- 15
- 16
- 17
- 18
- 19
- 20
- 21
- 22
- 23
- 24
- 25
- 26
- 27
- 28
- 29
- 30
- 31
- 32
- 33
- 34
7.4 导入数据-代码实现
POST goods/_doc/1 { "title":"小米手机", "price":1000, "createTime":"2019-12-01", "categoryName":"手机", "brandName":"小米", "saleNum":3000, "stock":10000, "spec":{ "网络制式":"移动4G", "屏幕尺寸":"4.5" } }- 1
- 2
- 3
- 4
- 5
- 6
- 7
- 8
- 9
- 10
- 11
- 12
- 13
- 14
/** * 从Mysql 批量导入 elasticSearch */ @Test public void test3() throws IOException { //1.查询所有数据,mysql List<Goods> goodsList = goodsMapper.findAll(); //2.bulk导入 BulkRequest bulkRequest=new BulkRequest(); //2.1 循环goodsList,创建IndexRequest添加数据 for (Goods goods : goodsList) { //2.2 设置spec规格信息 Map的数据 specStr:{} String specStr = goods.getSpecStr(); //将json格式字符串转为Map集合 Map map = JSON.parseObject(specStr, Map.class); //设置spec map goods.setSpec(map); //将goods对象转换为json字符串 String data = JSON.toJSONString(goods); IndexRequest indexRequest=new IndexRequest("goods").source(data,XContentType.JSON); bulkRequest.add(indexRequest); } BulkResponse response = client.bulk(bulkRequest, RequestOptions.DEFAULT); System.out.println(response.status()); }- 1
- 2
- 3
- 4
- 5
- 6
- 7
- 8
- 9
- 10
- 11
- 12
- 13
- 14
- 15
- 16
- 17
- 18
- 19
- 20
- 21
- 22
- 23
- 24
- 25
- 26
- 27
- 28
- 29
- 30
- 31
- 32
- 33
- 34
- 35
- 36
7.5 导入数据-代码实现-详解(选放)
转换成JSON的原因:
#spec配置的数据类型是JSON对象,所以当存放字符串的时候报错 "spec": { "type": "object" },- 1
- 2
- 3
- 4
错误信息

8.ElasticSearch查询
8.1 matchAll-脚本
# 默认情况下,es一次展示10条数据,通过from和size来控制分页 # 查询结果详解 GET goods/_search { "query": { "match_all": {} }, "from": 0, "size": 100 } GET goods- 1
- 2
- 3
- 4
- 5
- 6
- 7
- 8
- 9
- 10
- 11
- 12
- 13
8.2 matchAll-JavaAPI
/** * 查询所有 * 1. matchAll * 2. 将查询结果封装为Goods对象,装载到List中 * 3. 分页。默认显示10条 */ @Test public void matchAll() throws IOException { //2. 构建查询请求对象,指定查询的索引名称 SearchRequest searchRequest=new SearchRequest("goods"); //4. 创建查询条件构建器SearchSourceBuilder SearchSourceBuilder sourceBuilder=new SearchSourceBuilder(); //6. 查询条件 QueryBuilder queryBuilder= QueryBuilders.matchAllQuery(); //5. 指定查询条件 sourceBuilder.query(queryBuilder); //3. 添加查询条件构建器 SearchSourceBuilder searchRequest.source(sourceBuilder); // 8 . 添加分页信息 不设置 默认10条 // sourceBuilder.from(0); // sourceBuilder.size(100); //1. 查询,获取查询结果 SearchResponse searchResponse = client.search(searchRequest, RequestOptions.DEFAULT); //7. 获取命中对象 SearchHits SearchHits hits = searchResponse.getHits(); //7.1 获取总记录数 Long total= hits.getTotalHits().value; System.out.println("总数:"+total); //7.2 获取Hits数据 数组 SearchHit[] hits1 = hits.getHits(); //获取json字符串格式的数据 List<Goods> goodsList = new ArrayList<>(); for (SearchHit searchHit : hits1) { String sourceAsString = searchHit.getSourceAsString(); //转为java对象 Goods goods = JSON.parseObject(sourceAsString, Goods.class); goodsList.add(goods); } for (Goods goods : goodsList) { System.out.println(goods); } }- 1
- 2
- 3
- 4
- 5
- 6
- 7
- 8
- 9
- 10
- 11
- 12
- 13
- 14
- 15
- 16
- 17
- 18
- 19
- 20
- 21
- 22
- 23
- 24
- 25
- 26
- 27
- 28
- 29
- 30
- 31
- 32
- 33
- 34
- 35
- 36
- 37
- 38
- 39
- 40
- 41
- 42
- 43
- 44
- 45
- 46
- 47
- 48
- 49
- 50
- 51
设置条件的疑问点
8.3 termQuery
term查询和字段类型有关系,首先回顾一下ElasticSearch两个数据类型
ElasticSearch两个数据类型
text:会分词,不支持聚合 keyword:不会分词,将全部内容作为一个词条,支持聚合- 1
- 2
- 3
term查询:不会对查询条件进行分词。
GET goods/_search { "query": { "term": { "title": { "value": "华为" } } } }- 1
- 2
- 3
- 4
- 5
- 6
- 7
- 8
- 9
- 10
term查询,查询text类型字段时,只有其中的单词相匹配都会查到,text字段会对数据进行分词
例如:查询title 为“华为”的,title type 为text


查询categoryName 字段时,categoryName字段为keyword ,keyword:不会分词,将全部内容作为一个词条,
即完全匹配,才能查询出结果

GET goods/_search { "query": { "term": { "categoryName": { "value": "华为手机" } } } }- 1
- 2
- 3
- 4
- 5
- 6
- 7
- 8
- 9
- 10

8.4 matchQuery
match查询:
-
会对查询条件进行分词。
-
然后将分词后的查询条件和词条进行等值匹配
-
默认取并集(OR)
# match查询 GET goods/_search { "query": { "match": { "title": "华为手机" } }, "size": 500 }- 1
- 2
- 3
- 4
- 5
- 6
- 7
- 8
- 9
- 10
match 的默认搜索(or 并集)
例如:华为手机,会分词为 “华为”,“手机” 只要出现其中一个词条都会搜索到
match的 and(交集) 搜索
例如:例如:华为手机,会分词为 “华为”,“手机” 但要求“华为”,和“手机”同时出现在词条中
总结:
- term query会去倒排索引中寻找确切的term,它并不知道分词器的存在。这种查询适合keyword 、numeric、date
- match query知道分词器的存在。并且理解是如何被分词的
8.5 模糊查询-脚本
8.5.1 wildcard查询
wildcard查询:会对查询条件进行分词。还可以使用通配符 ?(任意单个字符) 和 * (0个或多个字符)
"*华*" 包含华字的 "华*" 华字后边多个字符 "华?" 华字后边多个字符 "*华"或"?华" 会引发全表(全索引)扫描 注意效率问题- 1
- 2
- 3
- 4
# wildcard 查询。查询条件分词,模糊查询 GET goods/_search { "query": { "wildcard": { "title": { "value": "华*" } } } }- 1
- 2
- 3
- 4
- 5
- 6
- 7
- 8
- 9
- 10
- 11
8.5.2 正则查询
\W:匹配包括下划线的任何单词字符,等价于 [A-Z a-z 0-9_] 开头的反斜杠是转义符 +号多次出现 (.)*为任意字符 正则查询取决于正则表达式的效率- 1
- 2
- 3
- 4
- 5
- 6
GET goods/_search { "query": { "regexp": { "title": "\\w+(.)*" } } }- 1
- 2
- 3
- 4
- 5
- 6
- 7
- 8
- 9
8.5.3 前缀查询
对keyword类型支持比较好
# 前缀查询 对keyword类型支持比较好 GET goods/_search { "query": { "prefix": { "brandName": { "value": "三" } } } }- 1
- 2
- 3
- 4
- 5
- 6
- 7
- 8
- 9
- 10
- 11
8.6 模糊查询-JavaAPI
//模糊查询 WildcardQueryBuilder query = QueryBuilders.wildcardQuery("title", "华*");//华后多个字符 //正则查询 RegexpQueryBuilder query = QueryBuilders.regexpQuery("title", "\\w+(.)*"); //前缀查询 PrefixQueryBuilder query = QueryBuilders.prefixQuery("brandName", "三");- 1
- 2
- 3
- 4
- 5
- 6
8.7 范围&排序查询
# 范围查询 GET goods/_search { "query": { "range": { "price": { "gte": 2000, "lte": 3000 } } }, "sort": [ { "price": { "order": "desc" } } ] }- 1
- 2
- 3
- 4
- 5
- 6
- 7
- 8
- 9
- 10
- 11
- 12
- 13
- 14
- 15
- 16
- 17
- 18
- 19
- 20
//范围查询 以price 价格为条件 RangeQueryBuilder query = QueryBuilders.rangeQuery("price"); //指定下限 query.gte(2000); //指定上限 query.lte(3000); sourceBuilder.query(query); //排序 价格 降序排列 sourceBuilder.sort("price",SortOrder.DESC);- 1
- 2
- 3
- 4
- 5
- 6
- 7
- 8
- 9
- 10
- 11
- 12
8.8 queryString查询
queryString 多条件查询
-
会对查询条件进行分词。
-
然后将分词后的查询条件和词条进行等值匹配
-
默认取并集(OR)
-
可以指定多个查询字段
query_string:识别query中的连接符(or 、and)
# queryString GET goods/_search { "query": { "query_string": { "fields": ["title","categoryName","brandName"], "query": "华为 AND 手机" } } }- 1
- 2
- 3
- 4
- 5
- 6
- 7
- 8
- 9
- 10
- 11
simple_query_string:不识别query中的连接符(or 、and),查询时会将 “华为”、“and”、“手机”分别进行查询
GET goods/_search { "query": { "simple_query_string": { "fields": ["title","categoryName","brandName"], "query": "华为 AND 手机" } } }- 1
- 2
- 3
- 4
- 5
- 6
- 7
- 8
- 9
query_string:有default_operator连接符的脚本
GET goods/_search { "query": { "query_string": { "fields": ["title","brandName","categoryName"], "query": "华为手机 " , "default_operator": "AND" } } }- 1
- 2
- 3
- 4
- 5
- 6
- 7
- 8
- 9
- 10
- 11
java代码
QueryStringQueryBuilder query = QueryBuilders.queryStringQuery("华为手机").field("title").field("categoryName") .field("brandName").defaultOperator(Operator.AND);- 1
- 2
simple_query_string:有default_operator连接符的脚本
GET goods/_search { "query": { "simple_query_string": { "fields": ["title","brandName","categoryName"], "query": "华为手机 " , "default_operator": "OR" } } }- 1
- 2
- 3
- 4
- 5
- 6
- 7
- 8
- 9
- 10
注意:query中的or and 是查询时 匹配条件是否同时出现----or 出现一个即可,and 两个条件同时出现
default_operator的or and 是对结果进行 并集(or)、交集(and)
8.9 布尔查询-脚本
boolQuery:对多个查询条件连接。连接方式:
-
must(and):条件必须成立
-
must_not(not):条件必须不成立
-
should(or):条件可以成立
-
filter:条件必须成立,性能比must高。不会计算得分
**得分:**即条件匹配度,匹配度越高,得分越高
# boolquery #must和filter配合使用时,max_score(得分)是显示的 #must 默认数组形式 GET goods/_search { "query": { "bool": { "must": [ { "term": { "brandName": { "value": "华为" } } } ], "filter":[ { "term": { "title": "手机" } }, { "range":{ "price": { "gte": 2000, "lte": 3000 } } } ] } } } #filter 单独使用 filter可以是单个条件,也可多个条件(数组形式) GET goods/_search { "query": { "bool": { "filter": [ { "term": { "brandName": { "value": "华为" } } } ] } } }- 1
- 2
- 3
- 4
- 5
- 6
- 7
- 8
- 9
- 10
- 11
- 12
- 13
- 14
- 15
- 16
- 17
- 18
- 19
- 20
- 21
- 22
- 23
- 24
- 25
- 26
- 27
- 28
- 29
- 30
- 31
- 32
- 33
- 34
- 35
- 36
- 37
- 38
- 39
- 40
- 41
- 42
- 43
- 44
- 45
- 46
- 47
- 48
- 49
- 50
- 51
- 52
8.10 布尔查询-JavaAPI
布尔查询:boolQuery
- 查询品牌名称为:华为
- 查询标题包含:手机
- 查询价格在:2000-3000
must 、filter为连接方式
term、match为不同的查询方式
//1.构建boolQuery BoolQueryBuilder boolQuery = QueryBuilders.boolQuery(); //2.构建各个查询条件 //2.1 查询品牌名称为:华为 TermQueryBuilder termQueryBuilder = QueryBuilders.termQuery("brandName", "华为"); boolQuery.must(termQueryBuilder); //2.2. 查询标题包含:手机 MatchQueryBuilder matchQuery = QueryBuilders.matchQuery("title", "手机"); boolQuery.filter(matchQuery); //2.3 查询价格在:2000-3000 RangeQueryBuilder rangeQuery = QueryBuilders.rangeQuery("price"); rangeQuery.gte(2000); rangeQuery.lte(3000); boolQuery.filter(rangeQuery); sourceBuilder.query(boolQuery);- 1
- 2
- 3
- 4
- 5
- 6
- 7
- 8
- 9
- 10
- 11
- 12
- 13
- 14
- 15
- 16
- 17
8.11 聚合查询-脚本
-
指标聚合:相当于MySQL的聚合函数。max、min、avg、sum等
-
桶聚合:相当于MySQL的 group by 操作。不要对text类型的数据进行分组,会失败。
# 聚合查询 # 指标聚合 聚合函数 GET goods/_search { "query": { "match": { "title": "手机" } }, "aggs": { "max_price": { "max": { "field": "price" } } } } # 桶聚合 分组 GET goods/_search { "query": { "match": { "title": "手机" } }, "aggs": { "goods_brands": { "terms": { "field": "brandName", "size": 100 } } } }- 1
- 2
- 3
- 4
- 5
- 6
- 7
- 8
- 9
- 10
- 11
- 12
- 13
- 14
- 15
- 16
- 17
- 18
- 19
- 20
- 21
- 22
- 23
- 24
- 25
- 26
- 27
- 28
- 29
- 30
- 31
- 32
- 33
- 34
- 35
- 36
- 37
- 38
8.12 聚合查询-JavaAPI
聚合查询:桶聚合,分组查询
- 查询title包含手机的数据
- 查询品牌列表
/** * 聚合查询:桶聚合,分组查询 * 1. 查询title包含手机的数据 * 2. 查询品牌列表 */ @Test public void testAggQuery() throws IOException { SearchRequest searchRequest=new SearchRequest("goods"); SearchSourceBuilder sourceBuilder=new SearchSourceBuilder(); //1. 查询title包含手机的数据 MatchQueryBuilder queryBuilder = QueryBuilders.matchQuery("title", "手机"); sourceBuilder.query(queryBuilder); //2. 查询品牌列表 只展示前100条 AggregationBuilder aggregation=AggregationBuilders.terms("goods_brands").field("brandName").size(100); sourceBuilder.aggregation(aggregation); searchRequest.source(sourceBuilder); SearchResponse searchResponse = client.search(searchRequest, RequestOptions.DEFAULT); //7. 获取命中对象 SearchHits SearchHits hits = searchResponse.getHits(); //7.1 获取总记录数 Long total= hits.getTotalHits().value; System.out.println("总数:"+total); // aggregations 对象 Aggregations aggregations = searchResponse.getAggregations(); //将aggregations 转化为map Map<String, Aggregation> aggregationMap = aggregations.asMap(); //通过key获取goods_brands 对象 使用Aggregation的子类接收 buckets属性在Terms接口中体现 // Aggregation goods_brands1 = aggregationMap.get("goods_brands"); Terms goods_brands =(Terms) aggregationMap.get("goods_brands"); //获取buckets 数组集合 List<? extends Terms.Bucket> buckets = goods_brands.getBuckets(); Map<String,Object>map=new HashMap<>(); //遍历buckets key 属性名,doc_count 统计聚合数 for (Terms.Bucket bucket : buckets) { System.out.println(bucket.getKey()); map.put(bucket.getKeyAsString(),bucket.getDocCount()); } System.out.println(map); }- 1
- 2
- 3
- 4
- 5
- 6
- 7
- 8
- 9
- 10
- 11
- 12
- 13
- 14
- 15
- 16
- 17
- 18
- 19
- 20
- 21
- 22
- 23
- 24
- 25
- 26
- 27
- 28
- 29
- 30
- 31
- 32
- 33
- 34
- 35
- 36
- 37
- 38
- 39
- 40
- 41
- 42
- 43
- 44
- 45
- 46
- 47
- 48
- 49
- 50
- 51
- 52
- 53
- 54
- 55
- 56
- 57
8.13 高亮查询-脚本
高亮三要素:
-
高亮字段
-
前缀
-
后缀
默认前后缀 :em
<em>手机em>- 1
GET goods/_search { "query": { "match": { "title": "电视" } }, "highlight": { "fields": { "title": { "pre_tags": "", "post_tags": "" } } } }- 1
- 2
- 3
- 4
- 5
- 6
- 7
- 8
- 9
- 10
- 11
- 12
- 13
- 14
- 15
- 16
8.14 高亮查询-JavaAPI
实施步骤:
高亮查询:
1. 设置高亮
高亮字段
前缀
后缀
2. 将高亮了的字段数据,替换原有数据/** * * 高亮查询: * 1. 设置高亮 * * 高亮字段 * * 前缀 * * 后缀 * 2. 将高亮了的字段数据,替换原有数据 */ @Test public void testHighLightQuery() throws IOException { SearchRequest searchRequest = new SearchRequest("goods"); SearchSourceBuilder sourceBulider = new SearchSourceBuilder(); // 1. 查询title包含手机的数据 MatchQueryBuilder query = QueryBuilders.matchQuery("title", "手机"); sourceBulider.query(query); //设置高亮 HighlightBuilder highlighter = new HighlightBuilder(); //设置三要素 highlighter.field("title"); //设置前后缀标签 highlighter.preTags(""); highlighter.postTags(""); //加载已经设置好的高亮配置 sourceBulider.highlighter(highlighter); searchRequest.source(sourceBulider); SearchResponse searchResponse = client.search(searchRequest, RequestOptions.DEFAULT); SearchHits searchHits = searchResponse.getHits(); //获取记录数 long value = searchHits.getTotalHits().value; System.out.println("总记录数:"+value); List<Goods> goodsList = new ArrayList<>(); SearchHit[] hits = searchHits.getHits(); for (SearchHit hit : hits) { String sourceAsString = hit.getSourceAsString(); //转为java Goods goods = JSON.parseObject(sourceAsString, Goods.class); // 获取高亮结果,替换goods中的title Map<String, HighlightField> highlightFields = hit.getHighlightFields(); HighlightField HighlightField = highlightFields.get("title"); Text[] fragments = HighlightField.fragments(); //highlight title替换 替换goods中的title goods.setTitle(fragments[0].toString()); goodsList.add(goods); } for (Goods goods : goodsList) { System.out.println(goods); } }- 1
- 2
- 3
- 4
- 5
- 6
- 7
- 8
- 9
- 10
- 11
- 12
- 13
- 14
- 15
- 16
- 17
- 18
- 19
- 20
- 21
- 22
- 23
- 24
- 25
- 26
- 27
- 28
- 29
- 30
- 31
- 32
- 33
- 34
- 35
- 36
- 37
- 38
- 39
- 40
- 41
- 42
- 43
- 44
- 45
- 46
- 47
- 48
- 49
- 50
- 51
- 52
- 53
- 54
- 55
- 56
- 57
- 58
- 59
- 60
- 61
- 62
- 63
- 64
- 65
- 66
8.15 重建索引&索引别名
#查询别名 默认别名无法查看,默认别名同索引名 GET goods/_alias/ #结果 { "goods" : { "aliases" : { } } }- 1
- 2
- 3
- 4
- 5
- 6
- 7
- 8
- 9
1.新建student_index_v1索引
# -------重建索引----------- # 新建student_index_v1。索引名称必须全部小写 PUT student_index_v1 { "mappings": { "properties": { "birthday":{ "type": "date" } } } } #查看 student_index_v1 结构 GET student_index_v1 #添加数据 PUT student_index_v1/_doc/1 { "birthday":"1999-11-11" } #查看数据 GET student_index_v1/_search #添加数据 PUT student_index_v1/_doc/1 { "birthday":"1999年11月11日" }- 1
- 2
- 3
- 4
- 5
- 6
- 7
- 8
- 9
- 10
- 11
- 12
- 13
- 14
- 15
- 16
- 17
- 18
- 19
- 20
- 21
- 22
- 23
- 24
- 25
- 26
- 27
- 28
- 29
2.重建索引:将student_index_v1 数据拷贝到 student_index_v2
# 业务变更了,需要改变birthday字段的类型为text # 1. 创建新的索引 student_index_v2 # 2. 将student_index_v1 数据拷贝到 student_index_v2 # 创建新的索引 student_index_v2 PUT student_index_v2 { "mappings": { "properties": { "birthday":{ "type": "text" } } } } # 将student_index_v1 数据拷贝到 student_index_v2 # _reindex 拷贝数据 POST _reindex { "source": { "index": "student_index_v1" }, "dest": { "index": "student_index_v2" } } GET student_index_v2/_search PUT student_index_v2/_doc/2 { "birthday":"1999年11月11日" }- 1
- 2
- 3
- 4
- 5
- 6
- 7
- 8
- 9
- 10
- 11
- 12
- 13
- 14
- 15
- 16
- 17
- 18
- 19
- 20
- 21
- 22
- 23
- 24
- 25
- 26
- 27
- 28
- 29
- 30
- 31
- 32
- 33
- 34
- 35
- 36
- 37
3.创建索引库别名:
注意:DELETE student_index_v1 这一操作将删除student_index_v1索引库,并不是删除别名
# 思考: 现在java代码中操作es,还是使用的是student_index_v1老的索引名称。 # 1. 改代码(不推荐) # 2. 索引别名(推荐) # 步骤: # 0. 先删除student_index_v1 # 1. 给student_index_v2起个别名 student_index_v1 # 先删除student_index_v1 #DELETE student_index_v1 这一操作将删除student_index_v1索引库 #索引库默认的别名与索引库同名,无法删除 # 给student_index_v1起个别名 student_index_v11 POST student_index_v2/_alias/student_index_v11 #测试删除命令 POST /_aliases { "actions": [ {"remove": {"index": "student_index_v1", "alias": "student_index_v11"}} ] } # 给student_index_v2起个别名 student_index_v1 POST student_index_v2/_alias/student_index_v1 #查询别名 GET goods/_alias/ GET student_index_v1/_search GET student_index_v2/_search- 1
- 2
- 3
- 4
- 5
- 6
- 7
- 8
- 9
- 10
- 11
- 12
- 13
- 14
- 15
- 16
- 17
- 18
- 19
- 20
- 21
- 22
- 23
- 24
- 25
- 26
- 27
- 28
- 29
- 30
- 31
- 32
- 33
- 34
9.ElasticSearch 集群
9.1 集群介绍
- 集群和分布式:
集群:多个人做一样的事。
分布式:多个人做不一样的事
- 集群解决的问题:
让系统高可用
分担请求压力
- 分布式解决的问题:
分担存储和计算的压力,提速
解耦
- 集群和分布式架构往往是并存的
9.2 ES集群相关概念
es 集群:
-
ElasticSearch 天然支持分布式
-
ElasticSearch 的设计隐藏了分布式本身的复杂性
ES集群相关概念:
-
集群(cluster):一组拥有共同的 cluster name 的 节点。
-
节点(node) :集群中的一个 Elasticearch 实例
-
索引(index) :es存储数据的地方。相当于关系数据库中的database概念
-
分片(shard):索引可以被拆分为不同的部分进行存储,称为分片。在集群环境下,一个索引的不同分片可以拆分到不同的节点中
-
主分片(Primary shard):相对于副本分片的定义。
-
副本分片(Replica shard)每个主分片可以有一个或者多个副本,数据和主分片一样。
9.3 集群搭建
Elasticsearch如果做集群的话Master节点至少三台服务器或者三个Master实例加入相同集群,三个Master节点最多只能故障一台Master节点,如果故障两个Master节点,Elasticsearch将无法组成集群.会报错,Kibana也无法启动,因为Kibana无法获取集群中的节点信息。
由于,我们使用只有一台虚拟机,所以我们在虚拟机中安装三个ES实例,搭建伪集群,而ES启动比较耗内存,所以先设置虚拟机的内存3G和CPU个数4个

9.3.1 整体步骤
步骤如下:
-
拷贝opt目录下的elasticsearch-7.4.0安装包3个,分别命名:
elasticsearch-7.4.0-zk1
elasticsearch-7.4.0-zk2
elasticsearch-7.4.0-zk3
-
然后修改elasticsearch.yml文件件。
-
然后启动启动zk1、zk2、zk3三个节点。
-
打开浏览器输⼊:http://192.168.149.135:9200/_cat/health?v ,如果返回的node.total是3,代表集 群搭建成功
在此,需要我们特别注意的是,像本文这样单服务器多节点( 3 个节点)的情况,仅供测试使用,集群环境如下:
cluster name node name IP Addr http端口 / 通信端口 zk-es zk1 192.168.149.135 9201 / 9700 zk-es zk2 192.168.149.135 9202 / 9800 zk-es zk3 192.168.149.135 9203 / 9900 9.3.2 拷贝副本
拷贝opt目录下的elasticsearch-7.4.0安装包3个,打开虚拟机到opt目录
执行 拷贝三份
cd /opt cp -r elasticsearch-7.4.0 elasticsearch-7.4.0-zk1 cp -r elasticsearch-7.4.0 elasticsearch-7.4.0-zk2 cp -r elasticsearch-7.4.0 elasticsearch-7.4.0-zk3- 1
- 2
- 3
- 4
9.3. 3 修改elasticsearch.yml配置文件
1)、创建日志目录
cd /opt mkdir logs mkdir data # 授权给wzk用户 chown -R wzk:wzk ./logs chown -R wzk:wzk ./data chown -R wzk:wzk ./elasticsearch-7.4.0-zk1 chown -R wzk:wzk ./elasticsearch-7.4.0-zk2 chown -R wzk:wzk ./elasticsearch-7.4.0-zk3- 1
- 2
- 3
- 4
- 5
- 6
- 7
- 8
- 9
- 10
打开elasticsearch.yml配置,分别配置下面三个节点的配置文件
vim /opt/elasticsearch-7.4.0-zk1/config/elasticsearch.yml vim /opt/elasticsearch-7.4.0-zk2/config/elasticsearch.yml vim /opt/elasticsearch-7.4.0-zk3/config/elasticsearch.yml- 1
- 2
- 3
2)、下面是elasticsearch-7.4.0-zk1配置文件
cluster.name: zk-es node.name: zk-1 node.master: true node.data: true node.max_local_storage_nodes: 3 network.host: 0.0.0.0 http.port: 9201 transport.tcp.port: 9700 discovery.seed_hosts: ["localhost:9700","localhost:9800","localhost:9900"] cluster.initial_master_nodes: ["zk-1", "zk-2","zk-3"] path.data: /opt/data path.logs: /opt/logs- 1
- 2
- 3
- 4
- 5
- 6
- 7
- 8
- 9
- 10
- 11
- 12
#集群名称 cluster.name: zk-es #节点名称 node.name: zk-1 #是不是有资格主节点 node.master: true #是否存储数据 node.data: true #最大集群节点数 node.max_local_storage_nodes: 3 #ip地址 network.host: 0.0.0.0 #端口 http.port: 9201 #内部节点之间沟通端口 transport.tcp.port: 9700 #es7.x 之后新增的配置,节点发现 discovery.seed_hosts: ["localhost:9700","localhost:9800","localhost:9900"] #es7.x 之后新增的配置,初始化一个新的集群时需要此配置来选举master cluster.initial_master_nodes: ["zk-1", "zk-2","zk-3"] #数据和存储路径 path.data: /opt/data path.logs: /opt/logs- 1
- 2
- 3
- 4
- 5
- 6
- 7
- 8
- 9
- 10
- 11
- 12
- 13
- 14
- 15
- 16
- 17
- 18
- 19
- 20
- 21
- 22
- 23
3)、下面是elasticsearch-7.4.0-zk2配置文件
cluster.name: zk-es node.name: zk-2 node.master: true node.data: true node.max_local_storage_nodes: 3 network.host: 0.0.0.0 http.port: 9202 transport.tcp.port: 9800 discovery.seed_hosts: ["localhost:9700","localhost:9800","localhost:9900"] cluster.initial_master_nodes: ["zk-1", "zk-2","zk-3"] path.data: /opt/data path.logs: /opt/logs- 1
- 2
- 3
- 4
- 5
- 6
- 7
- 8
- 9
- 10
- 11
- 12
- 13
#集群名称 cluster.name: zk-es #节点名称 node.name: zk-2 #是不是有资格主节点 node.master: true #是否存储数据 node.data: true #最大集群节点数 node.max_local_storage_nodes: 3 #ip地址 network.host: 0.0.0.0 #端口 http.port: 9202 #内部节点之间沟通端口 transport.tcp.port: 9800 #es7.x 之后新增的配置,节点发现 discovery.seed_hosts: ["localhost:9700","localhost:9800","localhost:9900"] #es7.x 之后新增的配置,初始化一个新的集群时需要此配置来选举master cluster.initial_master_nodes: ["zk-1", "zk-2","zk-3"] #数据和存储路径 path.data: /opt/data path.logs: /opt/logs- 1
- 2
- 3
- 4
- 5
- 6
- 7
- 8
- 9
- 10
- 11
- 12
- 13
- 14
- 15
- 16
- 17
- 18
- 19
- 20
- 21
- 22
- 23
4)、下面是elasticsearch-7.4.0-zk3 配置文件
cluster.name: zk-es node.name: zk-3 node.master: true node.data: true node.max_local_storage_nodes: 3 network.host: 0.0.0.0 http.port: 9203 transport.tcp.port: 9900 discovery.seed_hosts: ["localhost:9700","localhost:9800","localhost:9900"] cluster.initial_master_nodes: ["zk-1", "zk-2","zk-3"] path.data: /opt/data path.logs: /opt/logs- 1
- 2
- 3
- 4
- 5
- 6
- 7
- 8
- 9
- 10
- 11
- 12
- 13
#集群名称 cluster.name: zk-es #节点名称 node.name: zk-3 #是不是有资格主节点 node.master: true #是否存储数据 node.data: true #最大集群节点数 node.max_local_storage_nodes: 3 #ip地址 network.host: 0.0.0.0 #端口 http.port: 9203 #内部节点之间沟通端口 transport.tcp.port: 9900 #es7.x 之后新增的配置,节点发现 discovery.seed_hosts: ["localhost:9700","localhost:9800","localhost:9900"] #es7.x 之后新增的配置,初始化一个新的集群时需要此配置来选举master cluster.initial_master_nodes: ["zk-1", "zk-2","zk-3"] #数据和存储路径 path.data: /opt/data path.logs: /opt/logs- 1
- 2
- 3
- 4
- 5
- 6
- 7
- 8
- 9
- 10
- 11
- 12
- 13
- 14
- 15
- 16
- 17
- 18
- 19
- 20
- 21
- 22
- 23
9.3.4 执行授权
在root用户下执行 chown -R wzk:wzk /opt/elasticsearch-7.4.0-zk1 chown -R wzk:wzk /opt/elasticsearch-7.4.0-zk2 chown -R wzk:wzk /opt/elasticsearch-7.4.0-zk3 如果有的日志文件授权失败,可使用(也是在root下执行) cd /opt/elasticsearch-7.4.0-zk1/logs chown -R wzk:wzk ./* cd /opt/elasticsearch-7.4.0-zk2/logs chown -R wzk:wzk ./* cd /opt/elasticsearch-7.4.0-zk3/logs chown -R wzk:wzk ./*- 1
- 2
- 3
- 4
- 5
- 6
- 7
- 8
- 9
- 10
- 11
9.3.5 启动三个节点
启动之前,设置ES的JVM占用内存参数,防止内存不足错误

vim /opt/elasticsearch-7.4.0-zk1/bin/elasticsearch- 1

可以发现,ES启动时加载/config/jvm.options文件
vim /opt/elasticsearch-7.4.0-zk1/config/jvm.options- 1

默认情况下,ES启动JVM最小内存1G,最大内存1G
-xms:最小内存 -xmx:最大内存- 1
- 2
修改为256m

启动成功访问节点一:

可以从日志中看到:master not discovered yet。还没有发现主节点
访问集群状态信息 http://192.168.149.135:9201/_cat/health?v 不成功
[外链图片转存失败,源站可能有防盗链机制,建议将图片保存下来直接上传(img-cSe7k3fo-1660781506124)(ES图片/1575628567827.png)]
启动成功访问节点二:

可以从日志中看到:master not discovered yet。还没有发现主节点master node changed.已经选举出主节点zk-2
访问集群状态信息 http://192.168.149.135:9201/_cat/health?v 成功

健康状况结果解释: cluster 集群名称 status 集群状态 green代表健康; yellow代表分配了所有主分片,但至少缺少一个副本,此时集群数据仍旧完整; red 代表部分主分片不可用,可能已经丢失数据。 node.total代表在线的节点总数量 node.data代表在线的数据节点的数量 shards 存活的分片数量 pri 存活的主分片数量 正常情况下 shards的数量是pri的两倍。 relo迁移中的分片数量,正常情况为 0 init 初始化中的分片数量 正常情况为 0 unassign未分配的分片 正常情况为 0 pending_tasks准备中的任务,任务指迁移分片等 正常情况为 0 max_task_wait_time任务最长等待时间 active_shards_percent正常分片百分比 正常情况为 100%- 1
- 2
- 3
- 4
- 5
- 6
- 7
- 8
- 9
- 10
- 11
- 12
- 13
- 14
- 15
- 16
- 17
启动成功访问节点三
访问集群状态信息 http://192.168.149.135:9201/_cat/health?v 成功

可以看到节点已经变为3个,至此,ES集群已经搭建成功~
9.4 使用Kibana配置和管理集群
9.4.1 集群配置
因为之前我们在单机演示的时候也使用到了Kibana,我们先复制出来一个Kibana,然后修改它的集群配置
cd /opt/ cp -r kibana-7.4.0-linux-x86_64 kibana-7.4.0-linux-x86_64-cluster # 由于 kibana 中文件众多,此处会等待大约1分钟的时间- 1
- 2
- 3
修改Kibana的集群配置
vim kibana-7.4.0-linux-x86_64-cluster/config/kibana.yml 加入下面的配置 elasticsearch.hosts: ["http://localhost:9201","http://localhost:9202","http://localhost:9203"]- 1
- 2
- 3
启动Kibana
sh kibana --allow-root- 1

9.4.2 管理集群
1、打开Kibana,点开 Stack Monitoring 集群监控


2、点击【Nodes】查看节点详细信息
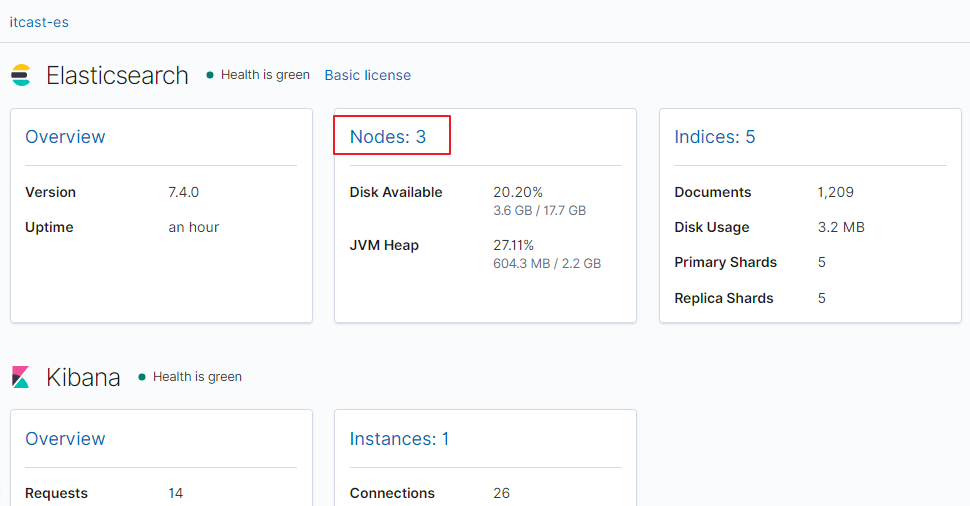

在上图可以看到,第一个红框处显示【Green】,绿色,表示集群处理健康状态
第二个红框是我们集群的三个节点,注意,zk-3旁边是星星,表示是主节点
9.5 kibina管理集群
vim kibana-7.4.0-linux-x86_64-cluster/config/kibana.yml- 1
kibana.yml
#支持中文 i18n.locale: "zh-CN" #5602避免与之前的冲突 server.port: 5602 server.host: "0.0.0.0" server.name: "kibana-zk-cluster" elasticsearch.hosts: ["http://localhost:9201","http://localhost:9202","http://localhost:9203"] elasticsearch.requestTimeout: 99999- 1
- 2
- 3
- 4
- 5
- 6
- 7
- 8
- 9
9.6 JavaAPI 访问集群
PUT cluster_test { "mappings": { "properties": { "name":{ "type": "text" } } } } GET cluster_test GET cluster_test/_search POST /cluster_test/_doc/1 { "name":"张三" }- 1
- 2
- 3
- 4
- 5
- 6
- 7
- 8
- 9
- 10
- 11
- 12
- 13
- 14
- 15
- 16
- 17
- 18
测试类
@Resource(name="clusterClient") RestHighLevelClient clusterClient; /** * 测试集群 * @throws IOException */ @Test public void testCluster() throws IOException { //设置查询的索引、文档 GetRequest indexRequest=new GetRequest("cluster_test","1"); GetResponse response = clusterClient.get(indexRequest, RequestOptions.DEFAULT); System.out.println(response.getSourceAsString()); }- 1
- 2
- 3
- 4
- 5
- 6
- 7
- 8
- 9
- 10
- 11
- 12
- 13
- 14
- 15
- 16
- 17
- 18
- 19
ElasticSearchConfig
private String host1; private int port1; private String host2; private int port2; private String host3; private int port3; //get/set ... @Bean("clusterClient") public RestHighLevelClient clusterClient(){ return new RestHighLevelClient(RestClient.builder( new HttpHost(host1,port1,"http"), new HttpHost(host2,port2,"http"), new HttpHost(host3,port3,"http") )); }- 1
- 2
- 3
- 4
- 5
- 6
- 7
- 8
- 9
- 10
- 11
- 12
- 13
- 14
- 15
- 16
- 17
- 18
- 19
- 20
- 21
- 22
application.yml
elasticsearch: host: 192.168.140.130 port: 9200 host1: 192.168.140.130 port1: 9201 host2: 192.168.140.130 port2: 9202 host3: 192.168.140.130 port3: 9203- 1
- 2
- 3
- 4
- 5
- 6
- 7
- 8
- 9
9.7 分片配置
-
在创建索引时,如果不指定分片配置,则默认主分片1,副本分片1。
-
在创建索引时,可以通过settings设置分片


分片配置
#分片配置 #"number_of_shards": 3, 主分片数量 #"number_of_replicas": 1 主分片备份数量,每一个主分片有一个备份 # 3个主分片+3个副分片=6个分片 PUT cluster_test1 { "settings": { "number_of_shards": 3, "number_of_replicas": 1 }, "mappings": { "properties": { "name":{ "type": "text" } } } }- 1
- 2
- 3
- 4
- 5
- 6
- 7
- 8
- 9
- 10
- 11
- 12
- 13
- 14
- 15
- 16
- 17
- 18
1.三个节点正常运行(0、1、2分片标号)

2.zk-3 挂掉

3.将挂掉节点的分片,自平衡到其他节点

4.zk-3 恢复正常后,节点分片将自平衡回去(并不一定是原来的分片)

分片与自平衡
- 当节点挂掉后,挂掉的节点分片会自平衡到其他节点中
注意:分片数量一旦确定好,不能修改。
索引分片推荐配置方案:
1.每个分片推荐大小10-30GB
2.分片数量推荐 = 节点数量 * 1~3倍
思考:比如有1000GB数据,应该有多少个分片?多少个节点
1.每个分片20GB 则可以分为40个分片
2.分片数量推荐 = 节点数量 * 1~3倍 --> 40/2=20 即20个节点
9.8 路由原理
路由原理
-
文档存入对应的分片,ES计算分片编号的过程,称为路由。
-
Elasticsearch 是怎么知道一个文档应该存放到哪个分片中呢?
-
查询时,根据文档id查询文档, Elasticsearch 又该去哪个分片中查询数据呢?
-
路由算法 :shard_index = hash(id) % number_of_primary_shards

查询id为5的文档:假如hash(5)=17 ,根据算法17%3=2
9.9 脑裂
ElasticSearch 集群正常状态:
-
一个正常es集群中只有一个主节点(Master),主节点负责管理整个集群。如创建或删除索引,跟踪哪些节点是群集的一部分,并决定哪些分片分配给相关的节点。
-
集群的所有节点都会选择同一个节点作为主节点。
脑裂现象:
- 脑裂问题的出现就是因为从节点在选择主节点上出现分歧导致一个集群出现多个主节点从而使集群分裂,使得集群处于异常状态。

脑裂产生的原因:
1.网络原因:网络延迟
-
一般es集群会在内网部署,也可能在外网部署,比如阿里云。
-
内网一般不会出现此问题,外网的网络出现问题的可能性大些。
2.节点负载
- 主节点的角色既为master又为data。数据访问量较大时,可能会导致Master节点停止响应(假死状态)。

3.JVM内存回收
- 当Master节点设置的JVM内存较小时,引发JVM的大规模内存回收,造成ES进程失去响应。
避免脑裂:
1.网络原因:discovery.zen.ping.timeout 超时时间配置大一点。默认是3S
2.节点负载:角色分离策略
-
候选主节点配置为
- node.master: true
- node.data: false
-
数据节点配置为
- node.master: false
- node.data: true
3.JVM内存回收:修改 config/jvm.options 文件的 -Xms 和 -Xmx 为服务器的内存一半。
9.10 ElasticSearch 集群-集群扩容
GetResponse response = clusterClient.get(indexRequest, RequestOptions.DEFAULT); System.out.println(response.getSourceAsString()); }- 1
- 2
- 3
- 4
ElasticSearchConfig ```java private String host1; private int port1; private String host2; private int port2; private String host3; private int port3; //get/set ... @Bean("clusterClient") public RestHighLevelClient clusterClient(){ return new RestHighLevelClient(RestClient.builder( new HttpHost(host1,port1,"http"), new HttpHost(host2,port2,"http"), new HttpHost(host3,port3,"http") )); }- 1
- 2
- 3
- 4
- 5
- 6
- 7
- 8
- 9
- 10
- 11
- 12
- 13
- 14
- 15
- 16
- 17
- 18
- 19
- 20
- 21
- 22
- 23
- 24
- 25
- 26
- 27
- 28
application.yml
elasticsearch: host: 192.168.140.130 port: 9200 host1: 192.168.140.130 port1: 9201 host2: 192.168.140.130 port2: 9202 host3: 192.168.140.130 port3: 9203- 1
- 2
- 3
- 4
- 5
- 6
- 7
- 8
- 9
9.7 分片配置
-
在创建索引时,如果不指定分片配置,则默认主分片1,副本分片1。
-
在创建索引时,可以通过settings设置分片
分片配置
#分片配置 #"number_of_shards": 3, 主分片数量 #"number_of_replicas": 1 主分片备份数量,每一个主分片有一个备份 # 3个主分片+3个副分片=6个分片 PUT cluster_test1 { "settings": { "number_of_shards": 3, "number_of_replicas": 1 }, "mappings": { "properties": { "name":{ "type": "text" } } } }- 1
- 2
- 3
- 4
- 5
- 6
- 7
- 8
- 9
- 10
- 11
- 12
- 13
- 14
- 15
- 16
- 17
- 18
1.三个节点正常运行(0、1、2分片标号)
2.zk-3 挂掉
3.将挂掉节点的分片,自平衡到其他节点
4.zk-3 恢复正常后,节点分片将自平衡回去(并不一定是原来的分片)
分片与自平衡
- 当节点挂掉后,挂掉的节点分片会自平衡到其他节点中
注意:分片数量一旦确定好,不能修改。
索引分片推荐配置方案:
1.每个分片推荐大小10-30GB
2.分片数量推荐 = 节点数量 * 1~3倍
思考:比如有1000GB数据,应该有多少个分片?多少个节点
1.每个分片20GB 则可以分为40个分片
2.分片数量推荐 = 节点数量 * 1~3倍 --> 40/2=20 即20个节点
9.8 路由原理
路由原理
-
文档存入对应的分片,ES计算分片编号的过程,称为路由。
-
Elasticsearch 是怎么知道一个文档应该存放到哪个分片中呢?
-
查询时,根据文档id查询文档, Elasticsearch 又该去哪个分片中查询数据呢?
-
路由算法 :shard_index = hash(id) % number_of_primary_shards
查询id为5的文档:假如hash(5)=17 ,根据算法17%3=2
9.9 脑裂
ElasticSearch 集群正常状态:
-
一个正常es集群中只有一个主节点(Master),主节点负责管理整个集群。如创建或删除索引,跟踪哪些节点是群集的一部分,并决定哪些分片分配给相关的节点。
-
集群的所有节点都会选择同一个节点作为主节点。
脑裂现象:
- 脑裂问题的出现就是因为从节点在选择主节点上出现分歧导致一个集群出现多个主节点从而使集群分裂,使得集群处于异常状态。
脑裂产生的原因:
1.网络原因:网络延迟
-
一般es集群会在内网部署,也可能在外网部署,比如阿里云。
-
内网一般不会出现此问题,外网的网络出现问题的可能性大些。
2.节点负载
- 主节点的角色既为master又为data。数据访问量较大时,可能会导致Master节点停止响应(假死状态)。
3.JVM内存回收
- 当Master节点设置的JVM内存较小时,引发JVM的大规模内存回收,造成ES进程失去响应。
避免脑裂:
1.网络原因:discovery.zen.ping.timeout 超时时间配置大一点。默认是3S
2.节点负载:角色分离策略
-
候选主节点配置为
- node.master: true
- node.data: false
-
数据节点配置为
- node.master: false
- node.data: true
3.JVM内存回收:修改 config/jvm.options 文件的 -Xms 和 -Xmx 为服务器的内存一半。
9.10 ElasticSearch 集群-集群扩容
按照集群搭建步骤再复制Es节点进行配置,参见9.3集群搭建
- content
-
相关阅读:
oracle 透明网关 MSSQL(oracle database gateway)
C++入门——域作用符,命名空间的讲解
数商云SRM系统询比价有何优势?供应商平台助力汽车零部件企业快速查找供应商
Editing Conditional Radiance Fields
面试心经
简述二进制码、十进制码、BCD码、十六进制码转换的算法
在vue3中通过vue-i18n实现国际化多语言切换
整理了197个经典SOTA模型,涵盖图像分类、目标检测、推荐系统等13个方向
mrctf2020_shellcode_revenge
commonJs和es6的区别
- 原文地址:https://blog.csdn.net/m0_53743471/article/details/126397978
