-
Python编程从入门到实践(第2版)个人学习笔记
这是本人学习Python编程从入门到实践(第2版)个人学习笔记,书本如下

目录
一、变量和简单数据类型
1.1字符串和数
1.1.1字符串部分方法的使用

注意:同元组一样,字符串是一个:无法修改的数据容器。
①方法title()以首字母大写的方式显示每个单词;方法upper()和方法lower()将字符改为全部大写或全部小写。
- name = "ada loveace"
- print(name.title())
- print(name.upper())
- print(name.lower())
运行结果为
- Ada Loveace
- ADA LOVEACE
- ada loveace
②取特定字符的索引
- name = "ada loveace"
- print(name.index("l"))
运行结果:
4③通过下标索引取值
- name = "ada loveace"
- print(name[2])
运行结果:
a④字符串的分割
- name = "ada loveace hello world"
- temp = name.split(" ")
- print(temp)
运行结果:
['ada', 'loveace', 'hello', 'world']1.1.2 f 字符串的用法
在字符串中使用变量
- first_name = "ada"
- last_name = "lovelace"
- fullname = f"{first_name} {last_name}"
- print(fullname)
运行结果为
ada lovelacef字符串的其他用法
- first_name = "ada"
- last_name = "lovelace"
- fullname = f"{first_name} {last_name}"
- print(f"Hello,{fullname.title()}!")
运行结果
Hello,Ada Lovelace!1.1.3删除空白
rstrip()方法删除字符串末尾多余的空白;lstrip()方法删除字符串开头多余的空白;strip()方法删除字符串开头和末尾多余的空白(或指定值 );
- favorite_language = ' Python '
- print(favorite_language.strip())
运行结果
Python1.1.4数中的下划线
- favorite_num = 100_450_100
- print(favorite_num)
运行结果
1004501001.1.5同时给多个变量赋值
- x, y, z = 1, 2, 0
- print(f"{x} + {y}")
运行结果
1 + 2二、列表简介
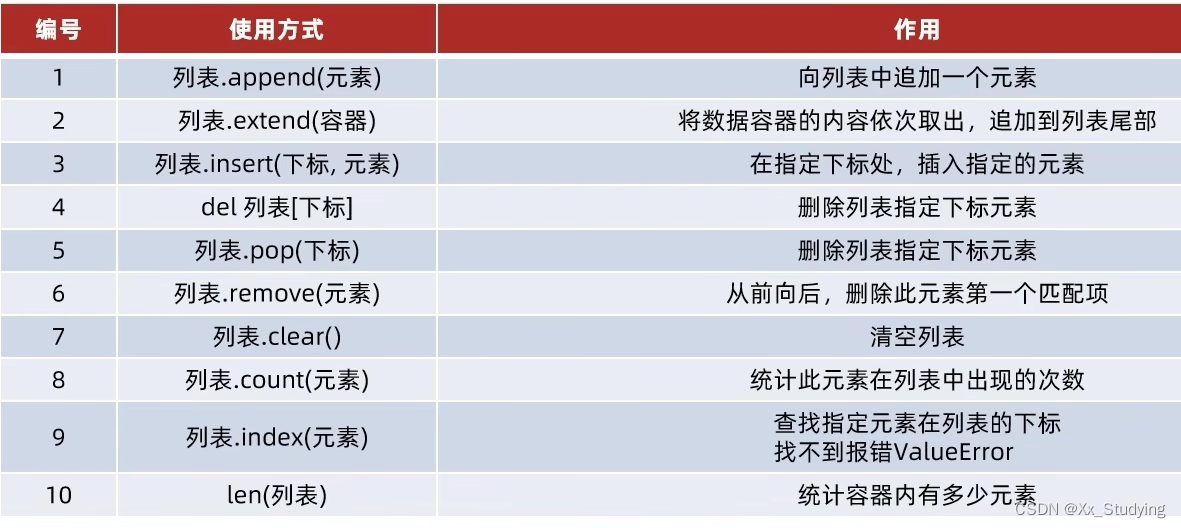
2.1列表(list)
2.1.1概念引入
在Python中,用方括号[]表示为列表,并用逗号分隔其中的元素。
- bicycles = ['trek', 'cannondable', 'redline', 'specialized']
- print(bicycles)
运行结果
['trek', 'cannondable', 'redline', 'specialized']2.1.2访问列表元素
可采用索引的方式进行访问,索引是从0开始的,返回元素不包含方括号
- bicycles = ['trek', 'cannondable', 'redline', 'specialized']
- print(bicycles[1])
- print(bicycles[-1])
- print(bicycles[-2])
- print(bicycles[1].title())
运行结果
- cannondable
- specialized
- redline
- Cannondable
2.1.3查找某元素的下标(index方法)
功能:查找指定元素在列表中的下标,如果找不到,报错ValueError
- bicycles = ['trek', 'cannondable', 'redline', 'specialized']
- index = bicycles.index('redline')
- print(index)
运行结果
22.2修改、添加和删除元素
2.2.1修改列表元素
- bicycles = ['trek', 'cannondable', 'redline', 'specialized']
- bicycles[1] = 'hello'
- print(bicycles)
运行结果
['trek', 'hello', 'redline', 'specialized']2.2.2在列表中添加元素
在列表末尾添加单个元素
- bicycles = ['trek', 'cannondable', 'redline', 'specialized']
- bicycles.append('hello world')
- print(bicycles)
运行结果
['trek', 'cannondable', 'redline', 'specialized', 'hello world']在列表末尾添加多项元素
- bicycles = ['trek', 'cannondable', 'redline', 'specialized']
- car = ["audi", "BYD"]
- bicycles.extend(car)
- print(bicycles)
运行结果
['trek', 'cannondable', 'redline', 'specialized', 'audi', 'BYD']在列表中插入元素
- bicycles = ['trek', 'cannondable', 'redline', 'specialized']
- bicycles.insert(1, 'hello')
- print(bicycles)
运行结果
['trek', 'hello', 'cannondable', 'redline', 'specialized']2.2.3在列表中删除元素
使用 del 语句删除元素
- bicycles = ['trek', 'cannondable', 'redline', 'specialized']
- del bicycles[0]
- print(bicycles)
运行结果如下
['cannondable', 'redline', 'specialized']使用 pop() 方法删除元素
方法pop() 删除列表末尾的元素,并让你能够接着使用它。
- bicycles = ['trek', 'cannondable', 'redline', 'specialized']
- pop_bicycles = bicycles.pop()
- print(bicycles)
- print(pop_bicycles)
运行结果
- ['trek', 'cannondable', 'redline']
- specialized
使用pop()方法弹出列表中任何位置的元素
- bicycles = ['trek', 'cannondable', 'redline', 'specialized']
- pop_bicycles = bicycles.pop(2)
- print(bicycles)
- print(pop_bicycles)
运行结果
- ['trek', 'cannondable', 'specialized']
- redline
当然,别忘了,当使用pop()时,被弹出的元素就不在列表中了。
根据值删除列表元素
如果只知道眼删除列表元素的值,可以用方法remove()
- bicycles = ['trek', 'cannondable', 'redline', 'specialized']
- bicycles.remove('redline')
- print(bicycles)
运行结果
['trek', 'cannondable', 'specialized']注意:方法 remove() 只删除第一个指定的值。
2.3组织列表
2.3.1使用sort()方法对列表永久排序
按字母顺序排列
- cars = ['bwm', 'audi', 'toyota', 'subaru']
- cars.sort()
- print(cars)
- cars.sort(reverse=True) # 字母反序
- print(cars)
运行结果
- ['audi', 'bwm', 'subaru', 'toyota']
- ['toyota', 'subaru', 'bwm', 'audi']
2.3.2使用函数sorted() 对列表临时排序
- cars = ['bwm', 'audi', 'toyota', 'subaru']
- print('Here is the original list: ')
- print(cars)
- print('Here is the sorted list: ')
- print(sorted(cars))
- print('Here is the original list: ')
- print(cars)
运行结果
- Here is the original list:
- ['bwm', 'audi', 'toyota', 'subaru']
- Here is the sorted list:
- ['audi', 'bwm', 'subaru', 'toyota']
- Here is the original list:
- ['bwm', 'audi', 'toyota', 'subaru']
2.3.3倒着打印列表
可使用方法 reverse() 反转列表元素的排列顺序
- cars = ['bwm', 'audi', 'toyota', 'subaru']
- print('Here is the original list: ')
- print(cars)
- print('Here is the reverse list: ')
- cars.reverse()
- print(cars)
运行结果
- Here is the original list:
- ['bwm', 'audi', 'toyota', 'subaru']
- Here is the reverse list:
- ['subaru', 'toyota', 'audi', 'bwm']
2.4操作列表
2.4.1遍历列表
采用for 循环遍历列表
- cars = ['bwm', 'audi', 'toyota', 'subaru']
- for car in cars:
- print(f'My favorite car is {car}')
- print('END!')
运行结果
- My favorite car is bwm
- My favorite car is audi
- My favorite car is toyota
- My favorite car is subaru
- END!
采用while循环遍历列表
- bicycles = ['trek', 'cannondable', 'redline', 'specialized']
- index = 0
- while index < len(bicycles):
- print(bicycles[index])
- index += 1
运行结果:
- trek
- cannondable
- redline
- specialized
2.4.2创建数值列表
使用range() 函数
- for value in range(1, 5):
- print(value)
运行结果:
- 1
- 2
- 3
- 4
可见,并没有输出5。故 range(a, b) 函数中只会取值 [a, b)
使用range() 函数创建数字列表,并进行简单统计
- # 默认步长为1
- numbers1 = list(range(1, 5))
- print(numbers1)
- # 步长自定义
- numbers2 = list(range(1, 10, 2))
- print(numbers2)
- print(min(numbers2))
- print(max(numbers2))
- print(sum(numbers2))
运行结果
- [1, 2, 3, 4]
- [1, 3, 5, 7, 9]
- 1
- 9
- 25
2.4.3列表解析
方括号中首先定义一个表达式,然后编写一个for 循环给表达式赋值
- squares = [value**2 for value in range(1, 10)]
- print(squares)
运行结果
[1, 4, 9, 16, 25, 36, 49, 64, 81]2.4.4切片
切片示意
- player = ['AAA', 'BBB', 'CCC', 'DDD', 'EEE']
- print(player[1:4])
- print(player[:4])
- print(player[1:])
- print(player[-2:])
运行结果
- ['BBB', 'CCC', 'DDD']
- ['AAA', 'BBB', 'CCC', 'DDD']
- ['BBB', 'CCC', 'DDD', 'EEE']
- ['DDD', 'EEE']
遍历切片
- players = ['AAA', 'BBB', 'CCC', 'DDD', 'EEE']
- for player in players[1:]:
- print(player)
运行结果
- BBB
- CCC
- DDD
- EEE
2.4.5复制列表
首先,让我们来看一下错误做法
- # 将my_color列表复制给your_color列表的错误做法
- my_color = ['red', 'yellow', 'blue']
- your_color = my_color
- print(your_color)
运行结果
['red', 'yellow', 'blue']看起来好像没什么问题,我们对上述程序进行简单测试:
- # 将my_color列表复制给your_color列表的错误做法
- my_color = ['red', 'yellow', 'blue']
- your_color = my_color
- print(your_color)
- # 对my_color列表进行简单修改,弹出列表最后一个元素
- my_color.pop()
- # 分别打印出my_color和your_color列表
- print(my_color)
- print(your_color)
运行结果如下,我们发现,对my_color列表进行修改,your_color列表也随之改变
- ['red', 'yellow', 'blue']
- ['red', 'yellow']
- ['red', 'yellow']
显然,对于your_color = my_color,是将my_color赋给your_color,而不是将my_color的副本赋给your_color。即原理如下所示,这两个变量指向同一个列表:

那如何正确进行列表的复制呢?可采用切片表示法[ : ]创建列表的副本
- # 将my_color列表复制给your_color列表的正确做法
- my_color = ['red', 'yellow', 'blue']
- your_color = my_color[:]
- print(your_color)
- # 对my_color列表进行简单修改,弹出列表最后一个元素
- my_color.pop()
- # 分别打印出my_color和your_color列表
- print(my_color)
- print(your_color)
打印输出结果如下
- ['red', 'yellow', 'blue']
- ['red', 'yellow']
- ['red', 'yellow', 'blue']
结果表明,对my_color列表进行修改,不影响your_color列表,这里是将my_color的副本赋给your_color。即原理如下所示,这两个变量分别指向两个列表:

2.5元组(tuple)
Python将不能修改的值称为不可变的,而不可变的列表被称为元组。
定义元组,元组看起来很像列表,但使用圆括号而非中括号来标识。可以使用索引访问元组元素。
- dimensions = (200, 50)
- print(dimensions[1])
- # 对元组重新赋值
- dimensions = (300, 100)
- print(dimensions[1])
运行结果
- 50
- 100
2.6集合 (set)
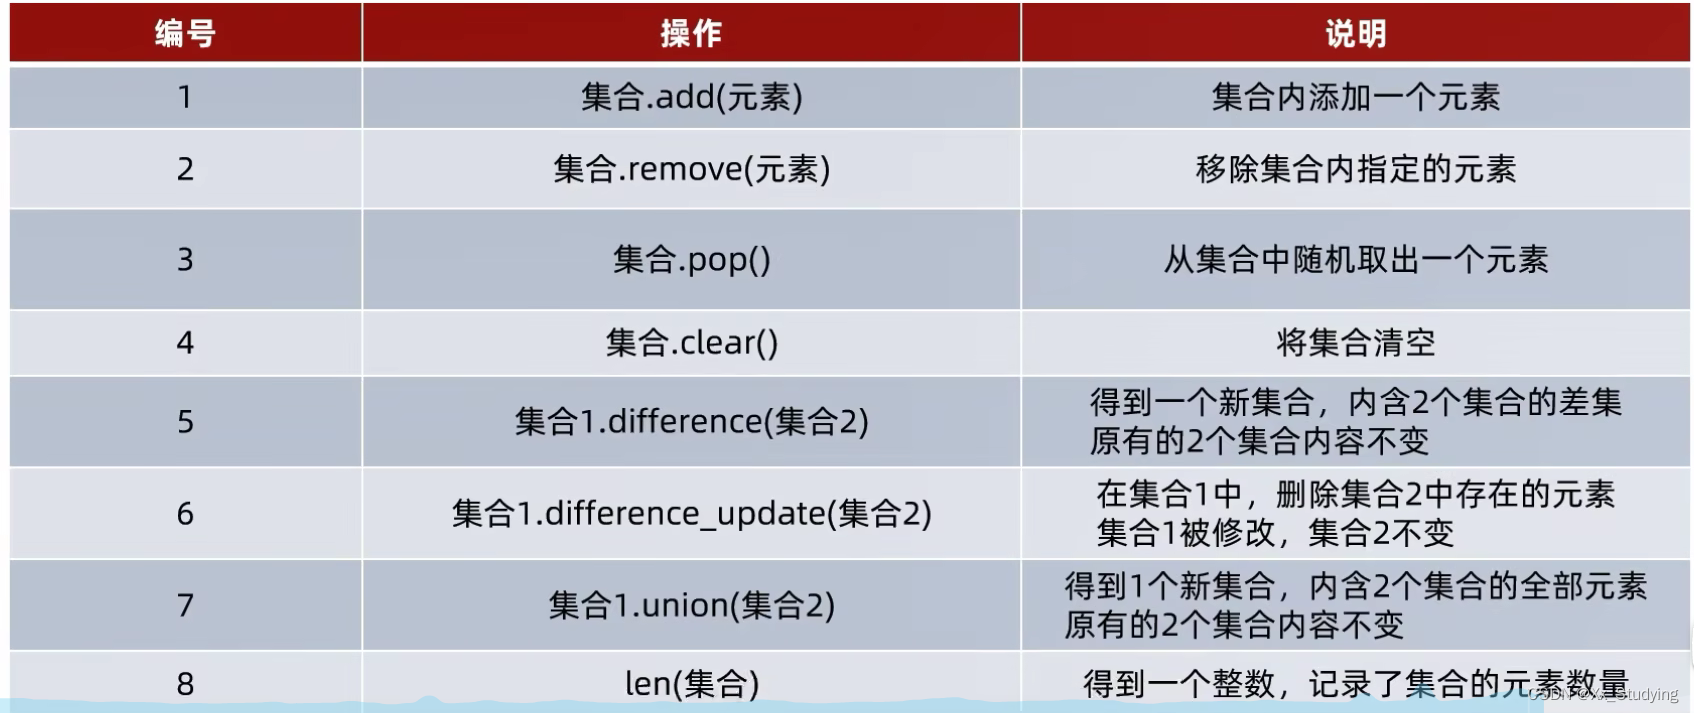
为什么需要学习集合这一类型,因为,列表可修改、支持重复元素有序;元组、字符串不可修改支持重复元素有序。如果场景需要对内容做去重处理,列表、元组、字符串就不方便了。而集合,最主要的特点就是不支持元素的重复,并且内容无序(顺序无法保证,不支持下标索引访问)。定义空集合只能用set(),不可以用{},{}是定义空字典的。
- # 定义集合
- my_set = {"hello", "world", "audi", "BYD","hello", "world", "audi", "BYD"}
- my_empty_set = set() # 定义空集合
- print(f"my_set的内容是:{my_set},类型是:{type(my_set)}")
- print(f"my_set的内容是:{my_empty_set},类型是:{type(my_empty_set)}")
运行结果:
- my_set的内容是:{'hello', 'BYD', 'world', 'audi'},类型是:<class 'set'>
- my_set的内容是:set(),类型是:<class 'set'>
①集合的修改,添加新元素
- my_set = {"hello", "world", "audi", "BYD","hello", "world", "audi", "BYD"}
- my_set.add("xuan")
- print(f"my_set添加元素后,结果为:{my_set}")
运行结果:
my_set添加元素后,结果为:{'hello', 'BYD', 'xuan', 'audi', 'world'}②集合的修改,移除元素
- # 定义集合
- my_set = {"hello", "world", "audi", "BYD","hello", "world", "audi", "BYD"}
- my_set.remove("BYD")
- print(f"my_set移除元素后,结果为:{my_set}")
运行结果
my_set移除元素后,结果为:{'audi', 'hello', 'world'}③集合中随机取出元素
- my_set = {"hello", "world", "audi", "BYD","hello", "world", "audi", "BYD"}
- temp = my_set.pop()
- print(f"my_set移除元素为:{temp}")
运行结果:
my_set移除元素为:hello④取两个集合的差集
- my_set1 = {1, 2, 3}
- my_set2 = {1, 5, 6}
- temp = my_set1.difference(my_set2)
- print(my_set1)
- print(my_set2)
- print(temp)
运行结果(集合1有集合2没有的)
- {1, 2, 3}
- {1, 5, 6}
- {2, 3}
⑤消除两个集合的差集
- my_set1 = {1, 2, 3}
- my_set2 = {1, 5, 6}
- my_set1.difference_update(my_set2)
- print(my_set1)
- print(my_set2)
运行结果:(在集合1的内部删除和集合2相同的元素)
- {2, 3}
- {1, 5, 6}
⑥两个集合合并
- my_set1 = {1, 2, 3}
- my_set2 = {1, 5, 6}
- temp = my_set1.union(my_set2)
- print(my_set1)
- print(my_set2)
- print(temp)
运行结果:
- {1, 2, 3}
- {1, 5, 6}
- {1, 2, 3, 5, 6}
⑦统计集合元素数量len()
- my_set1 = {1, 2, 3}
- print(len(my_set1))
运行结果:
3⑧集合的遍历
集合不支持下标索引,不能用while循环,可以用for循环
- my_set1 = {1, 2, 3, 5, 6}
- for element in my_set1:
- print(f"集合的元素有:{element}")
运行结果:
- 集合的元素有:1
- 集合的元素有:2
- 集合的元素有:3
- 集合的元素有:5
- 集合的元素有:6
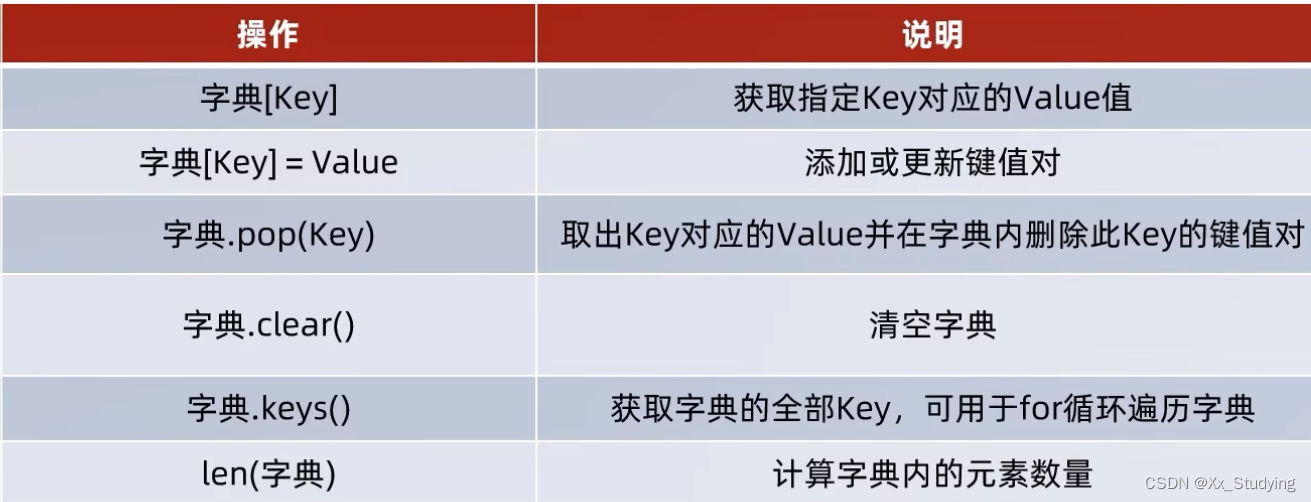
三、字典
定义空字典可以用{}或dict()
3.1使用字典
3.1.1访问字典
在Python中,字典是一系列键值对,首先创建一个字典。
- alien_0 = {'color': 'green', 'points': 5}
- print(alien_0['points'])
运行结果
53.1.2添加键值对
- alien_0 = {'color': 'green', 'points': 5}
- alien_0['hello'] = 'xuan'
- print(alien_0)
- print(alien_0['points'])
运行结果
- {'color': 'green', 'points': 5, 'hello': 'xuan'}
- 5
3.1.3修改字典的值
- alien_0 = {'color': 'green', 'points': 5}
- alien_0['points'] = 10
- print(alien_0)
运行结果
{'color': 'green', 'points': 10}3.1.4删除键值对
方法一:
- alien_0 = {'color': 'green', 'points': 5}
- del alien_0['points']
- print(alien_0)
运行结果
{'color': 'green'}方法二:
- alien_0 = {'color': 'green', 'points': 5}
- temp = alien_0.pop('points')
- print(alien_0)
- print(temp)
运行结果:
- {'color': 'green'}
- 5
3.1.5使用 get() 来访问值
如果访问字典中的键不存在,那么访问会报错,例如
- alien_0 = {'color': 'green', 'points': 5}
- print(alien_0['hello'])
运行结果
- Traceback (most recent call last):
- File "D:\exercise\python\pythonProject\hello.py", line 2, in
- print(alien_0['hello'])
- KeyError: 'hello'
对此可使用方法get() 在指定的键不存在时返回一个默认值。
- alien_0 = {'color': 'green', 'points': 5}
- hello_err = alien_0.get('hello', 'No hello')
- print(hello_err)
运行结果
No hello3.1.6获取全部的key
- alien_0 = {'color': 'green', 'points': 5}
- print(alien_0.keys())
运行结果
dict_keys(['color', 'points'])3.2遍历字典
3.2.1遍历所有键值对
方法items() 返回一个键值对列表
- alien_0 = {'color': 'green', 'points': 5}
- for key, valur in alien_0.items():
- print(f'{key} : {valur}')
运行结果
- color : green
- points : 5
3.2.2遍历字典中的所有键
采用方法keys()返回一个列表,包含字典的所有的键
- alien_0 = {'color': 'green', 'points': 5}
- for key in alien_0.keys():
- print(f'The key :{key} ')
运行结果
- The key :color
- The key :points
3.2.3遍历字典中的值
采用values() 方法可返回一个列表,包含字典中所有的值。为剔除重复值可用set() 函数。
- alien_0 = {'color': 'green', 'points': 5, 'lovecolor': 'green'}
- for value in alien_0.values():
- print(f'The value :{value} ')
- # 剔除重复项
- print('-------------------------------------')
- for value in set(alien_0.values()):
- print(f'The value :{value} ')
运行结果
- The value :green
- The value :5
- The value :green
- -------------------------------------
- The value :5
- The value :green
3.3嵌套
3.3.1字典列表
所谓字典列表就是在列表中存储字典
- alien_0 = {'color': 'green', 'point': 5}
- alien_1 = {'color': 'yellow', 'point': 10}
- alien_2 = {'color': 'red', 'point': 15}
- alien = [alien_0, alien_1, alien_2]
- print(alien)
- # 循环创建
- print('---------------------------------------')
- for alien_num in range(5):
- alien_num = {'color': 'green', 'point': 5}
- alien.append(alien_num)
- for num in alien:
- print(num)
运行结果
- [{'color': 'green', 'point': 5}, {'color': 'yellow', 'point': 10}, {'color': 'red', 'point': 15}]
- ---------------------------------------
- {'color': 'green', 'point': 5}
- {'color': 'yellow', 'point': 10}
- {'color': 'red', 'point': 15}
- {'color': 'green', 'point': 5}
- {'color': 'green', 'point': 5}
- {'color': 'green', 'point': 5}
- {'color': 'green', 'point': 5}
- {'color': 'green', 'point': 5}
3.3.2在字典中存储列表
在程序语言设计中,更多的是将列表存储在字典中,对于新手来说,如何快速上手,下面便通过小例子进行讲解
- # 建立一个存储披萨信息的字典
- pizza = {
- 'crust': 'thick',
- # 字典中包含两个元素的列表
- 'toppings': ['mushrooms', 'extra cheese']
- }
- print(f"You ordered a {pizza['crust']}-crust pizza"
- " with the following toppings:")
- for topping in pizza['toppings']:
- print('\t'+ topping)
打印输出如下结果:
- You ordered a thick-crust pizza with the following toppings:
- mushrooms
- extra cheese
3.3.3在字典中存储字典
在python中,在字典中包含字典信息,并逐个遍历
- # 定义一个名为user的字典,该字典中包含两个字典
- user = {
- 'aeinstein': {
- 'first': 'albert',
- 'last': 'einstein',
- 'location': 'princeton',
- },
- # 上一行末尾的逗号不要忘了
- 'mcurie': {
- 'first': 'marie',
- 'last': 'curie',
- 'location': 'paris',
- },
- # 同样的,上一行末尾的逗号不要忘了
- }
- # 遍历字典user,依次将两个健赋给变量username,将当前健所对应的信息赋给变量user_info
- for username, user_info in user.items():
- print(f"Username: {username}")
- print(f"Fullname: {user_info['first'] }{user_info['last']}")
- print(f"Location: {user_info['location']}\n")
遍历该字典,输出以下结果
- Username: aeinstein
- Fullname: alberteinstein
- Location: princeton
- Username: mcurie
- Fullname: mariecurie
- Location: paris
四、用户输入和while循环
4.1函数input
函数input() 让程序暂停运行,等待用户输入一些文本,获取输入后,Python将其赋值给一个变量。
- name = input('Please enter your name: ')
- print(f'your name is {name}')
输出结果
- Please enter your name: Erick
- your name is Erick
input读取作为一个字符串,那么如何读取数值呢,需要强制类型转换
- age = int(input('Please enter your age: '))
- print(f'your name is {age}')
输出结果
- Please enter your age: 18
- your name is 18
4.2while循环
4.2.1while简介
while循环示例,包括break用法:
- prompt = "\nTell me something, and I will repeat it back to you."
- prompt += "\nEnter 'quit' to end the program."
- active = True
- while active:
- message = input(prompt)
- if message == 'quit':
- break
- else:
- print(message)
运行结果
- Tell me something, and I will repeat it back to you.
- Enter 'quit' to end the program.hello everyone
- hello everyone
- Tell me something, and I will repeat it back to you.
- Enter 'quit' to end the program.jim bob
- jim bob
- Tell me something, and I will repeat it back to you.
- Enter 'quit' to end the program.quit
在循环中使用continue
- current_num = 0
- while current_num < 10:
- current_num += 1
- if current_num % 2 == 0:
- continue
- print(current_num)
运行结果:
- 1
- 3
- 5
- 7
- 9
4.2.2使用while循环处理列表和字典
示例:
- # 首先,创建一个待验证的用户列表
- # 和一个用于存储已验证用户的空列表
- unconfirmed_users = ['alice', 'brian', 'candace']
- confirmed_users = []
- # 验证每个用户,直到没有未验证用户为止
- # 将每个经过验证的用户都移动到已验证用户列表中
- while unconfirmed_users:
- current_user = unconfirmed_users.pop()
- print(f'Verifying user: {current_user.title()}')
- confirmed_users.append(current_user)
- # 显示所有已验证的用户
- print("\nThe follwing users have been confirmed: ")
- for confirmed_user in confirmed_users:
- print(confirmed_user.title())
输出:
- Verifying user: Candace
- Verifying user: Brian
- Verifying user: Alice
- The follwing users have been confirmed:
- Candace
- Brian
- Alice
4.2.3删除特定值的所有列表元素
- pets = ['dog', 'cat', 'dag', 'goldfish', 'cat', 'rabbit', 'cat']
- print(pets)
- while 'cat' in pets:
- pets.remove('cat')
- print(pets)
运行结果
- ['dog', 'cat', 'dag', 'goldfish', 'cat', 'rabbit', 'cat']
- ['dog', 'dag', 'goldfish', 'rabbit']
五、函数
5.1函数定义与调用
该例子中包含函数定义,默认参数,关键字实参等知识
例子:
- def describe_pet(animal_type, pet_name='dog'):
- """显示宠物信息"""
- print(f"\nI have a {animal_type}")
- print(f"My {animal_type}'s name is {pet_name}.")
- describe_pet('harry', 'hamster')
- describe_pet('Willie')
- describe_pet(pet_name='harry', animal_type='hamster')
运行结果
- I have a harry
- My harry's name is hamster.
- I have a Willie
- My Willie's name is dog.
- I have a hamster
- My hamster's name is harry.
5.2函数返回值
5.2.1返回简单值
- def get_formatted_name(first_name, last_name):
- """返回完整姓名"""
- full_name = f"{first_name} {last_name}"
- return full_name
- musician = get_formatted_name('jimi', 'hendrix')
- print(musician)
运行结果
jimi hendrix5.2.2返回字典
- def build_name(first_name, last_name, age=None):
- """返回完整姓名"""
- person = {'first':first_name, 'last':last_name}
- if age:
- person['age'] = age
- return person
- musician1 = build_name('jimi', 'hendrix')
- musician2 = build_name('bob', 'eric', 18)
- print(musician1)
- print(musician2)
运行结果
- {'first': 'jimi', 'last': 'hendrix'}
- {'first': 'bob', 'last': 'eric', 'age': 18}
5.2.3传递列表
将列表作为参数传递给函数形参。
- def greet_users(names):
- """向列表中的每位用户都发出简单的问候"""
- for name in names:
- msg = f'Hello, {name.title()}!'
- print(msg)
- usernames = ['jim', 'jack', 'bob']
- greet_users(usernames)
运行结果
- Hello, Jim!
- Hello, Jack!
- Hello, Bob!
5.2.4在函数中修改列表
- designs = ['phone case', 'robot pendant', 'dodecahedron']
- models = []
- # 模拟打印每个设计,直到没有未打印的设计为止
- # 打印每个设计后,都将其移到列表completed_models中
- while designs:
- design = designs.pop()
- # 模拟根据设计制作3D打印模型的过程
- print(f"Printing model: {design}")
- models.append(design)
- # 显示打印好的所有模型
- print("\nThe following models have been printed:")
- for model in models:
- print(model)
运行结果
- The following models have been printed:
- dodecahedron
- robot pendant
- phone case
对上述代码改进
- def print_models(designs, models):
- """
- 模拟打印每个设计,直到没有未打印的设计为止
- 打印每个设计后,都将其移到列表models中
- """
- while designs:
- design = designs.pop()
- # 模拟根据设计制作3D打印模型的过程
- print(f"Printing model: {design}")
- models.append(design)
- def show_models(models):
- """显示打印好的所有模型"""
- print("\nThe following models have been printed:")
- for model in models:
- print(model)
- designs = ['iphone case', 'robot pendant', 'dodecahedron']
- models = []
- print_models(designs, models)
- show_models(models)
运行结果
- The following models have been printed:
- dodecahedron
- robot pendant
- iphone case
5.3传递任意数量的实参
有时候,你预先不知道函数需要接受几个实参 , 好在python 允许从调用语句中收集任意数量的实参
- # 传递任意数量的实参 python
- def make_pizza(*toppings):
- """ 打印顾客点的所有配料"""
- print(toppings)
- make_pizza('Pepperoni')
- make_pizza('mushrooms', 'green peppers', 'extra cheese')
运行结果
- ('Pepperoni',)
- ('mushrooms', 'green peppers', 'extra cheese')
形参名 *toppings 中的星号让python 创建一个名为toppings的空元祖 , 并将收到的所有值都封装在这的元组里 .ps(python将实参封装到一个元组中,即便函数值只收到了一个值) .
5.3.1结合使用位置实参和任意数量实参
如果要让函数接受不同类型的实参 , 必须在函数定义中将接纳任意数量的实参的形参放在最后,python先匹配位置实参和关键字实参,再将余下的实参收集到最后一个形参中.
例如 ,如果上面的函数还需要一个表示披萨尺寸的实参, 必须将形参放在形参 *toppings的前面'
- def make_pizza(size, *toppings):
- print("\nMaking a " + str(size) +
- "-inch pizza with the following toppings")
- for topping in toppings:
- print("- " + topping)
- make_pizza(16, 'pepperoni')
- make_pizza(12, 'mushrooms', 'green peppers ', 'extra cheese')
运行结果
- Making a 16-inch pizza with the following toppings
- - pepperoni
- Making a 12-inch pizza with the following toppings
- - mushrooms
- - green peppers
- - extra cheese
5.3.2使用任意数量的关键字实参
有时候 ,需要接受任意数量的实参, 但预先不知道传递的函数会是什么样的信息 .在这种情况下,可以将函数编写成能够接受任意数量的键值对 ---调用语句提供了多少就接受多少 . 一个这样的实例是创建用户简介 :
- def build_profile(first, last, **user_info):
- profile ={}
- profile['first_name'] = first
- profile['last_name'] = last
- for key, value in user_info.items():
- profile[key] = value
- return profile
- user_profile = build_profile('albert', 'einstein', location='princeton', filed='physics')
- print(user_profile)
运行结果
{'first_name': 'albert', 'last_name': 'einstein', 'location': 'princeton', 'filed': 'physics'}5.3函数作为参数传递和lambda 匿名函数
5.3.1函数作为参数
- def test_func(computer):
- result = computer(1, 2)
- print(f"computer的类型是:{type(computer)}")
- print(f"计算结果:{result}")
- def computer(x, y):
- return x+y
- test_func(computer)
运行结果:
- computer的类型是:<class 'function'>
- 计算结果:3
5.3.2 lambda匿名函数

- def test_func(computer):
- result = computer(1, 2)
- print(f"computer的类型是:{type(computer)}")
- print(f"计算结果:{result}")
- test_func(lambda x, y:x + y)
运行结果:
- computer的类型是:<class 'function'>
- 计算结果:3
5.4将函数存储在模块中
函数的优点之一是,使用它们可将代码块与主程序分离。通过给函数指定描述性名称,可让主程序容易理解得多。你还可以更进一步,将函数存储在被称为模块的独立文件中,再将模块导入到主程序中。imprt语句允许在当前运行的程序文件中使用模块中的代码。
通过将函数存储在独立的文件中,可隐藏程序代码的细节,将重点放在程序的高级逻辑上。将函数存储在独立文件中后,可与其他程序员共享这些文件而不是整个程序。
5.4.1导入整个模块:
只需编写一条import语句并在其中指定模块名,就可以在程序中使用该模块的所有函数。
pizza.py- def make_pizza(size, *toppings):
- print(f"\nMaking a {str(size)} -inch pizza with the following toppings:")
- for topping in toppings:
- print(f"- {topping}")
making_pizzas.py
- import pizza
- # python读取这个文件时,代码行import pizza让Python打开文件pizza.py,并将其中的
- # 所有函数都复制到这个程序中
- pizza.make_pizza(16, 'pepperoni')
- pizza.make_pizza(12, 'mushrooms', 'green peppers', 'extra cheese')
上述两个 .py 文件放在一个工程目录下,运行结果
- Making a 16 -inch pizza with the following toppings:
- - pepperoni
- Making a 12 -inch pizza with the following toppings:
- - mushrooms
- - green peppers
- - extra cheese
5.4.2导入特定的函数
你可以导入模块中的特定函数,这种导入方法的语法如下:
from module_name import function_name 通过用逗号分隔函数名,可根据需要从模块中导入任意数量的函数。若使用这种语法,调用函数时就无需使用句点。
对上述pizza.pymaking_pizzas.py进行修改
- from pizza import make_pizza
- make_pizza(16, 'pepperoni')
- make_pizza(12, 'mushrooms', 'green peppers', 'extra cheese')
运行结果和上述一致。
5.4.3使用as给函数指定别名
如果要导入的函数名称可能与程序中现有的名称冲突,或者函数的名称太长,可指定简短而独一无二的别名——函数的;另一个名称,类似于外号。通过关键字as将函数重命名
对上述pizza.pymaking_pizzas.py进行修改
- from pizza import make_pizza as mp
- mp(16, 'pepperoni')
- mp(12, 'mushrooms', 'green peppers', 'extra cheese')
运行结果与上述一致
5.4.4使用as给模块指定别名
可以给模块指定别名。通过给模块指定简短的别名,能够轻松地调用模块中的函数。
对上述pizza.pymaking_pizzas.py进行修改
- import pizza as p
- p.make_pizza(16, 'pepperoni')
- p.make_pizza(12, 'mushrooms', 'green peppers', 'extra cheese')
运行结果与上述一致
5.4.5导入模块中的所有函数
使用星号(*)运算符可以让Python导入模块中的所有函数:由于导入了每个函数,可通过名称来调用每一个函数,而无需使用句点表示法。然而并非自己编写的大型模块时,最好不要采用这种导入方法。防止名称相同。
- from pizza import *
- make_pizza(16, 'pepperoni')
- make_pizza(12, 'mushrooms', 'green peppers', 'extra cheese')
运行结果与上述一致
六、类
6.1创建和使用类
- class Dog(): # 在Python中,首字母大写的名称指的是类。
- """一次模拟小狗的简单尝试"""
- """__init__()是一个特殊的方法,每当根据Dog类创建新实例时,Python都会自动运行它"""
- def __init__(self, name, age):
- """在这个放大的定义中self必不可少,还必须位于其他形参的前面。
- Python调用这个__init__方法来创建Dog实例时,将自动传入实参self。与每个类相关联的的方法
- 调用都自动传递实参self它是一个指向实例本身的引用,让实例能够访问类中的属性和方法"""
- """初始化属性name和age"""
- self.name = name
- """以self为前缀的变量都可供类中的所有方法使用,我们还可以通过类的任何实例来访问这些变量"""
- self.age = age
- def sit(self):
- """模拟小狗被命令时蹲下"""
- print(self.name.title() + " is now sitting.")
- def roll_over(self):
- """模拟小狗被命令时打滚"""
- print(self.name.title() + "rolled over!")
- my_dog = Dog('willie', 6)
- """方法__init__()并未显式地包含return语句,但Python自动返回一个表示这条小狗的实例
- 我们将这个实例存储在 变量 my_dog中"""
- print(f"My dog`s name is {my_dog.name.title()} .")
- print(f"My dog is {str(my_dog.age)} years old.")
- my_dog.sit()
- my_dog.roll_over()
- """要调用方法,可指定实例的名称和调用的方法,并用句点分隔它们。
- 可以按照需求根据一个类创建任意数量个实例,条件是将每个实例都存储在不同的变量中,或占用列表或字典的不同位置。"""
运行结果
- My dog`s name is Willie .
- My dog is 6 years old.
- Willie is now sitting.
- Willierolled over!
6.1.1魔术方法__str__
- class Student:
- def __init__(self, name, age):
- self.name = name
- self.age = age
- def __str__(self):
- return f"Student类对象,name:{self.name},sge:{self.age}"
- stu = Student("周树人", 30)
- print(stu)
运行结果:
Student类对象,name:周树人,sge:306.1.2__lt__小于符号比较方法
- class Student:
- def __init__(self, name, age):
- self.name = name
- self.age = age
- def __lt__(self, other):
- return self.age < other.age
- stu1 = Student("周树人", 30)
- stu2 = Student("周大", 36)
- print(stu1 < stu2)
运行结果:
True6.1.3__le__小于等于符号比较方法
- class Student:
- def __init__(self, name, age):
- self.name = name
- self.age = age
- def __le__(self, other):
- return self.age <= other.age
- stu1 = Student("周树人", 30)
- stu2 = Student("周大", 30)
- print(stu1 <= stu2)
运行结果:
True6.1.4__eq__等于符号比较方法
- class Student:
- def __init__(self, name, age):
- self.name = name
- self.age = age
- def __eq__(self, other):
- return self.age == other.age
- stu1 = Student("周树人", 30)
- stu2 = Student("周大", 31)
- stu3 = Student("周小", 30)
- print(stu1 == stu2)
- print(stu1 == stu3)
运行结果
- False
- True
6.2使用类和实例
6.2.1Car类
编写一个表示汽车的简单类
- class Car:
- """一次模拟汽车的简单尝试"""
- def __init__(self, make, model, year):
- self.make = make
- self.model = model
- self.year = year
- def get_descriptive_name(self):
- """返回整洁的描述性信息"""
- long_name = f"{self.year} {self.make} {self.model}"
- return long_name.title()
- my_car = Car('audi', 'a8', 2022)
- print(f"My car is {my_car.get_descriptive_name()}")
运行结果如下
My car is 2022 Audi A86.2.2给属性指定默认值
创建实例时,有些属性无须通过形参来定义,可在方法__init__()中为其指定默认值。,我们添加了一个属性名为odometer_reading,并将它的值默认为0,此外,我们还添加了一个方法read_odometer()。
- class Car:
- """一次模拟汽车的简单尝试"""
- ''''''
- def __init__(self, make, model, year):
- self.make = make
- self.model = model
- self.year = year
- self.odometer_reading = 0
- def get_descriptive(self):
- """返回整洁的描述性信息"""
- long_name = f"{self.year} {self.make} {self.model}"
- return long_name.title()
- def read_odometer(self):
- """读取里程数"""
- print(f"this car's meter is {self.odometer_reading} miles on it")
- my_car = Car('audi', 'a8', 2022)
- print(f"My car is {my_car.get_descriptive()}")
- my_car.read_odometer()
运行结果
- My car is 2022 Audi A8
- this car's meter is 0 miles on it
6.2.3修改属性的值
我们还可以对所添加的属性odometer_reading的值进行修改。
①通过实例直接修改属性值
- class Car:
- """一次模拟汽车的简单尝试"""
- def __init__(self, make, model, year):
- self.make = make
- self.model = model
- self.year = year
- self.odometer_reading = 0
- def get_descriptive(self):
- """返回整洁的描述性信息"""
- long_name = f"{self.year} {self.make} {self.model}"
- return long_name.title()
- def read_odometer(self):
- """读取里程数"""
- print(f"this car's meter is {self.odometer_reading} miles on it")
- my_car=Car('audi', 'a8', 2022)
- print(f"my car is {my_car.get_descriptive()}")
- my_car.read_odometer()
- my_car.odometer_reading = 23
- my_car.read_odometer()
运行结果
- D:\APP\Anaconda\Anaconda3\python.exe D:/exercise/python/pythonProject/hello.py
- my car is 2022 Audi A8
- this car's meter is 0 miles on it
- this car's meter is 23 miles on it
②通过方法修改属性的值
- class Car:
- """一次模拟汽车的简单尝试"""
- def __init__(self, make, model, year):
- self.make = make
- self.model = model
- self.year = year
- self.odometer_reading = 0
- def get_descriptive(self):
- """返回整洁的描述性信息"""
- long_name=f"{self.year} {self.make} {self.model}"
- return long_name.title()
- def read_odometer(self):
- """读取里程数"""
- print(f"this car's meter is {self.odometer_reading} miles on it")
- def update_odometer(self,mileage):
- """将里程数设置为指定的值"""
- self.odometer_reading=mileage
- def increment_odometer(self, miles):
- """将里程数增加指定的量"""
- self.odometer_reading += miles
- my_car=Car('audi', 'a8', 2022)
- print(f"my car is {my_car.get_descriptive()}")
- my_car.read_odometer()
- my_car.update_odometer(23)
- my_car.read_odometer()
- my_car.increment_odometer(10)
- my_car.read_odometer()
运行结果
- my car is 2022 Audi A8
- this car's meter is 0 miles on it
- this car's meter is 23 miles on it
- this car's meter is 33 miles on it
6.3继承
6.3.1子类的方法__init__()
我们创建一个新类ElectricCar(子类)让它继承父类Car的属性和方法
代码行class ElectricCar(Car):我们在创建新类(这里是子类)时,父类必须包含在文件中,且位于子类前面,我们定义了子类ElectricCar,并且将父类Car放在圆括号中,我们的子类要继承父类的属性和方法就必须将父类的名称指定在圆括号内。
方法__init__()接受创建Car实例所需的信息。
super()是一个特殊函数,让我们能够调用父类的方法。
代码行 super().init(make,model,year)是让python调用Car类的方法__init__(),让ElectricCar中的实例包含方法__init__()中定义的所有属性。
- class Car:
- """一次模拟汽车的简单尝试"""
- def __init__(self, make, model, year):
- self.make = make
- self.model = model
- self.year = year
- self.odometer_reading = 0
- def get_descriptive_name(self):
- """返回整洁的描述性信息"""
- long_name = f"{self.year} {self.make} {self.model}"
- return long_name.title()
- def read_odometer(self):
- """读取里程数"""
- print(f"this car's meter is {self.odometer_reading} miles on it")
- def update_odometer(self,mileage):
- """将里程数设置为指定的值"""
- if mileage >= self.odometer_reading:
- self.odometer_reading=mileage
- else:
- print("you can not roll back an odometer!")
- def increment_odometer(self, miles):
- """将里程数增加指定的量"""
- self.odometer_reading += miles
- class ElectricCar(Car):
- """电动车的独特之处"""
- def __init__(self, make, model, year):
- """初始父类的属性"""
- super().__init__(make, model, year)
- my_tesla = ElectricCar('tesla', 'models', 2022)
- print(my_tesla.get_descriptive_name())
运行结果
2022 Tesla Model6.3.2给子类定义属性和方法
我们可以给子类 ElectricCart添加它自己的属性和方法:
- class Car:
- """一次模拟汽车的简单尝试"""
- def __init__(self, make, model, year):
- self.make = make
- self.model = model
- self.year = year
- self.odometer_reading = 0
- def get_descriptive_name(self):
- """返回整洁的描述性信息"""
- long_name = f"{self.year} {self.make} {self.model}"
- return long_name.title()
- def read_odometer(self):
- """读取里程数"""
- print(f"this car's meter is {self.odometer_reading} miles on it")
- def update_odometer(self, mileage):
- """将里程数设置为指定的值"""
- if mileage >= self.odometer_reading:
- self.odometer_reading = mileage
- else:
- print("you can not roll back an odometer!")
- def increment_odometer(self, miles):
- """将里程数增加指定的量"""
- self.odometer_reading += miles
- class ElectricCar(Car):
- """电动车的独特之处"""
- def __init__(self, make, model, year):
- """初始父类的属性,再初始化电动汽车特有的属"""
- super().__init__(make, model, year)
- self.battery_size = 75
- def describe_battery(self):
- """打印一条描述电瓶容量的消息"""
- print(f"this car has a {self.battery_size} KWH battery")
- my_tesla=ElectricCar('tesla', 'models', 2022)
- print(my_tesla.get_descriptive_name())
- my_tesla.describe_battery()
运行结果
- 2022 Tesla Models
- this car has a 75 KWH battery
6.3.3将实例用作属性
有时候我们需要给子类添加的细节(属性和方法)越来越多,这样的情况下,我们可以将类的一部分提取出来,作为一个独立的类。
- class Car:
- """一次模拟汽车的简单尝试"""
- def __init__(self, make, model, year):
- self.make = make
- self.model = model
- self.year = year
- self.odometer_reading = 0
- def get_descriptive_name(self):
- """返回整洁的描述性信息"""
- long_name = f"{self.year} {self.make} {self.model}"
- return long_name.title()
- def read_odometer(self):
- """读取里程数"""
- print(f"this car's meter is {self.odometer_reading} miles on it")
- def update_odometer(self, mileage):
- """将里程数设置为指定的值"""
- if mileage >= self.odometer_reading:
- self.odometer_reading = mileage
- else:
- print("you can not roll back an odometer!")
- def increment_odometer(self, miles):
- """将里程数增加指定的量"""
- self.odometer_reading += miles
- class Battery:
- """一次模拟电动汽车的简单尝试"""
- def __init__(self, battery_size=75):
- """初始化电瓶的属性"""
- self.battery_size = battery_size
- def describe_battery(self):
- """打印一条描述电瓶容量的消息"""
- print(f"this car has a {self.battery_size} KWH battery")
- class ElectricCar(Car):
- """电动车的独特之处"""
- def __init__(self, make, model, year):
- """初始父类的属性,再初始化电动汽车特有的属性"""
- super().__init__(make, model, year)
- self.battery = Battery()
- my_tesla = ElectricCar('tesla', 'model ', 2022)
- print(my_tesla.get_descriptive_name())
- my_tesla.battery.describe_battery()
运行结果
- 2022 Tesla Model
- this car has a 75 KWH battery
6.4导入类
6.4.1导入单个类
car.py
- """一个可用于表示汽车的类"""
- class Car():
- """一次模拟汽车的简单尝试"""
- def __init__(self, make, model, year):
- """初始化描述汽车的属性"""
- self.make = make
- self.model = model
- self.year = year
- self.odometer_reading = 0
- def get_descriptive_name(self):
- """返回整洁的描述性名称"""
- long_name = str(self.year) + ' ' + self.make + ' ' + self.model
- return long_name.title()
- def read_odometer(self):
- """打印一条消息,指出汽车的里程"""
- print("This car has " + str(self.odometer_reading) + " miles on it.")
- def update_odometer(self, mileage):
- """
- 将里程表读数设置为指定的值
- 拒绝将里程表往回拨
- """
- if mileage >= self.odometer_reading:
- self.odometer_reading = mileage
- else:
- print("You can't roll back an odometer!")
- def increment_odometer(self, miles):
- """将里程表读数增加指定的量"""
- self.odometer_reading += miles
my_car.py
- from car import Car
- my_new_car = Car('audi', 'a4', 2022)
- print(my_new_car.get_descriptive_name())
- my_new_car.odometer_reading = 23
- my_new_car.read_odometer()
运行结果
- 2022 Audi A4
- This car has 23 miles on it.
import语句让Python打开模块car,并导入其中的Car类。这样我们就可以使用Car类了,就像它是在这个文件中定义的一样。输出与我们在前面看到的一样。
6.4.2在一个模块中存储多个类
car.py
- """一个可用于表示汽车的类"""
- class Car():
- """一次模拟汽车的简单尝试"""
- def __init__(self, make, model, year):
- """初始化描述汽车的属性"""
- self.make = make
- self.model = model
- self.year = year
- self.odometer_reading = 0
- def get_descriptive_name(self):
- """返回整洁的描述性名称"""
- long_name = str(self.year) + ' ' + self.make + ' ' + self.model
- return long_name.title()
- def read_odometer(self):
- """打印一条消息,指出汽车的里程"""
- print("This car has " + str(self.odometer_reading) + " miles on it.")
- def update_odometer(self, mileage):
- """
- 将里程表读数设置为指定的值
- 拒绝将里程表往回拨
- """
- if mileage >= self.odometer_reading:
- self.odometer_reading = mileage
- else:
- print("You can't roll back an odometer!")
- def increment_odometer(self, miles):
- """将里程表读数增加指定的量"""
- self.odometer_reading += miles
- class Battery():
- """一次模拟电动汽车电瓶的简单尝试"""
- def __init__(self, battery_size=70):
- """初始化电瓶的属性"""
- self.battery_size = battery_size
- def describe_battery(self):
- """打印一条描述电瓶容量的消息"""
- print("This car has a " + str(self.battery_size) + "-kWh battery.")
- def get_range(self):
- """打印一条描述电瓶续航里程的消息"""
- if self.battery_size == 75:
- range = 260
- elif self.battery_size == 100:
- range = 315
- message = "This car can go approximately " + str(range)
- message += " miles on a full charge."
- print(message)
- class ElectricCar(Car):
- """模拟电动汽车的独特之处"""
- def __init__(self, make, model, year):
- """
- 初始化父类的属性,再初始化电动汽车特有的属性
- """
- super().__init__(make, model, year)
- self.battery = Battery()
my_electric_car.py
- from car import ElectricCar
- my_tesla = ElectricCar('tesla', 'model s', 2016)
- print(my_tesla.get_descriptive_name())
- my_tesla.battery.describe_battery()
- my_tesla.battery.get_range()
我们新建了一个名为my_electric_car.py的文件,导入ElectricCar类,并创建一辆电动汽车。
6.4.3从一个模块中导入多个类
my_car.py
- from car import Car, ElectricCar
- my_beetle = Car('volkswagen', 'beetle', 2022)
- print(my_beetle.get_descriptive_name())
- my_tesla = ElectricCar('tesla', 'roadster', 2023)
- print(my_tesla.get_descriptive_name())
结合前文my_electric_car.py文件和car.py文件,运行my_car.py,结果如下
- 2022 Volkswagen Beetle
- 2023 Tesla Roadster
6.4.4导入整个模块
你还可以导入整个模块,再使用句点表示法访问需要的类。这种导入方法很简单,代码也易于阅读。由于创建类实例的代码都包含模块名,因此不会与当前文件使用的任何名称发生冲突。
下面的代码导入整个car模块,并创建一辆普通汽车和一辆电动汽车。对my_car.py文件进行修改,
my_car.py
- import car
- my_beetle = car.Car('volkswagen', 'beetle', 2022)
- print(my_beetle.get_descriptive_name())
- my_tesla = car.ElectricCar('tesla', 'roadster', 2023)
- print(my_tesla.get_descriptive_name())
结合前文my_electric_car.py文件和car.py文件,运行my_car.py,结果如下
- 2022 Volkswagen Beetle
- 2023 Tesla Roadster
6.4.5导入模块的所有类
frommodule_name import *6.5类型注解
注意:类型注解知识提示性的,并非决定性的。数据类型和注解类型无法对应也不会报错。
6.5.1变量的类型注释
类型注解主要功能在于:
帮助第三方IDE工具(如PyCharm)对代码进行类型推断,帮助做代码提示
帮助开发者自身对变量进行类型注释(备注)
- import random
- """
- 演示变量的类型注解
- """
- # 基础数据类型注解
- var_1: int = 10
- val_2: str = "xuan"
- var_3: bool = True
- # 类对象类型注解
- class Student:
- pass
- stu: Student = Student()
- # 基础容器类型注解
- my_list: list = [1, 2, 3]
- my_tuple: tuple = (1, 2, 3)
- my_dict: dict = {"xuan": 26}
- # 容器类型注解
- my_list1: list[int] = [1, 2, 3]
- my_tuple1: tuple[int, str, bool] = (1, "hello", True)
- my_dict1: dict[str, int] = {"xuan": 26}
- # 在注释中进行类型注解
- var_4 = random.randint(1, 10) # type: int
- def func():
- return 10
- var_5 = func() # type: int
6.5.2函数和方法类型注解
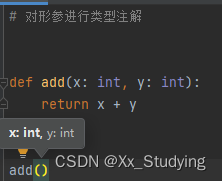
鼠标放到括号里,按ctrl+p,就会有提示
- # 对形参进行类型注解
- def add(x: int, y: int):
- return x + y
- # 对返回值进行类型注解
- def func(data: list) -> list:
- return data
6.5.3Union联合类型注解
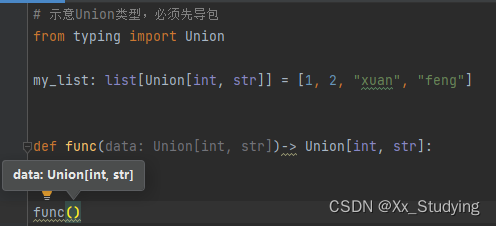
- # 示意Union类型,必须先导包
- from typing import Union
- my_list: list[Union[int, str]] = [1, 2, "xuan", "feng"]
- def func(data: Union[int, str])-> Union[int, str]:
- pass
- func()
-
相关阅读:
字符编码原理的理解
rust多个mod文件引用和文件夹mod使用注意事项
Java:关于mybatis框架mapper.xml编写小于号<的问题
Mybatis架构原理(二)-二级缓存源码剖析
Keras 3.0发布:全面拥抱 PyTorch!
C. Omkar and Baseball
私有云盘Nextcloud在线解压开发(瞎搞瞎搞0.0)
腾讯云4核8G12M服务器支持多少人在线?
修改origin分支名
Linux下gz和tar.gz、与Windows天zip压缩解压
- 原文地址:https://blog.csdn.net/Xx_Studying/article/details/126385428
