-
2022谷粒商城学习笔记(五)文件上传功能
前言
本系列博客基于B站谷粒商城,只作为本人学习总结使用。这里我会比较注重业务逻辑的编写和相关配置的流程。有问题可以评论或者联系我互相交流。原视频地址谷粒商城雷丰阳版。本人git仓库地址Draknessssw的谷粒商城
阿里云储存开通
首先去阿里云开通一个低频访问的公共读的bucket空间(本业务只做图片的上传和商城显示)
新建第三方服务模块
pom文件如下
<?xml version="1.0" encoding="UTF-8"?> <project xmlns="http://maven.apache.org/POM/4.0.0" xmlns:xsi="http://www.w3.org/2001/XMLSchema-instance" xsi:schemaLocation="http://maven.apache.org/POM/4.0.0 https://maven.apache.org/xsd/maven-4.0.0.xsd"> <modelVersion>4.0.0</modelVersion> <parent> <groupId>org.springframework.boot</groupId> <artifactId>spring-boot-starter-parent</artifactId> <version>2.3.2.RELEASE</version> <relativePath></relativePath> </parent> <groupId>com.xxxx.gulimall</groupId> <artifactId>gulimall-third-party</artifactId> <version>0.0.1-SNAPSHOT</version> <name>gulimall-third-party</name> <description>谷粒商城-第三方服务</description> <properties> <java.version>1.8</java.version> </properties> <dependencies> <!--公共模块--> <dependency> <groupId>com.xxxx.gulimall</groupId> <artifactId>gulimall-common</artifactId> <version>0.0.1-SNAPSHOT</version> <exclusions> <exclusion> <groupId>com.baomidou</groupId> <artifactId>mybatis-plus-boot-starter</artifactId> </exclusion> <exclusion> <groupId>org.springframework.cloud</groupId> <artifactId>spring-cloud-starter-zipkin</artifactId> </exclusion> </exclusions> </dependency> <!--web servlet--> <dependency> <groupId>org.springframework.boot</groupId> <artifactId>spring-boot-starter-web</artifactId> </dependency> <!--OSS_aliyun启动器 与springcloud alibaba一致--> <dependency> <groupId>com.alibaba.cloud</groupId> <artifactId>spring-cloud-starter-alicloud-oss</artifactId> <version>2.2.0.RELEASE</version> </dependency> <!--审计模块,监控应用的健康情况、调用信息--> <dependency> <groupId>org.springframework.boot</groupId> <artifactId>spring-boot-starter-actuator</artifactId> </dependency> <!--属性文件编写提示工具--> <dependency> <groupId>org.springframework.boot</groupId> <artifactId>spring-boot-configuration-processor</artifactId> <optional>true</optional> </dependency> <!--test--> <dependency> <groupId>com.tencentcloudapi</groupId> <artifactId>tencentcloud-sdk-java</artifactId> <!-- go to https://search.maven.org/search?q=tencentcloud-sdk-java and get the latest version. --> <!-- 请到https://search.maven.org/search?q=tencentcloud-sdk-java查询所有版本,最新版本如下 --> <version>3.1.322</version> </dependency> <dependency> <groupId>org.springframework.boot</groupId> <artifactId>spring-boot-starter-test</artifactId> <scope>test</scope> </dependency> </dependencies> <dependencyManagement> <dependencies> <!--springcloud--> <dependency> <groupId>org.springframework.cloud</groupId> <artifactId>spring-cloud-dependencies</artifactId> <version>Hoxton.SR6</version> </dependency> <!--springcloud alibaba--> <dependency> <groupId>com.alibaba.cloud</groupId> <artifactId>spring-cloud-alibaba-dependencies</artifactId> <version>2.2.1.RELEASE</version> </dependency> </dependencies> </dependencyManagement> <build> <plugins> <plugin> <groupId>org.springframework.boot</groupId> <artifactId>spring-boot-maven-plugin</artifactId> <version>2.3.2.RELEASE</version> </plugin> </plugins> </build> </project>- 1
- 2
- 3
- 4
- 5
- 6
- 7
- 8
- 9
- 10
- 11
- 12
- 13
- 14
- 15
- 16
- 17
- 18
- 19
- 20
- 21
- 22
- 23
- 24
- 25
- 26
- 27
- 28
- 29
- 30
- 31
- 32
- 33
- 34
- 35
- 36
- 37
- 38
- 39
- 40
- 41
- 42
- 43
- 44
- 45
- 46
- 47
- 48
- 49
- 50
- 51
- 52
- 53
- 54
- 55
- 56
- 57
- 58
- 59
- 60
- 61
- 62
- 63
- 64
- 65
- 66
- 67
- 68
- 69
- 70
- 71
- 72
- 73
- 74
- 75
- 76
- 77
- 78
- 79
- 80
- 81
- 82
- 83
- 84
- 85
- 86
- 87
- 88
- 89
- 90
- 91
- 92
- 93
- 94
- 95
- 96
- 97
- 98
- 99
- 100
- 101
- 102
- 103
- 104
nacos相关配置
spring.application.name=gulimall-thirty-party spring.cloud.nacos.config.server-addr=127.0.0.1:8848 spring.cloud.nacos.config.namespace=09955c2e-d399-4bee-8080-943d53d41be5- 1
- 2
- 3
主启动类添加开启服务注册注解

在第三方服务模块添加依赖
<!--OSS_aliyun启动器 与springcloud alibaba一致--> <dependency> <groupId>com.alibaba.cloud</groupId> <artifactId>spring-cloud-starter-alicloud-oss</artifactId> <version>2.2.0.RELEASE</version> </dependency>- 1
- 2
- 3
- 4
- 5
- 6
去阿里云右上角的个人信息创建AccessKey

创建即可

值得注意的是,secret-key不支持再次查看
在配置文件中配置刚刚生成的Access-key和secret-key,以及自己的储存节点和储存空间

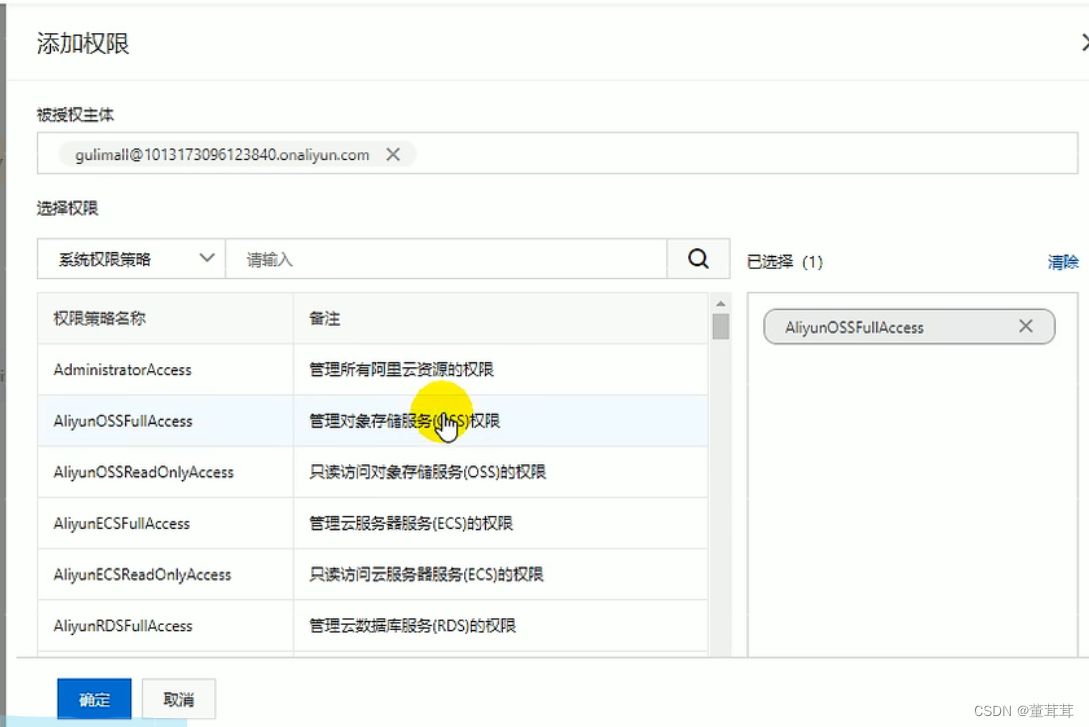
接着在控制台继续配置访问控制权限获取上传文件的签名数据
package com.xxxx.thirdparty.controller; import com.aliyun.oss.OSS; import com.aliyun.oss.common.utils.BinaryUtil; import com.aliyun.oss.model.MatchMode; import com.aliyun.oss.model.PolicyConditions; import com.xxxx.common.utils.R; import org.springframework.beans.factory.annotation.Autowired; import org.springframework.beans.factory.annotation.Value; import org.springframework.web.bind.annotation.GetMapping; import org.springframework.web.bind.annotation.RequestMapping; import org.springframework.web.bind.annotation.RestController; import java.text.SimpleDateFormat; import java.util.Date; import java.util.LinkedHashMap; import java.util.Map; /** * 对象存储 * @author LinLinD * @Create 2022-06-25-17:33 */ @RestController @RequestMapping("/oss") public class OssController { @Autowired OSS ossClient; @Value("${spring.cloud.alicloud.oss.endpoint}") private String endpoint; @Value("${spring.cloud.alicloud.oss.bucket}") private String bucket; @Value("${spring.cloud.alicloud.access-key}") private String accessId; /** * 获取对象签名 */ @GetMapping("/policy") public R policy() { // https://gulimall-wan.oss-cn-shanghai.aliyuncs.com String host = "https://" + bucket + "." + endpoint; // callbackUrl为 上传回调服务器的URL,请将下面的IP和Port配置为您自己的真实信息。 // String callbackUrl = "http://88.88.88.88:8888"; // 文件在bucket存储目录,若不存在则会自动创建路径。使用日期作为目录 String dir = new SimpleDateFormat("yyyy-MM-dd").format(new Date()) + "/"; // 创建OSSClient实例。这里是alicloud starter自动配置,可自动注入 //OSS ossClient = new OSSClientBuilder().build(endpoint, accessId, accessKey); Map<String, String> respMap = null; try { long expireTime = 30; long expireEndTime = System.currentTimeMillis() + expireTime * 1000; Date expiration = new Date(expireEndTime);// // PostObject请求最大可支持的文件大小为5 GB,即CONTENT_LENGTH_RANGE为5*1024*1024*1024。 PolicyConditions policyConds = new PolicyConditions(); policyConds.addConditionItem(PolicyConditions.COND_CONTENT_LENGTH_RANGE, 0, 1048576000); policyConds.addConditionItem(MatchMode.StartWith, PolicyConditions.COND_KEY, dir); String postPolicy = ossClient.generatePostPolicy(expiration, policyConds); byte[] binaryData = postPolicy.getBytes("utf-8"); String encodedPolicy = BinaryUtil.toBase64String(binaryData); String postSignature = ossClient.calculatePostSignature(postPolicy); respMap = new LinkedHashMap<String, String>(); respMap.put("accessid", accessId); respMap.put("policy", encodedPolicy); respMap.put("signature", postSignature); respMap.put("dir", dir); respMap.put("host", host); respMap.put("expire", String.valueOf(expireEndTime / 1000)); // respMap.put("expire", formatISO8601Date(expiration)); // 下面是跨域设置,在网关统一解决跨域 // JSONObject jasonCallback = new JSONObject(); // jasonCallback.put("callbackUrl", callbackUrl); // jasonCallback.put("callbackBody", // "filename=${object}&size=${size}&mimeType=${mimeType}&height=${imageInfo.height}&width=${imageInfo.width}"); // jasonCallback.put("callbackBodyType", "application/x-www-form-urlencoded"); // String base64CallbackBody = BinaryUtil.toBase64String(jasonCallback.toString().getBytes()); // respMap.put("callback", base64CallbackBody); // // JSONObject ja1 = JSONObject.fromObject(respMap); // // System.out.println(ja1.toString()); // response.setHeader("Access-Control-Allow-Origin", "*"); // response.setHeader("Access-Control-Allow-Methods", "GET, POST"); // response(request, response, ja1.toString()); } catch (Exception e) { // Assert.fail(e.getMessage()); System.out.println(e.getMessage()); } finally { ossClient.shutdown(); } return R.ok().put("data", respMap); } }- 1
- 2
- 3
- 4
- 5
- 6
- 7
- 8
- 9
- 10
- 11
- 12
- 13
- 14
- 15
- 16
- 17
- 18
- 19
- 20
- 21
- 22
- 23
- 24
- 25
- 26
- 27
- 28
- 29
- 30
- 31
- 32
- 33
- 34
- 35
- 36
- 37
- 38
- 39
- 40
- 41
- 42
- 43
- 44
- 45
- 46
- 47
- 48
- 49
- 50
- 51
- 52
- 53
- 54
- 55
- 56
- 57
- 58
- 59
- 60
- 61
- 62
- 63
- 64
- 65
- 66
- 67
- 68
- 69
- 70
- 71
- 72
- 73
- 74
- 75
- 76
- 77
- 78
- 79
- 80
- 81
- 82
- 83
- 84
- 85
- 86
- 87
- 88
- 89
- 90
- 91
- 92
- 93
- 94
- 95
- 96
- 97
- 98
- 99
- 100
- 101
- 102
getaway配置网关
spring: cloud: gateway: routes: - id: third_party_route uri: lb://gulimall-third-party predicates: - Path=/api/thirdparty/** filters: - RewritePath=/api/thirdparty/(?.*),/$\{segment} - 1
- 2
- 3
- 4
- 5
- 6
- 7
- 8
- 9
- 10
和前端联调还需要去阿里云控制台配置跨域规则

-
相关阅读:
FastJson
微积分(三) 不定积分和定积分
图像分割竟能如此丝滑、高清?大规模二分图像分割数据集DIS5K解读
彻底删除Ubuntu双系统(联想小新2022)
坚持用C++刷牛客题(剑指offer专题)
【情态动词练习题】Can / Could you
PDF文件怎么转换成Word?这几种方法原来这么简单
2024年热门电脑监控软件,十大电脑监控软件推荐
面试题速记:JavaScript有哪些数据类型,它们的区别是?
Unity中AssetBundle的变体(Varient)使用教程
- 原文地址:https://blog.csdn.net/qq_44737138/article/details/126371093