-
PyTorch笔记 - Recurrent Neural Network(RNN) 循环神经网络
循环神经网络,RNN(Recurrent Neural Network):
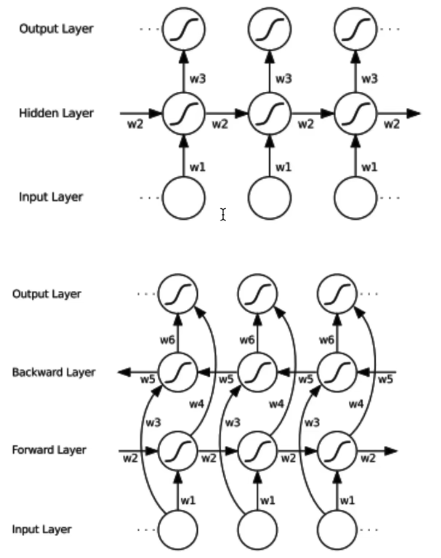
- 记忆单元分类:RNN(Recurrent Neural Network)、GRU(Gate Recurrent Unit)、LSTM(Long Short-Term Memory)
- 模型类别:单向循环、双向循环、多层单向或双向叠加
- 优缺点:
- 优点:可以处理变长序列、模型大小与序列长度无关、计算量与序列长度呈线性增长、考虑历史信息、便于流式输出、权重时不变
- 缺点:串行计算比较慢、无法获取太长的历史信息
- 应用:AI诗歌生成、文本情感分类、词法识别、机器翻译、语音识别/合成、语言模型

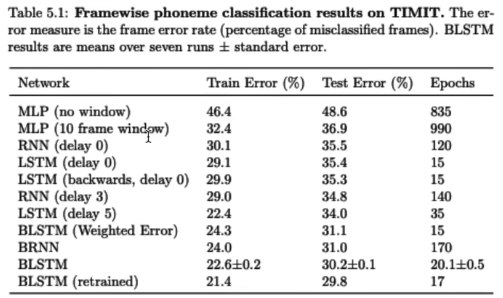
不同类型的RNN效果对比:
- delay 3,预测第1帧时,使用第3帧输入的结果,模型已经看到第1~3帧,看到更多上下文,提升预测效果。

诗歌生成任务:one -> many

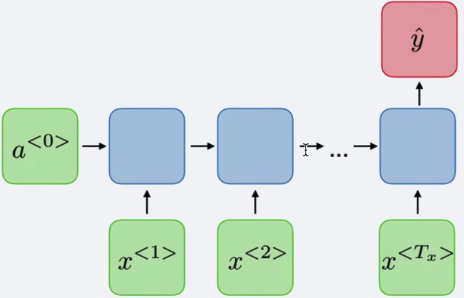
情感分类任务:many -> one

词法识别:

机器翻译:sequence to sequence,AED,Attention Based Encoder-Decoder

- 当前输入x(t),上一时刻h(t-1)是t-1时刻的隐含状态
- 激活函数tanh

RNN参数:
input_size: 输入尺寸hidden_size: 隐含层尺寸num_layers: 循环层数,RNN的堆叠层nonlinearity: 非线性激活bias: 偏置batch_first: 批次在前dropout: 抛弃层bidirectional: 双向RNN结构,输出是2 x hidden_size,头尾都有输出
输入:input和h_0,
input -> (L, N, H_in)、h_0 -> (Dxnum_layer, N, H_out),默认是0填充RNN - PyTorch函数
import torch import torch.nn as nn import torch.nn.functional as F # step1 单向,单层RNN # input_size, hidden_size, num_layers single_rnn = nn.RNN(4, 3, 1, batch_first=True) input = torch.randn(1, 2, 4) # bs * sl * fs output, h_n = single_rnn(input) # 不输入h_0,默认是0填充 print(f'output: {outp ut.shape}') print(f'h_n: {h_n.shape}') # 最后一行的值 # step2 双向,单层RNN bidirectional_rnn = nn.RNN(4, 3, 1, batch_first=True, bidirectional=True) bi_output, bi_h_n = bidirectional_rnn(input) print(f'bi_output: {bi_output.shape}') # 2个hidden_size print(f'bi_h_n: {bi_h_n.shape}') # 最后一行的值,双向中有两个层的状态- 1
- 2
- 3
- 4
- 5
- 6
- 7
- 8
- 9
- 10
- 11
- 12
- 13
- 14
- 15
- 16
- 17
实现RNN和BiRNN:
bs, T = 2, 3 # batch_size,输入序列长度 input_size, hidden_size = 2, 3 # 输入特征大小,隐含层特征大小 torch.manual_seed(42) input = torch.randn(bs, T, input_size) # 随机初始化一个输入特征序列 h_prev = torch.zeros(bs, hidden_size) # 初始隐含状态 # step1 调用PyTorch RNN API rnn = nn.RNN(input_size, hidden_size, batch_first=True) rnn_output, state_final = rnn(input, h_prev.unsqueeze(0)) # print(f'rnn_output: \n{rnn_output}') # print(f'state_final: \n{state_final}') # step2 手写一个rnn_forward函数, 实现RNN的计算过程 def rnn_forward(input, weight_ih, weight_hh, bias_ih, bias_hh, h_prev): bs, T, input_size = input.shape h_dim = weight_ih.shape[0] h_out = torch.zeros(bs, T, h_dim) for t in range(T): x = input[:, t, :].unsqueeze(2) # 获取当前时刻输入特征, bs*input_size*1 # weight在不同batch中相同 w_ih_batch = weight_ih.unsqueeze(0).tile(bs, 1, 1) # bs*h_dim*input_size w_hh_batch = weight_hh.unsqueeze(0).tile(bs, 1, 1) # bs*h_dim*h_dim w_times_x = torch.bmm(w_ih_batch, x).squeeze(-1) # bs*h_dim w_times_h = torch.bmm(w_hh_batch, h_prev.unsqueeze(2)).squeeze(-1) # bs*h_dim h_prev = torch.tanh(w_times_x + bias_ih + w_times_h + bias_hh) h_out[:, t, :] = h_prev # 更新状态 return h_out, h_prev.unsqueeze(0) # 验证一下rnn_forward的正确性 # for k, v in rnn.named_parameters(): # print(k, v) custom_rnn_output, custom_state_final = rnn_forward(input, rnn.weight_ih_l0, rnn.weight_hh_l0, rnn.bias_ih_l0, rnn.bias_hh_l0, h_prev) # print(f'custom_rnn_output: \n{custom_rnn_output}') # print(f'custom_state_final: \n{custom_state_final}') # step3 手写一个bidrectional_rnn_forward函数,实现双向RNN的计算资源 def bidirectional_rnn_forward(input, weight_ih, weight_hh, bias_ih, bias_hh, h_prev, \ weight_ih_reverse, weight_hh_reverse, bias_ih_reverse, bias_hh_reverse, h_prev_reverse): bs, T, input_size = input.shape h_dim = weight_ih.shape[0] h_out = torch.zeros(bs, T, h_dim*2) forward_output = rnn_forward(input, weight_ih, weight_hh, bias_ih, bias_hh, h_prev)[0] # forward layer backward_output = rnn_forward(torch.flip(input, dims=[1]), weight_ih_reverse, weight_hh_reverse, bias_ih_reverse, bias_hh_reverse, h_prev_reverse)[0] h_out[:, :, :h_dim] = forward_output # 更新状态 h_out[:, :, h_dim:] = backward_output # 更新状态 return h_out, h_out[:, -1, :].reshape((bs, 2, h_dim)).transpose(0, 1) # 验证一下bidirectional_rnn_forward的正确性 bi_rnn = nn.RNN(input_size, hidden_size, batch_first=True, bidirectional=True) torch.manual_seed(42) input = torch.randn(bs, T, input_size) # 随机初始化一个输入特征序列 h_prev = torch.zeros(2, bs, hidden_size) # 初始隐含状态 rnn_output, state_final = bi_rnn(input, h_prev) print(f'rnn_output: \n{rnn_output}') print(f'state_final: \n{state_final}') # for k, v in bi_rnn.named_parameters(): # print(k, v) custom_bi_rnn_output, custom_bi_state_final = \ bidirectional_rnn_forward(input, bi_rnn.weight_ih_l0, \ bi_rnn.weight_hh_l0, bi_rnn.bias_ih_l0, \ bi_rnn.bias_hh_l0, h_prev[0], \ bi_rnn.weight_ih_l0_reverse, \ bi_rnn.weight_hh_l0_reverse, \ bi_rnn.bias_ih_l0_reverse, \ bi_rnn.bias_hh_l0_reverse, h_prev[1]) print(f'custom_bi_rnn_output: \n{custom_bi_rnn_output}') print(f'custom_bi_state_final: \n{custom_bi_state_final}')- 1
- 2
- 3
- 4
- 5
- 6
- 7
- 8
- 9
- 10
- 11
- 12
- 13
- 14
- 15
- 16
- 17
- 18
- 19
- 20
- 21
- 22
- 23
- 24
- 25
- 26
- 27
- 28
- 29
- 30
- 31
- 32
- 33
- 34
- 35
- 36
- 37
- 38
- 39
- 40
- 41
- 42
- 43
- 44
- 45
- 46
- 47
- 48
- 49
- 50
- 51
- 52
- 53
- 54
- 55
- 56
- 57
- 58
- 59
- 60
- 61
- 62
- 63
- 64
- 65
- 66
- 67
- 68
- 69
- 70
- 71
- 72
- 73
- 74
- 75
- 76
- 77
- 78
- 79
- 80
- 81
- 82
- 83
-
相关阅读:
intel 一些偏门汇编指令总结
Linux中创建文件夹,删除文件夹
FreeSWITCH的originate命令解析及示例
5. 基于Embedding实现超越elasticsearch高级搜索
AndroidStudio004--RelativeLayout相对布局使用
为什么都说考完二建就要去准备一建,这几点你一定不知道!
Spring Data JPA
云原生技术盛会KubeCon即将召开!亚马逊云科技作为钻石赞助商参会
【Java】泛型的理解与使用,包装类
Java终止线程的三种方式
- 原文地址:https://blog.csdn.net/u012515223/article/details/126375796
