-
springboot 引入nacos
springboot 引入nacos
参考官网:
https://nacos.io/zh-cn/docs/quick-start-spring-cloud.html
依赖<dependency> <groupId>com.alibaba.cloud</groupId> <artifactId>spring-cloud-starter-alibaba-nacos-config</artifactId> <version>2.0.4.RELEASE</version> </dependency>- 1
- 2
- 3
- 4
- 5
启动类bootstrap.yml
server: port: 8080 servlet: context-path: /api spring: profiles: active: dev servlet: multipart: max-file-size: 10MB application: name: lcem-server cloud: nacos: config: server-addr: XXXXX:8848 namespace: f70658b1-8a35-42bc-a219-23a309456ce8 group: DEFAULT_GROUP file-extension: yaml enabled: true refresh-enabled: true extension-configs: - data-id: application-dev.yml refresh: true - data-id: securedev.yml refresh: true authEnabled: true- 1
- 2
- 3
- 4
- 5
- 6
- 7
- 8
- 9
- 10
- 11
- 12
- 13
- 14
- 15
- 16
- 17
- 18
- 19
- 20
- 21
- 22
- 23
- 24
- 25
- 26
- 27
- 28
- 29
- 30
- 31
- 32
访问nacos网址:http://localhost:8080/nacos,初始用户名和密码都是nacos
nacos配置需要放入的配置文件:
我的data_id 就是我的文件名

获取配置:@RestController @RequestMapping("/config") @RefreshScope public class ConfigController { @Value("${useLocalCache:false}") private boolean useLocalCache; @RequestMapping("/get") public boolean get() { return useLocalCache; } }- 1
- 2
- 3
- 4
- 5
- 6
- 7
- 8
- 9
- 10
- 11
- 12
- 13
将读取出来的yml文件转换成对象
依赖:
<dependency> <groupId>com.fasterxml.jackson.dataformat</groupId> <artifactId>jackson-dataformat-yaml</artifactId> <version>2.12.4</version> </dependency> <dependency> <groupId>com.fasterxml.jackson.core</groupId> <artifactId>jackson-core</artifactId> <version>2.11.2</version> </dependency>- 1
- 2
- 3
- 4
- 5
- 6
- 7
- 8
- 9
- 10
- 11
代码实现:
@Value("${authConfigUrl:secure.yml}") private String secureUrl;//这是配置在nacos中的不同环境的配置 @Value("${spring.cloud.nacos.config.server-addr}") private String SERVER_ADDR; @Value("${spring.cloud.nacos.config.namespace}") private String NAMESPACE; @Value("${spring.cloud.nacos.config.group}") private String GROUP; /** * 使用NacosFactory 从nacos配置中心获取城市编码列表 * * @return */ @SneakyThrows public HashMap getCityCodeListByNacosFactory() { Properties properties = new Properties(); // nacos服务器地址 properties.put(PropertyKeyConst.SERVER_ADDR, SERVER_ADDR); // 配置中心的命名空间id properties.put(PropertyKeyConst.NAMESPACE, NAMESPACE); ConfigService configService = NacosFactory.createConfigService(properties); // 根据dataId、group定位到具体配置文件,获取其内容. 方法中的三个参数分别是: dataId, group, 超时时间 String content = configService.getConfig(secureUrl, GROUP, 3000L); ObjectMapper mapper = new ObjectMapper(new YAMLFactory()); mapper.findAndRegisterModules(); HashMap hashMap = new HashMap(); try { hashMap = mapper.readValue(content, HashMap.class); return hashMap; } catch (JsonProcessingException e) { e.printStackTrace(); } return hashMap; }- 1
- 2
- 3
- 4
- 5
- 6
- 7
- 8
- 9
- 10
- 11
- 12
- 13
- 14
- 15
- 16
- 17
- 18
- 19
- 20
- 21
- 22
- 23
- 24
- 25
- 26
- 27
- 28
- 29
- 30
- 31
- 32
- 33
- 34
- 35
- 36
- 37
- 38
- 39
- 40
- 41
多环境配置:
maven多环境配置
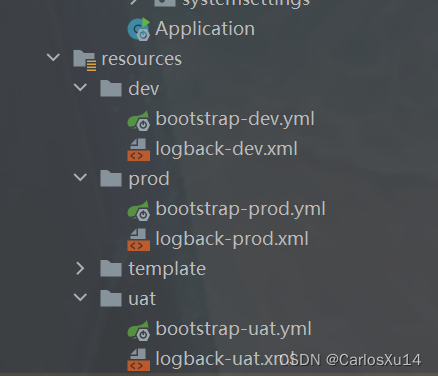
配置目录:

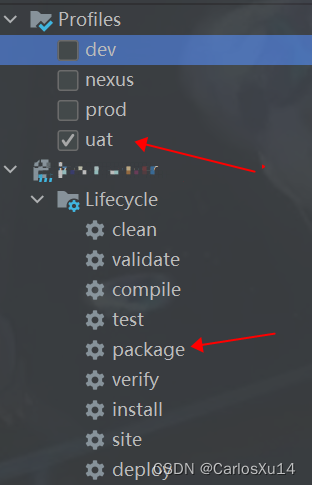
dev,uat,prod不同环境,这写配置是放在项目的pom文件中
<profiles> <profile> <!-- 本地开发环境 --> <id>dev</id> <properties> <profiles.active>dev</profiles.active> <deploy.url>http://localhost:8080/manager/text</deploy.url> <build-type>war</build-type> </properties> <activation> <activeByDefault>true</activeByDefault> </activation> </profile> <profile> <!-- 生产环境 --> <id>prod</id> <properties> <profiles.active>prod</profiles.active> <deploy.url>http://host:port/manager/text</deploy.url> <build-type>jar</build-type> </properties> </profile> <profile> <!-- uat环境 --> <id>uat</id> <properties> <profiles.active>uat</profiles.active> <deploy.url>http://host:port/manager/text</deploy.url> <build-type>jar</build-type> </properties> </profile> </profiles>- 1
- 2
- 3
- 4
- 5
- 6
- 7
- 8
- 9
- 10
- 11
- 12
- 13
- 14
- 15
- 16
- 17
- 18
- 19
- 20
- 21
- 22
- 23
- 24
- 25
- 26
- 27
- 28
- 29
- 30
- 31
- 32
- 33
- 34
- 35
配置
<build> <resources> <resource> <directory>src/main/resources</directory> <!-- 资源根目录排除各环境的配置,使用单独的资源目录来指定 --> <excludes> <exclude>prod/*dev/* uat/* src/main/resources/${profiles.active} ../resources prod/* dev/* uat/* ../resources/${profiles.active} src/main/java **/ maven-compiler-plugin 1.8 1.8 UTF-8 org.apache.maven.plugins maven-surefire-plugin true - 1
- 2
- 3
- 4
- 5
- 6
- 7
- 8
- 9
- 10
- 11
- 12
- 13
- 14
- 15
- 16
- 17
- 18
- 19
- 20
- 21
- 22
- 23
- 24
- 25
- 26
- 27
- 28
- 29
- 30
- 31
- 32
- 33
- 34
- 35
- 36
- 37
- 38
- 39
- 40
- 41
- 42
- 43
- 44
- 45
- 46
- 47
- 48
- 49
- 50
- 51
- 52
- 53
- 54
- 55
- 56
- 57
- 58
- 59
- 60
- 61
- 62
- 63
- 64
- 65
- 66
- 67
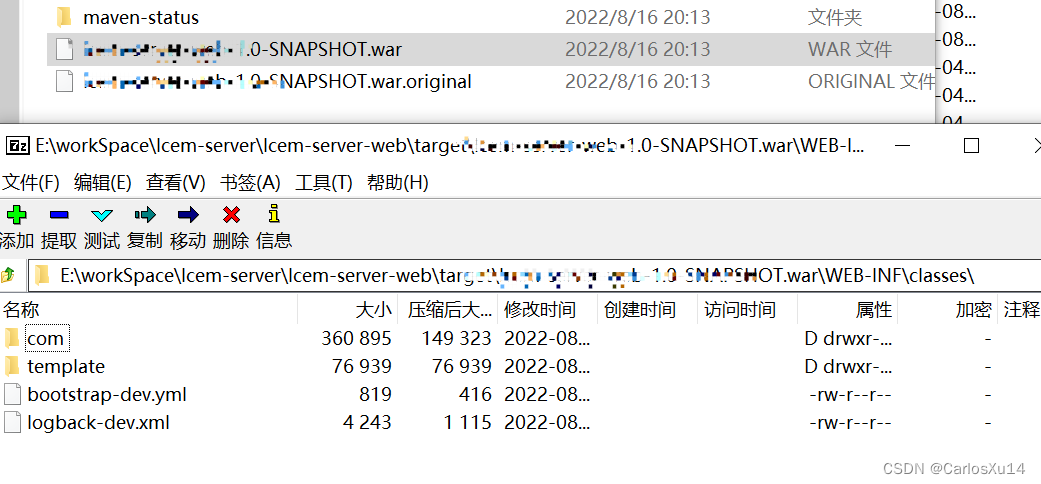
idea本地启动成功,远程打包失败:
可以现本地打远程包看看内容

查看内容是否和自己预想的一致

-
相关阅读:
第5讲:Python运算符的优先级以及结核性
Python学习日记-第三十八天-生成器(第二节)
论文笔记:Convolutional Image Captioning
期末前端web大作业:餐饮美食网站设计与实现——HTML+CSS+JavaScript美食餐饮网站 3页面
Java线程stop,sleep,yield,join
核酸管外观缺陷检测(一)
117组Zbrush三维树木枝干雕刻建模笔刷,50个Alpha和8个树底
虚拟机安装 | 远程连接服务器
【我不熟悉的javascript】02. 使用token和refreshToken的管理用户登录状态
【论文阅读】Bag of Tricks for Efficient Text Classification高效率文本分类技巧包
- 原文地址:https://blog.csdn.net/qq_43459184/article/details/126372192
