-
python笔记 -- 面向对象
1. 类与对象
1.1 类的创建
-
类的组成
- 类属性
- 实例方法
- 静态方法
- 类方法
# 格式 class Student: name = 'swy' # 类属性 def f(): # 实例方法 print('实例方法') @staticmethod def g(): # 静态方法 print('静态方法') @classmethod def h(cls): # 类方法 print('类方法') def __init__(self, name, age): # 初始化方法 self.name = name self.age = age- 1
- 2
- 3
- 4
- 5
- 6
- 7
- 8
- 9
- 10
- 11
- 12
- 13
- 14
- 15
- 16
- 17
- 18
1.2 对象的创建
语法: 实例名 = 类名()
stu = Student('swy', 23) print(stu.name, stu.age) # 第一种调用方式 stu.g() stu.h() stu.m() # 第二种调用方式 Student.m(stu) Student.h() Student.h()- 1
- 2
- 3
- 4
- 5
- 6
- 7
- 8
- 9
- 10
1.3 动态绑定属性和方法
stu = Student('swy', 23) # 动态绑定属性 stu.gender = '男' print(stu.gender) def show(): print('show') # 动态绑定方法 stu.show = show stu.show()- 1
- 2
- 3
- 4
- 5
- 6
- 7
- 8
- 9
- 10
2. 三大特征
2.1 封装
- 提高程序的安全性
- 将数据和行为封装到类对象中,在方法内部对属性进行操作,在类对象的外部调用方法
- Python中没有专门的修饰符用于属性的私有,可以前面使用两个"_"
class Car: def __init__(self, name): self.__name = name #name不希望在类的外部被使用,所以加了两个_ def start(self): print('启动中...') car = Car('宝马') car.start() print(car.name)- 1
- 2
- 3
- 4
- 5
- 6
- 7
- 8
- 9

2.2 继承
- 继承可以提高代码的可复用性
- Python支持多继承
- 定义子类时,必须在其构造函数中调用父类的构造函数
- 默认继承object类
class 子类类名( 父类1, 父类2... ): pass- 1
- 2
# 父类 class Person(object): def __init__(self, name, age): self.name = name self.age = age def info(self): print('姓名:{0} 年龄:{1}'.format(self.name, self.age)) # 子类 class Student(Person): def __init__(self, name, age, score): super().__init__(name, age) self.score = score # 实例化子类 stu = Student('swy', 23, 59) stu.info() # 子类继承的父类的方法- 1
- 2
- 3
- 4
- 5
- 6
- 7
- 8
- 9
- 10
- 11
- 12
- 13
- 14
- 15
- 16
- 17

object类- object类是所有类的父类,因此所有类都有object类的属性和方法
- 内置函数dir()可以查看指定对象所有属性
- Object有一个_str_()方法,用于返回一个对于“对象的描述”,因此我们经常会对_str_()进行重写,类似于Java中的toString()方法
obj = object() print(dir(obj))- 1
- 2
结果:
[‘class’, ‘delattr’, ‘dir’, ‘doc’, ‘eq’, ‘format’, ‘ge’, ‘getattribute’, ‘gt’, ‘hash’, ‘init’, ‘init_subclass’, ‘le’, ‘lt’, ‘ne’, ‘new’, ‘reduce’, ‘reduce_ex’, ‘repr’, ‘setattr’, ‘sizeof’, ‘str’, ‘subclasshook’]
class Student: def __init__(self, name): self.name = name def __str__(self): # 重写__str__()方法 return '重写__str__(): name: {0}'.format('swy') stu = Student('swy') print(stu)- 1
- 2
- 3
- 4
- 5
- 6
- 7
- 8

2.3 多态
- 多态就是“具有多种形态”
- 即便不知道一个变量所引用的对象到底是什么类型,仍然可以通过这个变量调用方法,在运行过程中根据变量所引用对象的类型,动态决定调用哪个对象中的方法
class Animal(object): def eat(self): print('动物会吃') class Dog(Animal): def eat(self): print('狗会吃') class Cat(Animal): def eat(self): print('猫会吃') def eat(obj): obj.eat() eat(Animal()) eat(Dog()) eat(Cat())- 1
- 2
- 3
- 4
- 5
- 6
- 7
- 8
- 9
- 10
- 11
- 12
- 13
- 14
- 15
- 16
- 17
- 18

3. 特殊属性和方法
特殊属性 描述 __dict__ 获得类对象或实例对象所绑定的所有属性和方法的字典 特殊方法 描述 __len__() 通过重写该方法,让内置函数len()的参数可以是自定义类型 __add__() 通过重写该方法,可以使自定义对象具有"+"功能 __new__() 用于创建对象 __init__() 对创建的对象进行初始化 4. 浅拷贝与深拷贝
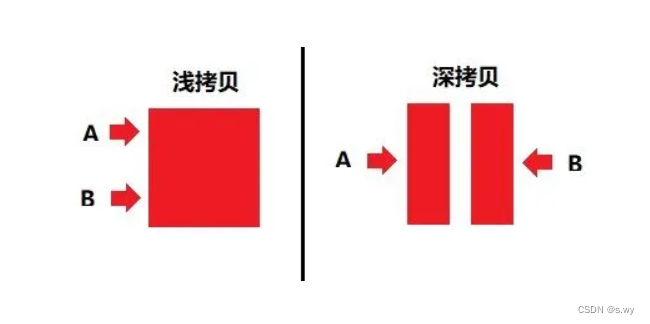
- 浅拷贝: Python拷贝一般都是浅拷贝,拷贝时,对象包含的子对象内容不拷贝,因此,源对象与拷贝对象会引用同一个子对象
- 深拷贝: 使用copy模块的deepcopy函数,递归拷贝对象中包含的子对象,源对象和拷贝对象所有的子对象也不相同
class CPU: pass class Disk: pass class Computer: def __init__(self, cpu, disk): self.cpu = cpu self.disk = disk cpu = CPU() disk = Disk() computer = Computer(cpu, disk) # 浅拷贝 import copy print('--------浅拷贝--------') computer2 = copy.copy(computer) print(computer, computer.cpu, computer.disk) print(computer2, computer2.cpu, computer2.disk) # 深拷贝 print('\n--------深拷贝--------') computer3 = copy.deepcopy(computer) print(computer, computer.cpu, computer.disk) print(computer3, computer3.cpu, computer3.disk)- 1
- 2
- 3
- 4
- 5
- 6
- 7
- 8
- 9
- 10
- 11
- 12
- 13
- 14
- 15
- 16
- 17
- 18
- 19
- 20
- 21
- 22
- 23
- 24
- 25

-
相关阅读:
【Leetcode小解析】正则表达式匹配
Spring Boot+Vue+阿里云OOS实现图片上传
Python爬虫实战,requests+parsel模块,爬取二手房房源信息数据
TDE和数据脱敏功能介绍
【Pygame】 游戏开发 基础知识
E138: Can‘t write viminfo file
机器人C++库(9)Robotics Library 之机器人建模(VRML)、工作场景Scances建模(VRML)
c# --- 列表
[前端必学]精准控制webpack处理文件名hash的问题
【kubernetes】使用virtual-kubelet扩展k8s
- 原文地址:https://blog.csdn.net/swy66/article/details/126356153
