-
Spring常见问题解决 - 同一个类型的单例Bean找到了两个?
前言
其实这个问题,在我上一篇文章Spring - 常见编程错误之Bean的定义就有说过了。但是我在做这一块内容的时候,我还是觉得做成一个问题对应一篇文章的方式比较好,这样更具有针对性。我个人也希望自己能够在源码角度能够将自身学过的知识串联起来。因此从源码角度会分析的更多一点。
一. 单例 Bean 为何找到了两个?
首先,这类错误比较常见的提示信息是:
required a single bean, but 2 were found- 1
1.1 案例复现
然后我们来复现一下这个问题:
1.提供一个接口,2个或以上的对应接口实现类:public interface UserService { void say(); } @Service public class TeacherService implements UserService{ @Override public void say() { System.out.println("Teacher"); } } @Service public class StudentService implements UserService{ @Override public void say() { System.out.println("Student"); } }- 1
- 2
- 3
- 4
- 5
- 6
- 7
- 8
- 9
- 10
- 11
- 12
- 13
- 14
- 15
- 16
- 17
- 18
- 19
2.然后在
Controller类中去引入这个接口实例:@Autowired private UserService userService;- 1
- 2
3.运行结果如下:

1.2 原理分析
同样的,我们应该从
@Autowired这个注解出发。我们知道,这个注解用于根据类型对Bean进行自动装配。 那么首先我们应该追溯的是这个Bean的创建过程。而
Bean的创建过程,统一在AbstractAutowireCapableBeanFactory.createBean()这个函数中。这个函数,我们需要明知的重要信息是,一个Bean的创建,包含了三大步骤:Bean实例的创建。- 相关依赖的属性注入。
Bean的初始化过程。
那么首先的我们应该去看外部因素,也就是
@Autowired注解的使用是否和这个问题有关联?1.2.1 @Autowired 和 BeanPostProcessor的关系
那么,
@Autowired注解本身和这个Bean的创建过程有何关联呢?我们先来看下这个注解所在的包结构:

红圈框起来的两个是一对小俩口,我觉得可以这么理解:@Autowired注解:用来一个显式的声明。AutowiredAnnotationBeanPostProcessor:用来底层逻辑的具体实现。
在上一篇文章我们说过,
BeanPostProcessor它是一个接口,可以让使用者在某个Bean被初始化操作的前后做出对应地修改操作。这里再做个额外的分享,Spring中有一个名字很像的接口,然后呢又极容易搞混:BeanFactoryPostProcessor:这个处理器,是在Bean被实例化之前,允许对其元数据做出动态地修改。BeanPostProcessor:这个处理器,则是在Bean被实例化之后,初始化之前/后做出对应地修改操作。
请注意的是,两者的调用时机不一样,请不要搞混了。
回到正轨,我们来继续说下
AutowiredAnnotationBeanPostProcessor这个类,到目前为止,我们得知的信息有两点:@Autowired注解的实现依靠于AutowiredAnnotationBeanPostProcessor底层逻辑。AutowiredAnnotationBeanPostProcessor又和BeanPostProcessor这个后置处理器有关联。
在上一篇文章Spring - 常见编程错误之Bean的定义我提到了,
@Autowired注解的作用就是自动装配,只不过对应的Bean是一个单例罢了。但是本文的案例中,在自动装配的过程中,却发现了两个Bean?那么我们就要看下自动装配的过程了。1.2.2 @Autowired 和 依赖注入的关系
我们再来看下
Controller这个类:@Controller public class MyController { @Autowired private UserService userService; }- 1
- 2
- 3
- 4
- 5
我们再来重复一遍这样的话,一个
Bean的创建分为三个步骤:实例创建、依赖注入、初始化。很明显,userService对于MyController类而言,是它的一个内部依赖对象,涉及到依赖注入阶段。因此我们来看下依赖注入的代码:AbstractAutowireCapableBeanFactory.populateBean():protected void populateBean(String beanName, RootBeanDefinition mbd, @Nullable BeanWrapper bw) { // .. for (BeanPostProcessor bp : getBeanPostProcessors()) { if (bp instanceof InstantiationAwareBeanPostProcessor) { InstantiationAwareBeanPostProcessor ibp = (InstantiationAwareBeanPostProcessor) bp; PropertyValues pvsToUse = ibp.postProcessProperties(pvs, bw.getWrappedInstance(), beanName); // .. pvs = pvsToUse; } } // .. }- 1
- 2
- 3
- 4
- 5
- 6
- 7
- 8
- 9
- 10
- 11
- 12
这里我们可以看出,代码主要是循环调用
BeanPostProcessor这个后置处理器的postProcessProperties()函数。但是看到这里的朋友们可能有疑惑了。文章不是说,BeanPostProcessor的作用不就是在初始化Bean的前后做出对应的处理吗?那不就是对应着两个方法呗?没错,看下BeanPostProcessor这个接口:public interface BeanPostProcessor { default Object postProcessBeforeInitialization(Object bean, String beanName) throws BeansException { return bean; } default Object postProcessAfterInitialization(Object bean, String beanName) throws BeansException { return bean; } }- 1
- 2
- 3
- 4
- 5
- 6
- 7
- 8
那么
postProcessProperties()函数从何而来?它来自InstantiationAwareBeanPostProcessor接口,其继承了BeanPostProcessor接口:public interface InstantiationAwareBeanPostProcessor extends BeanPostProcessor { @Nullable default PropertyValues postProcessProperties(PropertyValues pvs, Object bean, String beanName) throws BeansException { return null; } }- 1
- 2
- 3
- 4
- 5
- 6
- 7
那么回到
AutowiredAnnotationBeanPostProcessor类中,就有这个方法的具体实现:(由于和上篇文章的内容有点重复,因此这里只把关键代码的调用链贴出来)@Override public PropertyValues postProcessProperties(PropertyValues pvs, Object bean, String beanName) { // 1.寻找注入对象的相关元数据 InjectionMetadata metadata = findAutowiringMetadata(beanName, bean.getClass(), pvs); // 2.执行依赖的注入 metadata.inject(bean, beanName, pvs); } ↓↓↓↓↓↓↓↓↓↓↓↓↓↓↓↓↓ private InjectionMetadata findAutowiringMetadata(String beanName, Class<?> clazz, @Nullable PropertyValues pvs) { metadata = buildAutowiringMetadata(clazz); } ↓↓↓↓↓↓↓↓↓↓↓↓↓↓↓↓↓ private InjectionMetadata buildAutowiringMetadata(final Class<?> clazz) { ReflectionUtils.doWithLocalFields(targetClass, field -> { // 寻找字段元数据信息 MergedAnnotation<?> ann = findAutowiredAnnotation(field); currElements.add(new AutowiredFieldElement(field, required)); }); // 寻找方法元数据信息 ReflectionUtils.doWithLocalMethods(targetClass, method -> { currElements.add(new AutowiredMethodElement(method, required, pd)); }); }; }- 1
- 2
- 3
- 4
- 5
- 6
- 7
- 8
- 9
- 10
- 11
- 12
- 13
- 14
- 15
- 16
- 17
- 18
- 19
- 20
- 21
- 22
- 23
- 24
这里我们只需要关注两点即可:
- 我们的
ControllerBean,其相关的依赖元数据信息在这里都被收集起来了,并且封装成了AutowiredMethodElement对象。 - 然后去调用对应的
inject()函数,根据第一点,这里实际调用的自然而然的是AutowiredMethodElement.inject()函数。
1.2.3 依赖注入和 inject() 之间的关系
我们可以从上文直到,依赖注入其实就俩过程:
- 寻找目标类的相关依赖元数据信息。包括字段、方法。
- 执行
inject()方法完成依赖注入,本质上就是通过反射赋值。
我们来看下
inject()中比较重要的一点:@Override protected void inject(Object bean, @Nullable String beanName, @Nullable PropertyValues pvs) throws Throwable { Field field = (Field) this.member; Object value; // 第一次肯定没缓存,我们不考虑这个分支 if (this.cached) { value = resolvedCachedArgument(beanName, this.cachedFieldValue); } else { DependencyDescriptor desc = new DependencyDescriptor(field, this.required); desc.setContainingClass(bean.getClass()); Set<String> autowiredBeanNames = new LinkedHashSet<>(1); Assert.state(beanFactory != null, "No BeanFactory available"); TypeConverter typeConverter = beanFactory.getTypeConverter(); try { // 根据依赖的信息,找到对应的依赖并完成注入 value = beanFactory.resolveDependency(desc, beanName, autowiredBeanNames, typeConverter); } catch (BeansException ex) { throw new UnsatisfiedDependencyException(null, beanName, new InjectionPoint(field), ex); } // ... if (value != null) { ReflectionUtils.makeAccessible(field); field.set(bean, value); } }- 1
- 2
- 3
- 4
- 5
- 6
- 7
- 8
- 9
- 10
- 11
- 12
- 13
- 14
- 15
- 16
- 17
- 18
- 19
- 20
- 21
- 22
- 23
- 24
- 25
- 26
- 27
我们将重点转移到
beanFactory.resolveDependency这个函数上:最终实现:public class DefaultListableBeanFactory extends AbstractAutowireCapableBeanFactory implements ConfigurableListableBeanFactory, BeanDefinitionRegistry, Serializable { public Object resolveDependency(DependencyDescriptor descriptor, @Nullable String requestingBeanName, @Nullable Set<String> autowiredBeanNames, @Nullable TypeConverter typeConverter) throws BeansException { result = doResolveDependency(descriptor, requestingBeanName, autowiredBeanNames, typeConverter); } // 这里的descriptorz指的是userService这个字段,beanName指的是myController @Nullable public Object doResolveDependency(DependencyDescriptor descriptor, @Nullable String beanName, @Nullable Set<String> autowiredBeanNames, @Nullable TypeConverter typeConverter) throws BeansException { InjectionPoint previousInjectionPoint = ConstructorResolver.setCurrentInjectionPoint(descriptor); try { Object shortcut = descriptor.resolveShortcut(this); if (shortcut != null) { return shortcut; } // 拿到这个字段对应的类型 ---> UserService Class<?> type = descriptor.getDependencyType(); // 看看是否有默认值,没有就是null Object value = getAutowireCandidateResolver().getSuggestedValue(descriptor); if (value != null) { // ...一些converter转换 } // 如果是集合类型依赖的处理 Object multipleBeans = resolveMultipleBeans(descriptor, beanName, autowiredBeanNames, typeConverter); if (multipleBeans != null) { return multipleBeans; } // 根据类型userService,去匹配Bean 。由于UserService我们有两个实现类,因此这里能匹配出两条数据 // 这里只是一个候选的Bean Map<String, Object> matchingBeans = findAutowireCandidates(beanName, type, descriptor); // ... String autowiredBeanName; Object instanceCandidate; // 我们只关注如果匹配出来的结果有多个会怎么样 if (matchingBeans.size() > 1) { // 开始匹配,确定最终该使用哪一个Bean做注入 autowiredBeanName = determineAutowireCandidate(matchingBeans, descriptor); if (autowiredBeanName == null) { // 如果匹配出来的结果为null 但是呢,Required属性又是true(意思就是说这个属性必须要注入,要有值) // 或者indicatesMultipleBeans这个条件不满足 if (isRequired(descriptor) || !indicatesMultipleBeans(type)) { return descriptor.resolveNotUnique(descriptor.getResolvableType(), matchingBeans); } else { return null; } } instanceCandidate = matchingBeans.get(autowiredBeanName); } // ... return result; } finally { ConstructorResolver.setCurrentInjectionPoint(previousInjectionPoint); } } }- 1
- 2
- 3
- 4
- 5
- 6
- 7
- 8
- 9
- 10
- 11
- 12
- 13
- 14
- 15
- 16
- 17
- 18
- 19
- 20
- 21
- 22
- 23
- 24
- 25
- 26
- 27
- 28
- 29
- 30
- 31
- 32
- 33
- 34
- 35
- 36
- 37
- 38
- 39
- 40
- 41
- 42
- 43
- 44
- 45
- 46
- 47
- 48
- 49
- 50
- 51
- 52
- 53
- 54
- 55
- 56
- 57
- 58
- 59
- 60
- 61
总的来说就是:
- 根据目标类下的对应字段,我们拿到它的类型是
UserService。 - 根据类型去
Spring容器中已经装配好的Bean中,去查找候选Bean。这里找到了两个。 - 从候选集合中做进一步的筛选,确定最终到底需要用哪个
Bean为当前字段做注入操作。 - 如果匹配不出来或者不满足一定条件,那么就抛异常了。
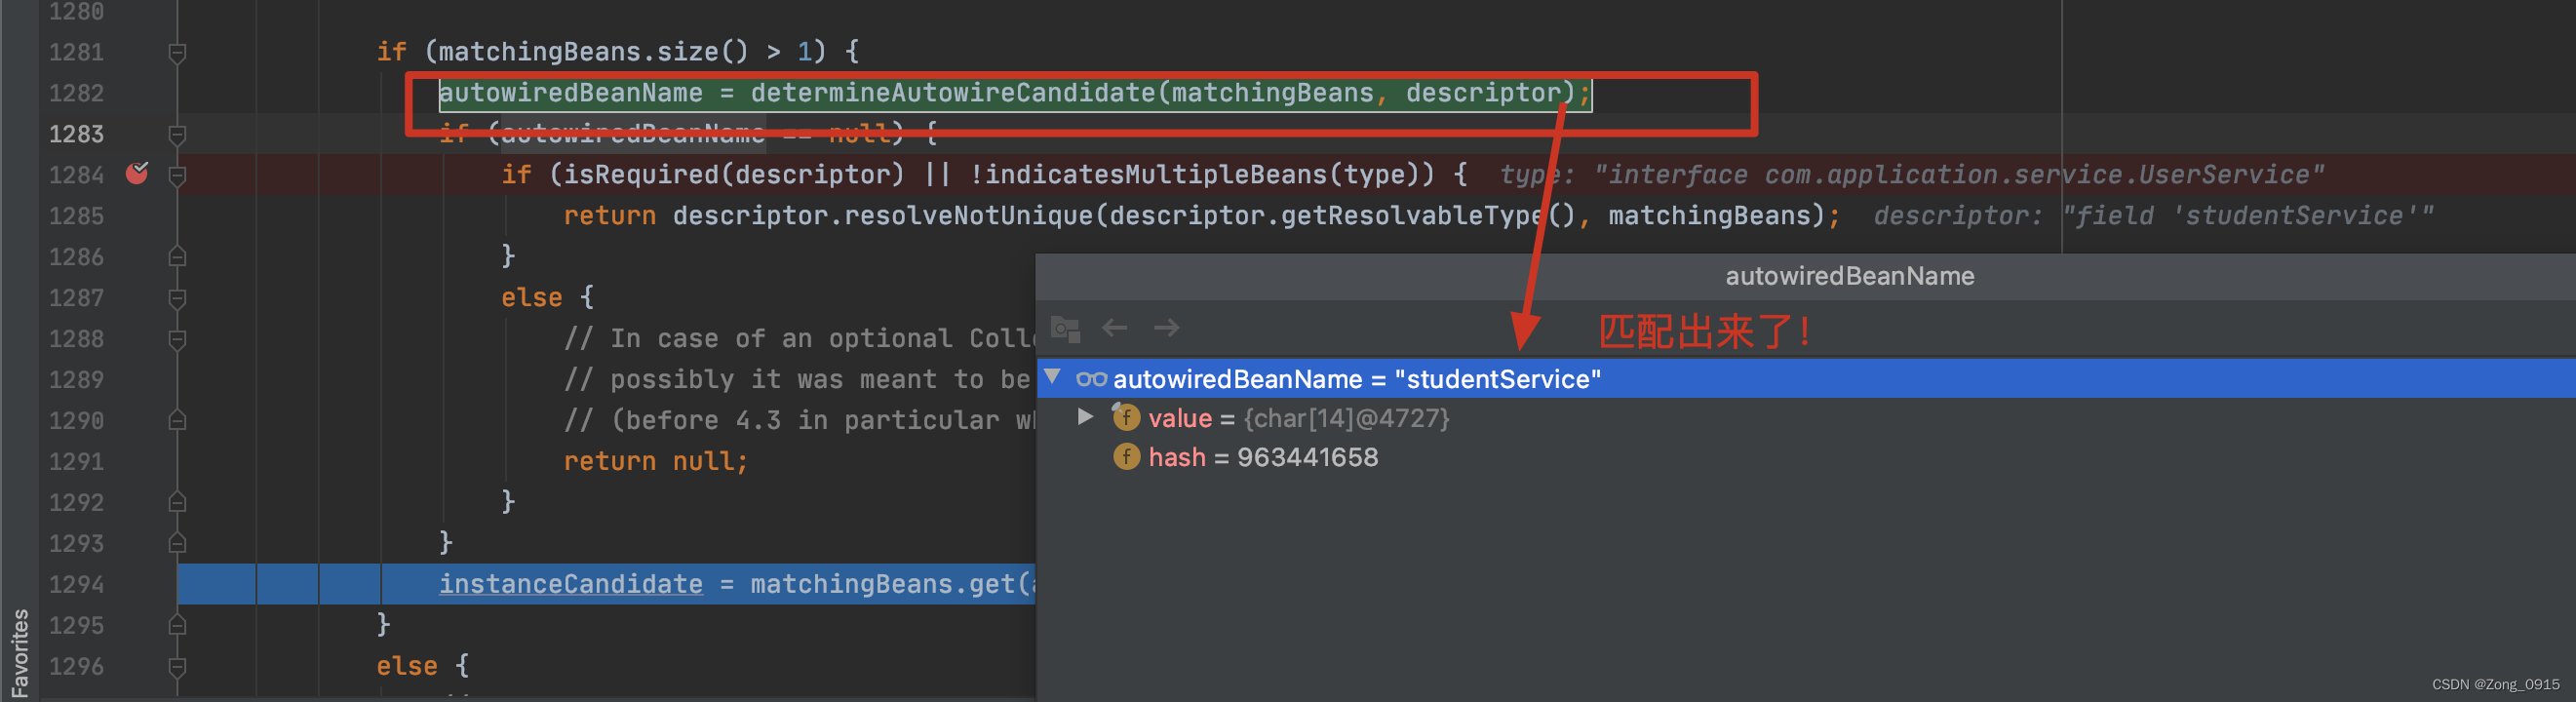
那么我们应该看下,第三步中的匹配流程,这里给出
debug下的截图会更直观点:

因此这里无法做到严格的名字匹配,因此匹配结果为null,就自然而然抛出我们案例给出的异常信息啦:

1.2.4 总结
我们知道
@Autowired注解是通过类型去自动装配的,那么本文从源码角度来说很好地解释了这点,具体原理如下:@Autowired注解修饰的属性M,会被BeanPostProcessor后置处理器做对应地操作。具体的实现逻辑在于AutowiredAnnotationBeanPostProcessor类中。AutowiredAnnotationBeanPostProcessor类主要做两件事:1.收集M的相关元数据信息。2.将这些元数据封装成AutowiredMethodElement类。- 如果某个类
A中通过@Autowired注解引入M。那么根据创建Bean的三大步骤来说,第二步的依赖注入阶段,会执行postProcessProperties()方法。从而执行了上面生成的AutowiredMethodElement.inject()函数。
inject()主要做两件事:- 根据当前类的类型去
Spring容器中寻找候选匹配类型。 - 从候选类型中进一步匹配:先看
Primary,再看Priority,再根据名称做严格匹配。 - 由于
Spring进行Bean创建的时候,beanName默认就是这个类名或者字段名(首字母小写)。因此候选Bean对于本文案例来说就是俩:studentService和teacherService。无法和目标类userService做严格匹配。 - 因此匹配结果为
null,程序抛出异常。
知道了原理,那么解决起来就容易了。
1.3 解决方案
解决方案一:修改下字段名称。
@Autowired private UserService userService; 改成 @Autowired private UserService studentService;- 1
- 2
- 3
- 4
- 5
那么这样做匹配的时候,就是根据
studentService这个名字来全匹配了:
解决方案二:通过
Qualifier加个名称。@Autowired @Qualifier("studentService") private UserService userService;- 1
- 2
- 3
二. 关于 Bean 默认名称大小写问题
其实第一章节里面,我们可以发现
bean的名称在案例问题中有着至关重要的地位。那么为了防止踩坑,这里讲一下Spring中生成bean的一个方法。入口:
AnnotationBeanNameGenerator.generateBeanName():@Override public String generateBeanName(BeanDefinition definition, BeanDefinitionRegistry registry) { // 如果bean 显式地指定了名称,就用它 if (definition instanceof AnnotatedBeanDefinition) { String beanName = determineBeanNameFromAnnotation((AnnotatedBeanDefinition) definition); if (StringUtils.hasText(beanName)) { // Explicit bean name found. return beanName; } } // 否则,根据默认的规则去生成一个 return buildDefaultBeanName(definition, registry); }- 1
- 2
- 3
- 4
- 5
- 6
- 7
- 8
- 9
- 10
- 11
- 12
- 13
看下默认生成规则:
protected String buildDefaultBeanName(BeanDefinition definition) { String beanClassName = definition.getBeanClassName(); Assert.state(beanClassName != null, "No bean class name set"); String shortClassName = ClassUtils.getShortName(beanClassName); return Introspector.decapitalize(shortClassName); } public static String decapitalize(String name) { if (name == null || name.length() == 0) { return name; } // 如果第一个字符和第二个字符都是大写,那么直接返回名称。例如SQLService,那么对应的beanName就是SQLService if (name.length() > 1 && Character.isUpperCase(name.charAt(1)) && Character.isUpperCase(name.charAt(0))){ return name; } // 否则就让第一个字符变成小写然后返回 char chars[] = name.toCharArray(); chars[0] = Character.toLowerCase(chars[0]); return new String(chars); }- 1
- 2
- 3
- 4
- 5
- 6
- 7
- 8
- 9
- 10
- 11
- 12
- 13
- 14
- 15
- 16
- 17
- 18
- 19
- 20
- 21
说白了就是:
- 第一个第二个字符为大写,原样返回。
- 其余情况第一个字符转小写然后返回。
因此切记,通过
@Autowired引入的对象,名称,或者显式指定方式下的名称,命名规则一定要对得上。否则就会报错!例如:
@Autowired @Qualifier("StudentService") private UserService userService;- 1
- 2
- 3
结果如下:
StudentService这个Bean并没有命中!

-
相关阅读:
SCConv:用于特征冗余的空间和通道重构卷积
WebSocket集群解决方案,不用MQ
Redis入门到实战教程(基础篇)笔记
java毕业设计小说网站mybatis+源码+调试部署+系统+数据库+lw
Python调用摄像头
力扣刷题61-旋转链表
3 Prim算法的设计--来源舒姐
无人机无刷电机理论教学培训课程
C语言输出以下图案
LS-dnay 压力显示异常
- 原文地址:https://blog.csdn.net/Zong_0915/article/details/126364227


