-
修改Cpython解释器为python单文件代码加密(无import自己模块)
一、参考链接
- cpython的github仓库:https://github.com/python/cpython
- 简单对称加密:https://juejin.cn/post/7023708355608707108
- 此文章修改后的cpython代码已经上传github https://github.com/MakeEarthBetter/cpythondiy/tree/master,注意分支是master
二、实现步骤
1.下载cpython代码
出于方便我直接在cpython的github仓库download zip
2.构建cpython解释器
注意,以下操作(在ubuntu下)将会使你的python3版本默认为你新构建的python解释器,
因为以下操作会在你的/usr/local/bin/下创建一个python3.12并且新建一个python3指向python3.12,操作前请注意影响。
在cpython主目录下执行以下操作,此处可参考cpython的readme文件./configure make make test sudo make install- 1
- 2
- 3
- 4
3.测试cpython构建结果
如果上一步你已经完成,那么你现在输入python3应该是你make后的python版本,比如

下面开始修改代码。4.构建py文件加密程序
十分感谢
https://juejin.cn/post/7023708355608707108
的作者提供此简单对称加密方法。
加密程序代码:#include#include long fileRead(char fileName[50],char **buffer){ //打开文件 FILE *fp = fopen(fileName,"rb"); if(fp == NULL){ printf("open file is failed"); exit(1); } //把文件指针移到文件末尾 fseek(fp,0,SEEK_END); //保存文件的长度 long fileSize = ftell(fp); //把文件指针移到文件开头 fseek(fp,0,SEEK_SET); //读取文件,保存到buffer中 *buffer = (char*)malloc(fileSize); fread(*buffer,1,fileSize,fp); //关闭文件 fclose(fp); return fileSize; } void fileWrite(char fileName[50],char *buffer,long fileSize){ //创建文件进行写入 FILE *fp = fopen(fileName,"wb"); if(fp == NULL){ printf("open file is failed"); exit(1); } fwrite(buffer,1,fileSize,fp); fclose(fp); } void encrypt_decode(char encryptFile[50],char encryptedFile[50],int key){ char *buffer; long fileSize = fileRead(encryptFile,&buffer); //加密 / 解密 for(int i = 0; i < fileSize; i++){ buffer[i] = buffer[i]^key; } fileWrite(encryptedFile,buffer,fileSize); } void encrypt(){ char encryptFile[50];//原文件名 int key;//加密关键字 char encryptedFile[50];//加密后文件名 //输出提示信息 printf("Please input the filename you want to encrypt: "); scanf("%s",encryptFile); printf("Please input key:"); scanf("%d",&key); printf("Please input the encrypted filename:"); scanf("%s",encryptedFile); encrypt_decode(encryptFile,encryptedFile,key); } void decode(){ char encryptedFile[50];//加密后文件名 int key;//加密关键字 char decodeFile[50];//原文件名 //输出提示信息 printf("Please input the encrypted filename: "); scanf("%s",encryptedFile); printf("Please input key:"); scanf("%d",&key); printf("Please input output filename:"); scanf("%s",decodeFile); encrypt_decode(encryptedFile,decodeFile,key); } int main(){ encrypt(); return 0; } - 1
- 2
- 3
- 4
- 5
- 6
- 7
- 8
- 9
- 10
- 11
- 12
- 13
- 14
- 15
- 16
- 17
- 18
- 19
- 20
- 21
- 22
- 23
- 24
- 25
- 26
- 27
- 28
- 29
- 30
- 31
- 32
- 33
- 34
- 35
- 36
- 37
- 38
- 39
- 40
- 41
- 42
- 43
- 44
- 45
- 46
- 47
- 48
- 49
- 50
- 51
- 52
- 53
- 54
- 55
- 56
- 57
- 58
- 59
- 60
- 61
- 62
- 63
- 64
- 65
- 66
- 67
- 68
- 69
- 70
- 71
- 72
- 73
- 74
- 75
- 76
- 77
- 78
- 79
- 80
- 81
- 82
- 83
- 84
- 85
编译:
gcc -o enc encrypto.c- 1
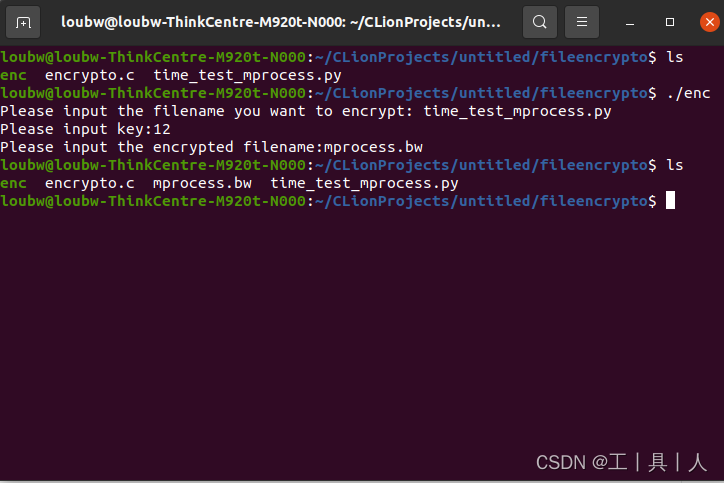
使用:

5.为cpython代码添加解密函数
通过全文搜索我们找到python读取文件的函数是./Python/pythonrun.c的pyrun_file
在其上方声明解密函数// ***************************encrypto&decrypto funcs***************************// long fileRead(const char *fileName,char **buffer){ //打开文件 FILE *fp = fopen(fileName,"rb"); if(fp == NULL){ printf("open file is failed"); exit(1); } //把文件指针移到文件末尾 fseek(fp,0,SEEK_END); //保存文件的长度 long fileSize = ftell(fp); //把文件指针移到文件开头 fseek(fp,0,SEEK_SET); //读取文件,保存到buffer中 *buffer = (char*)malloc(fileSize); fread(*buffer,1,fileSize,fp); //关闭文件 fclose(fp); return fileSize; } void fileWrite(const char fileName[50],char *buffer,long fileSize){ //创建文件进行写入 FILE *fp = fopen(fileName,"wb"); if(fp == NULL){ printf("open file is failed"); exit(1); } fwrite(buffer,1,fileSize,fp); fclose(fp); } void encrypt_decode(const char *encryptFile,const char *encryptedFile,int key){ char *buffer; long fileSize = fileRead(encryptFile,&buffer); //加密 / 解密 for(int i = 0; i < fileSize; i++){ buffer[i] = buffer[i]^key; } fileWrite(encryptedFile,buffer,fileSize); } void encrypt(const char* encryptFile , const char *outFile){ int key = 12;// loubw: 先写死 加密关键字 encrypt_decode(encryptFile,outFile,key); } // ***************************encrypto&decrypto funcs***************************//- 1
- 2
- 3
- 4
- 5
- 6
- 7
- 8
- 9
- 10
- 11
- 12
- 13
- 14
- 15
- 16
- 17
- 18
- 19
- 20
- 21
- 22
- 23
- 24
- 25
- 26
- 27
- 28
- 29
- 30
- 31
- 32
- 33
- 34
- 35
- 36
- 37
- 38
- 39
- 40
- 41
- 42
- 43
- 44
- 45
- 46
- 47
- 48
- 49
此处解密密码写死了,加密秘钥应写活,以后再说吧。
6.修改cpython读取文件函数
按照思路,我们应该在读取文件时知道是加密后的文件时,应该将其先解密,获得一个解密了的暂时文件,再将其通过文件IO打开,再让cpython将代码写进内存,之后就可以将解密获得的暂时文件删除(或者可以解密时直接将其解密到内存文件流,这个之后再优化)。
我们修改的是pyrun_file函数。static PyObject * pyrun_file(FILE *fp, PyObject *filename, int start, PyObject *globals, PyObject *locals, int closeit, PyCompilerFlags *flags) { int isDelete = 0; char *output = NULL; // 在此处修改运行文件 // loubw #ifdef MS_WINDOWS printf("this cpython can not execute in windows because I have not build it."); exit(0); #else // 此分支是unix char *path_bytes; PyObject *filebytes = PyUnicode_EncodeFSDefault(filename); // 将filename这个PyObject转换为char*以知道传入的文件名 if (filebytes == NULL) { PyErr_Clear(); return NULL; } path_bytes = PyBytes_AS_STRING(filebytes); // 到这转换成char*结束 const char *pFile; pFile = strrchr(path_bytes,'.'); if(strcmp(pFile, ".bw")==0){ // 查看文件名是否是以.bw为后缀 output = "tmp"; encrypt(path_bytes, output); // 解码,得到临时文件 filename = PyUnicode_FromString(output); // 将filename重新声明为output并转化为PyObject(因为cpython打开文件的函数_Py_fopen_obj需传入的是PyObject) fp = _Py_fopen_obj(filename, "rb"); // 将fp重新声明为打开临时文件 isDelete = 1; //此flag是为了将来删除临时文件 } #endif PyArena *arena = _PyArena_New(); if (arena == NULL) { return NULL; } mod_ty mod; mod = _PyParser_ASTFromFile(fp, filename, NULL, start, NULL, NULL, flags, NULL, arena); if (closeit) { fclose(fp); } PyObject *ret; if (mod != NULL) { ret = run_mod(mod, filename, globals, locals, flags, arena, output,isDelete); } else { ret = NULL; } _PyArena_Free(arena); return ret; }- 1
- 2
- 3
- 4
- 5
- 6
- 7
- 8
- 9
- 10
- 11
- 12
- 13
- 14
- 15
- 16
- 17
- 18
- 19
- 20
- 21
- 22
- 23
- 24
- 25
- 26
- 27
- 28
- 29
- 30
- 31
- 32
- 33
- 34
- 35
- 36
- 37
- 38
- 39
- 40
- 41
- 42
- 43
- 44
- 45
- 46
- 47
- 48
- 49
- 50
由于unix和windows文件打开函数是不一样的(windows字符是wchar),所以windows的我没写。
具体代码目的请查看注释。删除临时文件的代码在同文件的run_mod函数中,修改如下。
注意最后两个参数delFIle和isDelete是新增的,所以此函数的所有引用都需要修改,
头文件的此函数定义也需要修改。static PyObject * run_mod(mod_ty mod, PyObject *filename, PyObject *globals, PyObject *locals, PyCompilerFlags *flags, PyArena *arena, char *delFile,int isDelete) { PyThreadState *tstate = _PyThreadState_GET(); PyCodeObject *co = _PyAST_Compile(mod, filename, flags, -1, arena); if (co == NULL) return NULL; if(isDelete==1){ remove(delFile); } if (_PySys_Audit(tstate, "exec", "O", co) < 0) { Py_DECREF(co); return NULL; } PyObject *v = run_eval_code_obj(tstate, co, globals, locals); Py_DECREF(co); return v; }- 1
- 2
- 3
- 4
- 5
- 6
- 7
- 8
- 9
- 10
- 11
- 12
- 13
- 14
- 15
- 16
- 17
- 18
- 19
- 20
7.构建改完的cpython
在主目录再次执行
sudo make install- 1
8.测试结果
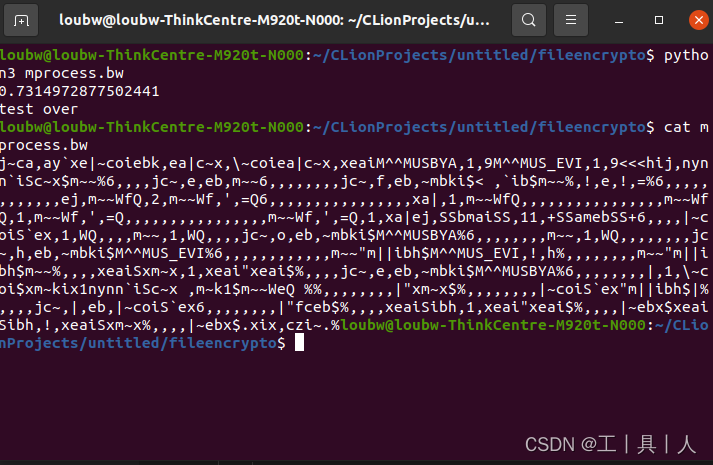
我们就拿之前加了密的文件进行测试。

总结
目前只实现了单文件的加密,对于导入非内置库的代码加密还需要研究
-
相关阅读:
【Linux】2022 安装jdk教程,超级详细
多测师肖sir_高级讲师_第2个月第4讲python之判断循环语句
unity项目加密(比如到指定时间,项目打不开)
数据库和sql语句
【计算机视觉】CVPR 23 | 视觉 Transformer 全新学习范式!用长尾数据提升ViT性能
2020-10《信息资源管理 02378》真卷(独家文字版),圈定章节考点+统计真题分布
PAT 1032 Sharing
centos 端口被占用的快速排查方式
Spring Security多种用户定义方式
使用python玩转二维码!速学速用!⛵
- 原文地址:https://blog.csdn.net/qq_42455809/article/details/126364474
