-
SpringBoot概念、创建和运行及配置文件
一、Spring Boot 概念
Spring 的诞生是为了简化 Java程序的开发的,而
Spring Boot的诞生是为了简化Spring程序开发的。
Spring Boot翻译一下就是Spring脚手架。Spring Boot就是Spring框架的脚手架,它就是为了快速开发Spring框架而诞生的。二、Spring Boot优点
- 快速集成框架,Spring Boot提供了启动添加依赖的功能,用于秒级集成各种框架。
- 内置运行容器,无需配置Tomcat 等 Web容器,直接运行和部署程序。
- 快速部署项目,无需外部容器即可启动并运行项目。
- 可以完全抛弃繁琐的XML,使用注解和配置的方式进行开发。
- 支持更多的监控的指标,可以更好的了解项目的运行情况。
三、Spring Boot 项目创建
使用Idea进行创建:
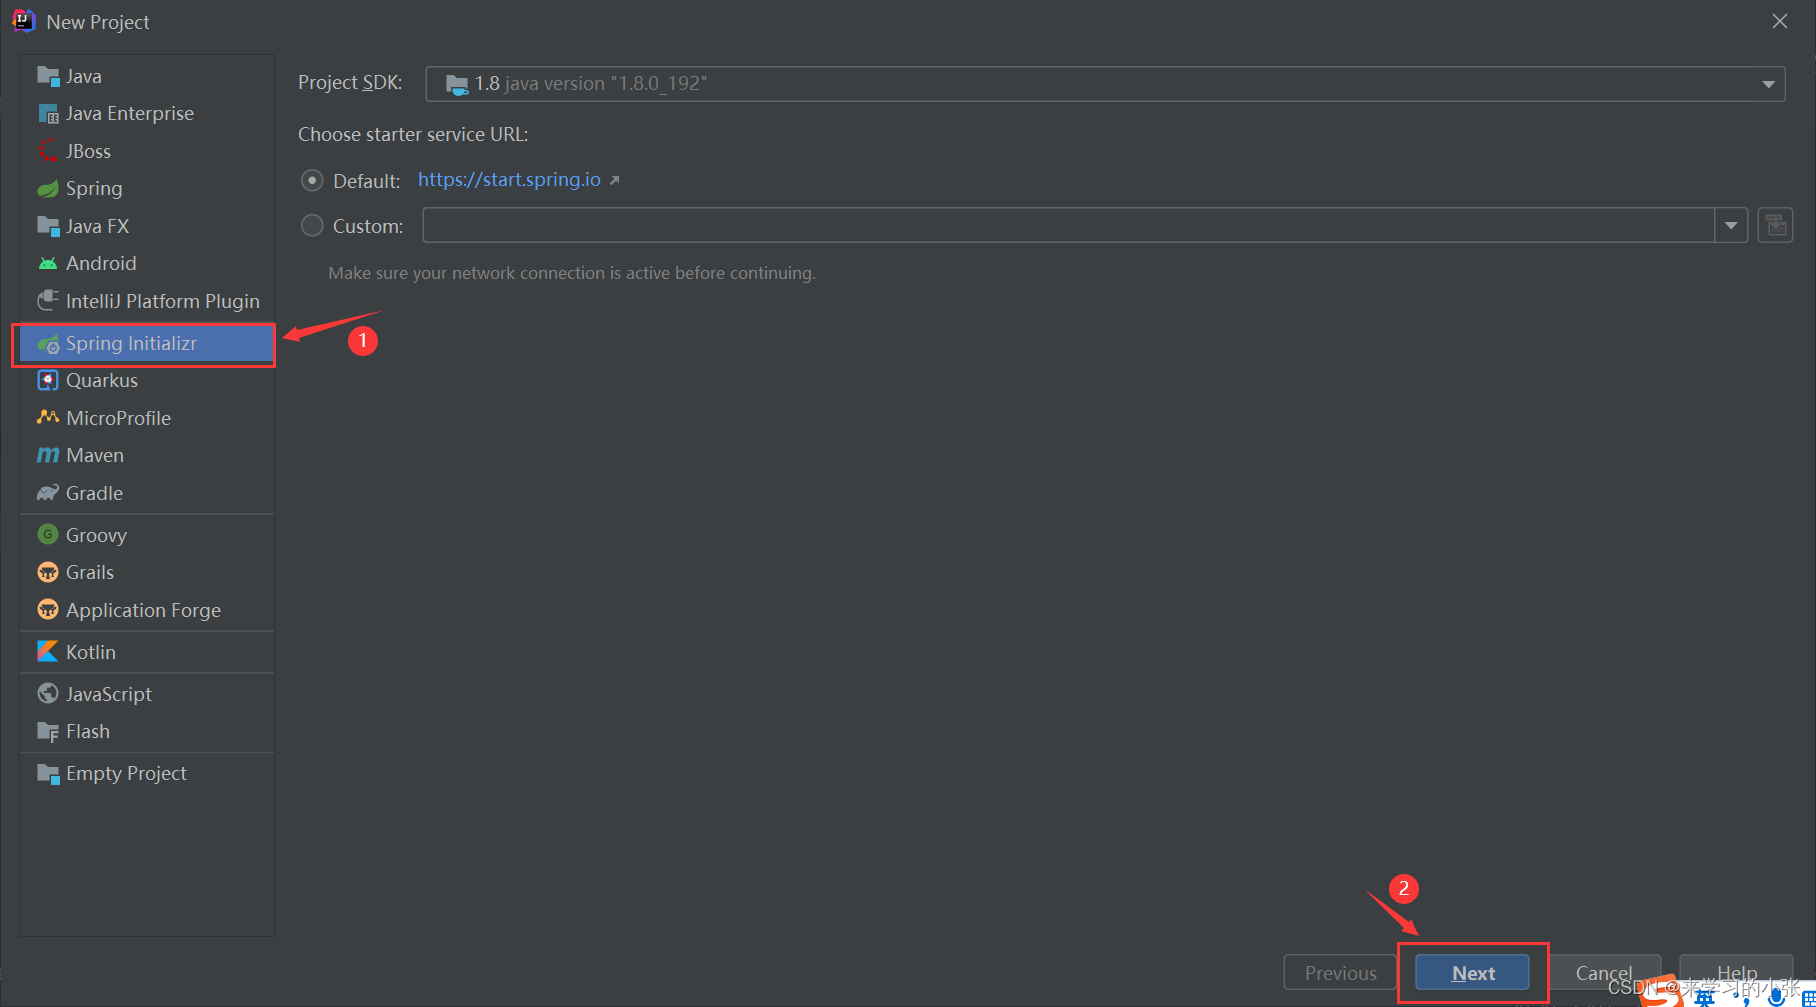
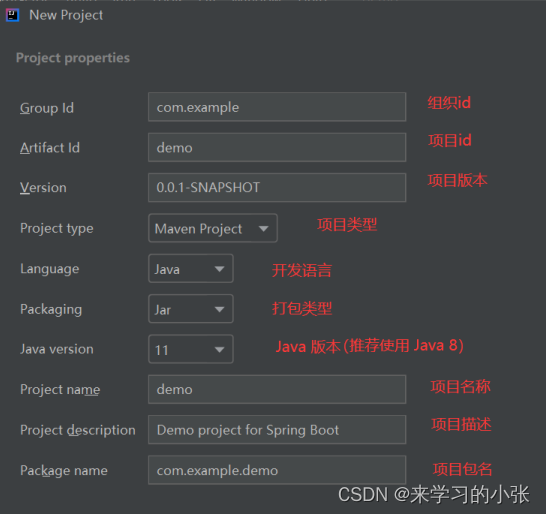
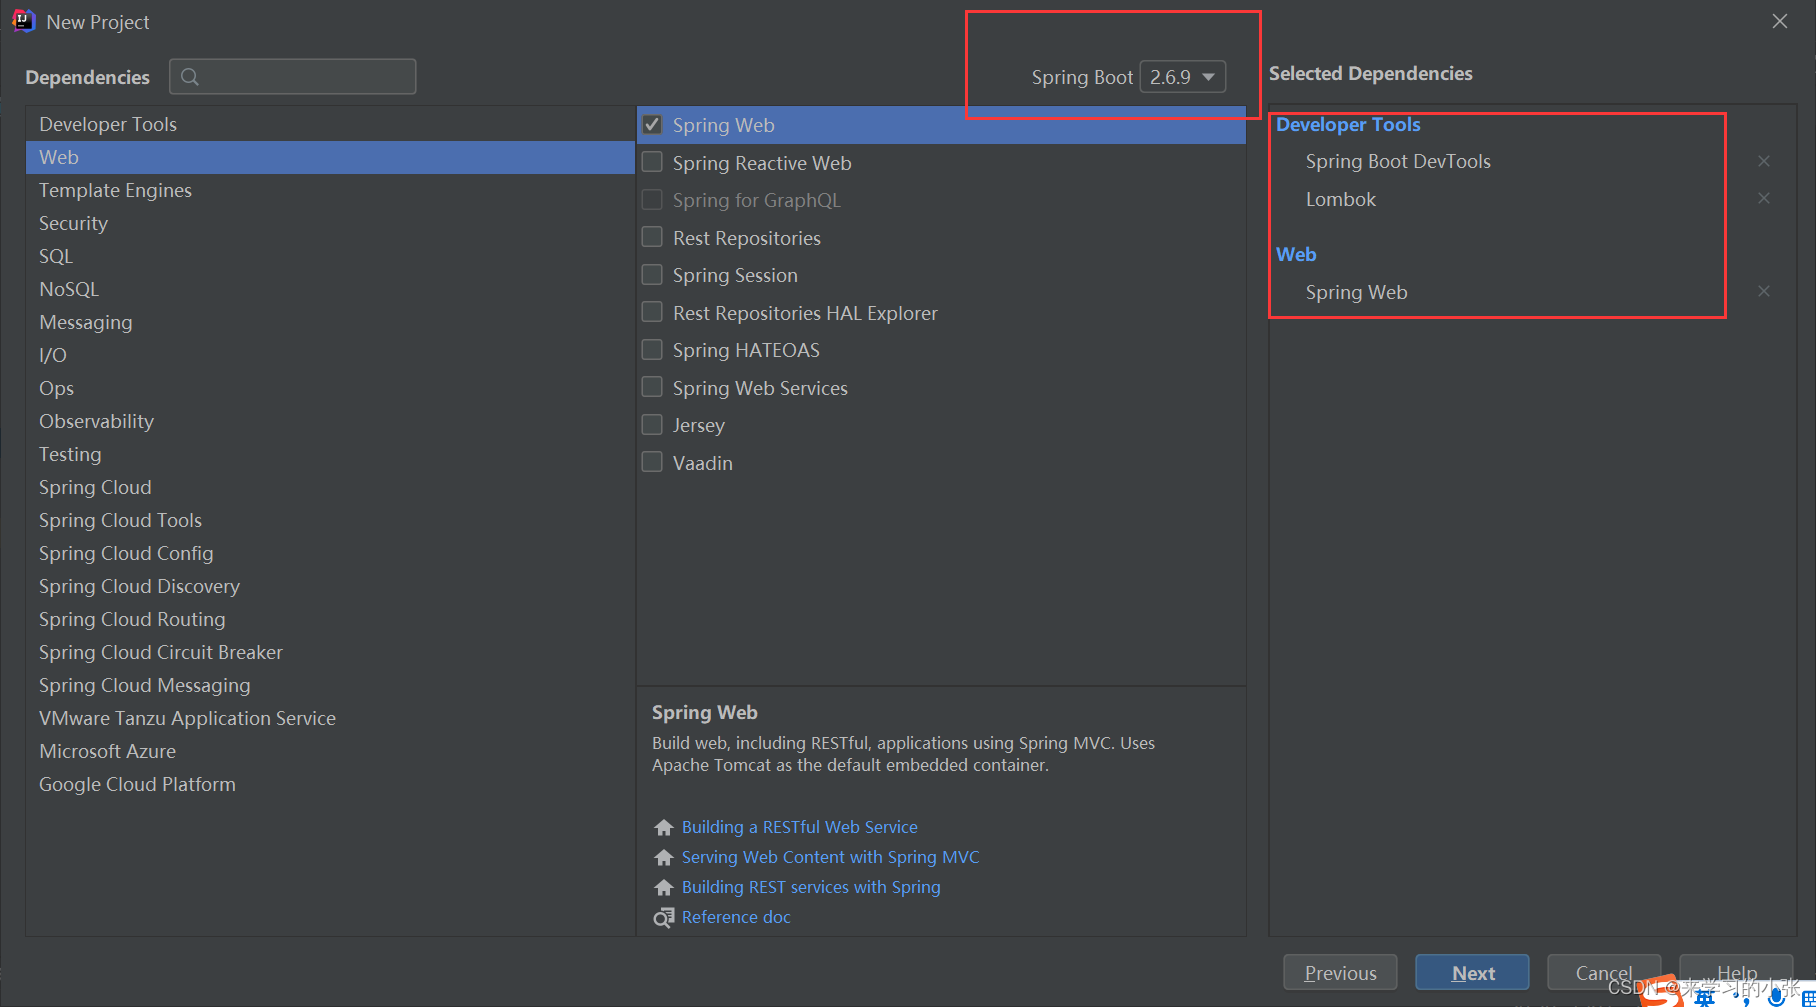
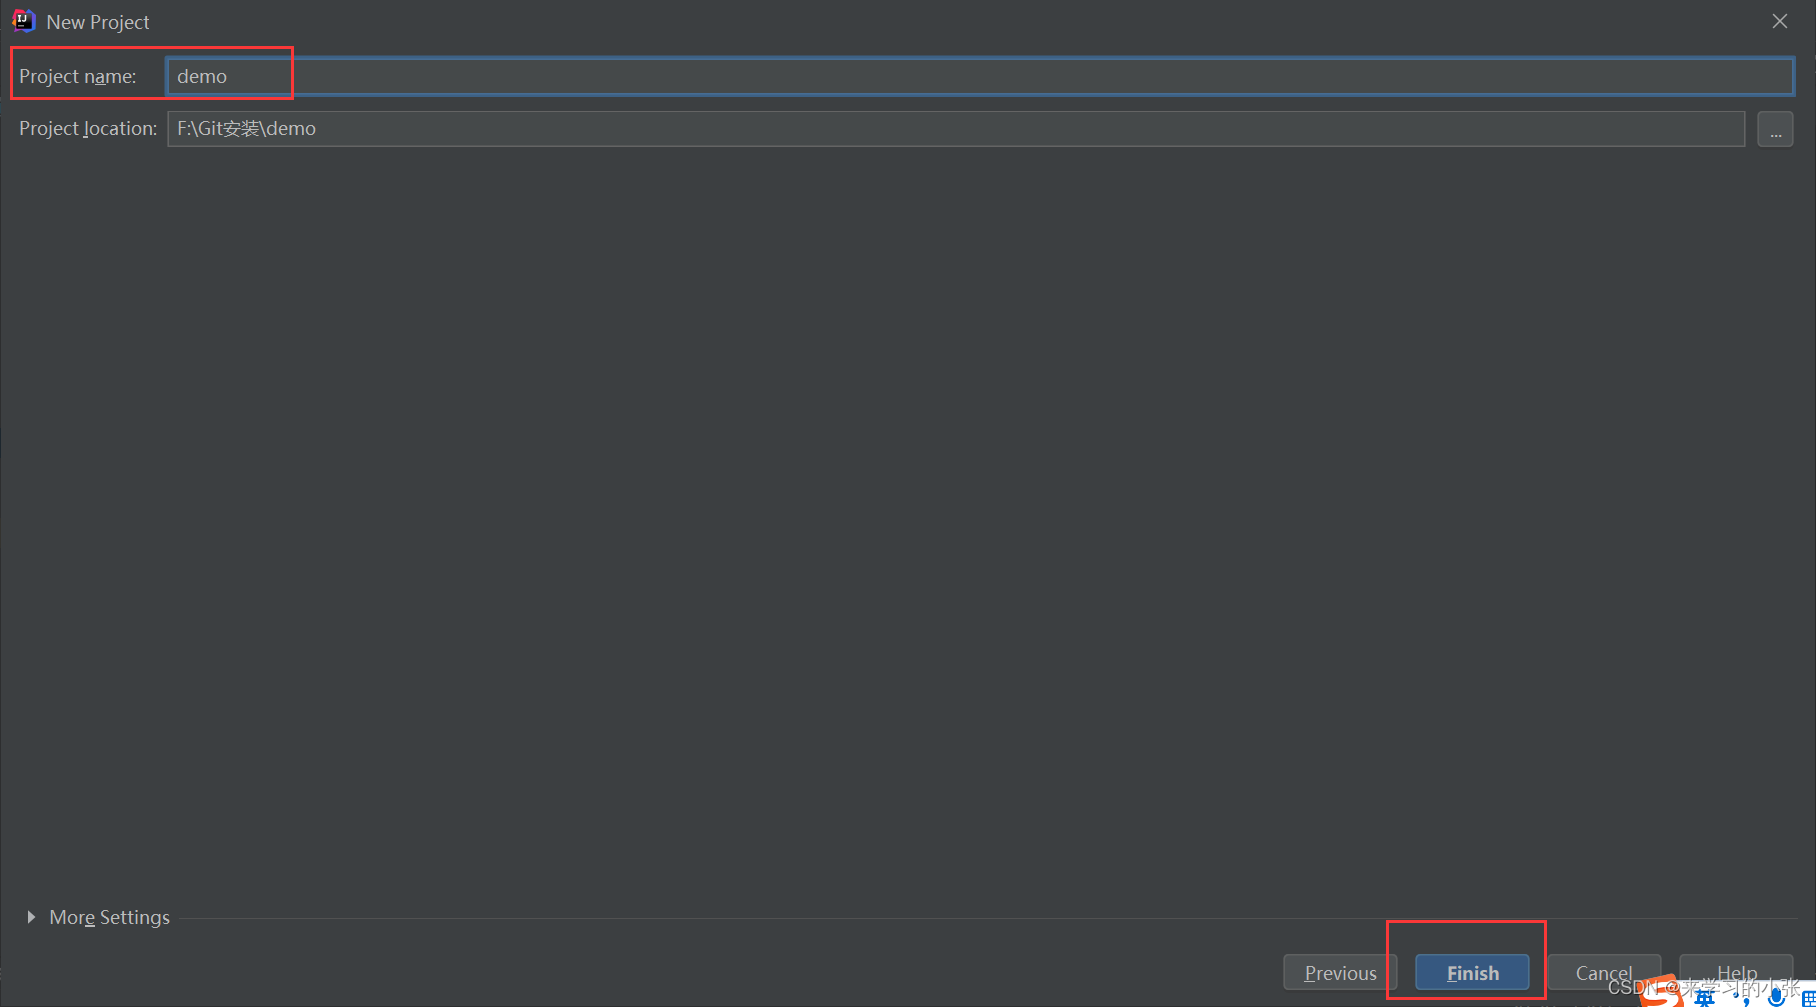
网页版创建项目:spring initializr四、SpringBoot 配置文件
配置文件的分类:
- 系统的配置文件,比如连接字符串、比如日志的相关设置,系统定义好的。
- 用户自定义的。
4.1 配置文件的作用
整个项目中所有重要的数据都是在配置文件中配置的,比如∶
- 数据库的连接信息(包含用户名和密码的设置);
- 项目的启动端口;
- 第三方系统的调用秘钥等信息;
- 用于发现和定位问题的普通日志和异常日志等。
想象一下如果没有配置信息,那么 Spring Boot项目就不能连接和操作数据库,甚至是不能保存可以用于排查问题的关键日志,所以配置文件的作用是非常重要的。
4.2 配置文件的格式
Spring Boot配置文件主要分为以下两种格式:.properties .yml- 1
- 2
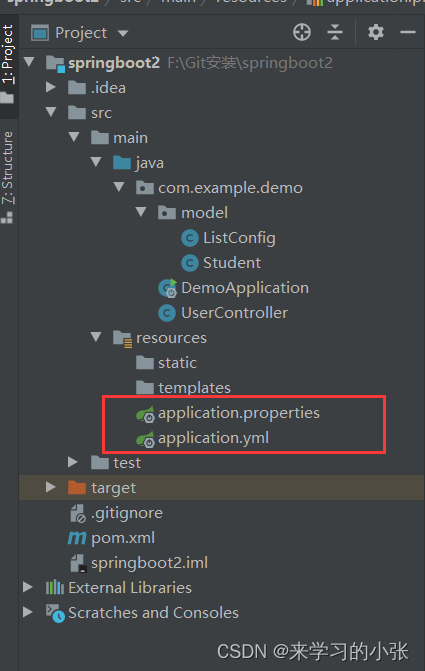
- 理论上讲
properties可以和yml一起存在于一个项目当中,当properties和yml一起存在一个项目中时,如果配置文件中出现了同样的配置,比如properties和yml中都配置了“server.port”,那么这个时候会以properties中的配置为主,也就是**.properties配置文件的优先级最高,但加载完.properties文件之后,也会加载.yml文件的配置信息**。 - 虽然理论上来讲
.properties可以和.yml共存,但实际的业务当中,我们通常会采取一种统一的配置文件格式,这样可以更好的维护(降低故障率)。
4.3 properties配置文件说明
properties配置文件是最早期的配置文件格式,也是创建Spring Boot项目默认的配置文件。properties 基本语法
properties是以键值的形式配置的,key和value之间是以“=”连接的,如:#系统的配置文件 server.port=8080 spring.datasource.url=jdbc:mysql://127.0.0.1:3306/testdb?characterEncoding=utf8 spring.datasource.name=root spring.datasource.password=123456- 1
- 2
- 3
- 4
- 5
properties 读取配置文件
如果在项目中,想要主动的读取配置文件中的内容,可以使用
@Value注解来实现。@Value注解使用“${}”的格式读取,如下代码所示:
新建一个UserController类:import org.springframework.beans.factory.annotation.Value; import org.springframework.stereotype.Controller; import org.springframework.web.bind.annotation.RequestMapping; import org.springframework.web.bind.annotation.ResponseBody; @Controller public class UserController { @Value("${server.port}") private String port; @ResponseBody//返回一个非静态页面的数据 @RequestMapping("/sayhi")//设置路由地址(一定要全部小写) public String sayHi(){ System.out.println("Hello" + port); return "Hello,World + port:" + port; } }- 1
- 2
- 3
- 4
- 5
- 6
- 7
- 8
- 9
- 10
- 11
- 12
- 13
- 14
- 15
- 16
- 17
在浏览器中输入
url:
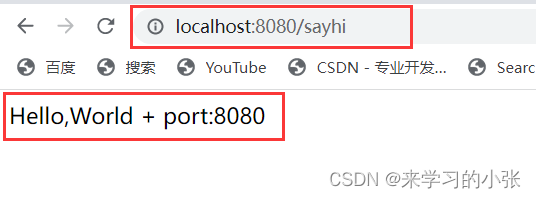
页面进行加载之后,可以在控制台看到:

properties 的缺点
properties配置是以key-value的形式配置的,从上面的基本语法中可以看到properties配置⽂件中会有很多的冗余的信息。想要解决这个问题,就可以使用yml配置文件的格式。4.4 yml配置文件说明
yml是YMAL是缩写,它的全称Yet Another Markup Language翻译成中文就是“另⼀种标记语言”。
yml特点:- 写法简单、可读性高。
- 支持更多的数据类型。(数组、散列表、标量等)
- 跨语言使用:
java/golang/高版本python都可以用yml作为配置文件。
yml基本语法
key : value,注意 key 和 value 之间使⽤英文冒号加空格的方式组成的,其中的空格不可省略。
基本语法如下:#连接数据库 spring: datasource: url: jdbc:mysql://127.0.0.1:3306/testdb?characterEncoding=utf8mb4&useSSL=true name: root password: 123456- 1
- 2
- 3
- 4
- 5
- 6
yml读取配置文件
yml读取配置的⽅式和properties相同,使⽤@Value注解即可。
例:yml配置文件里面写string: hello: shijain- 1
- 2
在类中进行读取:
import org.springframework.beans.factory.annotation.Value; import org.springframework.stereotype.Controller; import org.springframework.web.bind.annotation.RequestMapping; import org.springframework.web.bind.annotation.ResponseBody; @Controller public class UserController { @Value("${string.hello}") private String hello; @ResponseBody//返回一个非静态页面的数据 @RequestMapping("/sayhi")//设置路由地址(一定要全部小写) public String sayHi(){ System.out.println("YML " + hello); return "yml " + hello; } }- 1
- 2
- 3
- 4
- 5
- 6
- 7
- 8
- 9
- 10
- 11
- 12
- 13
- 14
- 15
- 16
- 17
页面加载结果为:

在控制台中显示:

练习一:value 值加单双引号在yml配置文件中配置如下信息:
mystring: nihao\n世界 mystring2: 'nihao\n世界' mystring3: "nihao\n世界"- 1
- 2
- 3
读取程序实现代码如下:
import org.springframework.beans.factory.annotation.Value; import org.springframework.stereotype.Controller; import org.springframework.web.bind.annotation.RequestMapping; import org.springframework.web.bind.annotation.ResponseBody; ```java @Controller public class UserController { @Value("${mystring}") private String mystring; @Value("${mystring2}") private String mystring2; @Value("${mystring3}") private String mystring3; @ResponseBody//返回一个非静态页面的数据 @RequestMapping("/sayhi")//设置路由地址(一定要全部小写) public String sayHi(){ System.out.println("mystring:"+ mystring); System.out.println("mystring2:"+ mystring2); System.out.println("mystring3:"+ mystring3); } }- 1
- 2
- 3
- 4
- 5
- 6
- 7
- 8
- 9
- 10
- 11
- 12
- 13
- 14
- 15
- 16
- 17
- 18
- 19
- 20
- 21
- 22
- 23
运行程序所得结果:

从上述结果可以看出:- 字符串默认不用加上单引号或者双引号。
- 单引号会转义特殊字符,特殊字符最终只是一个普通的字符串数据。
- 双引号不会转义字符串里面的特殊字符﹔特殊字符会作为本身想表示的意思。
结论:yml中如果使用了双引号就会按照(原)语义执行,如果不加单、双引号,或者加了单引号,那么默认会将字符串中的特殊字符进行转义,比如 \n -> \n(转义)处理。
yml配置对象
还可以在yml中配置对象:
#对象写法1 student1: id: 1 name: 张三 age : 18 #对象写法2(⾏内写法) student2: {id: 2,name: 李四,age: 20}- 1
- 2
- 3
- 4
- 5
- 6
- 7
- 8
这个时候就不能用
@Value来读取配置中的对象了,此时要使⽤另⼀个注解@ConfigurationProperties来读取,具体实现如下:import lombok.Data; import org.springframework.boot.context.properties.ConfigurationProperties; import org.springframework.stereotype.Controller; @Data //使用Data就不用再写 getter 和 setter ⽅法及toString方法 @ConfigurationProperties(prefix = "student1")//读取配置文件中的对象 @Controller//不能省略 public class Student { private int id; private String name; private int age; }- 1
- 2
- 3
- 4
- 5
- 6
- 7
- 8
- 9
- 10
- 11
- 12
调用类的实现如下:
@Controller public class UserController { @Autowired private Student student; @ResponseBody//返回一个非静态页面的数据 @RequestMapping("/sayhi")//设置路由地址(一定要全部小写) public String sayHi(){ System.out.println(student); return "student:"+student; } }- 1
- 2
- 3
- 4
- 5
- 6
- 7
- 8
- 9
- 10
- 11
- 12
代码执行结果:


yml配置集合
配置⽂件也可以配置 list 集合,如下所示:
#集合 dbtypes: {name: [mysql,sqlserver,db2]}- 1
- 2
集合的读取和对象⼀样,也是使⽤
@ConfigurationProperties来读取的:import lombok.Data; import org.springframework.boot.context.properties.ConfigurationProperties; import org.springframework.stereotype.Component; import java.util.List; @Component @Data @ConfigurationProperties("dbtypes") public class ListConfig { private List<String> name; }- 1
- 2
- 3
- 4
- 5
- 6
- 7
- 8
- 9
- 10
- 11
打印类的实现如下:
@Controller public class UserController { @Autowired private ListConfig listConfig; @ResponseBody//返回一个非静态页面的数据 @RequestMapping("/sayhi")//设置路由地址(一定要全部小写) public String sayHi(){ return "list: "+ listConfig; } }- 1
- 2
- 3
- 4
- 5
- 6
- 7
- 8
- 9
- 10
- 11
结果显示:

-
相关阅读:
【图神经网络学习笔记系列】01-Graph Attention Networks 学习笔记
Molecular Plant | ChIP-seq+RNA-seq解析E2F转录因子在植物复制胁迫响应中的独特和互补作用
免费的云产品
OMO模式成为教育行业“标配“
灵雀云ACP 斩获“2022金边奖-最佳云原生边缘云平台”
Kotlin:协程基础
逻辑判断与正则表达式文本处理
ubuntu 安装串口工具和添加虚拟串口
电脑报错由于找不到vcruntime140.dll文件怎么修复
C语言 每日一题 牛客网 11.12 Day16
- 原文地址:https://blog.csdn.net/dddddrrrzz/article/details/125854905
