-
Elasticsearch 7.6 集群搭建
ES集群搭建
准备工作
服务器环境
准备三台服务器集群,如下图机器的分配情况:
服务器名称
IP地址
node-1
192.168.8.190
node-2
192.168.8.185
node-3
192.168.8.183
下载Elasticsearch压缩包
下载地址: https://www.elastic.co/cn/downloads/elasticsearch创建路径module用来存放elasticsearch安装文件。
mkdir /home/elasticsearch/module- 1
打开xshell中的文件传输 , 将下载的压缩包传到每台服务器。(路径为/home/elasticsearch/module)
我们以192.168.8.190机器安装为例,其他两台只是配置文件的IP地址不一样
解压安装
进入module路径,解压安装文件
cd home/elasticsearch/module tar -zxvf elasticsearch-7.6.0-linux-x86_64.tar.gz mv elasticsearch-7.6.0 elasticsearch- 1
- 2
- 3
- 4
- 5
单主机配置
修改配置文件 elasticsearch.yml
cd /home/elasticsearch/module/elasticsearch vim config/elasticsearch.yml- 1
- 2
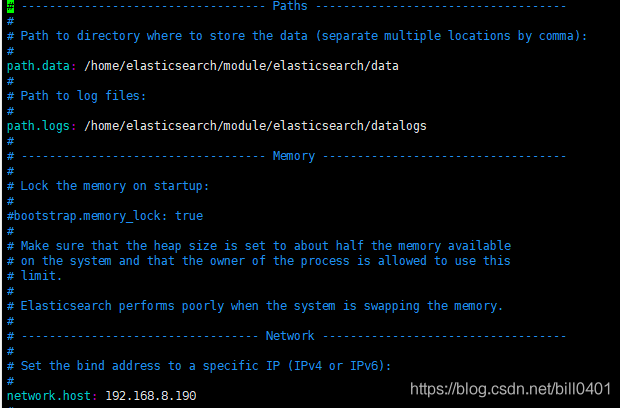
修改一下配置
cluster.name: myes # 同一集群内cluster.name 相同 path.data: /home/elasticsearch/module/elasticsearch/data # 数据的默认存放路径 path.logs: /home/elasticsearch/module/elasticsearch/logs # 日志的默认存放路径 node.name: node-1 #每个节点名称不一样 network.host: 192.168.8.190 #### 实际服务器ip地址 # es对外提供的http端口,默认 9200 http.port: 9200 # TCP的默认监听端口,默认 9300 #transport.tcp.port: 9300 cluster.initial_master_nodes: ["node-1"] #单机只添加自己- 1
- 2
- 3
- 4
- 5
- 6
- 7
- 8
- 9
- 10
- 11
- 12
- 13
- 14
- 15
创建对应data文件路径
mkdir data- 1
操作系统调优
(必须配置,否则ES启动报错)
内存优化
在/etc/sysctl.conf添加如下内容sudo vim /etc/sysctl.conf
fs.file-max=65536 vm.max_map_count=262144- 1
- 2
使用sysctl -p使条件生效
修改 limits.conf 配置文件
vim /etc/security/limits.conf- 1
添加如下配置
* soft nofile 65536 * hard nofile 65536 * soft nproc 65536 * hard nproc 65536 * soft memlock unlimited * hard memlock unlimited- 1
- 2
- 3
- 4
- 5
- 6
登出当前用户,让上述配置启动。
单主机启动
./bin/elasticsearch- 1


浏览器访问指定端口9200显示单机elasticsearch启动成功
集群配置
修改192.168.8.190 服务器配置文件
# 设置集群名称,集群内所有节点的名称必须一致。 cluster.name: myes # 表示该节点会不会作为主节点,true表示会;false表示不会 node.master: true # 当前节点是否用于存储数据,是:true、否:false node.data: true # 索引数据存放的位置 path.data: /home/elasticsearch/module/elasticsearch/data # 日志文件存放的位置 path.logs: /home/elasticsearch/module/elasticsearch/logs node.name: node-1 #每个节点名称不一样 其他两台为node-2 ,node-3 network.host: 192.168.8.190 #### 实际服务器ip地址 # es对外提供的http端口,默认 9200 http.port: 9200 # TCP的默认监听端口,默认 9300 #transport.tcp.port: 9300 discovery.seed_hosts: ["192.168.8.190", "192.168.8.185","192.168.9.183"] # # Bootstrap the cluster using an initial set of master-eligible nodes: # cluster.initial_master_nodes: ["node-1", "node-2", "node-3"] #- 1
- 2
- 3
- 4
- 5
- 6
- 7
- 8
- 9
- 10
- 11
- 12
- 13
- 14
- 15
- 16
- 17
- 18
- 19
- 20
- 21
- 22
- 23
- 24
- 25
- 26
- 27


修改192.168.8.185 服务器配置
# 设置集群名称,集群内所有节点的名称必须一致。 cluster.name: myes # 表示该节点会不会作为主节点,true表示会;false表示不会 node.master: true # 当前节点是否用于存储数据,是:true、否:false node.data: true # 索引数据存放的位置 path.data: /home/elasticsearch/module/elasticsearch/data # 日志文件存放的位置 path.logs: /home/elasticsearch/module/elasticsearch/logs node.name: node-2 #每个节点名称不一样 其他两台为node-2 ,node-3 network.host: 192.168.8.185 #### 实际服务器ip地址 # es对外提供的http端口,默认 9200 http.port: 9200 # TCP的默认监听端口,默认 9300 #transport.tcp.port: 9300 discovery.seed_hosts: ["192.168.8.190", "192.168.8.185","192.168.9.183"] # # Bootstrap the cluster using an initial set of master-eligible nodes: # cluster.initial_master_nodes: ["node-1", "node-2", "node-3"] #- 1
- 2
- 3
- 4
- 5
- 6
- 7
- 8
- 9
- 10
- 11
- 12
- 13
- 14
- 15
- 16
- 17
- 18
- 19
- 20
- 21
- 22
- 23
- 24
- 25
- 26
- 27
修改192.168.8.183 服务器配置
# 设置集群名称,集群内所有节点的名称必须一致。 cluster.name: myes # 表示该节点会不会作为主节点,true表示会;false表示不会 node.master: true # 当前节点是否用于存储数据,是:true、否:false node.data: true # 索引数据存放的位置 path.data: /home/elasticsearch/module/elasticsearch/data # 日志文件存放的位置 path.logs: /home/elasticsearch/module/elasticsearch/logs node.name: node-3 #每个节点名称不一样 其他两台为node-2 ,node-3 network.host: 192.168.8.183 #### 实际服务器ip地址 # es对外提供的http端口,默认 9200 http.port: 9200 # TCP的默认监听端口,默认 9300 #transport.tcp.port: 9300 discovery.seed_hosts: ["192.168.8.190", "192.168.8.185","192.168.9.183"] # # Bootstrap the cluster using an initial set of master-eligible nodes: # cluster.initial_master_nodes: ["node-1", "node-2", "node-3"] #- 1
- 2
- 3
- 4
- 5
- 6
- 7
- 8
- 9
- 10
- 11
- 12
- 13
- 14
- 15
- 16
- 17
- 18
- 19
- 20
- 21
- 22
- 23
- 24
- 25
- 26
- 27
分别启动三台Elasticsearch
注意:请使用非root用户启动./elasticsearch/bin/elasticsearch- 1

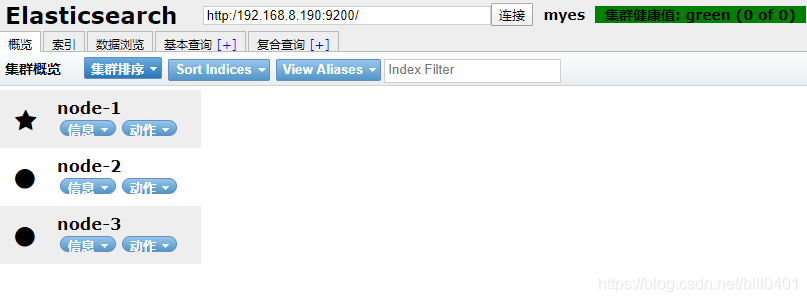
如图显示elastic search集群加载成功,节点分别加入。
浏览器访问或使用elasticsearch head 插件访问服务器9200端口
-
相关阅读:
【Linux】Ubuntu存储分析
利用多Lora节省大模型部署成本|得物技术
大白话JS中Object.entires()和Object.assign()的使用
神经网络 注意力机制 Q K V 理解
Spring底层的核心原理解析
【Python】AppUI自动化—appium自动化元素定位、元素事件操作(17)下
vscode无法实现函数跳转,跳转到函数定义的地方
spring security教程(一)--认证
数学建模——微分方程介绍
二叉树层序遍历算法
- 原文地址:https://blog.csdn.net/m0_67401134/article/details/126358543