-
HC32L110 在 Ubuntu 下使用 J-Link 烧录
目录
HC32L110 在 Ubuntu 下使用 J-Link 烧录
以下说明在 Ubuntu 下如何配置 HC32L110 的烧录环境, 当前使用的是 JLink
硬件准备
- 开发板, 可以用
- LilyGo 的 T-HC32 开发板, 这个开发板用的就是 CSP16封装的 HC32L110B6
- 或者用泽耀的2.4G模块套件底板AS06-VTB07H. 套件9.9还送一片Si24R1. 这个底板最早使用的是STM8S, 现在改成 QFN20 的 HC32L110C4UA
- 以上在某宝上都能买到
- 烧录卡: 某宝上最常见的 J-Link OB
软件
- JLink安装包, 从 Segger官网下载
- HC32L110_IDE_Rev1.0.3.zip 需要其中的算法文件
安装 JLink
对下载的JLink安装文件, 直接通过dpkg安装
sudo -i JLink_Linux_V770a_x86_64.deb- 1
其默认安装位置在 /opt/SEGGER/JLink_V770a, 并且会创建一个link路径 /opt/SEGGER/JLink 指向实际目录, 方便版本变更时升级无需修改路径.
添加 HC32L110 硬件
将 HC32L110_IDE_Rev1.0.3.zip 在Win10下安装pack后得到的两个flash算法文件复制到 /opt/SEGGER/JLink/Devices下, 结构为
/opt/SEGGER/JLink_V770a/Devices$ tree . ├── Altera │ └── Cyclone_V │ └── Altera_Cyclone_V_QSPI.elf ... ├── HDSC │ ├── HC32L110B4_C4.FLM │ └── HC32L110B6_C6.FLM ├── Infineon- 1
- 2
- 3
- 4
- 5
- 6
- 7
- 8
- 9
- 10
修改 /opt/SEGGER/JLink_V770a/JLinkDevices.xml, 和 Win10 下一样, 在
之前增加设备信息<Device> <ChipInfo Vendor="HDSC" Name="HC32L110x4" WorkRAMAddr="0x20000000" WorkRAMS ize="0x800" Core="JLINK_CORE_CORTEX_M0"/>Device> <Device> <ChipInfo Vendor="HDSC" Name="HC32L110x6" WorkRAMAddr="0x20000000" WorkRAMS ize="0x1000" Core="JLINK_CORE_CORTEX_M0"/> Device> - 1
- 2
- 3
- 4
- 5
- 6
- 7
- 8
- 9
- 10
- 11
- 12
- 13
- 14
- 15
- 16
- 17
运行 J-Flash 烧录
经过上面的配置, 就可以通过J-Link对HC32L110进行烧录了.
Ubuntu下开一个终端窗口直接运行 /opt/SEGGER/JLink/JFlashExe, 窗口和 Win10 下是一样的
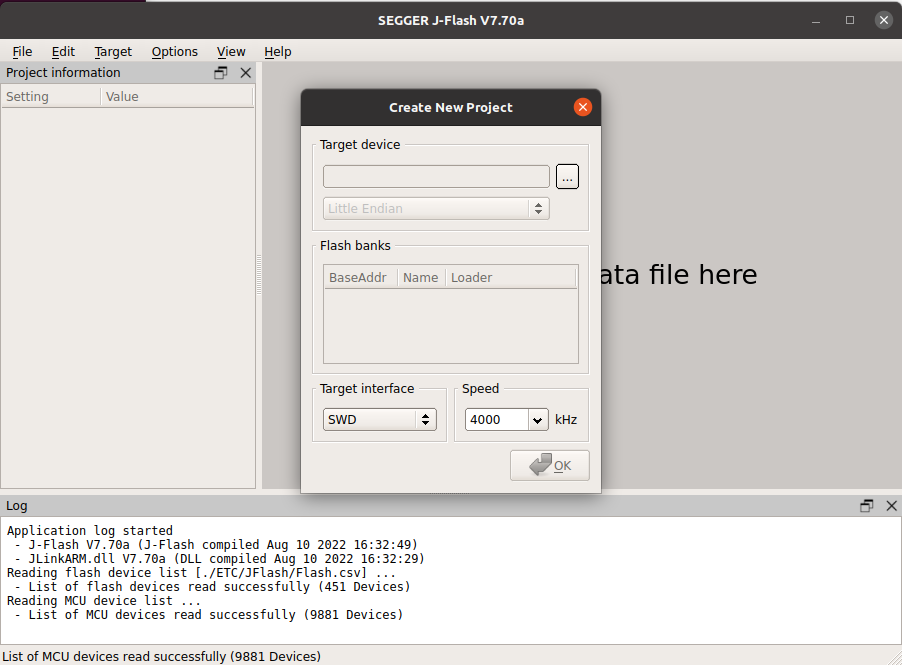
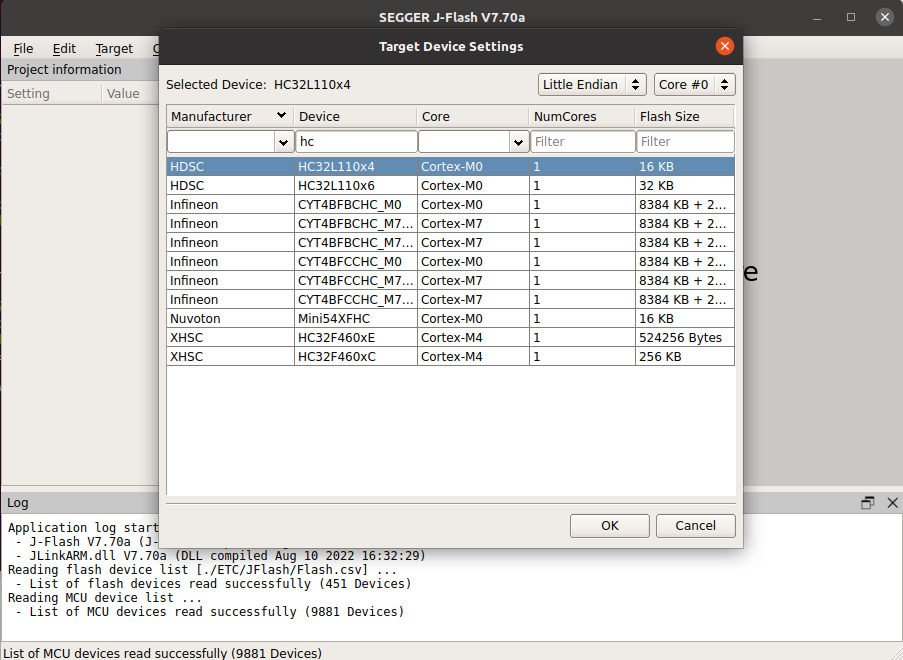
在 Target 对话框中, Device 输入 HC32 就能看到刚才添加的设备, 如果是 HC32L110B6 就选择 HC32L110x6, 如果是 HC32L110C4 就选择 HC32L110x4
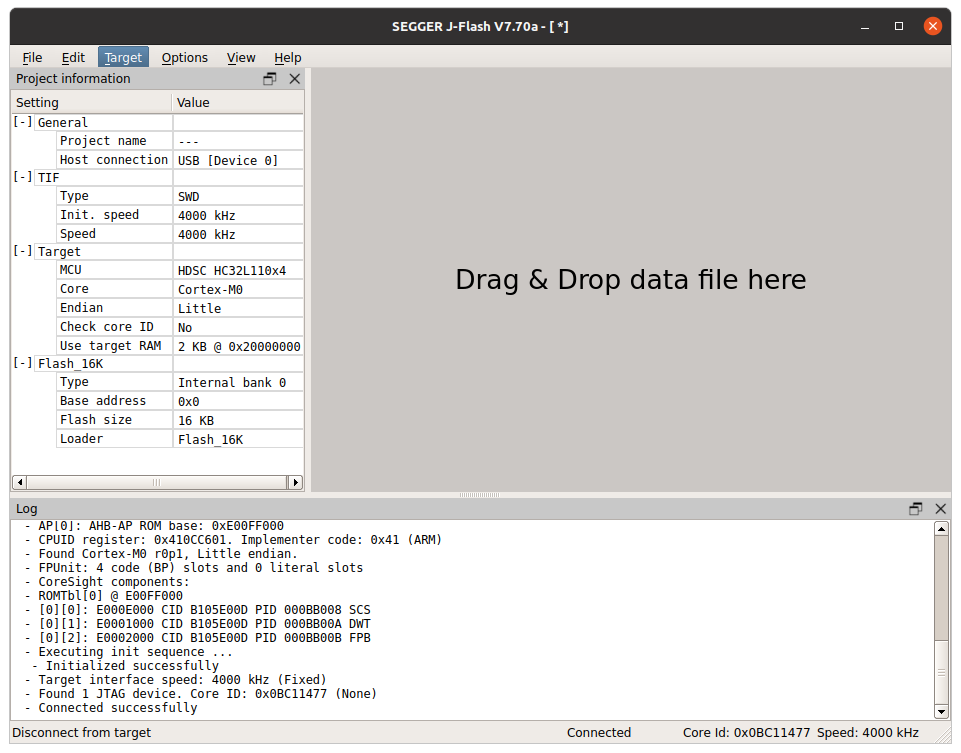
连接好开发板和JLink, 点击 Target -> Connect, 能看到连接信息
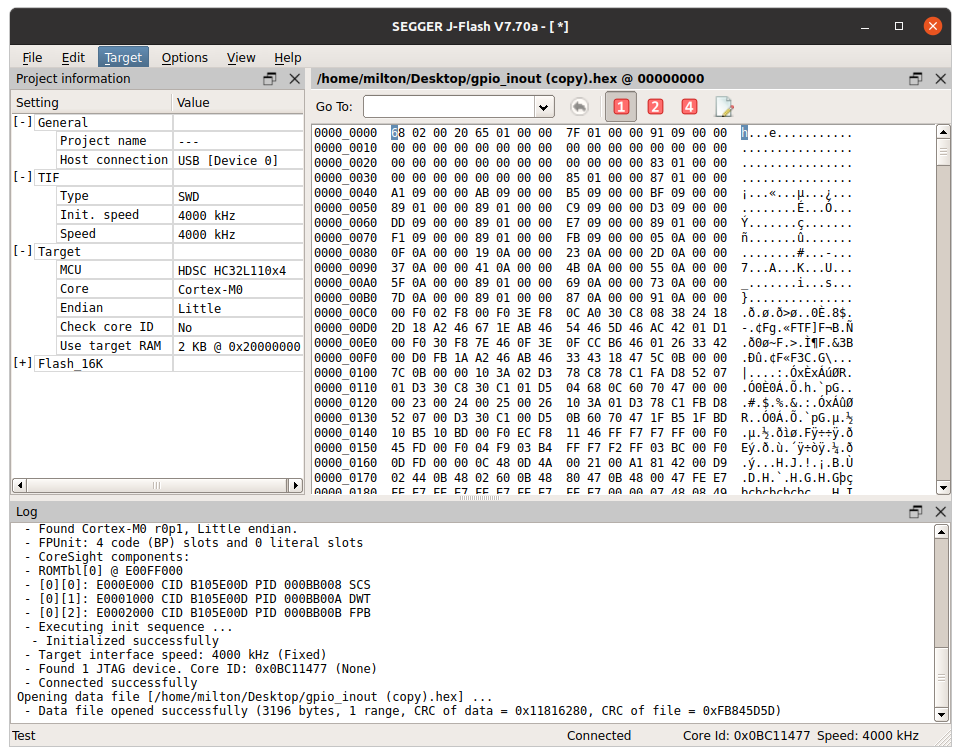
选择要烧录的hex文件, 点击 Target -> Production Programming 或者按 F7, 就会进行烧录
默认的烧录完成后不会立即运行, 需要配置一下, 在 Options -> Project Settings -> Production, 勾选 Start Application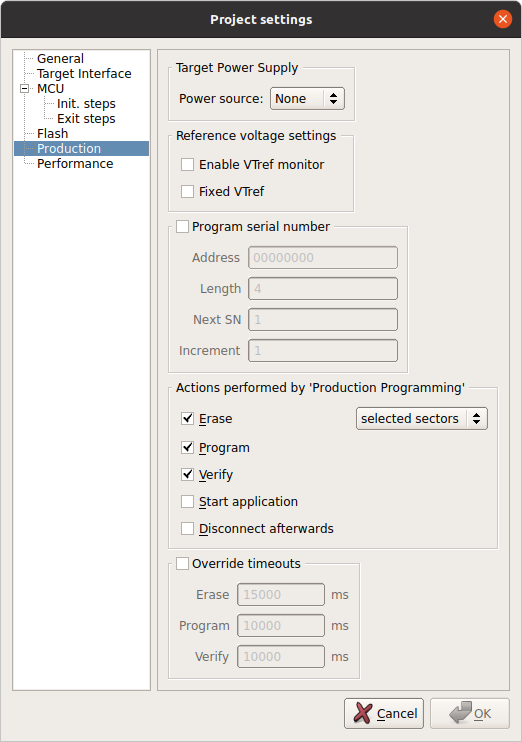
将 JFlash 添加到桌面应用
每次开一个命令行运行 JFlashExe 还是很不方便的, 可以给它创建一个桌面应用, 这样就能直接从 win 键调出应用列表中运行了
sudo vi /usr/share/applications/jflash.desktop- 1
添加如下内容
[Desktop Entry] Version=1.0 Type=Application Name=JFlash Exec="/opt/SEGGER/JLink/JFlashExe" Comment=J-Flash Categories=Development; Terminal=false- 1
- 2
- 3
- 4
- 5
- 6
- 7
- 8
这是没有图标的, 如果需要图标, 可以自己造一个icon.png 放到 /opt/SEGGER/JLink/ 下, 然后添加一行
Icon=/opt/SEGGER/JLink/icon.png- 1
命令行烧录
在开发环境用界面进行烧录比较繁琐, 一般会需要用命令行集成到Make或IDE环境, 这时候就会需要使用命令行的烧录方式
JLink提供了 JLinkExe 这个命令行工具, 对于 HC32L110 可以用下面的命令和jlink脚本进行烧录
/opt/SEGGER/JLink/JLinkExe -device HC32L110x4 -if swd -speed 4000 -CommanderScript download.jlink- 1
编写download.jlink文件
erase loadfile gpio_inout.hex reset exit- 1
- 2
- 3
- 4
因为erase已经对MCU reset + halt, 在 loadfile 写入时可以不 reset + halt, 第二行可以改成
loadfile gpio_inout.hex 0 noreset- 1
命令说明
- Erase Erase flash (range) of selected device, 加 noreset 表示不需要重启
- LoadFile Load data file into target memory, 可以写入 .hex, .bin, .elf 文件, 如果指定地址, 只对 bin 文件有效, 其他格式, 地址参数会被忽略
- SaveBin Save target memory range into binary file
- VerifyBin Verfy if specified bin file is at the specified target memory location
- Go 简写为
G, Start CPU if halted - Reset 简写为
RReset CPU - Exit 退出
详细的命令, 可以在 Segger 官网WIKI上查看 https://wiki.segger.com/J-Link_Commander
执行记录为
SEGGER J-Link Commander V7.70a (Compiled Aug 10 2022 16:32:44) DLL version V7.70a, compiled Aug 10 2022 16:32:29 J-Link Command File read successfully. Processing script file... J-Link>erase J-Link connection not established yet but required for command. Connecting to J-Link via USB...O.K. Firmware: J-Link ARM-OB STM32 compiled Aug 22 2012 19:52:04 Hardware version: V7.00 J-Link uptime (since boot): N/A (Not supported by this model) S/N: 20090928 License(s): RDI,FlashDL,FlashBP,JFlash,GDB VTref=3.300V Target connection not established yet but required for command. Device "HC32L110X4" selected. Connecting to target via SWD Found SW-DP with ID 0x0BC11477 DPv0 detected CoreSight SoC-400 or earlier Scanning AP map to find all available APs AP[1]: Stopped AP scan as end of AP map has been reached AP[0]: AHB-AP (IDR: 0x04770031) Iterating through AP map to find AHB-AP to use AP[0]: Core found AP[0]: AHB-AP ROM base: 0xE00FF000 CPUID register: 0x410CC601. Implementer code: 0x41 (ARM) Found Cortex-M0 r0p1, Little endian. FPUnit: 4 code (BP) slots and 0 literal slots CoreSight components: ROMTbl[0] @ E00FF000 [0][0]: E000E000 CID B105E00D PID 000BB008 SCS [0][1]: E0001000 CID B105E00D PID 000BB00A DWT [0][2]: E0002000 CID B105E00D PID 000BB00B FPB Cortex-M0 identified. No address range specified, 'Erase Chip' will be executed 'erase': Performing implicit reset & halt of MCU. Reset: Halt core after reset via DEMCR.VC_CORERESET. Reset: Reset device via AIRCR.SYSRESETREQ. Erasing device... J-Link: Flash download: Total time needed: 0.159s (Prepare: 0.072s, Compare: 0.000s, Erase: 0.065s, Program: 0.000s, Verify: 0.000s, Restore: 0.022s) Erasing done. J-Link>loadfile gpio_inout.hex 'loadfile': Performing implicit reset & halt of MCU. Reset: Halt core after reset via DEMCR.VC_CORERESET. Reset: Reset device via AIRCR.SYSRESETREQ. Downloading file [gpio_inout.hex]... J-Link: Flash download: Bank 0 @ 0x00000000: 1 range affected (3584 bytes) J-Link: Flash download: Total: 0.595s (Prepare: 0.034s, Compare: 0.098s, Erase: 0.128s, Program: 0.257s, Verify: 0.053s, Restore: 0.023s) J-Link: Flash download: Program speed: 13 KB/s O.K. J-Link>reset Reset delay: 0 ms Reset type NORMAL: Resets core & peripherals via SYSRESETREQ & VECTRESET bit. Reset: Halt core after reset via DEMCR.VC_CORERESET. Reset: Reset device via AIRCR.SYSRESETREQ. J-Link>exit Script processing completed.- 1
- 2
- 3
- 4
- 5
- 6
- 7
- 8
- 9
- 10
- 11
- 12
- 13
- 14
- 15
- 16
- 17
- 18
- 19
- 20
- 21
- 22
- 23
- 24
- 25
- 26
- 27
- 28
- 29
- 30
- 31
- 32
- 33
- 34
- 35
- 36
- 37
- 38
- 39
- 40
- 41
- 42
- 43
- 44
- 45
- 46
- 47
- 48
- 49
- 50
- 51
- 52
- 53
- 54
- 55
- 56
- 57
- 58
- 59
- 60
结束
以上是使用JLink的烧录方式, 使用 DAP-Link 的烧录方式未测试成功, 待有进展后更新
- 开发板, 可以用
-
相关阅读:
MySQL一条SQL语句的执行过程
自学SLAM(6)相机与图像实践:OpenCV处理图像与图像拼接(点云)
[高等数学]同济版高等数学【第七版】上下册教材+习题全解PDF
Ubuntu22.04+Nvidia驱动+Cuda11.8+cudnn8.6
vivo 容器集群监控系统架构与实践
GeoServer地图服务器权限控制
《IEEE Transactions on Robotics》发表!北京大学研究团队推出具有多种运动模态的软体两栖机器人
LeetCode-数组-No41缺失的第一个正数
海康设备、LiveNVR等通过GB35114国密协议对接到LiveGBS GB28181/GB35114平台的详细操作说明
优秀案例 | 以虚拟人IP“科普熊猫”,为2023成都市全国科普日注入新活力
- 原文地址:https://blog.csdn.net/michaelchain/article/details/126346145
