-
Android Navigation 过渡动画
之前写过一篇。但是没有从很基础开始。。
这有点不太对。那么今天就来一个从很基础开始的教程
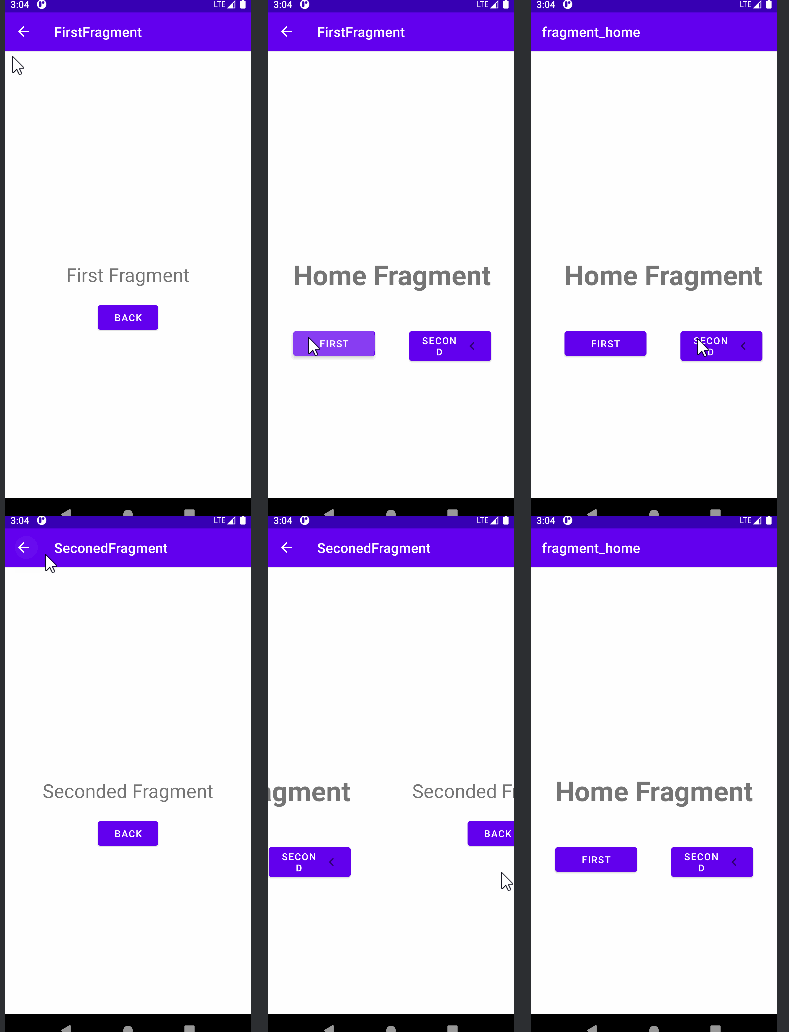
效果如下

依赖
- implementation 'androidx.navigation:navigation-fragment-ktx:2.5.1'
- implementation 'androidx.navigation:navigation-ui:2.5.1'
第一个页面
MainActivity
- package com.example.shardelement
- import androidx.appcompat.app.AppCompatActivity
- import android.os.Bundle
- import android.widget.Toast
- import androidx.navigation.findNavController
- import androidx.navigation.ui.setupActionBarWithNavController
- class MainActivity : AppCompatActivity() {
- override fun onCreate(savedInstanceState: Bundle?) {
- super.onCreate(savedInstanceState)
- setContentView(R.layout.activity_main)
- setupActionBarWithNavController(findNavController(R.id.fcv))
- }
- override fun onSupportNavigateUp(): Boolean {
- val navController = findNavController(R.id.fcv)
- return navController.navigateUp() || super.onSupportNavigateUp()
- }
- }
的布局
activity_main
- <androidx.constraintlayout.widget.ConstraintLayout xmlns:android="http://schemas.android.com/apk/res/android"
- xmlns:app="http://schemas.android.com/apk/res-auto"
- xmlns:tools="http://schemas.android.com/tools"
- android:layout_width="match_parent"
- android:layout_height="match_parent"
- tools:context=".MainActivity">
- <fragment
- android:id="@+id/fcv"
- android:name="androidx.navigation.fragment.NavHostFragment"
- android:layout_width="0dp"
- app:defaultNavHost="true"
- app:navGraph="@navigation/my_nav"
- android:layout_height="0dp"
- app:layout_constraintBottom_toBottomOf="parent"
- app:layout_constraintEnd_toEndOf="parent"
- app:layout_constraintStart_toStartOf="parent"
- app:layout_constraintTop_toTopOf="parent" />
- androidx.constraintlayout.widget.ConstraintLayout>
里面很简单 一个Fragment但是里面用到了my_nav。这个会在创建三个fragment后再给大家贴出来 先不要着急
HomeFragment
-》可以跳转FirstFragment 用的是从左边向右边滑动的动画。
-》可以跳转SecondedFragment用的是从右边边向右边滑动的动画。
代码
- package com.example.shardelement
- import android.os.Bundle
- import androidx.fragment.app.Fragment
- import android.view.LayoutInflater
- import android.view.View
- import android.view.ViewGroup
- import android.widget.Button
- import androidx.navigation.fragment.findNavController
- class HomeFragment : Fragment() {
- override fun onCreateView(
- inflater: LayoutInflater, container: ViewGroup?,
- savedInstanceState: Bundle?
- ): View? {
- // Inflate the layout for this fragment
- val view = inflater.inflate(R.layout.fragment_home, container, false)
- view.findViewById<Button>(R.id.navToFirst_btn).setOnClickListener {
- findNavController().navigate(R.id.action_homeFragment_to_firstFragment)
- }
- view.findViewById<Button>(R.id.navToSecond_btn).setOnClickListener {
- findNavController().navigate(R.id.action_homeFragment_to_seconedFragment)
- }
- return view
- }
- }
布局
- <androidx.constraintlayout.widget.ConstraintLayout xmlns:android="http://schemas.android.com/apk/res/android"
- xmlns:app="http://schemas.android.com/apk/res-auto"
- xmlns:tools="http://schemas.android.com/tools"
- android:layout_width="match_parent"
- android:layout_height="match_parent"
- tools:context=".HomeFragment">
- <TextView
- android:id="@+id/homeFragment_txt"
- android:layout_width="wrap_content"
- android:layout_height="wrap_content"
- android:text="Home Fragment"
- android:textSize="40sp"
- android:textStyle="bold"
- app:layout_constraintBottom_toBottomOf="parent"
- app:layout_constraintEnd_toEndOf="parent"
- app:layout_constraintStart_toStartOf="parent"
- app:layout_constraintTop_toTopOf="parent" />
- <Button
- android:id="@+id/navToFirst_btn"
- android:layout_width="120dp"
- android:layout_height="wrap_content"
- android:layout_marginTop="50dp"
- android:drawableStart="@drawable/ic_baseline_keyboard_arrow_left"
- android:drawableLeft="@drawable/ic_baseline_keyboard_arrow_left"
- android:text="First"
- app:layout_constraintStart_toStartOf="@+id/homeFragment_txt"
- app:layout_constraintTop_toBottomOf="@+id/homeFragment_txt" />
- <Button
- android:id="@+id/navToSecond_btn"
- android:layout_width="120dp"
- android:layout_height="wrap_content"
- android:layout_marginTop="50dp"
- android:drawableEnd="@drawable/ic_baseline_keyboard_arrow_right"
- android:drawableRight="@drawable/ic_baseline_keyboard_arrow_right"
- android:text="Second"
- app:layout_constraintEnd_toEndOf="@+id/homeFragment_txt"
- app:layout_constraintTop_toBottomOf="@+id/homeFragment_txt" />
- androidx.constraintlayout.widget.ConstraintLayout>
预览

用到了俩左边按钮和右边按钮的icon。。其实。。也可以不放。核心不在此就不贴了
FirstFragment
- package com.example.shardelement
- import android.os.Bundle
- import androidx.fragment.app.Fragment
- import android.view.LayoutInflater
- import android.view.View
- import android.view.ViewGroup
- import android.widget.Button
- import androidx.navigation.fragment.findNavController
- class FirstFragment : Fragment() {
- override fun onCreateView(
- inflater: LayoutInflater, container: ViewGroup?,
- savedInstanceState: Bundle?
- ): View? {
- // Inflate the layout for this fragment
- val view = inflater.inflate(R.layout.fragment_first, container, false)
- view.findViewById<Button>(R.id.view_back).setOnClickListener {
- findNavController().navigate(R.id.action_firstFragment_to_homeFragment)
- }
- return view
- }
- }
布局
- <androidx.constraintlayout.widget.ConstraintLayout xmlns:android="http://schemas.android.com/apk/res/android"
- xmlns:app="http://schemas.android.com/apk/res-auto"
- android:layout_width="match_parent"
- android:layout_height="match_parent">
- <TextView
- android:id="@+id/tv_tag"
- android:layout_width="wrap_content"
- android:layout_height="wrap_content"
- android:text="First Fragment"
- android:textSize="28sp"
- app:layout_constraintBottom_toBottomOf="parent"
- app:layout_constraintEnd_toEndOf="parent"
- app:layout_constraintStart_toStartOf="parent"
- app:layout_constraintTop_toTopOf="parent" />
- <Button
- android:id="@+id/view_back"
- android:layout_width="wrap_content"
- android:layout_height="wrap_content"
- android:layout_marginTop="20dp"
- android:text="BACK"
- app:layout_constraintEnd_toEndOf="parent"
- app:layout_constraintStart_toStartOf="parent"
- app:layout_constraintTop_toBottomOf="@+id/tv_tag" />
- androidx.constraintlayout.widget.ConstraintLayout>
其实第二个Fragment和他一样。。
真不是为了凑字数。就是为了完整教程来吧
SecondedFragment
- package com.example.shardelement
- import android.os.Bundle
- import androidx.fragment.app.Fragment
- import android.view.LayoutInflater
- import android.view.View
- import android.view.ViewGroup
- import android.widget.Button
- import androidx.navigation.fragment.findNavController
- class SecondedFragment : Fragment() {
- override fun onCreateView(
- inflater: LayoutInflater, container: ViewGroup?,
- savedInstanceState: Bundle?
- ): View? {
- // Inflate the layout for this fragment
- val view = inflater.inflate(R.layout.fragment_seconed, container, false)
- view.findViewById<Button>(R.id.view_back).setOnClickListener {
- findNavController().navigate(R.id.action_seconedFragment_to_homeFragment)
- }
- return view
- }
- }
代码
- <androidx.constraintlayout.widget.ConstraintLayout xmlns:android="http://schemas.android.com/apk/res/android"
- xmlns:app="http://schemas.android.com/apk/res-auto"
- android:layout_width="match_parent"
- android:layout_height="match_parent">
- <TextView
- android:id="@+id/tv_tag"
- android:layout_width="wrap_content"
- android:layout_height="wrap_content"
- android:text="Seconded Fragment"
- android:textSize="28sp"
- app:layout_constraintBottom_toBottomOf="parent"
- app:layout_constraintEnd_toEndOf="parent"
- app:layout_constraintStart_toStartOf="parent"
- app:layout_constraintTop_toTopOf="parent" />
- <Button
- android:id="@+id/view_back"
- android:layout_width="wrap_content"
- android:layout_height="wrap_content"
- android:layout_marginTop="20dp"
- android:text="BACK"
- app:layout_constraintEnd_toEndOf="parent"
- app:layout_constraintStart_toStartOf="parent"
- app:layout_constraintTop_toBottomOf="@+id/tv_tag" />
- androidx.constraintlayout.widget.ConstraintLayout>
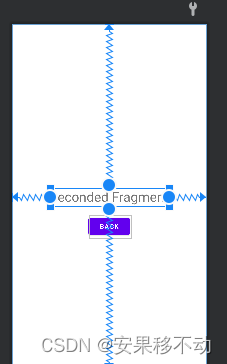
那么预览我就给一个咯

好
下面是核心。重点 敲黑板
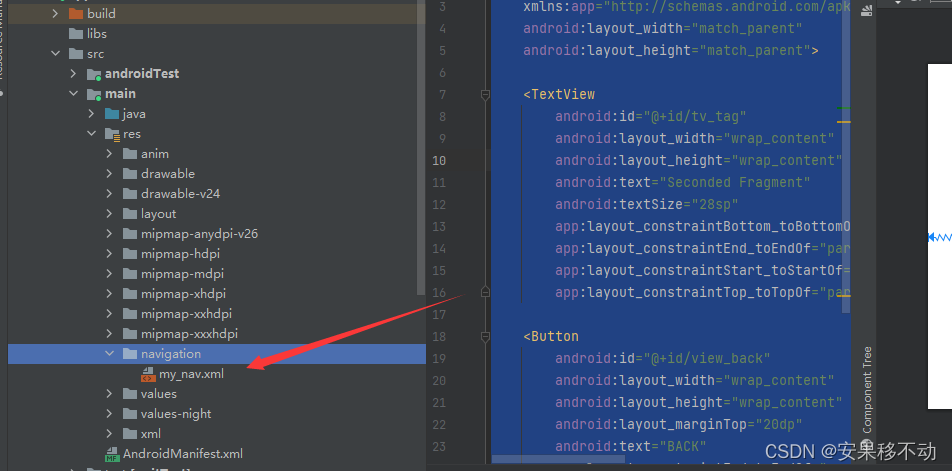
资源文件新建

my_nav.xml
剩下的我用哔哩哔哩展示把。。为了给大家一个更为骚而快的操作效果。。更详细的效果
下面先贴上去代码。后续看下如何操作的朋友可以看下哔哩哔哩的教学视频哦
- <navigation xmlns:android="http://schemas.android.com/apk/res/android"
- xmlns:app="http://schemas.android.com/apk/res-auto"
- xmlns:tools="http://schemas.android.com/tools"
- android:id="@+id/my_nav.xml"
- app:startDestination="@id/homeFragment">
- <fragment
- android:id="@+id/homeFragment"
- android:name="com.example.shardelement.HomeFragment"
- android:label="fragment_home"
- tools:layout="@layout/fragment_home">
- <action
- android:id="@+id/action_homeFragment_to_firstFragment"
- app:destination="@id/firstFragment"
- app:enterAnim="@anim/from_left"
- app:exitAnim="@anim/to_right"
- app:popEnterAnim="@anim/from_right"
- app:popExitAnim="@anim/to_left" />
- <action
- android:id="@+id/action_homeFragment_to_seconedFragment"
- app:destination="@id/seconedFragment"
- app:enterAnim="@anim/from_right"
- app:exitAnim="@anim/to_left"
- app:popEnterAnim="@anim/from_left"
- app:popExitAnim="@anim/to_right" />
- fragment>
- <fragment
- android:id="@+id/firstFragment"
- android:name="com.example.shardelement.FirstFragment"
- android:label="FirstFragment">
- <action
- android:id="@+id/action_firstFragment_to_homeFragment"
- app:destination="@id/homeFragment"
- app:enterAnim="@anim/from_right"
- app:exitAnim="@anim/to_left" />
- fragment>
- <fragment
- android:id="@+id/seconedFragment"
- android:name="com.example.shardelement.SecondedFragment"
- android:label="SeconedFragment">
- <action
- android:id="@+id/action_seconedFragment_to_homeFragment"
- app:destination="@id/homeFragment"
- app:enterAnim="@anim/from_left"
- app:exitAnim="@anim/to_right" />
- fragment>
- navigation>
from_left.xml
- <set
- android:duration="800"
- xmlns:android="http://schemas.android.com/apk/res/android">
- <translate
- android:fromXDelta="-100%"
- android:toXDelta="0%"
- />
- set>
from_right.xml
- <set
- android:duration="800"
- xmlns:android="http://schemas.android.com/apk/res/android">
- <translate
- android:fromXDelta="100%"
- android:toXDelta="0%"
- />
- set>
to_left.xml
- <set
- android:duration="800"
- xmlns:android="http://schemas.android.com/apk/res/android">
- <translate
- android:fromXDelta="0%"
- android:toXDelta="-100%"
- />
- set>
to_right.xml
- <set
- android:duration="800"
- xmlns:android="http://schemas.android.com/apk/res/android">
- <translate
- android:fromXDelta="0%"
- android:toXDelta="100%"
- />
- set>
哔哩哔哩地址
哔哩哔哩上面有更啰嗦的讲解
-
相关阅读:
c 两进程(多进程)通过mmap()共享内存通信
达梦数据库整合在springboot的使用教程
用Python在PDF文档中插入单图像水印和平铺图像水印
[附源码]计算机毕业设计springboot教学辅助系统
dat.GUI
【花书笔记|PyTorch版】手动学深度学习303: 线性神经模型:代码部分(下)
MySQL——数据的增删改
stdmap和stdmultimap的使用总结
Java中split方法简介
C#网页打印功能实现
- 原文地址:https://blog.csdn.net/mp624183768/article/details/126338041
