-
Linux 搭建K8s集群,最新教程,细到极致
Hello,各位小伙伴,大家好呀。老哥最近在接触云原生相关的东西,然后的话,需要接触到k8s,之前一直没有时间搭建。今天趁着周末放假,赶紧动起来!
给大家带来的是最新版k8s集群的搭建,希望给大家带来一点小小的帮助。老哥资金有限,这次采用一主一从进行搭建集群
k8s官方文档:https://kubernetes.io/docs/home/
k8s集群(kubeadm)官方搭建教程: https://kubernetes.io/zh-cn/docs/setup/production-environment/tools/kubeadm/create-cluster-kubeadm/
1、首先,准备两台干净的Centos8 服务器,设置一下主机名
第一台[root@VM-4-2-centos ~]# hostnamectl set-hostname master- 1
第二台
[root@VM-4-12-centos /]# hostnamectl set-hostname node1- 1
2、k8s集群搭建,需要用到内网ip,千万别用公网ip!!!,否则工作节点无法加入主节点,然后报错,Failed to load kubelet config file" err=“failed to load Kubelet config file /var/lib/kubelet/config.yaml, error failed to read kubelet config file “/var/lib/kubelet/config.yaml”, error: open /var/lib/kubelet/config.yaml: no such file or directory” path=“/var/lib/kubelet/config.yaml”
提前查看好内网ip,我们可以通过 ifconfig命令查看
[root@VM-4-2-centos ~]# ifconfig- 1

3、然后两台服务器,设置主机映射
[root@VM-4-2-centos ~]# vi /etc/hosts- 1
你的内网ip master 你的内网ip node1- 1
- 2
3A、内网访问,我们可以用ping一下,能不能ping通,如果不能,需要做 ip地址重定向,老哥简单解释一下,就是通过iptable,将内网访问的ip重定向到外网,这样互通的时候,集群配置的时候,虽然是内网,但是我们依旧可以通过外网形式访问
第一台服务器,主节点
ping node1内网ip iptables -t nat -A OUTPUT -d node1内网ip -j DNAT --to-destination 101.34.7.236- 1
- 2
第二台服务器,工作节点
ping master内网ip iptables -t nat -A OUTPUT -d master内网ip -j DNAT --to-destination 101.35.245.191- 1
- 2
5、然后我们在第一台服务器测试一下,没有任何问题
[root@VM-4-2-centos ~]# ping node1 PING node1 (xxx) 56(84) bytes of data. 64 bytes from node1 (xxx): icmp_seq=1 ttl=57 time=2.93 ms 64 bytes from node1 (xxx): icmp_seq=2 ttl=57 time=2.93 ms 64 bytes from node1 (xxx): icmp_seq=3 ttl=57 time=2.92 ms ^C --- node1 ping statistics --- 3 packets transmitted, 3 received, 0% packet loss, time 2002ms rtt min/avg/max/mdev = 2.920/2.926/2.933/0.062 ms- 1
- 2
- 3
- 4
- 5
- 6
- 7
- 8
- 9
- 10
6、接着,两台服务器执行以下命令,关闭一些不必要的检查,生产环境建议不要这样做
# 所有节点关闭 SELinux setenforce 0 sed -i --follow-symlinks 's/SELINUX=enforcing/SELINUX=disabled/g' /etc/sysconfig/selinux- 1
- 2
- 3
所有节点确保防火墙关闭 systemctl stop firewalld systemctl disable firewalld- 1
- 2
- 3
7、然后添加K8s安装源,移动到 /etc/yum.repos.d/目录下,(所有节点执行)
cat <kubernetes.repo [kubernetes] name=Kubernetes baseurl=https://mirrors.aliyun.com/kubernetes/yum/repos/kubernetes-el7-x86_64 enabled=1 gpgcheck=0 repo_gpgcheck=0 gpgkey=https://mirrors.aliyun.com/kubernetes/yum/doc/yum-key.gpg https://mirrors.aliyun.com/kubernetes/yum/doc/rpm-package-key.gpg EOF - 1
- 2
- 3
- 4
- 5
- 6
- 7
- 8
- 9
[root@VM-4-2-centos ~]# mv kubernetes.repo /etc/yum.repos.d/- 1
8、安装yum 仓库依赖,两个节点执行
[root@VM-4-2-centos ~]# yum -y install yum-utils- 1
9、添加Docker安装源,两个节点执行
[root@VM-4-2-centos ~]# yum-config-manager --add-repo http://mirrors.aliyun.com/docker-ce/linux/centos/docker-ce.repo- 1
10、安装kubelet、docker,两个节点执行
[root@VM-4-2-centos ~]# yum install -y kubelet-1.22.4 kubectl-1.22.4 kubeadm-1.22.4 docker-ce- 1
11、启动docker,设置docker和kubelet开机自启,注意,这里千万不要启动kubelet,因为还没有做初始化,不然等下报错,哭都没地方哭,两个节点执行
[root@VM-4-2-centos ~]# systemctl start docker [root@VM-4-2-centos ~]# systemctl enable kubelet [root@VM-4-2-centos ~]# systemctl enable docker- 1
- 2
- 3
12、添加一下docker镜像,两个节点执行
cat <daemon.json { "exec-opts": ["native.cgroupdriver=systemd"], "registry-mirrors": ["https://ud6340vz.mirror.aliyuncs.com"] } EOF mv daemon.json /etc/docker/ - 1
- 2
- 3
- 4
- 5
- 6
- 7
13、刷新docker配置,两个节点执行
[root@VM-4-2-centos ~]# systemctl daemon-reload [root@VM-4-2-centos ~]# systemctl restart docker- 1
- 2
14、kubelet初始化,主节点执行,如果你能够看到以下提示,说明初始化成功了
[root@VM-4-2-centos ~]# kubeadm init --image-repository=registry.aliyuncs.com/google_containers- 1

15、然后,主节点需要暴露配置,给工作节点,可以使用普通用户命令和root用户命令,这里我们都用上,主节点执行
[root@VM-4-2-centos ~]# mkdir -p $HOME/.kube [root@VM-4-2-centos ~]# sudo cp -i /etc/kubernetes/admin.conf $HOME/.kube/config [root@VM-4-2-centos ~]# sudo chown $(id -u):$(id -g) $HOME/.kube/config [root@VM-4-2-centos ~]# export KUBECONFIG=/etc/kubernetes/admin.conf- 1
- 2
- 3
- 4
16、启动kubelet,主节点执行,执行完以后,云服务器开放6443端口
[root@VM-4-2-centos ~]# systemctl start kubelet- 1
17、将主节点初始化后的join命令,在工作节点执行
[root@VM-4-12-centos opt]# kubeadm join xxx:6443 --token 054e0q.0vkelrud3t8oafdk \ > --discovery-token-ca-cert-hash sha256:e3114194a4b5a18cfc08fadd26de0b18e0d08baa9132ff594366d6453c282a8a- 1
- 2

18、然后我们到主节点查看信息,工作节点加入进来了
[root@VM-4-2-centos ~]# kubectl get nodes NAME STATUS ROLES AGE VERSION master NotReady control-plane,master 105m v1.22.4 node1 NotReady104m v1.22.4 - 1
- 2
- 3
- 4
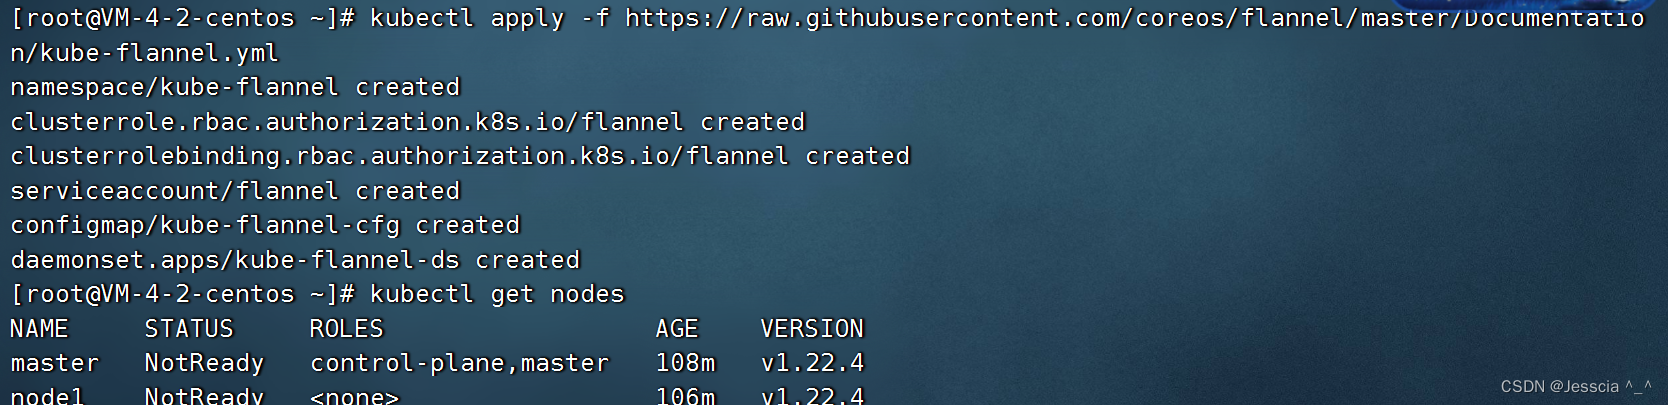
19、加入进来以后,发现主节点和工作节点都没有准备就绪,我们需要借助一个网络插件 flannel,安装好以后它不会马上是准备状态,需要我们等待一下,大概1分钟左右
[root@VM-4-2-centos ~]# kubectl apply -f https://raw.githubusercontent.com/coreos/flannel/master/Documentation/kube-flannel.yml- 1
20、flannel 还需要配置一个插件,这个是方便后面创建pod,运行pod使用的,两个节点都需要执行,如果没有配置的话,会报错 Failed to create pod sandbox: rpc error: code = Unknown desc = failed to set up sandbox container “dbd0d27f829c8c6ebae6bdcc8593e3af1849ce9d2b4deeb724de1070a46e4ea7” network for pod “nginx-56bc9fcd6b-5djbw”: networkPlugin cni failed to set up pod “nginx-56bc9fcd6b-5djbw_default” network: open /run/flannel/subnet.env: no such file or directory
[root@VM-4-2-centos ~]# cd /run/flannel/ [root@VM-4-2-centos flannel]# vim subnet.env- 1
- 2
FLANNEL_NETWORK=10.244.0.0/16 FLANNEL_SUBNET=10.244.0.1/24 FLANNEL_MTU=1450 FLANNEL_IPMASQ=true- 1
- 2
- 3
- 4
21、主节点查看,ok,大功告成
[root@VM-4-2-centos ~]# kubectl get nodes NAME STATUS ROLES AGE VERSION master Ready control-plane,master 113m v1.22.4 node1 Ready112m v1.22.4 - 1
- 2
- 3
- 4
22、最后,各位小伙伴,麻烦给老哥一个点赞、关注、收藏三连好吗,你的支持是老哥更新最大的动力,谢谢!
-
相关阅读:
java飞机航班信息查询系统演示视频2021计算机毕业设计MyBatis+系统+LW文档+源码+调试部署
Java多线程-----线程安全
进入前六!博云在中国云管理软件市场销量排行持续上升
java计算机毕业设计课题申报系统MyBatis+系统+LW文档+源码+调试部署
python-爬虫(可直接使用)
【操作系统】十分钟了解关于TCP/IP网络的基础知识(一)CSMA/CD、MAC、IP以及子网掩码
虚拟机用户切换及设置root权限的密码
C语言 | Leetcode C语言题解之第401题二进制手表
求解数组中N数之和最接近目标值的算法详解
Qt编程,文件操作、UDP通信
- 原文地址:https://blog.csdn.net/gubeichengxuyuan/article/details/126314419