-
【AQS】概述、执行流程、体系架构、深⼊源码解读(加锁,解锁)、源码总结_JUC20
1、AQS是什么?
1)AQS的概念
- 1.是什么?:是用来构建锁或者其它同步器组件的重量级基础框架及整个JUC体系的基石。他是通过内置CLH(FIFO)队列的变种来完成资源获取线程的排队工作(AQS中的队列是CLH变体的虚拟双向队列FIFO)。
- 2.成员1Node节点:将每条将要去抢占资源的线程,封装成一个Node节点来实现锁的分配。
- 3.成员2Int变量:有一个int类变量表示持有锁的状态(private volatile int state)。之后通过CAS完成对status值的修改(0表示没有,1表示阻塞)。
- 心得:加锁会导致阻塞、有阻塞就需要排队,实现排队必然需要队列。
2)AQS为什么是JUC内容中最重要的基石?
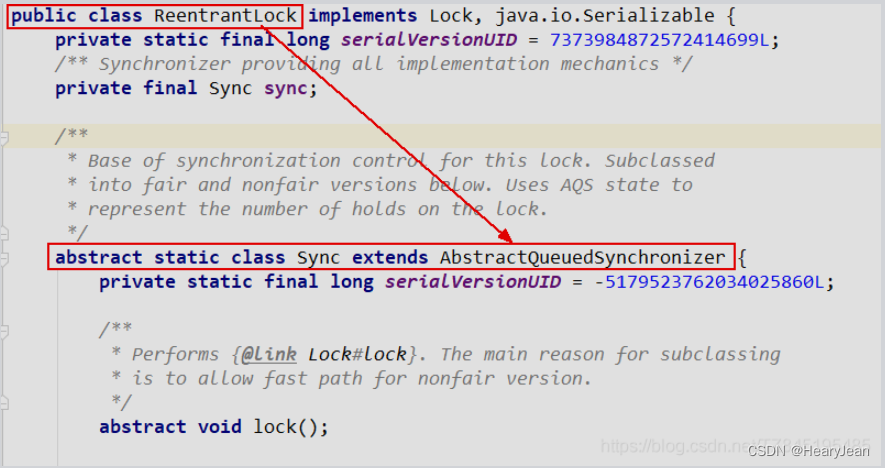
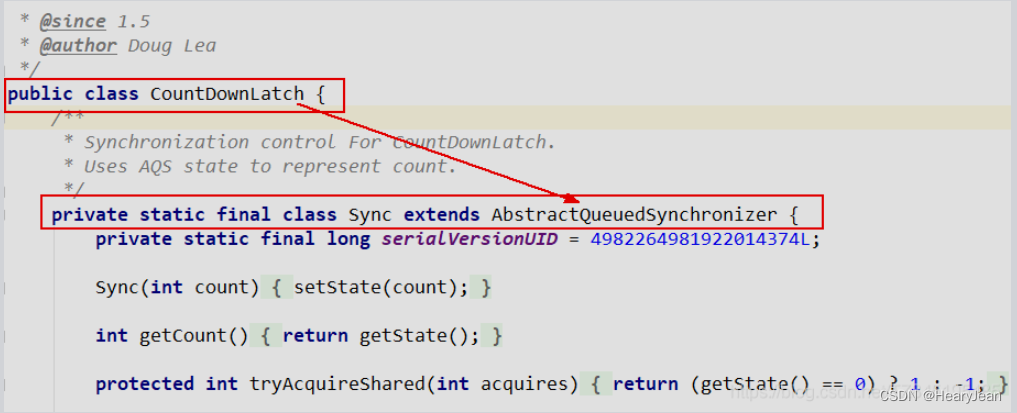
- ReentrantLock | CountDownLatch | ReentrantReadWriteLock | Semaphore。
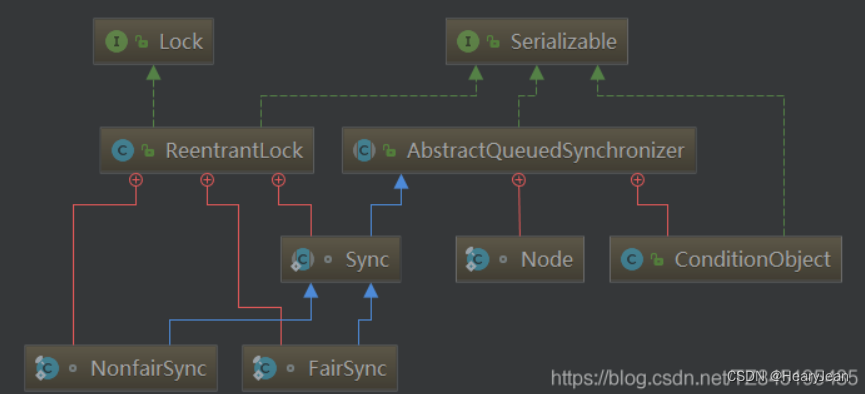
- 他们内部都有一个抽象内部类Sync,并且继承了AbstractQueuedSynchronizer。
①. ReentrantLock
②. CountDownLatch
③. ReentrantReadWriteLock

④. Semaphore

3)通过和对比加强对同步器的理解
- 锁,面向锁的使用者(定义了程序员和锁交互的使用层API,隐藏了实现细节,你调用即可)
- 同步器,面向锁的实现者(比如Java并发大神Douglee,提出统一规范并简化了锁的实现,屏蔽了同步状态管理、阻塞线程排队和通知、唤醒机制等。)
4)深层次理解AQS
- 1.如果共享资源被占用,就需要一定的阻塞等待唤醒机制来保证锁分配。
- 2.这个机制主要用的是CLH队列的变体实现的,将暂时获取不到锁的线程加入到队列中,这个队列就是AQS的抽象表现。
- 3.它将请求共享资源的线程,封装成队列的结点(Node) ,通过CAS自旋以及LockSuport.park()的方式,维护state变量的状态,使并发达到同步的效果。
2、AQS执行流程
- 1.AQS的执行流程大体为当线程获取锁失败时,会加入到同步队列中,在同步队列中的线程会按照从头至尾的顺序依次再去尝试获取锁执行。
- 2.当线程获取锁后如果调用了condition.await()方法,那么线程就加入到等待队列排队,当被唤醒(signal(),signalAll())时再从等待队列中按照从头至尾的顺序加入到同步队列中,然后再按照同步队列的执行流程去获取锁。
- 3.所以AQS最核心的数据结构其实就两个队列,同步队列和等待队列,然后再加上一个获取锁的同步状态。
3、AQS内部体系架构
1)AQS继承关系图:
2)AQS内部数据结构?
概述:AQS最核心的数据结构就三个:同步队列、等待队列、同步状态。
①. 同步队列
- 源码中head和tail为同步队列的头尾节点,在通过前后指向则构成了同步队列,为双向链表,学名为CLH队列。

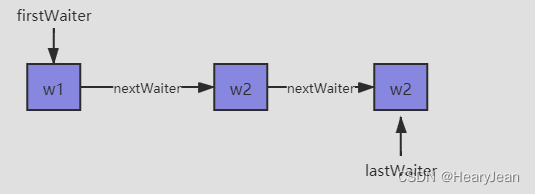
②. 等待队列
- ConditionObject中的firstWaiter和lastWaiter为同步队列的头尾节点,然后通过next指向则构成了等待队列,是个单向链表。
③. 同步状态
- state为同步状态,通过CAS操作来实现获取锁的操作。
public abstract class AbstractQueuedSynchronizer{ /** * 1.【同步队列】的头节点 */ private transient volatile Node head; /** * 2.【同步队列】的尾节点 */ private transient volatile Node tail; /** * 3.【同步状态】 */ private volatile int state; /** * 4.【等待队列】 */ public class ConditionObject implements Condition, java.io.Serializable { /** 等待队列的头节点 */ private transient Node firstWaiter; /** 等待队列的尾节点 */ private transient Node lastWaiter; } }- 1
- 2
- 3
- 4
- 5
- 6
- 7
- 8
- 9
- 10
- 11
- 12
- 13
- 14
- 15
- 16
- 17
- 18
- 19
- 20
- 21
- 22
- 23
- 24
- 25
- 26
- 27
- 28
- 29
④. Node节点
-
两个队列中的节点都是通过AQS中内部类Node来实现的。主要字段:
-
waitStatus
当前节点的状态,具体看源码列出的注释。很重要,之后会在源码中讲解。
-
Node prev
同步队列节点指向的前置节点
-
Node next
同步队列节点指向的后置节点
-
Node nextWaiter
等待队列中节点指向的后置节点
-
Thread thread
当前节点持有的线程
-
static final class Node { /** */ static final Node SHARED = new Node(); /** */ static final Node EXCLUSIVE = null; /** 1.1 标明当前节点线程取消排队 */ static final int CANCELLED = 1; /** 1.2 标明该节点的后置节点需要自己去唤醒 */ static final int SIGNAL = -1; /** 1.3 标明当前节点在等待某个条件,此时节点在等待队列中 */ static final int CONDITION = -2; /** * waitStatus value to indicate the next acquireShared should * unconditionally propagate */ static final int PROPAGATE = -3; /** * 2. 【等待状态】,值对于上面的四个常量 */ volatile int waitStatus; /** * 3. 【同步队列】节点指向的前置节点 */ volatile Node prev; /** * 4. 【同步队列】节点指向的后置节点 */ volatile Node next; /** * 5. 【当前节点持有的线程】 */ volatile Thread thread; /** * 6. 【等待队列】中节点指向的后置节点 */ Node nextWaiter; ... ... }- 1
- 2
- 3
- 4
- 5
- 6
- 7
- 8
- 9
- 10
- 11
- 12
- 13
- 14
- 15
- 16
- 17
- 18
- 19
- 20
- 21
- 22
- 23
- 24
- 25
- 26
- 27
- 28
- 29
- 30
- 31
- 32
- 33
- 34
- 35
- 36
- 37
- 38
- 39
- 40
- 41
- 42
- 43
- 44
- 45
- 46
- 47
- 48

4、解读源码前言
1)前言:
- 1.AQS里面有个变量叫State,它的值有几种?:答案是3个状态:没占用是0,占用了是1,大于1是可重入锁。
- 2.如果AB两个线程进来了以后,请问这个总共有多少个Node节点?:答案是3个,其中队列的第一个是傀儡节点(哨兵节点)。
2)场景举例分析
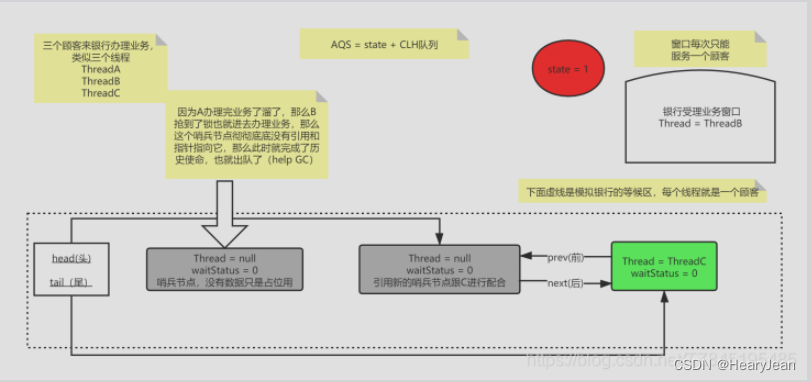
- 带入一个银行办理业务的案例来模拟我们的AQS如何进行线程的管理和通知唤醒机制。
- 3个线程模拟3个来银行网点,受理窗口办理业务的顾客。
3)测试代码展示
public class AQSDemo { public static void main(String[] args) { //创建所对象lock ReentrantLock lock = new ReentrantLock(); //A顾客就是第一个顾客,此时受理窗口没有任何人,A可以直接去办理 new Thread(() -> { lock.lock(); try{ System.out.println("-----A thread come in"); try { TimeUnit.MINUTES.sleep(20); }catch (Exception e) {e.printStackTrace();} }finally { lock.unlock(); } },"A").start(); //第二个顾客,第二个线程---》由于受理业务的窗口只有一个(只能一个线程持有锁),此时B只能等待, //进入候客区 new Thread(() -> { lock.lock(); try{ System.out.println("-----B thread come in"); }finally { lock.unlock(); } },"B").start(); //第三个顾客,第三个线程---》由于受理业务的窗口只有一个(只能一个线程持有锁),此时C只能等待, //进入候客区 new Thread(() -> { lock.lock(); try{ System.out.println("-----C thread come in"); }finally { lock.unlock(); } },"C").start(); } }- 1
- 2
- 3
- 4
- 5
- 6
- 7
- 8
- 9
- 10
- 11
- 12
- 13
- 14
- 15
- 16
- 17
- 18
- 19
- 20
- 21
- 22
- 23
- 24
- 25
- 26
- 27
- 28
- 29
- 30
- 31
- 32
- 33
- 34
- 35
- 36
- 37
- 38
- 39
- 40
- 41
- 42
- 43
5、ReentrantLock的加锁解读
1)非公平锁的lock.lock( ) 源码

2)acquire( ):源码和3大流程走向
- 从源码中看出执行流程为:tryAcquire——>addWaiter——>acquireQueued。
public final void acquire(int arg) { if (!tryAcquire(arg) && acquireQueued(addWaiter(Node.EXCLUSIVE), arg)) selfInterrupt(); }- 1
- 2
- 3
- 4
- 5

3)tryAcquire():公平和非公平
帮助理解:tryAcquire实现的具体加锁逻辑,当加锁失败时返回false,则会执行addWaiter(Node.EXCLUSIVE),将线程加入到同步队列中。Node.EXCLUSIVE为独占锁的模式,即同时只能有一个线程获取锁去执行。
①. 公平和非公平tryAcquire内部的区别:
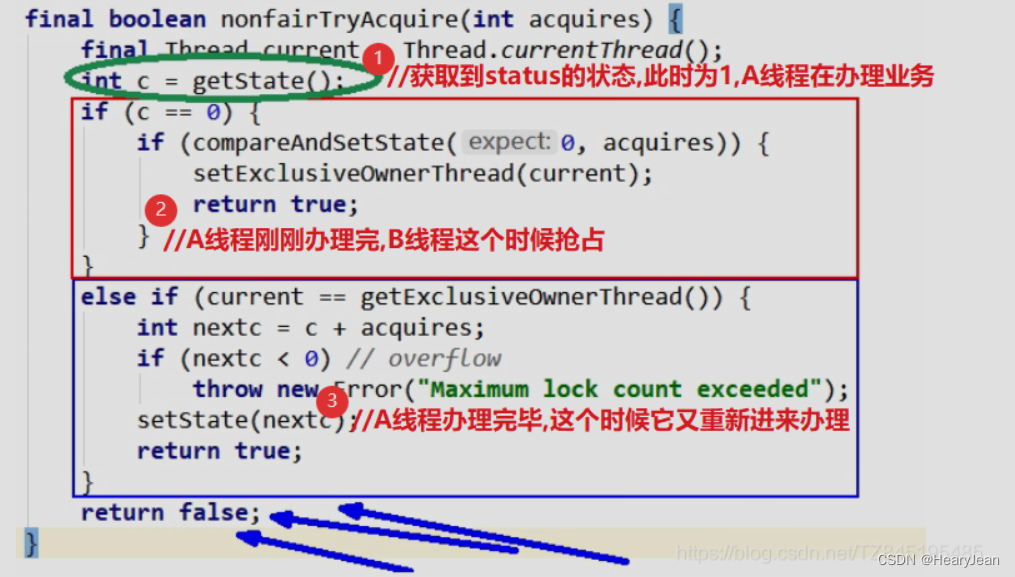
- 1.公平锁与非公平锁的lock()方法唯一的区别:就在于公平锁在获取同步状态时多了一个限制条件:hasQueuedPredecessors()。
- 2.hasQueuedPredecessors是公平锁加锁时:判断同步队列中是否存在有效节点的方法。

②. 判断队列是否存在有效节点

③. 分析tryAcquire()/nonfairTryAcquire()
4)addWaiter(Node mode )
①. 该方法的作用:
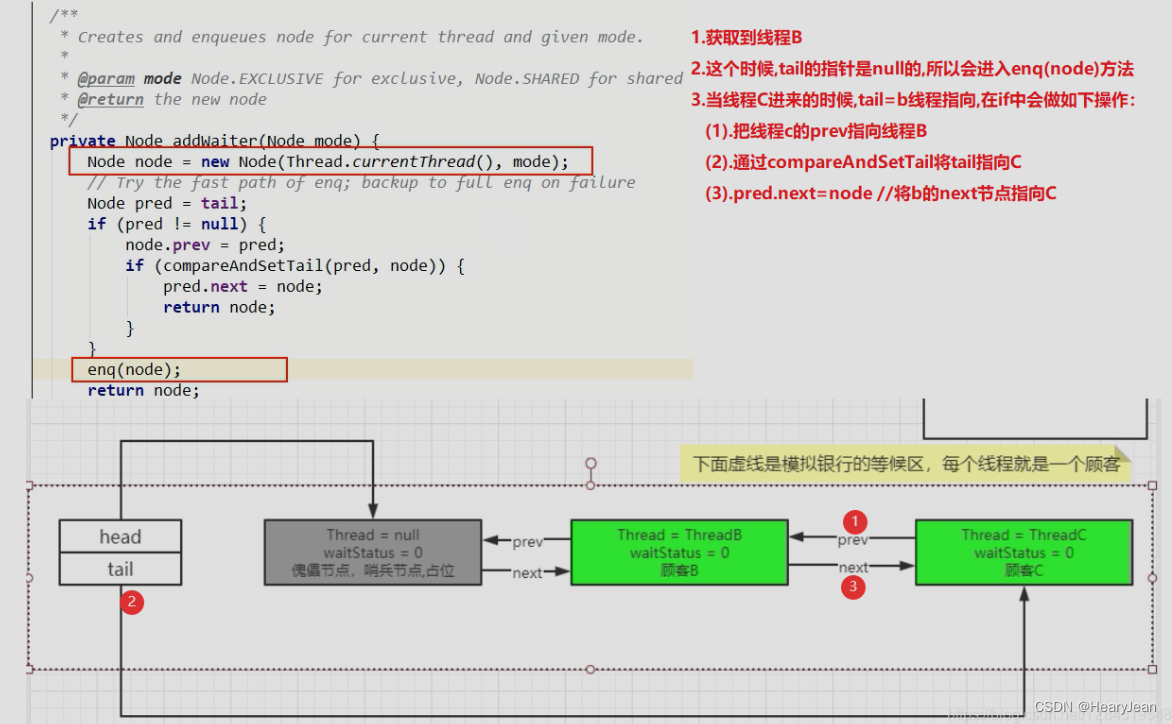
- addWaiter方法,首先会初始化一个node节点,将当前线程设置到node节点中。然后判断head和tail节点是否为空,head和tail节点是懒加载的,当AQS初始化时为null,则第一次进来时if (pred != null) 条件不成立,执行enq方法。
- 如果再有D,D线程这时获取到了cpu的执行权,此时head节点已经初始化,则进入条件中的代码,其实也是通过CAS操作将D节点加入到同步队列尾部,后面会调用acquireQueued。
②. 源码分析
6)addWaiter中的enq(node);
①. 该方法的作用:
- 此时可能多个线程会同时调用enq方法,所以该方法中也使用CAS保证线程安全。for (;;)是个死循环,第一次循环会CAS操作初始化head(哨兵)节点,要知道head节点是个空节点,没有设置线程。
- 然后第二次循环时通过CAS操作将B节点设置为尾部节点,并将B的前置节点指向head,之后会跳出循环,返回生成的Node节点到addWaiter,从源码可以看到addWaiter方法后面没有逻辑,之后会调用acquireQueued。
②. 源码分析

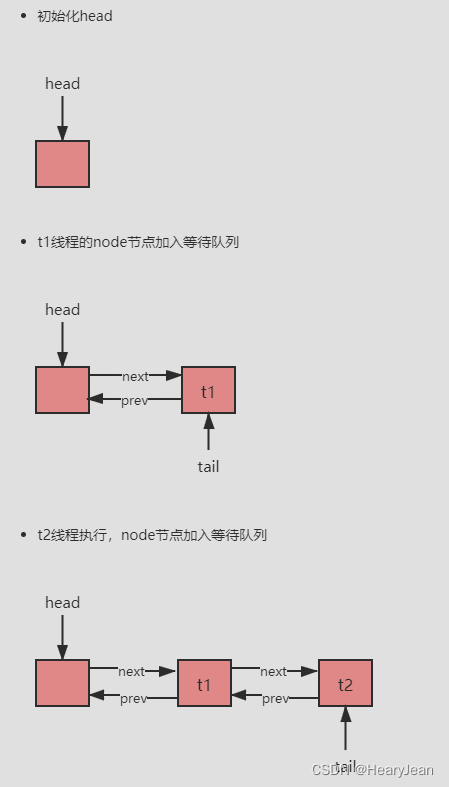
③. enq(node)例子说明
- t1(B)和t2(C)线程同时执行,t1(B)线程上天眷顾CAS成功,则流程为:
7)acquireQueued(addWaiter(), arg)
①. 概述
-
这个方法有两个逻辑,首先如果该节点的前置节点是head会走第一个if,再次去尝试获取锁。
-
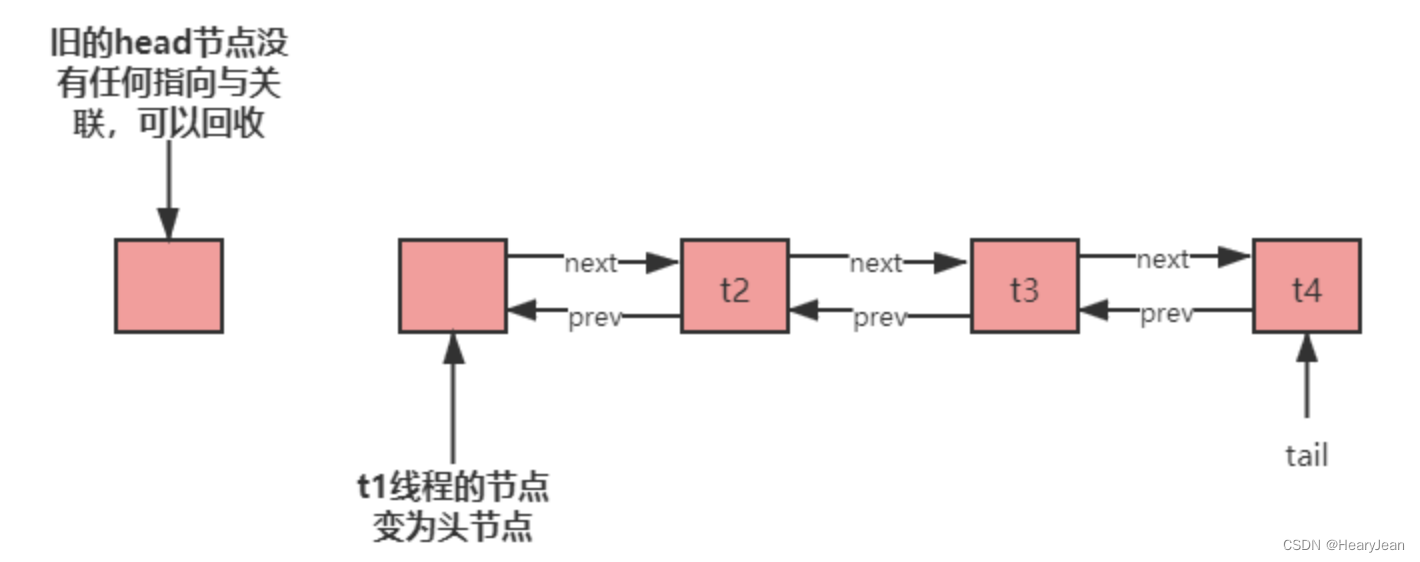
逻辑1:获取锁成功,则将头节点设置为自己,并返回到acquire方法,此时acquire方法执行完,代表获取锁成功,线程可以执行自己的逻辑了。这里有下面几个注意点:
- p.next = null;// 将哨兵节点的后置节点为null。
- setHead方法将t1节点设置为头节点,因为头节点是个空节点,所以设置t1线程节点线程为null,设置t1前置节点为null,此时旧的head节点已经没有任何指向和关联,可以被gc回收。
-
逻辑2:获取锁失败或者前置节点不是头节点,都会走第二个if逻辑,首先会判断当前线程是否需要挂起,如果需要则执行线程挂起。
②. 源码分析
- 1.前置节点为头结点&&获取锁成功就走第一个if逻辑。
- 2.当获取锁失败 或者 前置节点不是头节点都会走第二个if逻辑。
final boolean acquireQueued(final Node node, int arg) { boolean failed = true; try { boolean interrupted = false; for (;;) { //获取当前节点的前置节点 final Node p = node.predecessor(); //前置节点是头结点,就尝试获取锁 if (p == head && tryAcquire(arg)) {//获取锁成功就可以进入if内部 setHead(node); p.next = null; // help GC failed = false; return interrupted; } //获取锁失败 或者 前置节点不是头结点 if (shouldParkAfterFailedAcquire(p, node) && parkAndCheckInterrupt())//线程被挂起阻塞 interrupted = true; } } finally { if (failed) cancelAcquire(node); } } private void setHead(Node node) { head = node; node.thread = null; node.prev = null; }- 1
- 2
- 3
- 4
- 5
- 6
- 7
- 8
- 9
- 10
- 11
- 12
- 13
- 14
- 15
- 16
- 17
- 18
- 19
- 20
- 21
- 22
- 23
- 24
- 25
- 26
- 27
- 28
- 29
- 30
③. 第一个if之-再次去尝试获取锁
- 1、主要作用:
- 当t1线程的前置节点为头结点,走第一个if,同时呢t1执行tryAcquire获取锁成功,则结果为:
④. 第二个if 之 - shouldParkAfterFailedAcquire
帮助理解:把当前节点的前置节点的状态修改为Node.SIGNAL(指明让谁来把自己唤醒)
-
1、前言:
- Node节点的状态–>waitStatus初始化后是0。
-
2、概述:
- 当获取锁失败或者前置节点不是头节点都会走第二个if逻辑,首先会判断当前线程是否需要挂起,如果需要则执行线程挂起。
-
3、主要作用:
- 判断线程是否需要挂起,首先需要注意的是这个方法的参数是当前节点的前置节点。
- 我们再来看Node节点中的waitStatus状态,这个状态有一个Node.SIGNAL=-1,代表了当前节点需要将后置节点唤醒。这个理解可能有点绕。
- 首先我们要理解一点,如果我需要被唤醒,那么就要设置我的前置节点的状态为Node.SIGNAL,这样当我的前置节点发现自己的waitStatus=Node.SIGNAL时,它就知道当自己执行完后需要去唤醒后置节点让后置节点去执行。
- 总结:当线程需要挂起的时候,它需要把身后事安排明白,指明让谁来把自己唤醒。所以这个方法就是把当前节点的前置节点的状态修改为Node.SIGNAL。
-
4、该方法的内部内容:
- 所以这个方法其实是两个逻辑:先设置前置节点状态,再判断是否可以挂起。因为前面acquireQueued方法中for (;; ) 会重复进入。
- 第一次进入:发现自己的前置节点不是Node.SIGNAL,需要先设置为Node.SIGNAL状态
- 第二次进入:发现前置节点已经是Node.SIGNAL状态,就返回true,那么我就可以安心的挂起了,有人会唤醒我的。
-
5、查看源码:
//pred:当前节点的前置节点 //node:当前节点 private static boolean shouldParkAfterFailedAcquire(Node pred, Node node) { int ws = pred.waitStatus; //前置节点已经是-1,直接返回true。就可以安心挂起了 if (ws == Node.SIGNAL) return true; if (ws > 0) {//标识前置节点获取锁的请求取消了。那么就得再往前找,找到一个没有放弃获取锁请求的节点 do { node.prev = pred = pred.prev; } while (pred.waitStatus > 0); pred.next = node; } else { //前置节点不是-1,那么修改为Node.SIGNAL compareAndSetWaitStatus(pred, ws, Node.SIGNAL); } return false; }- 1
- 2
- 3
- 4
- 5
- 6
- 7
- 8
- 9
- 10
- 11
- 12
- 13
- 14
- 15
- 16
- 17
- 18
- 19
- 20
- 21
⑤. 第二个if之-parkAndCheckInterrupt
-
1、概述:
- 将自己的前置节点设置为可唤醒的状态后,就会进入该方法,把线程挂起。
-
2、查看源码:
private final boolean parkAndCheckInterrupt() { LockSupport.park(this);//挂起线程 return Thread.interrupted(); }- 1
- 2
- 3
- 4
- 3、例子说明
- 分析:此时t2 到 t4之间线程都执行到了此方法,则t2到t4之间线程都已经挂起不再执行,并且head到t3之间节点的waitStatus都为Node.SIGNAL,因为t4不是-1,因为没有后置节点。

5、ReentrantLock的解锁解读
- unlock( )主要目的:就是获取permit,唤醒阻塞线程。
- 会调用如下方法:release | tryRelease | unparkSuccessor(h);
1)release
①. 主要作用:
- 解锁方法的入口是AQS的release方法,首先会调用tryRelease方法,这个是AQS实现类自己实现的方法,去CAS改变state状态,如果解锁成功,则会进入if里的代码,判断head节点的waitStatus!=0,如果等于0代表没有后置节点需要去唤醒。之后调用unparkSuccessor方法。

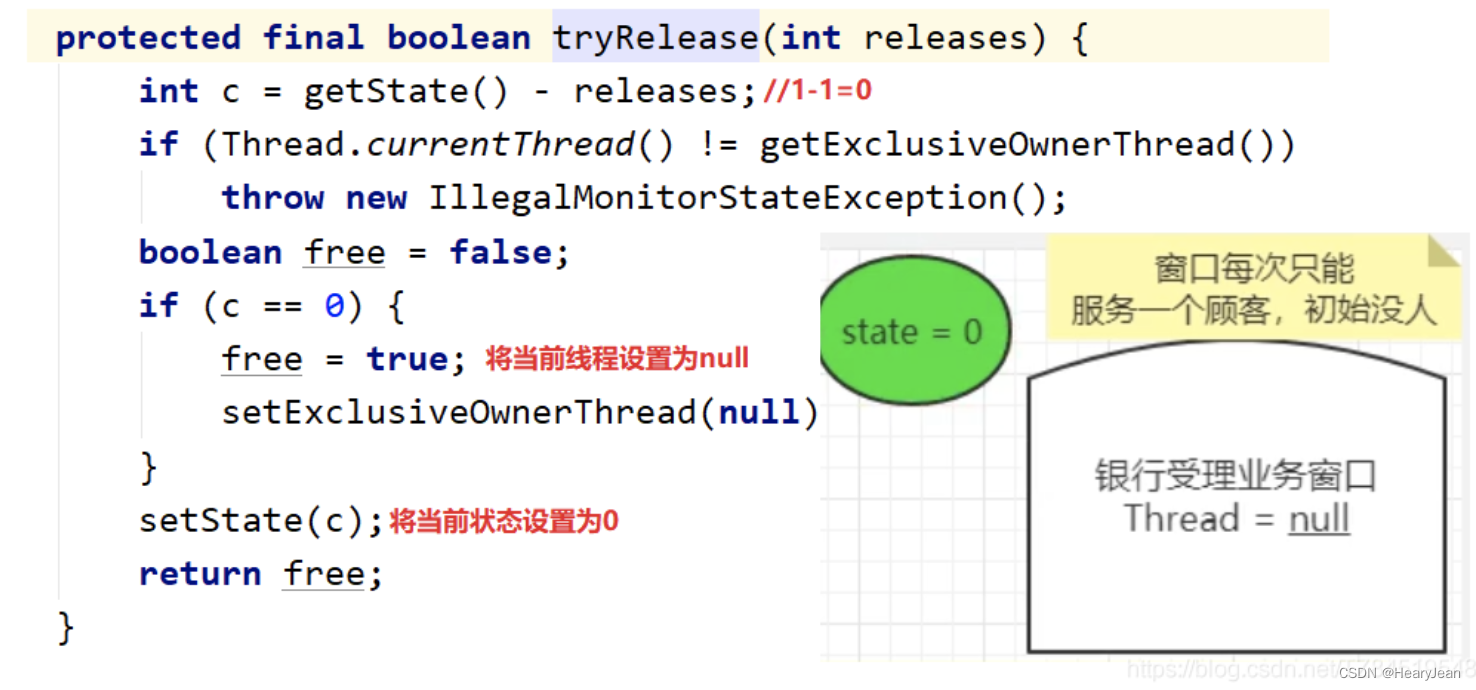
2)tryRelease()
①. 主要作用
- tryRelease方法主要就是让银行受理窗口空出来,通过CAS改变state状态、受理窗口的用户线程置为空,这样就可以让其他线程进来办业务了。
②. 查看源码
3)unparkSuccessor
①. 主要作用:
- 1.将哨兵节点状态改为0;
- 2.从尾部节点开始扫描,找到距离head最近的一个waitStatus<=0的节点
- 3.最近的这个线程节点waitStatus<=0,就直接唤醒这个线程即可(给他一个许可证)
②. 源码分析
- 1.要先知道:waitStatus>0时,代表为CANCELLED = 1状态,即线程取消排队。
- 2.如果waitStatus<0,先将头结点的waitStatus状态设为初始值0,之后查看后置节点的状态,如果==>0==代表后置节点取消了排队,不需要唤醒。
- 3.但是当前节点需要去唤醒后续的节点让后续节点再去执行,所以会从尾结点开始寻找找到离当前线程最近的一个且waitStatus<0的去唤醒。唤醒操作LockSupport.unpark(s.thread);取消最近的那个节点的挂起,让他恢复执行能力。
private void unparkSuccessor(Node node) { int ws = node.waitStatus;//获得head节点的状态 if (ws < 0){ compareAndSetWaitStatus(node, ws, 0);// 设置head节点状态为0 } Node s = node.next;//得到head节点的下一个节点 if (s == null || s.waitStatus > 0) { //如果下一个节点为null或者status>0表示cancelled状态. //通过从尾部节点开始扫描,找到距离head最近的一个waitStatus<=0的节点 s = null; for (Node t = tail; t != null && t != node; t = t.prev) if (t.waitStatus <= 0) s = t; } if (s != null) //next节点不为空,直接唤醒这个线程即可(总之离头节点最近的一个可唤醒节点) LockSupport.unpark(s.thread); }- 1
- 2
- 3
- 4
- 5
- 6
- 7
- 8
- 9
- 10
- 11
- 12
- 13
- 14
- 15
- 16
- 17
- 18
- 19
- 20
③. unparkSuccessor()方法中寻找要唤醒的下一个节点时,为什么从后往前遍历?
- 因为enq()方法中,当发生上下文切换的时候,可能导致next=null,就会出现后续节点被漏掉的情况。
- 但是prev是不会出现等于null的情况,所以采用从后往前利用prev来遍历,就不会出现漏掉现象。

④. 例子说明
- 情况1:此时同步队列的数据,当t0线程执行完成业务后,进行解锁操作,此时所有等待的线程都没有取消等待。则t0线程会唤醒t1线程。
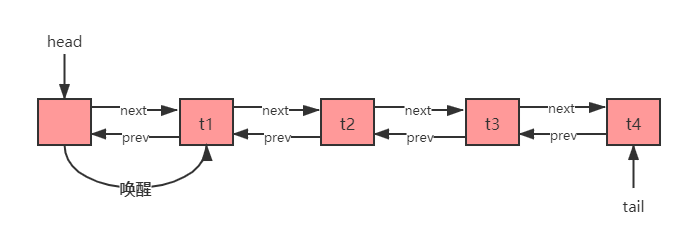
- 情况2:如果t1和t3线程取消的排队时,t0线程会唤醒t2,从后往前找离head最近的一个没有取消派对的节点。

6、流程总结
- 1.线程执行到parkAndCheckInterrupt方法时被挂起。
- 2.当被头节点唤醒后的线程会继续执行,设置interrupted=true,表示被中断,会继续执行for循环逻辑。
- 3.到现在一个正常的获取锁失败(或成功)——>加入同步队列——>挂起——>被唤醒继续执行的流程已经整体走了一遍。
7、举例总结
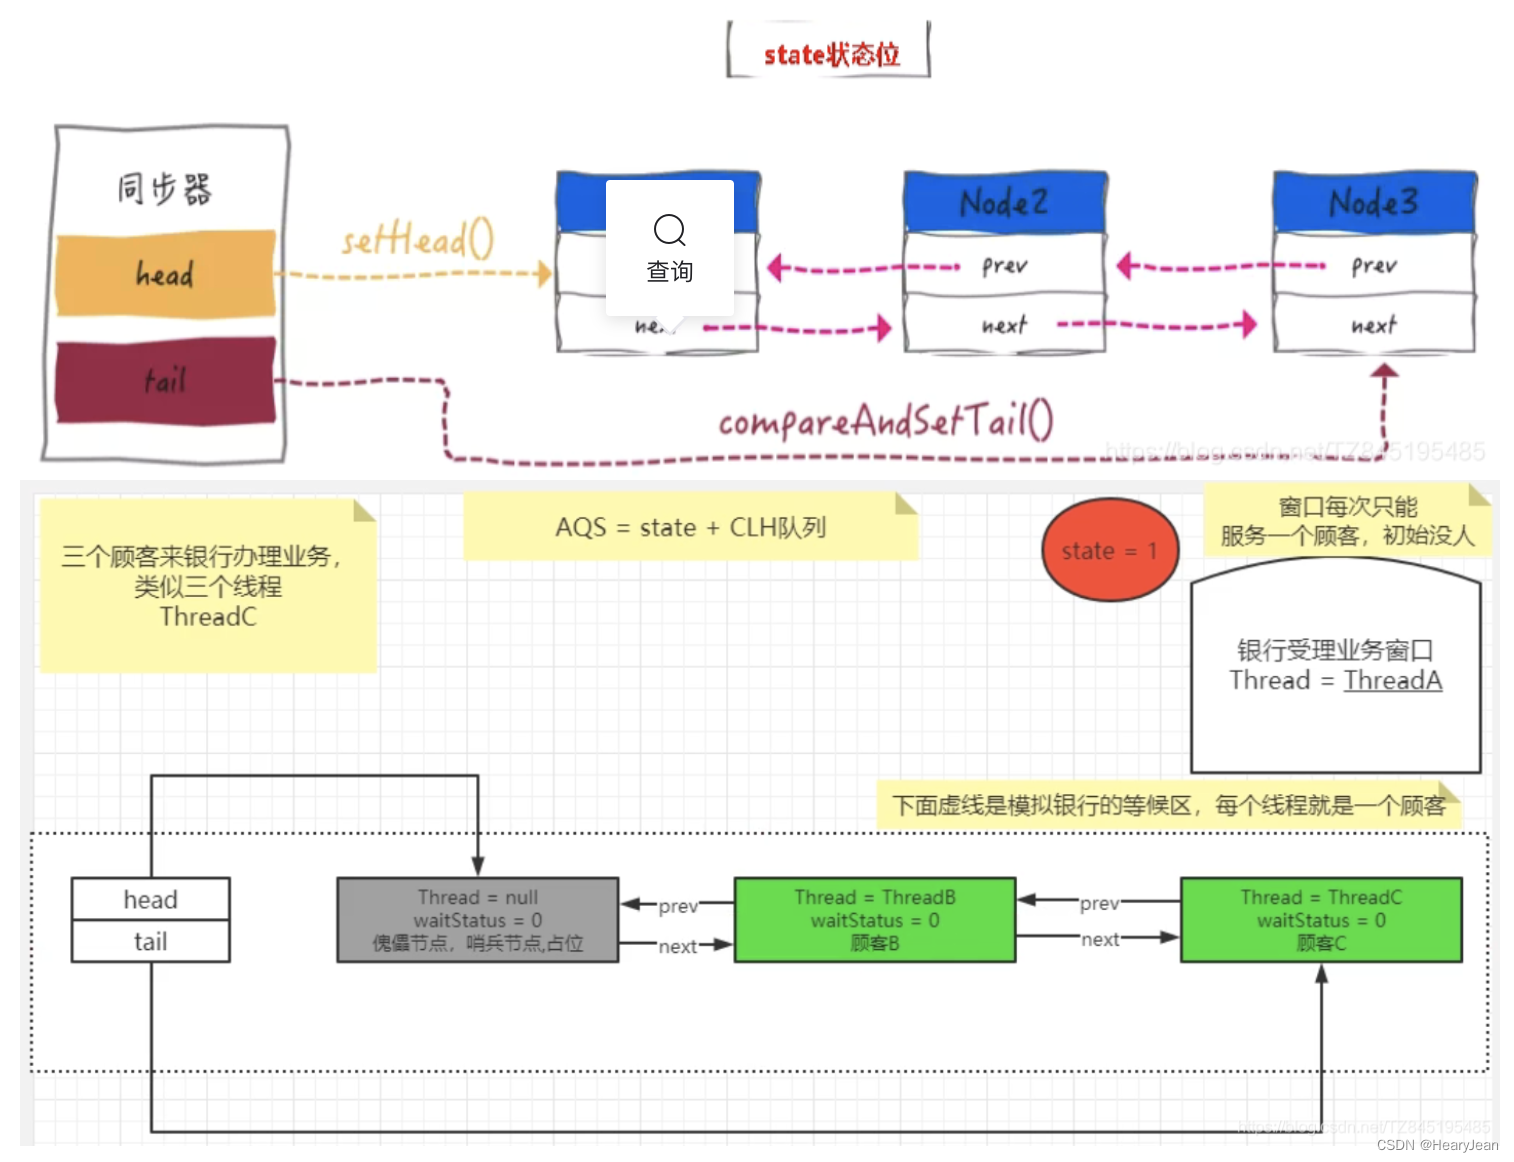
- ①. 业务场景,比如说我们有三个线程A、B、C去银行办理业务了,A线程最先抢到执行权开始办理业务,那么B、C两个线程就在CLH队列里面排队如图所示,注意傀儡结点和B结点的状态都会改为-1。(C还是0,因为后面没有节点需要被唤醒了)
-
②. 当A线程办理好业务,离开的时候,会把傀儡结点的waitStatus从-1改为0 | 将status从1改为0,将当前线程置为null
-
③. 这个时候如果B上位,首先将status从0改为1(表示占用),把thread置为线程B ,会执行如下图的①②③④,会触发GC,然后就把第一个灰色的傀儡结点给清除掉了,这个时候原来的B结点重新成为傀儡结点。

-
相关阅读:
Nginx 四层和七层代理区别、配置
新手学习 python 的好工具:PyScripter
20221106
【MySQL】多表连接查询
网络文化经营许可证这样办,省时又便捷!
奇瑞新能源无界Pro 高科技配置+强续航实力征战纯电市场
WPF 项目开发入门(四) MVVM 模式 与 TreeView树组件
systemverilog中的输入输出系统函数
《原CSharp》第二回 巧习得元素分类 子不知怀璧其罪
C++数据结构X篇_01_数据结构的基本概念
- 原文地址:https://blog.csdn.net/weixin_38963649/article/details/126144813
