-
FreeMarker快速入门详解
freemarker 介绍
FreeMarker 是一款 模板引擎: 即一种基于模板和要改变的数据, 并用来生成输出文本(HTML网页,电子邮件,配置文件,源代码等)的通用工具。 它不是面向最终用户的,而是一个Java类库,是一款程序员可以嵌入他们所开发产品的组件。
模板编写为FreeMarker Template Language (FTL)。它是简单的,专用的语言, 不是 像PHP那样成熟的编程语言。 那就意味着要准备数据在真实编程语言中来显示,比如数据库查询和业务运算, 之后模板显示已经准备好的数据。在模板中,你可以专注于如何展现数据, 而在模板之外可以专注于要展示什么数据。
常用的java模板引擎还有哪些?(面试)
Jsp、Freemarker、Thymeleaf 、Velocity 等。
1.Jsp 为 Servlet 专用,不能单独进行使用。
2.Thymeleaf 为新技术,功能较为强大,但是执行的效率比较低。
3.Velocity从2010年更新完 2.0 版本后,便没有在更新。Spring Boot 官方在 1.4 版本后对此也不在支持,虽然 Velocity 在 2017 年版本得到迭代,但为时已晚。
模板+数据模型=输出
freemarker并不关心数据的来源,只是根据模板的内容,将数据模型在模板中显示并输出文件(通常为html,也可以生成其它格式的文本文件)
1、数据模型
数据模型在java中可以是基本类型也可以List、Map、Pojo等复杂类型。
2、来自官方的例子
环境搭建&&快速入门
freemarker作为springmvc一种视图格式,默认情况下SpringMVC支持freemarker视图格式。
需要创建Spring Boot+Freemarker工程用于测试模板。
在线预览:freemarker作为springmvc一种页面。在浏览器展示
浏览器发起请求---->SpringMVC---->执行Controller----->定义返回值(模板地址)---->模板中绑定数据---->浏览器展示
创建测试工程
这里我就简单介绍一下,要想详细了解大家可以进我发官网去看看
导入依赖
<!-- 添加springboot 父类依赖 --> <parent> <groupId>org.springframework.boot</groupId> <artifactId>spring-boot-starter-parent</artifactId> <version>2.3.2.RELEASE</version> </parent> <dependencies> <!--添加 spring boot web 依赖--> <dependency> <groupId>org.springframework.boot</groupId> <artifactId>spring-boot-starter-web</artifactId> </dependency> <dependency> <groupId>org.springframework.boot</groupId> <artifactId>spring-boot-starter-validation</artifactId> </dependency> <dependency> <groupId>org.springframework.boot</groupId> <artifactId>spring-boot-starter-freemarker</artifactId> </dependency> <dependency> <groupId>org.springframework.boot</groupId> <artifactId>spring-boot-starter-test</artifactId> </dependency> <!-- lombok使用 --> <dependency> <groupId>org.projectlombok</groupId> <artifactId>lombok</artifactId> <version>1.18.8</version> <scope>provided</scope> </dependency> <!-- apache 对 java io 的封装工具库 --> <dependency> <groupId>org.apache.commons</groupId> <artifactId>commons-io</artifactId> <version>1.3.2</version> </dependency> </dependencies>- 1
- 2
- 3
- 4
- 5
- 6
- 7
- 8
- 9
- 10
- 11
- 12
- 13
- 14
- 15
- 16
- 17
- 18
- 19
- 20
- 21
- 22
- 23
- 24
- 25
- 26
- 27
- 28
- 29
- 30
- 31
- 32
- 33
- 34
- 35
- 36
- 37
- 38
- 39
配置application.yml配置
spring: freemarker: #开启 freemarker 功能 enabled: true #关闭模板缓存,方便测试 cache: false settings: template_update_delay: 0 #页面模板后缀名 suffix: .ftl charset: UTF-8 #页面模板位置(默认为 classpath:/templates/) template-loader-path: classpath:/templates/ resources: #关闭项目中的静态资源映射(static、resources文件夹下的资源) add-mappings: false- 1
- 2
- 3
- 4
- 5
- 6
- 7
- 8
- 9
- 10
- 11
- 12
- 13
- 14
- 15
- 16
创建模型类;
package com.xuecheng.freemarker.entity; import lombok.Data; import lombok.ToString; import java.util.Date; import java.util.List; @Data @ToString public class Student { private String name;//姓名 private int age;//年龄 private Date birthday;//生日 private Float money;//钱包 }- 1
- 2
- 3
- 4
- 5
- 6
- 7
- 8
- 9
- 10
- 11
- 12
- 13
- 14
- 15
模拟controller层:
package com.xuecheng.test.freemarker.controller; import org.springframework.beans.factory.annotation.Autowired; import org.springframework.stereotype.Controller; import org.springframework.web.bind.annotation.RequestMapping; import org.springframework.web.client.RestTemplate; import java.util.Map; @Controller public class HelloController { @GetMapping("basic") public String test(Model model) { //1.纯文本形式的参数 model.addAttribute("name", "freemarker"); //2.实体类相关的参数 Student student = new Student(); student.setName("小明"); student.setAge(18); model.addAttribute("stu", student); return "01-basic"; } }- 1
- 2
- 3
- 4
- 5
- 6
- 7
- 8
- 9
- 10
- 11
- 12
- 13
- 14
- 15
- 16
- 17
- 18
- 19
- 20
- 21
- 22
- 23
- 24
创建模板
在resources下创建templates,此目录为freemarker的默认模板存放目录。
在templates下创建模板文件 01-basic.ftl ,模板中的插值表达式最终会被freemarker替换成具体的数据。<!DOCTYPE html> <html> <head> <meta charset="utf-8"> <title>Hello World!</title> </head> <body> <b>普通文本 String 展示: Hello ${name}</b><br><br> <br> <hr> <b>对象Student中的数据展示:${stu}</b><br/> 姓名:${stu.name}<br/> 年龄:${stu.age} <hr> </body> </html>- 1
- 2
- 3
- 4
- 5
- 6
- 7
- 8
- 9
- 10
- 11
- 12
- 13
- 14
- 15
- 16
支持EL表达式

页面上的指令,基本语法规则
基础语法种类:
1.注释,即<#-- -->,介于其之间的内容会被freemarker忽略 <#--我是一个freemarker注释-->- 1
- 2

2、插值(Interpolation):即 ${..} 部分,freemarker会用真实的值代替${..} Hello ${name}- 1
- 2
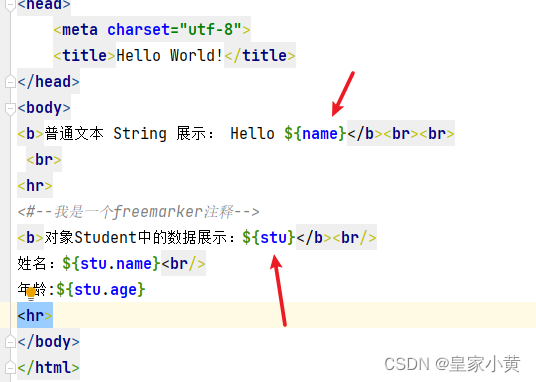
3、FTL指令:和HTML标记类似,名字前加#予以区分,Freemarker会解析标签中的表达式或逻辑。 <#>FTL指令</#>- 1
- 2
@GetMapping("/list") public String list(Model model) { //响应数据 //2.1 小强对象模型数据 Student stu1 = new Student(); stu1.setName("小强"); stu1.setAge(18); stu1.setMoney(1000.86f); //2.2 小红对象模型数据 Student stu2 = new Student(); stu2.setName("小红"); stu2.setMoney(200.1f); stu2.setAge(19); //2.3 将两个对象模型数据存放到List集合中 List<Student> stus = new ArrayList<>(); stus.add(stu1); stus.add(stu2); model.addAttribute("stus",stus);- 1
- 2
- 3
- 4
- 5
- 6
- 7
- 8
- 9
- 10
- 11
- 12
- 13
- 14
- 15
- 16
- 17
- 18
- 19
- 20
- 21
DOCTYPE html> <html> <head> <meta charset="utf-8"> <title>Hello World!title> head> <body> <b>展示list中的stu数据:b> <br> <br> <#--list 数据的展示--> <b>展示list中的stu数据:b> <#list stus as s> name:${s.name}, age:${s.age}, money:${s.money}, #list> <hr> body> html>- 1
- 2
- 3
- 4
- 5
- 6
- 7
- 8
- 9
- 10
- 11
- 12
- 13
- 14
- 15
- 16
- 17
- 18
- 19
- 20
- 21
- 22

4、文本,仅文本信息,这些不是freemarker的注释、插值、FTL指令的内容会被freemarker忽略解析,直接输出内容. <#--freemarker中的普通文本--> 我是一个普通的文本- 1
- 2
- 3
- 4

集合指令(List和Map)
@GetMapping("/list") public String list(Model model) { //响应数据 //2.1 小强对象模型数据 Student stu1 = new Student(); stu1.setName("小强"); stu1.setAge(18); stu1.setMoney(1000.86f); //2.2 小红对象模型数据 Student stu2 = new Student(); stu2.setName("小红"); stu2.setMoney(200.1f); stu2.setAge(19); //2.3 将两个对象模型数据存放到List集合中 List<Student> stus = new ArrayList<>(); stus.add(stu1); stus.add(stu2); model.addAttribute("stus",stus); //3. 创建Map数据 Map<String,Student> stuMap = new HashMap<>(); stuMap.put("stu1",stu1); stuMap.put("stu2",stu2); model.addAttribute("stuMap", stuMap); //返回模板地址 return "02-collection"; }- 1
- 2
- 3
- 4
- 5
- 6
- 7
- 8
- 9
- 10
- 11
- 12
- 13
- 14
- 15
- 16
- 17
- 18
- 19
- 20
- 21
- 22
- 23
- 24
- 25
- 26
- 27
- 28
- 29
- 30
- 31
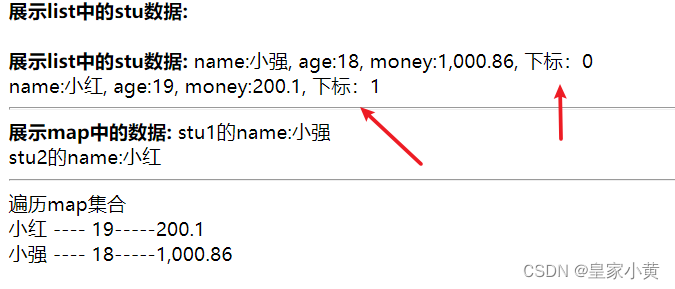
DOCTYPE html> <html> <head> <meta charset="utf-8"> <title>Hello World!title> head> <body> <b>展示list中的stu数据:b> <br> <br> <#--list 数据的展示--> <b>展示list中的stu数据:b> <#list stus as s> name:${s.name}, age:${s.age}, money:${s.money}, #list> <hr> <b>展示map中的数据:b> <#--获取map中某个key下的数据:map.key.属性--> stu1的name:${stuMap.stu1.name}<br> stu2的name:${stuMap.stu2.name}<br> <#--遍历map集合,获取map中的所有数据 语法:[map]?keys as key -- 循环map集合获取获取每个key --> <hr> 遍历map集合 <br> <#--<#list stuMap?keys as key>--> <#-- ${stuMap[key].name} -- ${stuMap[key].age}- 1
- 2
- 3
- 4
- 5
- 6
- 7
- 8
- 9
- 10
- 11
- 12
- 13
- 14
- 15
- 16
- 17
- 18
- 19
- 20
- 21
- 22
- 23
- 24
- 25
- 26
- 27
- 28
- 29
- 30
- 31
- 32
- 33
- 34
- 35
- 36
- 37

${k_index}: index:得到循环的下标,使用方法是在stu后边加"_index",它的值是从0开始- 1
- 2

if指令
if 指令即判断指令,是常用的FTL指令,freemarker在解析时遇到if会进行判断,条件为真则输出if中间的内容,否则跳过内容不再输出。<#--格式--> <#if condition> ... <#elseif condition2> ... <#elseif condition3> ... ... <#else> ... #if>- 1
- 2
- 3
- 4
- 5
- 6
- 7
- 8
- 9
- 10
- 11
package com.example; import org.springframework.beans.factory.annotation.Autowired; import org.springframework.stereotype.Controller; import org.springframework.ui.Model; import org.springframework.web.bind.annotation.GetMapping; import org.springframework.web.bind.annotation.RequestMapping; import org.springframework.web.client.RestTemplate; import java.util.*; @Controller public class HelloController { @GetMapping("basic") public String test(Model model) { //1.纯文本形式的参数 model.addAttribute("name", "freemarker"); //2.实体类相关的参数 Student student = new Student(); student.setName("小明"); student.setAge(18); model.addAttribute("stu", student); return "01-basic"; } @GetMapping("/list") public String list(Model model) { //响应数据 //2.1 小强对象模型数据 Student stu1 = new Student(); stu1.setName("小强"); stu1.setAge(18); stu1.setMoney(1000.86f); //2.2 小红对象模型数据 Student stu2 = new Student(); stu2.setName("小红"); stu2.setMoney(200.1f); stu2.setAge(19); //2.3 将两个对象模型数据存放到List集合中 List<Student> stus = new ArrayList<>(); stus.add(stu1); stus.add(stu2); model.addAttribute("stus",stus); //3. 创建Map数据 Map<String,Student> stuMap = new HashMap<>(); stuMap.put("stu1",stu1); stuMap.put("stu2",stu2); model.addAttribute("stuMap", stuMap); //返回模板地址 return "03-if"; } }- 1
- 2
- 3
- 4
- 5
- 6
- 7
- 8
- 9
- 10
- 11
- 12
- 13
- 14
- 15
- 16
- 17
- 18
- 19
- 20
- 21
- 22
- 23
- 24
- 25
- 26
- 27
- 28
- 29
- 30
- 31
- 32
- 33
- 34
- 35
- 36
- 37
- 38
- 39
- 40
- 41
- 42
- 43
- 44
- 45
- 46
- 47
- 48
- 49
- 50
- 51
- 52
- 53
- 54
- 55
- 56
- 57
- 58
- 59
DOCTYPE html> <html> <head> <meta charset="utf-8"> <title>Hello World!title> head> <body> <#list stus as s> <#if s.name='小红'> <b style="color: red"> ${s.name}<br> b> <#elseif s.name='小绿'> <b style="color: green"> ${s.name}<br> b> <#--类似于swich中的default--> <#else> ${s.name}<br> #if> #list> body> html>- 1
- 2
- 3
- 4
- 5
- 6
- 7
- 8
- 9
- 10
- 11
- 12
- 13
- 14
- 15
- 16
- 17
- 18
- 19
- 20
- 21
- 22
- 23

空值处理:
Freemarker 在显示数据时,如果遇到了null或空,Freemarker就会在显示页面中报出错误信息:null or missing,Freemarker中需要对空值间判断,判断后的数据就不会显示错误信息。
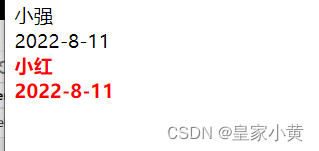
判断某变量是否存在使用 “??” 如:为防止stus为空报错可以加上判断如下: <#if stus??> <#list stus as stu> ...... </#list> </#if>- 1
- 2
- 3
- 4
- 5
- 6
- 7
缺失变量默认值使用 “!”** 使用!要以指定一个默认值,当变量为空时显示默认值 如:${name!''}表示如果name为空显示空字符串。- 1
- 2
- 3
实际例子:
<!DOCTYPE html> <html> <head> <meta charset="utf-8"> <title>Hello World!</title> </head> <body> <#list stus as s> <#if s??> <#if s.name='小红'> <b style="color: red"> ${s.name}<br> ${s.birthday!'2022-8-11'}<br> </b> <#elseif s.name='小绿'> <b style="color: green"> ${s.name}<br> ${s.birthday!'2022-8-11'}<br> </b> <#else> ${s.name}<br> ${s.birthday!'2022-8-11'}<br> </#if> </#if> </#list> </body> </html>- 1
- 2
- 3
- 4
- 5
- 6
- 7
- 8
- 9
- 10
- 11
- 12
- 13
- 14
- 15
- 16
- 17
- 18
- 19
- 20
- 21
- 22
- 23
- 24
- 25
- 26
- 27
内建函数
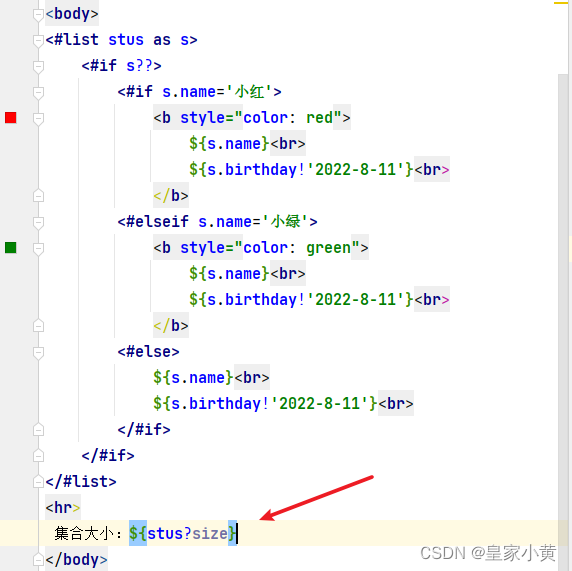
内建函数语法格式:变量+?+函数名称- 某个集合的大小
<hr> 集合大小:${stus?size}<br>- 1
- 2

-
日期格式化
显示年月日:
${today?date}
显示时分秒:${today?time}
显示日期+时间:${today?datetime}
自定义格式化:${today?string("yyyy年MM月")}

Date date = new Date(); model.addAttribute("today",date);- 1
- 2
<hr> 日期格式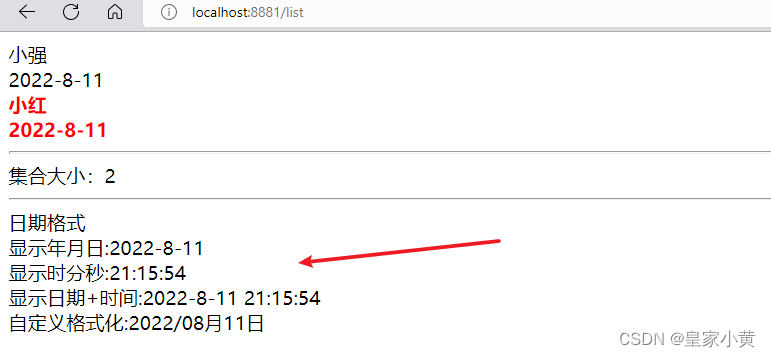 <br> 显示年月日:${today?date}<br> 显示时分秒:${today?time}<br> 显示日期+时间:${today?datetime}<br> 自定义格式化:${today?string("yyyy/MM月dd日")}- 1
- 2
- 3
- 4
- 5
- 6
- 7

- 内函数
c
model.addAttribute("point", 102920122); point是数字型,使用${point}会显示这个数字的值,每三位使用逗号分隔。 如果不想显示为每三位分隔的数字,可以使用c函数将数字型转成字符串输出- 1
- 2
- 3
- 4
- 5
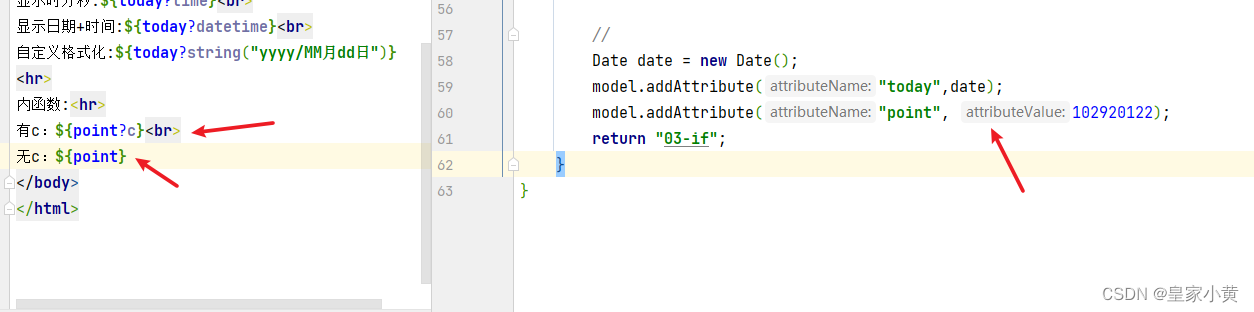
model.addAttribute("point", 102920122);- 1
<hr> 内函数:<br> 有c:${point?c}<br> 无c:${point}- 1
- 2
- 3
- 4

静态化测试(练习)
之前的测试都是SpringMVC将Freemarker作为视图解析器(ViewReporter)来集成到项目中,工作中,有的时候需要使用Freemarker原生Api来生成静态内容并使用文件来存储静态化后的内容,下面一起来学习下原生Api生成文本文件。
使用freemarker原生Api将页面生成html文件,本节测试html文件生成的方法: 1、根据模板文件生成html文件的字符串 模板文件 + 数据模型 = 静态文件 2、根据模板字符串生成静态文件 模板字符串 + 数据模型 = 静态文件- 1
- 2
- 3
- 4
- 5
- 6
- 7
- 8
- 9
GeneratorHtml.class
package com.example; import freemarker.template.Configuration; import freemarker.template.Template; import org.apache.commons.io.IOUtils; import org.junit.Test; import org.springframework.boot.test.context.SpringBootTest; import org.springframework.ui.freemarker.FreeMarkerTemplateUtils; import java.io.File; import java.io.FileOutputStream; import java.io.InputStream; import java.util.HashMap; import java.util.Map; @SpringBootTest public class GeneratorHtml { @Test public void testHtml() throws Exception { //1、创建配置类,指定版本信息 Configuration configuration = new Configuration(Configuration.getVersion()); //2、指定模板,字符编码 String path = this.getClass().getResource("/templates").getPath(); configuration.setDirectoryForTemplateLoading(new File(path)); //指定模板文件的文件夹路径 configuration.setDefaultEncoding("utf-8"); //3、获取模板文件 Template template = configuration.getTemplate("01-basic.ftl"); //4、构造数据,必须是一个Map集合 Map data = getData(); //5、根据数据 + 模板文件进行数据填充,得到字符串 String content = FreeMarkerTemplateUtils.processTemplateIntoString(template, data); //6、将静态化字符串写入到指定文件下 InputStream inputStream = IOUtils.toInputStream(content); //字符串转化为输入流 FileOutputStream outputStream = new FileOutputStream(new File("e:/index.html")); //创建文件 IOUtils.copy(inputStream, outputStream); //输入流写入文件 } private Map getData() { Map map = new HashMap(); map.put("name","zjf"); Student student = new Student(); student.setName("王者荣耀"); student.setAge(12); map.put("student",student); return map; } }- 1
- 2
- 3
- 4
- 5
- 6
- 7
- 8
- 9
- 10
- 11
- 12
- 13
- 14
- 15
- 16
- 17
- 18
- 19
- 20
- 21
- 22
- 23
- 24
- 25
- 26
- 27
- 28
- 29
- 30
- 31
- 32
- 33
- 34
- 35
- 36
- 37
- 38
- 39
- 40
- 41
- 42
- 43
- 44
- 45
- 46
- 47
- 48
- 49
01-basic.ftl
DOCTYPE html> <html> <head> <meta charset="utf-8"> <title>Hello World!title> head> <body> <#--我是一个freemarker注释--> <b>普通文本 String 展示:b><br><br> Hello ${name1!""}<br> <hr> <b>对象Student中的数据展示:b><br/> 姓名:${student.name}<br/> 年龄:${student.age} <hr> body> html>- 1
- 2
- 3
- 4
- 5
- 6
- 7
- 8
- 9
- 10
- 11
- 12
- 13
- 14
- 15
- 16
- 17
- 18
- 19

-
相关阅读:
高等数学(第七版)同济大学 习题10-4 (前7题)个人解答
08-Linux特殊权限
Choose the WiFi card that suits you: QCA9882 vs. MT7915/QCN6024
【华为OD机试python】比赛【2023 B卷|100分】
MIUI查看当前手机电池容量
el-table中保留分页选中
X86_64函数调用汇编程序分(2)
java基于springboot+vue的旅游心得分享攻略系统 elementui
web:[HCTF 2018]WarmUp
数据结构——非线性结构(树与二叉树)
- 原文地址:https://blog.csdn.net/weixin_44233087/article/details/126293747
