-
Debian 11 服务器配置日记
异想之旅:本人原创博客完全手敲,绝对非搬运,全网不可能有重复;本人无团队,仅为技术爱好者进行分享,所有内容不牵扯广告。本人所有文章仅在CSDN、掘金和个人博客(一定是异想之旅域名)发布,除此之外全部是盗文!
以下内容为使用 Debian 11.4.0 Network Installer 镜像的条件下,为一台 ThinkPad 笔记本安装 server 系统测试通过。理论适用于 Ubuntu 等 Debian 系 Linux,具体请自行测试。
装机过程
安装过程笔记本非常容易发热,而且此时并没有好用的风扇驱动,在电脑旁放一个电扇比冰袋和空调好用……
装机过程中换源那一步, 一定不要用163源 ,血的教训……下文件30KB/s,睡了20分钟起来还没下载好
远程登录后切换到 root
su- 1
下面的步骤全部默认你在 root 下执行。
安装 sudo
apt install sudo- 1
设置当前用户的 root 权限
# username替换为你的用户名 # 以 root 用户执行也要加 sudo sudo usermod -aG sudo username- 1
- 2
- 3
设置盒盖不休眠
打开配置文件
sudo vim /etc/systemd/logind.conf- 1
在文件中查找
#HandleLidSwitch=suspend修改为
HandleLidSwitch=ignore保存,重启服务
systemctl restart systemd-logind # Debian service systemd-logind restart # Ubuntu- 1
- 2
ssh 配置
禁止 root 用户 ssh 登录
(禁止后你仍然可以通过别的用户登录后使用
su切换到 root)vim /etc/ssh/sshd_config- 1
查找
#PermitRootLogin prohibit-password修改为
PermitRootLogin no重启服务
systemctl restart ssh # Debian service ssh restart # Ubuntu- 1
- 2
同时启用密码和 ssh 公钥登录
还是先更改
vim /etc/ssh/sshd_config在文件中添加这两行(或者将原有内容取消注释)
PubKeyAuthentication yes AuthorizedKeysFile .ssh/authorized_keys- 1
- 2
使用 你希望使用公钥登录的用户 ,创建
~/.ssh/authorized_keys文件,向其中写入 你个人电脑(即 ssh 客户端) 的 ssh 公钥信息。如果有多个,则每个一行。出于安全考虑,最好设置如下权限:
chmod 600 ~/.ssh/authorized_keys chmod 700 ~/.ssh- 1
- 2
最后重启 ssh 服务
systemctl restart ssh- 1
此处介绍的是将客户端公钥添加到认可的公钥列表的方法。如果你希望客户端使用服务器的 ssh 公钥进行登录,则先在服务器使用对应要登录生成 ssh 密钥对,然后创建 ~/.ssh/authorized_keys 文件,将公钥中的内容复制进去,然后重启 ssh 服务即可。参照上文的描述,也可以同时支持客户端和服务端密钥。
更换 apt 源
cp /etc/apt/sources.list /etc/apt/sources.list.bak cat /dev/null > /etc/apt/sources.list vim /etc/apt/sources.list- 1
- 2
- 3
向其中输入如下内容(Debian 11 bullseye,更多系统请前往 debian | 镜像站使用帮助 | 清华大学开源软件镜像站 | Tsinghua Open Source Mirror查询):
# 默认注释了源码镜像以提高 apt update 速度,如有需要可自行取消注释 deb https://mirrors.tuna.tsinghua.edu.cn/debian/ bullseye main contrib non-free # deb-src https://mirrors.tuna.tsinghua.edu.cn/debian/ bullseye main contrib non-free deb https://mirrors.tuna.tsinghua.edu.cn/debian/ bullseye-updates main contrib non-free # deb-src https://mirrors.tuna.tsinghua.edu.cn/debian/ bullseye-updates main contrib non-free deb https://mirrors.tuna.tsinghua.edu.cn/debian/ bullseye-backports main contrib non-free # deb-src https://mirrors.tuna.tsinghua.edu.cn/debian/ bullseye-backports main contrib non-free deb https://mirrors.tuna.tsinghua.edu.cn/debian-security bullseye-security main contrib non-free # deb-src https://mirrors.tuna.tsinghua.edu.cn/debian-security bullseye-security main contrib non-free- 1
- 2
- 3
- 4
- 5
- 6
- 7
- 8
- 9
- 10
- 11
pip 安装和换源
sudo apt install python3-pip pip config set global.index-url https://pypi.tuna.tsinghua.edu.cn/simple # 注意:这个换源仅针对单用户生效,多用户需要分别执行- 1
- 2
修改时区
sudo timedatectl set-timezone Asia/Shanghai- 1
常用软件安装
按需选择即可。
apt install gcc g++ cmake- 1
安装 MySQL
apt 安装
wget https://dev.mysql.com/get/mysql-apt-config_0.8.18-1_all.deb sudo dpkg -i mysql-apt-config_0.8.18-1_all.deb sudo apt update sudo apt install mysql-server # 安装过程中会要求设置 root 的密码;这一步很可能卡住,千万不要退出!耐心等待几分钟 mysql_secure_installation # 可选:更安全的配置(禁用 root 远程登录等)- 1
- 2
- 3
- 4
- 5
如果在执行
apt update时遇到这样的报错:W: GPG error: http://repo.mysql.com/apt/debian bullseye InRelease: The following signatures couldn't be verified because the public key is not available: NO_PUBKEY 467B942D3A79BD29 E: The repository 'http://repo.mysql.com/apt/debian bullseye InRelease' is not signed. N: Updating from such a repository can't be done securely, and is therefore disabled by default. N: See apt-secure(8) manpage for repository creation and user configuration details.- 1
- 2
- 3
- 4
请定位这个文本:
NO_PUBKEY 467B942D3A79BD29,提取后面的字符串,执行这样的命令:apt-key adv --keyserver keyserver.ubuntu.com --recv-keys 467B942D3A79BD29 # 最后一个参数为提取到的字符串- 1
测试连接和新建用户
连接到数据库
mysql -u root -p- 1
(上一步成功登录后)创建一个名为 username ,密码为 password ,允许从任意地址登录的用户:
CREATE USER 'username'@'%' IDENTIFIED BY 'password';- 1
若要退出 mysql 命令行,使用
exit或按下Ctrl + Z更改端口
修改配置文件(通常为
/etc/mysql/my.cnf或/etc/my.cnf,如果找不到请参考这篇文章),向其中增加如下内容(若其中已有[mysqld]则在该部分追加第二行即可)[mysqld] port=3306 # 3306为默认端口,根据自己喜好更改即可- 1
- 2
修改后重启服务:
sudo systemctl restart mysql- 1
Nginx 安装
sudo apt install nginx- 1
请注意配置文件放在
/etc/nginx/sites-available文件夹中,使用形如sudo ln -s /etc/nginx/sites-available/example /etc/nginx/sites-enabled/example的命令创建软链接到sites-enabled(必须是绝对路径),然后sudo nginx -s reload即可生效。nvm(为所有用户配置)
nvm 是一个很好用的 node 版本管理器,可以实现同一电脑同一用户同时使用不同版本的 node,具体请自行查找资料。
mkdir /usr/local/nvm /opt/nvm git clone https://github.com/nvm-sh/nvm.git /opt/nvm # GitHub 响应慢请尝试镜像站 https://ghproxy.com/https://github.com/nvm-sh/nvm.git- 1
- 2
编辑
/etc/profile.d/nvm.sh文件,写入如下内容:export NVM_NODEJS_ORG_MIRROR=https://mirrors.tuna.tsinghua.edu.cn/nodejs-release/ # 更换源站加速下载 export NVM_DIR=/usr/local/nvm # 导出 NVM_DIR 环境变量,让 nvm 安装 node 到该目录 source /opt/nvm/nvm.sh # 执行 nvm 的命令, 激活 nvm 到 shell 中 nvm use 16.16.0 # 用户登录后默认使用的 node 版本- 1
- 2
- 3
- 4
- 5
重新进入终端(如果是使用 su 间接进入 root,请用
su - root替代su),安装几个常用版本(下放给出的是 10 ~ 16 各个大版本最新的 LTS):nvm install 10.24.1 nvm install 12.22.12 nvm install 14.20.0 nvm install 16.16.0- 1
- 2
- 3
- 4
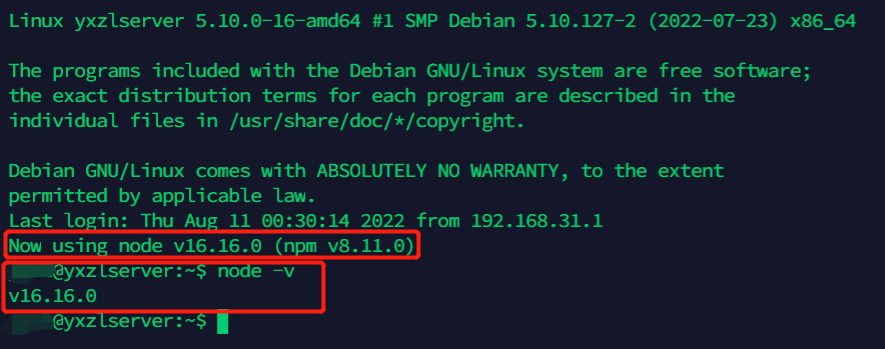
此时用户登录的效果:

注意:此时除 root 用户外均无法使用nvm install安装更多版本的 node,因为环境变量无法在 sudo 中使用,而 /usr/local 路径需要 root 才能写入若每个用户想单独配置自己的默认版本号,直接将
nvm use xxx写入.bashrc即可;若要自己安装 nvm 以下载更多版本,则正常使用下面的命令安装即可:wget -qO- https://raw.githubusercontent.com/creationix/nvm/v0.35.3/install.sh | bash source ~/.bashrc export NVM_NODEJS_ORG_MIRROR=https://mirrors.tuna.tsinghua.edu.cn/nodejs-release/ # 更换源站,为未来使用方便也可以加入 ~/.profile 中- 1
- 2
- 3
PostgreSQL 安装和配置
安装
sudo sh -c 'echo "deb http://apt.postgresql.org/pub/repos/apt $(lsb_release -cs)-pgdg main" > /etc/apt/sources.list.d/pgdg.list' wget --quiet -O - https://www.postgresql.org/media/keys/ACCC4CF8.asc | sudo apt-key add - sudo apt-get update sudo apt-get -y install postgresql-14 # postgresql-14是目前官方推荐的版本号;‘-14’可替换为任意版本号或删除以使用默认- 1
- 2
- 3
- 4
配置外网访问
(该部分需要的两个配置文件路径,对于非 14 版本的 PostgreSQL 可能有所不同,请自行查阅资料)
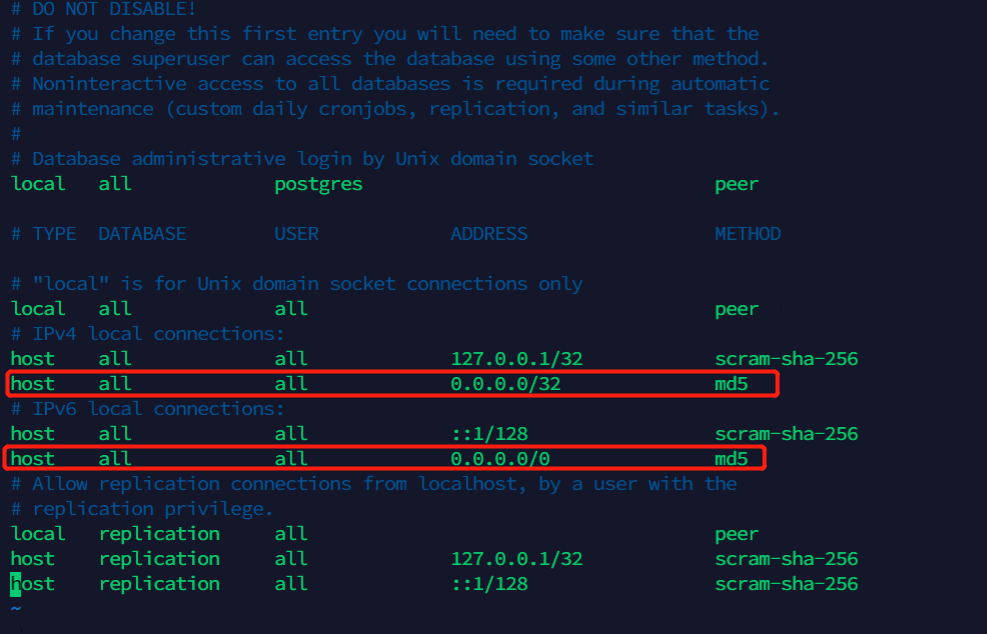
编辑文件
/etc/postgresql/14/main/pg_hba.conf,在图示位置添加如下内容:host all all 0.0.0.0/32 md5 # 注意,为了维持原配置文件格式,最好不要把两行放在一起! host all all 0.0.0.0/0 md5- 1
- 2
- 3

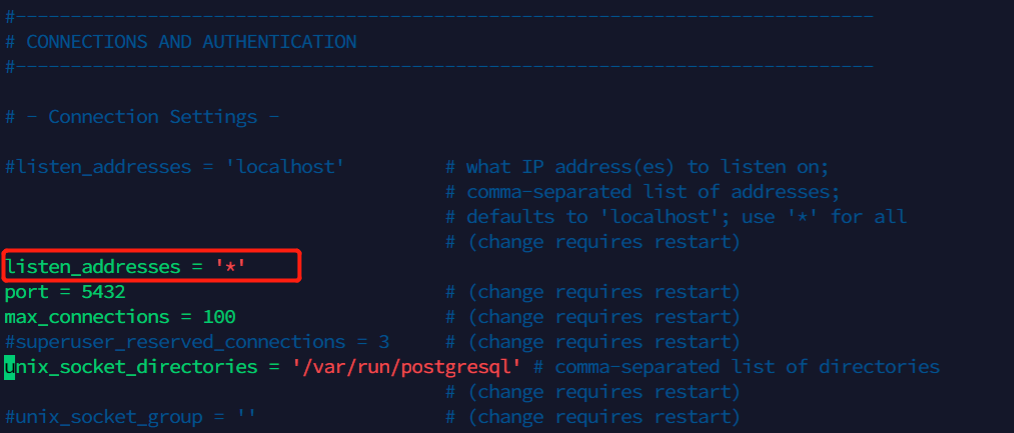
再编辑文件/etc/postgresql/14/main/postgresql.conf(14 对应你安装的版本号),在如图所示位置添加listen_addresses = '*'(看图就能知道,配置端口也在这里)
重启服务生效:sudo systemctl restart postgresql- 1
配置
打开 PostgreSQL 终端
sudo -u postgres psql- 1
创建用户:
CREATE USER username WITH PASSWORD '*****';- 1
服务器风扇不转

-
相关阅读:
ArcgisForJS如何使用ArcGIS Server的缓冲区几何服务?
Android设计模式--工厂模式
Cyanine5tetrazine(CAS号:1427705-31-4)结构式原理
FFmpeg视音频分离器----向雷神学习
【代码开发】python一个终端运行多个进程
Linux高可用(HA)集群keepalived实验
elementUI中的table动态表单记录
vue中ref的用法
亲测:你这些网站都不知道,哪来时间去摸鱼?
Flask 学习-26.JWT(JSON Web Token)生成Token
- 原文地址:https://blog.csdn.net/weixin_44495599/article/details/126269602