-
PyTorch笔记 - Convolution卷积的原理 (2)
卷积操作示意图:
- 蓝色是input feature map = 5x5
- 深蓝色是kernel = 3x3
- 绿色是output feature map = 3x3
- stride是1,pad是0
- O = (I-K+2P)/S+1,即(5-3+0)/1+1 = 3

修改padding和stride:
- 将input feature map进行pad操作,左右+1,即padding=1,5x5 -> 7x7
- 将stride修改为2
- O = (I-K+2P)/S+1,即(5-3+2)/2+1 = 3

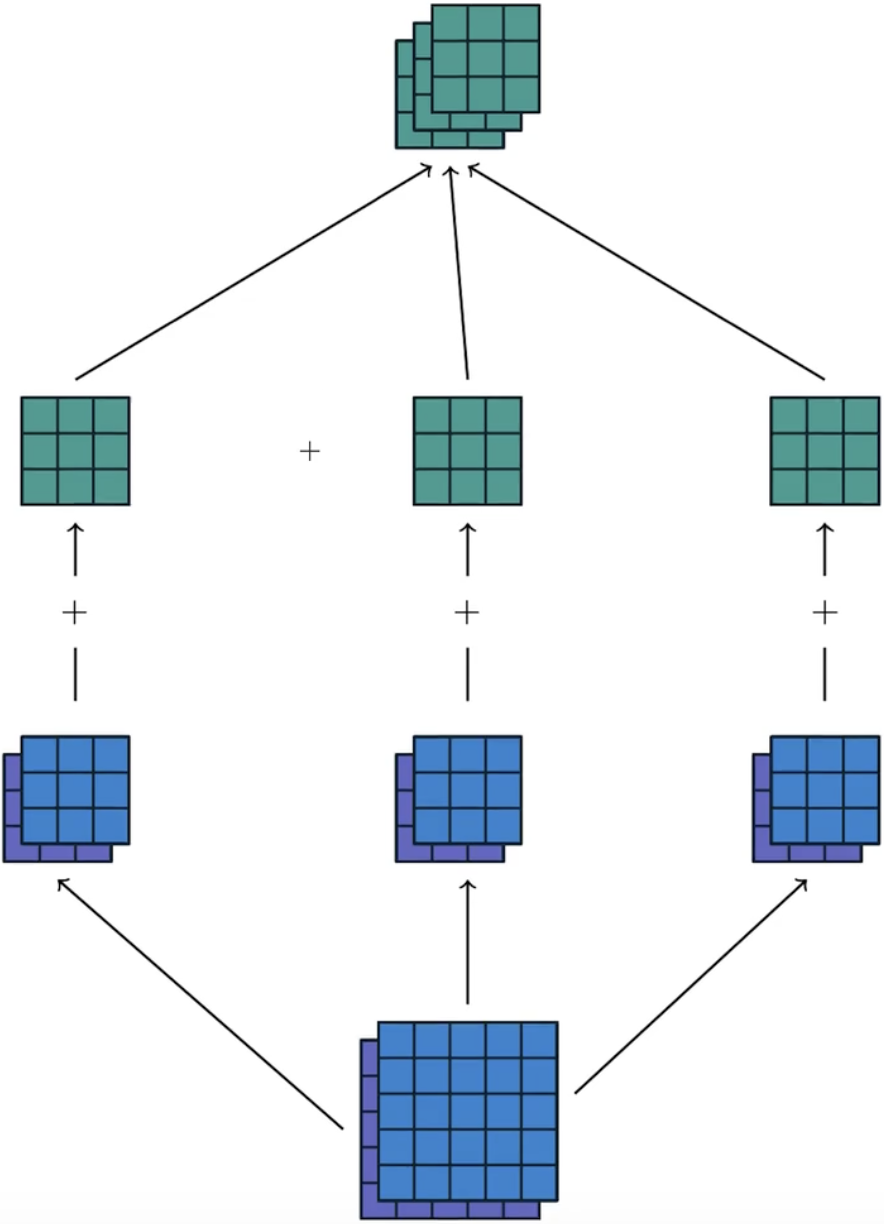
多通道卷积:
- in_channels = 2,out_channels = 3
- 从下向上,第2行是kernel,即2个3x3的kernel

Padding是{‘valid’, ‘same’}
padding='valid'is the same as no padding.padding='same'pads the input so the output has the shape as the input. However, this mode doesn’t support any stride values other than 1. same不支持stride大于1
用原始的矩阵运算来实现二维卷积, 先不考虑batchsize维度和channel维度:
- 支持bias、stride、padding
- 验证 矩阵运算实现卷积的结果 = 调用PyTorch API的卷积实现结果
# step1 用原始的矩阵运算来实现二维卷积, 先不考虑batchsize维度和channel维度 input = torch.randn(5, 5) # 卷积输入特征图 kernel = torch.randn(3, 3) # 卷积核 bias = torch.randn(1) # 卷积偏置,默认输出通道数是1 def matrix_multiplication_for_conv2d(input, kernel, bias=0, stride=1, padding=0): if padding > 0: input = F.pad(input, (padding, padding, padding, padding)) input_h, input_w = input.shape kernel_h, kernel_w = kernel.shape # 向下取整floor, 直接pad到input,不用padding output_w = int((input_w - kernel_w) / stride + 1) # 卷积输出的高度 output_h = int((input_h - kernel_h) / stride + 1) # 卷积输出的宽度 output = torch.zeros(output_h, output_w) # 初始化输出矩阵 for i in range(0, input_h-kernel_h+1, stride): # 对高度维进行遍历 for j in range(0, input_w-kernel_w+1, stride): # 对宽度度维进行遍历 region = input[i:i+kernel_h, j:j+kernel_w] output[int(i/stride), int(j/stride)] = torch.sum(region * kernel) + bias # 点乘,并且赋值输出位置的元素 return output # 矩阵运算实现卷积的结果 mat_mul_conv_output = matrix_multiplication_for_conv2d(input, kernel, bias=bias, padding=1) print(f'mat_mul_conv_output: \n{mat_mul_conv_output}') # 调用PyTorch API的卷积实现结果, padding=1, padding="same" mat_mul_conv_output = F.conv2d(input.reshape((1,1,*input.shape)), kernel.reshape(1, 1, *kernel.shape), bias=bias, padding="same") print(f'mat_mul_conv_output: \n{mat_mul_conv_output.reshape(mat_mul_conv_output.shape[2:])}')- 1
- 2
- 3
- 4
- 5
- 6
- 7
- 8
- 9
- 10
- 11
- 12
- 13
- 14
- 15
- 16
- 17
- 18
- 19
- 20
- 21
- 22
- 23
- 24
- 25
- 26
- 27
- 28
- 29
- 30
- 31
-
相关阅读:
java计算机毕业设计酒店预约入住系统源码+mysql数据库+系统+lw文档+部署
移动硬盘丢了怎么找回来呢?
MFC网络编程2——异步套接字
如何看待PMP的2022年11月新考纲?
grafana InfluxDB returned error: error reading influxDB 400错误解决
【C++/类和对象/2023年10月3日】
一文带你读懂 Hbase 的架构组成
JavaWeb | 常用的HTML(JavaWeb)标签
进口抛光树脂使用方法
【高级篇】线程与线程池
- 原文地址:https://blog.csdn.net/u012515223/article/details/126258330
