-
Unity实现UI的边缘检测和拖拽拉伸功能

👉一、功能需求分析
最近赶项目,许久没写博客了。今天忙里偷闲,记录一下最近项目里遇到的一个功能——拖拽UI窗口边缘拉伸其大小,基本上现在的PC端的软件窗口都有这个功能。该功能效果就是需要做成跟Unity工具栏中的矩形工具的功能一样,当鼠标光标移入UI的各个边缘区域时显示不同的鼠标光标,并按下鼠标往不同方向拖拽拉伸时能实时调整该UI的大小。所以总结了以下两点需求:
- 鼠标移入UI时作边缘检测算法,获取该边缘类型的标识。
- 根据边缘类型,在拖拽时动态调整该UI大小。
以下博客内容仅记录本人开发UI窗口自由拖拽拉伸功能过程,方法不唯一,欢迎各位开发朋友一起探讨交流新想法!
👉二、拖拽拉伸调整UI大小效果抢先看
Unity实现UI窗口拖拽拉伸实时调整大小
👉三、实现原理
1.UI边缘检测算法原理
我们都知道可以使用RectTransformUtility.RectangleContainsScreenPoint方法来判断鼠标位置是否在一个UI矩形区域内,那如何判断鼠标是否在UI的上下左右边缘区域或者四个边缘角的位置呢?刚开始我也是百思不得其解,后来才逐渐摸索出来解决方法。我们这里也是需要小小的使用到分治思想——那就是“分而治之”,将复杂问题拆分成诺干个相同的小问题进行解决。即:
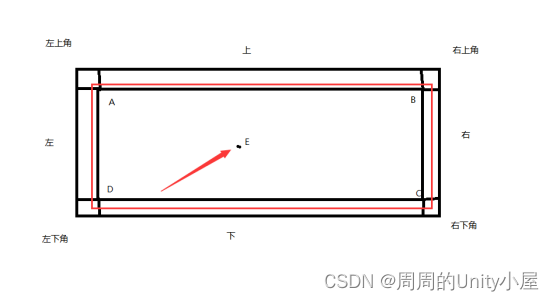
将UI矩形区域分为上、下、左、右、右上角、右下角、左上角、左下角8小区域矩形,检测鼠标点是否在这些小矩形范围内;转为判断鼠标点是否在其中某个矩形区域内,转为判断鼠标点是否在左右和上下两条边之间;判断鼠标点是否在两条线段之间,就转为判断一个点是否在某条线段的一边上,利用叉乘的方向性,判断夹角是否超过180度。如上图:
如果 ( A B ⃗ \vec{AB} AB x A E ⃗ \vec{AE} AE)∗( C D ⃗ \vec{CD} CD x C E ⃗ \vec{CE} CE)>=0 ,证明E在AB和DC中间,同理可证E在AD和BC中间;则得出E(鼠标位置)点在ABCD组成的矩形范围内。2.拖拽拉伸调整UI大小原理
通过实现IDragHandler接口的方法OnDrag在拖拽过程中获取鼠标指针坐标的增量PointerEventData.delta,去实时改变RectTransform.offsetMin(矩形左下角相对于左下锚点的偏移)和RectTransform.offsetMax(矩形右上角相对于右上锚点的偏移)的值,即可实现拖拽拉伸调整UI大小,具体看后面核心代码。
👉四、搭建场景demo
1、添加一个Panel物体(非必要,可不添加),添加一个Image,作为其子物体,随便赋值一张图片;删除原主相机,在EventSystem下添加一个相机,命名为UICamera;修改Canvas的渲染模式为相机,并将UICamera赋值给其项目渲染相机。
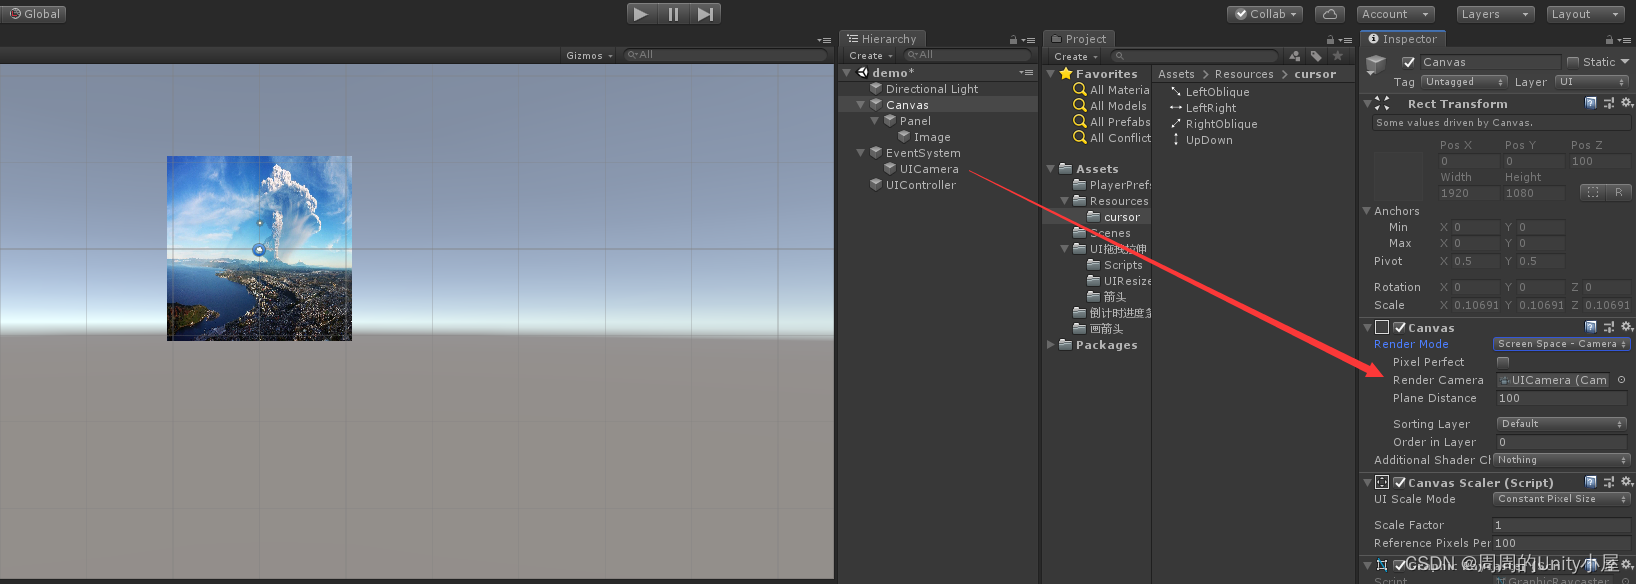
2、新建脚本命名为UIResize,用来实现拖拽拉伸改变该UI图片大小功能的,拖拽给Image物体。
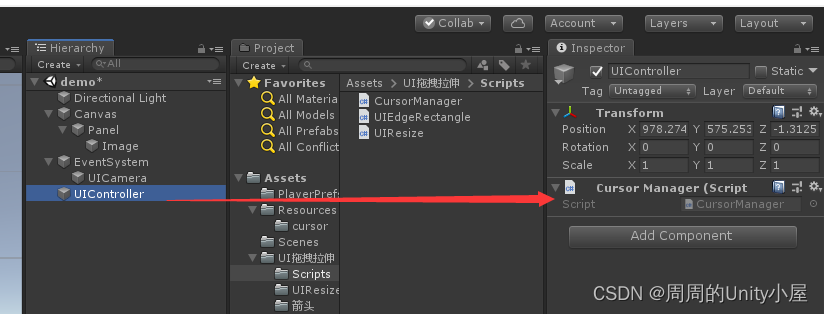
3、添加一个空物体命名为UIController,并新建脚本命名为CursorManager作为鼠标光标管理单例脚本,拖拽给UIController。
4、新建静态类脚本命名为UIEdgeRectangle,用来实现UI边缘检测算法,获取鼠标点位置在UI某个边缘区域时的标识。👉五、核心脚本代码
1.UI边缘检测算法:UIEdgeRectangle.cs
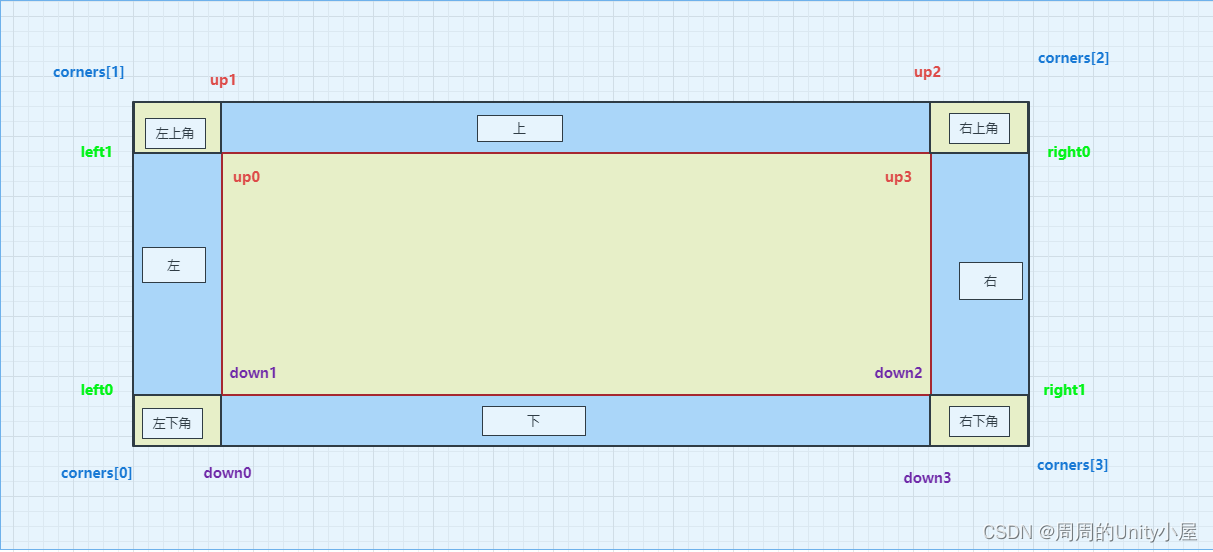
使用以下代码进行UI边缘检测时请参考上图(注:UI锚点为UI中心点)。//UI边缘枚举 public enum UIEdge { None, Up, Down, Left, Right, TopRightCorner, BottomRightCorner, TopLeftCorner, BottomLeftCorner } public static class UIEdgeRectangle { public static float areaPixel = 10.0f;//边缘检测区域大小 private static Vector3[] corners = new Vector3[4]; ////// UI边缘检测算法,获取UI边缘枚举 /// /// 鼠标点 /// UI矩形框 /// public static UIEdge GetUIEdge(Vector2 mousePos, RectTransform rect) { UIEdge uiEdge = UIEdge.None;//默认是None类型:表示中心区域 rect.GetLocalCorners(corners);//获取UI矩形四个边缘角的局部坐标 //上方矩形区域点 var up0 = new Vector2(corners[1].x + areaPixel, corners[1].y - areaPixel);//与左边矩形区域共用 var up1 = new Vector2(corners[1].x + areaPixel, corners[1].y); var up2 = new Vector2(corners[2].x - areaPixel, corners[2].y); var up3 = new Vector2(corners[2].x - areaPixel, corners[2].y - areaPixel);//与右边矩形区域共用 //下方矩形区域点 var down0 = new Vector2(corners[0].x + areaPixel, corners[0].y); var down1 = new Vector2(corners[0].x + areaPixel, corners[0].y + areaPixel);//与左边矩形区域共用 var down2 = new Vector2(corners[3].x - areaPixel, corners[3].y + areaPixel);//与右边矩形区域共用 var down3 = new Vector2(corners[3].x - areaPixel, corners[3].y); //左边矩形区域点 var left0 = new Vector2(corners[0].x, corners[0].y + areaPixel); var left1 = new Vector2(corners[1].x, corners[1].y - areaPixel); //右边矩形区域点 var right0 = new Vector2(corners[2].x, corners[2].y - areaPixel); var right1 = new Vector2(corners[3].x, corners[3].y + areaPixel); if (IsPointInRectangle(up0, up1, up2, up3, mousePos)) { uiEdge = UIEdge.Up;//鼠标点在up0、up1、up2和up3组成的矩形区域时返回枚举类型up:表示上方 } else if (IsPointInRectangle(down0, down1, down2, down3, mousePos)) { uiEdge = UIEdge.Down;//鼠标点在down0、down1、down2和down3组成的矩形区域时返回枚举类型down:表示下方 } else if (IsPointInRectangle(down1, left0, left1, up0, mousePos)) { uiEdge = UIEdge.Left;//鼠标点在down1、left0、left1和up0组成的矩形区域时返回枚举类型left:表示左边 } else if (IsPointInRectangle(up3, right0, right1, down2, mousePos)) { uiEdge = UIEdge.Right;//鼠标点在up3、right0、right1和down2组成的矩形区域时返回枚举类型right:表示下方 } else if (IsPointInRectangle(up3, up2, corners[2], right0, mousePos)) { uiEdge = UIEdge.TopRightCorner;//鼠标点在up3、up2、corners[2]和right0组成的矩形区域时返回枚举类型TopRightCorner:表示下方 } else if (IsPointInRectangle(down2, right1, corners[3], down3, mousePos)) { uiEdge = UIEdge.BottomRightCorner;//鼠标点在down2、right1、corners[3]和down3组成的矩形区域时返回枚举类型BottomRightCorner:表示下方 } else if (IsPointInRectangle(left1, corners[1], up1, up0, mousePos)) { uiEdge = UIEdge.TopLeftCorner;//鼠标点在left1、corners[1]、up1和up0组成的矩形区域时返回枚举类型TopLeftCorner:表示下方 } else if (IsPointInRectangle(corners[0], left0, down1, down0, mousePos)) { uiEdge = UIEdge.BottomLeftCorner;//鼠标点在corners[0]、left1、down1和down0组成的矩形区域时返回枚举类型BottomLeftCorner:表示下方 } return uiEdge; } // 计算两个向量的叉积 public static float Cross(Vector2 a, Vector2 b) { return a.x * b.y - b.x * a.y; } // 判断点E是否在ABCD组成的矩形框内 public static bool IsPointInRectangle(Vector2 A, Vector2 B, Vector2 C, Vector2 D, Vector2 E) { //计算E与ABCD矩形的叉积 bool value = Cross(A - B, A - E) * Cross(C - D, C - E) >= 0 && Cross(A - D, A - E) * Cross(C - B, C - E) >= 0; return value; } } - 1
- 2
- 3
- 4
- 5
- 6
- 7
- 8
- 9
- 10
- 11
- 12
- 13
- 14
- 15
- 16
- 17
- 18
- 19
- 20
- 21
- 22
- 23
- 24
- 25
- 26
- 27
- 28
- 29
- 30
- 31
- 32
- 33
- 34
- 35
- 36
- 37
- 38
- 39
- 40
- 41
- 42
- 43
- 44
- 45
- 46
- 47
- 48
- 49
- 50
- 51
- 52
- 53
- 54
- 55
- 56
- 57
- 58
- 59
- 60
- 61
- 62
- 63
- 64
- 65
- 66
- 67
- 68
- 69
- 70
- 71
- 72
- 73
- 74
- 75
- 76
- 77
- 78
- 79
- 80
- 81
- 82
- 83
- 84
- 85
- 86
- 87
- 88
- 89
- 90
- 91
- 92
- 93
- 94
2.拖拽拉伸改变UI窗口大小:UIResize.cs
using UnityEngine; using UnityEngine.UI; using UnityEngine.EventSystems; ////// UI拖拽拉伸 /// public class UIResize : MonoBehaviour, IDragHandler, IPointerExitHandler { private Image img;//拖拽的对象 public Camera uicam;//渲染UI的相机 private RectTransform rect;//拖拽对象的矩形对象 private UIEdge currentUiEdge;//当前鼠标所在UI的边缘枚举 private void Start() { CursorManager.instance.LoadCursor();//初始化加载鼠标光标 img = GetComponent<Image>(); rect = img.GetComponent<RectTransform>(); } /// /// 鼠标移出UI,恢复默认光标 /// /// public void OnPointerExit(PointerEventData eventData) { CursorManager.instance.SetDefaultCursor(); } /// /// 拖拽过程中,根据鼠标所在边缘区域动态修改该UI图片的右上偏移offsetMax或左下偏移offsetMin /// /// public void OnDrag(PointerEventData eventData) { switch (currentUiEdge) { case UIEdge.None: break; case UIEdge.Up://UI上方 rect.offsetMax = new Vector2(rect.offsetMax.x, rect.offsetMax.y + eventData.delta.y); break; case UIEdge.Down://UI下方 rect.offsetMin = new Vector2(rect.offsetMin.x, rect.offsetMin.y + eventData.delta.y); break; case UIEdge.Left://UI左边 rect.offsetMin = new Vector2(rect.offsetMin.x+eventData.delta.x, rect.offsetMin.y); break; case UIEdge.Right://UI右边 rect.offsetMax = new Vector2(rect.offsetMax.x + eventData.delta.x, rect.offsetMax.y); break; case UIEdge.TopRightCorner://UI右上角 rect.offsetMax = rect.offsetMax + eventData.delta; break; case UIEdge.BottomRightCorner://UI右下角 rect.offsetMax = new Vector2(rect.offsetMax.x + eventData.delta.x, rect.offsetMax.y); rect.offsetMin = new Vector2(rect.offsetMin.x, rect.offsetMin.y + eventData.delta.y); break; case UIEdge.TopLeftCorner://UI左上角 rect.offsetMax = new Vector2(rect.offsetMax.x , rect.offsetMax.y + eventData.delta.y); rect.offsetMin = new Vector2(rect.offsetMin.x + eventData.delta.x, rect.offsetMin.y); break; case UIEdge.BottomLeftCorner://UI左下角 rect.offsetMin = rect.offsetMin + eventData.delta; break; } } private void Update() { if (RectTransformUtility.RectangleContainsScreenPoint(rect,Input.mousePosition,uicam)) { Vector2 mousePos; //将鼠标的屏幕位置转为在该UI图片下的ui坐标 RectTransformUtility.ScreenPointToLocalPointInRectangle(rect, Input.mousePosition, uicam, out mousePos); //进行UI边缘检测,判断鼠标位置在UI边缘的哪个位置,返回其边缘类型枚举 currentUiEdge = UIEdgeRectangle.GetUIEdge(mousePos, rect); switch (currentUiEdge)//根据边缘类型的情况切换鼠标光标 { case UIEdge.None: CursorManager.instance.SetDefaultCursor(); break; case UIEdge.Up: CursorManager.instance.SetCursor(CursorType.UpDown); break; case UIEdge.Down: CursorManager.instance.SetCursor(CursorType.UpDown); break; case UIEdge.Left: CursorManager.instance.SetCursor(CursorType.LeftRight); break; case UIEdge.Right: CursorManager.instance.SetCursor(CursorType.LeftRight); break; case UIEdge.TopRightCorner: CursorManager.instance.SetCursor(CursorType.RightOblique); break; case UIEdge.BottomRightCorner: CursorManager.instance.SetCursor(CursorType.LeftOblique); break; case UIEdge.TopLeftCorner: CursorManager.instance.SetCursor(CursorType.LeftOblique); break; case UIEdge.BottomLeftCorner: CursorManager.instance.SetCursor(CursorType.RightOblique); break; } } } } - 1
- 2
- 3
- 4
- 5
- 6
- 7
- 8
- 9
- 10
- 11
- 12
- 13
- 14
- 15
- 16
- 17
- 18
- 19
- 20
- 21
- 22
- 23
- 24
- 25
- 26
- 27
- 28
- 29
- 30
- 31
- 32
- 33
- 34
- 35
- 36
- 37
- 38
- 39
- 40
- 41
- 42
- 43
- 44
- 45
- 46
- 47
- 48
- 49
- 50
- 51
- 52
- 53
- 54
- 55
- 56
- 57
- 58
- 59
- 60
- 61
- 62
- 63
- 64
- 65
- 66
- 67
- 68
- 69
- 70
- 71
- 72
- 73
- 74
- 75
- 76
- 77
- 78
- 79
- 80
- 81
- 82
- 83
- 84
- 85
- 86
- 87
- 88
- 89
- 90
- 91
- 92
- 93
- 94
- 95
- 96
- 97
- 98
- 99
- 100
- 101
- 102
- 103
- 104
- 105
- 106
- 107
记得对UI渲染相机进行赋值:

3.鼠标光标单例管理类:CursorManager.cs
////// 鼠标光标类型枚举 /// public enum CursorType { None, UpDown,//上下箭头 LeftRight,//左右箭头 LeftOblique,//左斜箭头 RightOblique//右斜箭头 } public class CursorManager : MonoBehaviour { public static CursorManager instance; private Dictionary<CursorType, Texture2D> dicCursors = new Dictionary<CursorType, Texture2D>(); private void Awake() { instance = this; } /// /// 加载鼠标光标保存到字典 /// public void LoadCursor() { string[] cursors = System.Enum.GetNames(typeof(CursorType)); for (int i = 0; i < cursors.Length; i++) { Texture2D sprite = Resources.Load<Texture2D>("cursor/" + cursors[i]); CursorType type =(CursorType)System.Enum.Parse(typeof(CursorType), cursors[i]);//根据字符串名转换为对应枚举类型 if (!dicCursors.ContainsKey(type)) { dicCursors.Add(type, sprite); } } } /// /// 根据枚举设置不同的鼠标光标 /// /// public void SetCursor(CursorType type) { if (dicCursors.ContainsKey(type)) { //因为这里的光标图片大小是32*32像素的,所以需要设置切换光标后鼠标位置为该图片中心位置 //即偏移为(16,16),避免在UI边缘检测时出现误差 Cursor.SetCursor(dicCursors[type], new Vector2(16, 16), CursorMode.Auto); } } //恢复默认光标 public void SetDefaultCursor() { Cursor.SetCursor(null, Vector2.zero, CursorMode.Auto); } } - 1
- 2
- 3
- 4
- 5
- 6
- 7
- 8
- 9
- 10
- 11
- 12
- 13
- 14
- 15
- 16
- 17
- 18
- 19
- 20
- 21
- 22
- 23
- 24
- 25
- 26
- 27
- 28
- 29
- 30
- 31
- 32
- 33
- 34
- 35
- 36
- 37
- 38
- 39
- 40
- 41
- 42
- 43
- 44
- 45
- 46
- 47
- 48
- 49
- 50
- 51
- 52
- 53
- 54
- 55
- 56
👉六、边缘检测及拖拽拉伸效果图示
1.鼠标移入UI左、右区域并拖拽拉伸
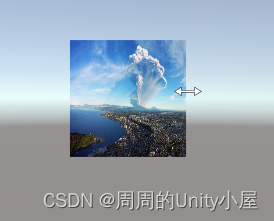

2.鼠标移入UI上、下区域并拖拽拉伸


3.鼠标移入UI右上、下角区域并拖拽拉伸


4.鼠标移入UI左上、下角区域并拖拽拉伸


-
相关阅读:
【推送服务】【FAQ】Push Ki常见咨询合集1--权益类问题
基于蒙特卡洛的大规模电动汽车充电行为分析(Matlab代码实现)
数据结构编写程序出现syntax error before '&' token怎么修改
Vuex模块化(modules)与namespaced(命名空间)的搭配
如何使用html、css制作一个期末作业网站【羽毛球体育运动主题html网页设计】
【JavaSE】多线程篇(二)线程终止、线程中断与线程插队
jmeter压测
蓝牙技术|蓝牙在物联网产品上的功能,特别是苹果Find My中的应用
golang中常用的空接口数据类型转换方法
解读Sketching the Future (STF):零样本条件视频生成
- 原文地址:https://blog.csdn.net/qq_42437783/article/details/126224851
