-
Flutter气泡框实现
前言
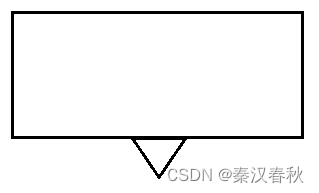
遇到一个需要实现气泡框的组件,大概长这样:

里面的内容可以是单行文字,可以是菜单,或其他组件;当时想了3种办法:
- 使用已有的气泡框图做背景
- 制作点九图做背景
- 自己画背景
用现有的图始终难以控制边距,矩形内是有内容的;
点九图也有同样的问题,只有自己画的图才有可能计算出准确的边距。于是开始自定义View。
绘制
因为最终目的是要在绘制好的组件中放置其他组件,所以优先选择CustomClipper<
Path> ,相当于剪切出一个可容纳子组件存在的空间出来;
理论上也可以使用CustomPainter画出背景后进行操作,但那样就和使用已有的图做背景区别不大了。要点
如最开始的草图所示,其实气泡框就是一个矩形和三角形的组合,但除此之外还有一些可以扩展的操作,比如:
- 矩形的角和三角形的角可以增加一定弧度
- 三角形的顶角可以偏移成为斜角,接近于聊天的气泡框
- 矩形容纳子组件的边距能够先行计算
- 三角形朝向不同
- …
除此之外,就是进行一些简单的几何计算,比如三角形朝向左右上下不同方向时,对应坐标参数的变化。
思路则是:先画三角,再画矩形,最后计算边距。
三角需要先根据朝向计算画的起始点,矩形则根据三角的高度确定四角所在坐标,边距也根据三角的高度确定。API
矩形比较容易实现,加圆角也容易:
RRect.fromRectAndRadius( Rect.fromLTWH(l, t, r ,b), radius);- 1
- 2
三角形也简单,使用连线即可:
path.lineTo(x,y);- 1
但lineTo只能画直线,如果要使角有弧度,可以考虑使用圆锥曲线:
path.conicTo(peakX, peakY, endX, endY, weight);- 1
当weight>1后,曲线会越来越锐利,接近三角形的角,可以自行调节;
实现
先定义朝向:
enum ArrowDirection { left, right, top, bottom, none }- 1
朝向不同,就需要计算相应的坐标;
再确定三角形的高度与宽度:
@override Path getClip(Size size) { print("w=${size.width},h=${size.height}"); final pathTriangle = Path(); final pathRect = Path(); //若有指定值,则宽高为指定值, //若无指定值,宽高以各自平行的矩形边作为基准 final arrowW = arrowWidth == 0 ? (direction == ArrowDirection.left || direction == ArrowDirection.right ? size.height : size.width) * widthWeight : arrowWidth; final arrowH = arrowHeight == 0 ? (direction == ArrowDirection.left || direction == ArrowDirection.right ? size.width : size.height) * heightWeight : arrowHeight; print("arrowW=$arrowW,arrowH=$arrowH"); }- 1
- 2
- 3
- 4
- 5
- 6
- 7
- 8
- 9
- 10
- 11
- 12
- 13
- 14
- 15
- 16
- 17
- 18
- 19
- 20
- 21
- 22
- 23
- 24
为了能够让三角形的宽高能随着父布局的宽高而变,在这里设置了两种选择,一种是直接传入宽高准确值,一种是传入与整个布局成比例的比例值;
三角形始终以与矩形相邻的边作为宽(底边),当朝向为左右(水平)时,三角形实际上是“放倒了”,所以需要判断在水平方向时的取值;接着确定起点:
//箭头为水平方向(左右)时,三角形底边中心的纵坐标 final basisPointY = arrowBasisOffset < -1 || arrowBasisOffset > 1 ? size.height / 2 + arrowBasisOffset : size.height / 2 * (1 + arrowBasisOffset); //箭头为水平方向(左右)时,三角形顶角顶点的纵坐标 final peakPointY = basisPointY + arrowW * arrowPeakOffset; print("b=$arrowBasisOffset,p=$arrowPeakOffset"); //箭头为垂直方向(上下)时,三角形底边中心的横坐标 final basisPointX = arrowBasisOffset < -1 || arrowBasisOffset > 1 ? size.width / 2 + arrowBasisOffset : size.width / 2 * (1 + arrowBasisOffset); //箭头为垂直方向(上下)时,三角形顶角顶点的横坐标 final peakPointX = basisPointX + arrowW * arrowPeakOffset; print("peakX=$peakPointX,basisX=$basisPointX");- 1
- 2
- 3
- 4
- 5
- 6
- 7
- 8
- 9
- 10
- 11
- 12
- 13
- 14
- 15
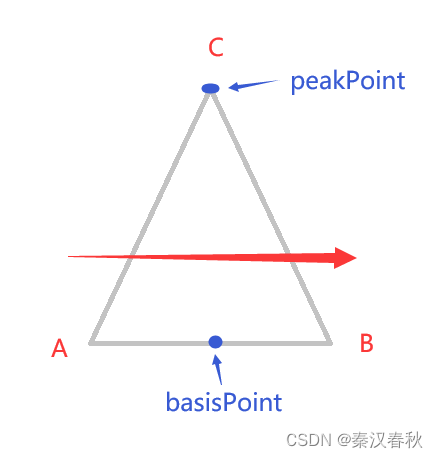
这里将三角形底边中心点作为基准点(basisPoint),起点则为底边靠左或靠上的一个端点;
项角顶点(peakPoint)则用于偏移,当peakPoint与basisPoint相等时,说明是等腰三角;
同样分水平和垂直方向,水平时基准点只算Y轴,垂直时基准点只算X轴;

然后开始画三角形;
依据上图,A-B即为宽度,c-basisPoint的垂直高度即为高度,C点为圆锥曲线的控制点,从A到B绘制曲线,weight(权重)超过10就很接近三角形了;drawArrow(Path pathTriangle, double startX, double startY, double peakX, double peakY, double endX, double endY, double weight) { pathTriangle.moveTo(startX, startY); pathTriangle.conicTo(peakX, peakY, endX, endY, weight); pathTriangle.close(); }- 1
- 2
- 3
- 4
- 5
- 6
A点(startX,startY);
B点(endX,endY);
C点(peakX,peakY);然后根据朝向画矩形:
switch (direction) { case ArrowDirection.left: //绘制位于左边的三角形箭头,即画一个顶角朝左的三角形 drawArrow(pathTriangle, arrowH, basisPointY - arrowW / 2, 0, peakPointY, arrowH, basisPointY + arrowW / 2, conicWeight); //绘制位于右方的矩形 pathRect.addRRect(RRect.fromRectAndRadius( Rect.fromLTWH(arrowH, 0, (size.width - arrowH), size.height), radius)); break; case ArrowDirection.right: //绘制位于右边的三角形箭头,画一个顶角朝右的三角形 drawArrow( pathTriangle, size.width - arrowH, basisPointY - arrowW / 2, size.width, peakPointY, size.width - arrowH, basisPointY + arrowW / 2, conicWeight); //绘制位于左边的矩形 pathRect.addRRect(RRect.fromRectAndRadius( Rect.fromLTWH(0, 0, (size.width - arrowH), size.height), radius)); break; case ArrowDirection.top: //绘制位于顶部的三角形箭头,画一个顶角朝上的三角形 drawArrow(pathTriangle, basisPointX - arrowW / 2, arrowH, peakPointX, 0, basisPointX + arrowW / 2, arrowH, conicWeight); //绘制位于下边的矩形 pathRect.addRRect(RRect.fromRectAndRadius( Rect.fromLTWH(0, arrowH, size.width, size.height - arrowH), radius)); break; case ArrowDirection.bottom: //绘制位于底部的三角形箭头,画一个顶角朝下的三角形 drawArrow( pathTriangle, basisPointX - arrowW / 2, size.height - arrowH, peakPointX, size.height, basisPointX + arrowW / 2, size.height - arrowH, conicWeight); // 绘制位于下边的矩形 pathRect.addRRect(RRect.fromRectAndRadius( Rect.fromLTWH(0, 0, size.width, size.height - arrowH), radius)); break; default: pathRect.addRRect(RRect.fromRectAndRadius( Rect.fromLTWH(0, 0, size.width, size.height), radius)); break; }- 1
- 2
- 3
- 4
- 5
- 6
- 7
- 8
- 9
- 10
- 11
- 12
- 13
- 14
- 15
- 16
- 17
- 18
- 19
- 20
- 21
- 22
- 23
- 24
- 25
- 26
- 27
- 28
- 29
- 30
- 31
- 32
- 33
- 34
- 35
- 36
- 37
- 38
- 39
- 40
- 41
- 42
- 43
- 44
- 45
- 46
- 47
- 48
- 49
- 50
- 51
- 52
- 53
- 54
合并返回:
pathTriangle.addPath(pathRect, const Offset(0, 0)); return pathTriangle;- 1
- 2
至此CustomClipper的工作完成,计算边距需要在自定义的容器中实现;
指定了准确的三角形高度,那么可以直接使用高度作为padding,考虑朝向即可:_padding() { switch (direction) { case ArrowDirection.bottom: return EdgeInsets.only(bottom: arrowHeight).add(padding!); case ArrowDirection.left: return EdgeInsets.only(left: arrowHeight).add(padding!); case ArrowDirection.right: return EdgeInsets.only(right: arrowHeight).add(padding!); case ArrowDirection.top: return EdgeInsets.only(top: arrowHeight).add(padding!); case ArrowDirection.none: return padding; } }- 1
- 2
- 3
- 4
- 5
- 6
- 7
- 8
- 9
- 10
- 11
- 12
- 13
- 14
如果高度是指定比例,则使用FractionallySizedBox来变相实现padding:
_box() { switch (direction) { case ArrowDirection.left: case ArrowDirection.right: return FractionallySizedBox( widthFactor: 1 - arrowHeightWeight, child: child, ); case ArrowDirection.top: case ArrowDirection.bottom: return FractionallySizedBox( heightFactor: 1 - arrowHeightWeight, child: child, ); case ArrowDirection.none: return FractionallySizedBox( child: child, ); } }- 1
- 2
- 3
- 4
- 5
- 6
- 7
- 8
- 9
- 10
- 11
- 12
- 13
- 14
- 15
- 16
- 17
- 18
- 19
- 20
最后统合组件即可,源码见末尾。
成果
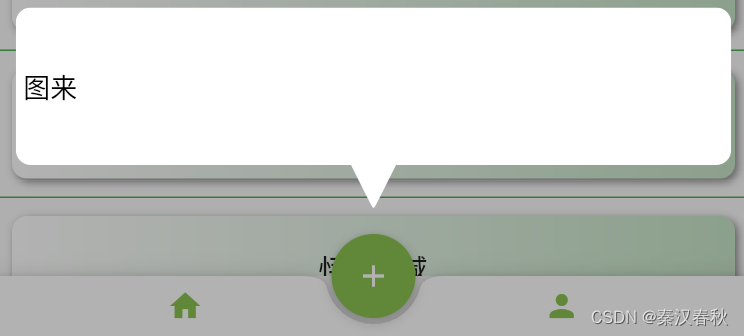
示例1,传入准确宽高:
ChatBubble( direction: ArrowDirection.bottom, arrowWidth: 30, arrowHeight: 30, child: Container( alignment: Alignment.centerLeft, child: Text( "图来", style: TextStyle(color: Colors.black, inherit: false, fontSize: 18), ), ), )- 1
- 2
- 3
- 4
- 5
- 6
- 7
- 8
- 9
- 10
- 11
- 12

示例2,加上偏移成为斜三角:ChatBubble( direction: ArrowDirection.left, arrowWidth: 20, arrowHeight: 20, arrowPeakOffset: -0.8, child: Container( alignment: Alignment.centerLeft, child: Text( "图来", style: TextStyle(color: Colors.black, inherit: false, fontSize: 18), ), ), )- 1
- 2
- 3
- 4
- 5
- 6
- 7
- 8
- 9
- 10
- 11
- 12
- 13

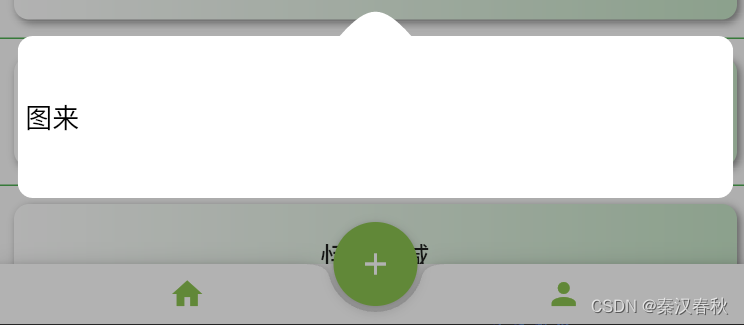
示例3,改变权重使角更为平滑:ChatBubble( direction: ArrowDirection.top, arrowWidthWeight: 0.1, arrowHeightWeight: 0.2, conicWeight: 1.5, child: Container( alignment: Alignment.centerLeft, child: Text( "图来", style: TextStyle(color: Colors.black, inherit: false, fontSize: 18), ), ), )- 1
- 2
- 3
- 4
- 5
- 6
- 7
- 8
- 9
- 10
- 11
- 12
- 13

源码在此。
以上。 -
相关阅读:
Python入门之经典函数实例
ROS 工作空间及功能包
将树形结构的复杂数组转换为一维数组
IPV6工作手册
记录一个sentinel修改密码方法
Django使用post和get方法做简易登录验证
周阳老师JUC并发编程
C++对象模型(8)-- 数据语义学:this指针
纯CSS制作3D动态相册【流星雨3D旋转相册】HTML+CSS+JavaScriptHTML5七夕情人节表白网页制作
MAC版Gradle构建Spring5.X源码阅读环境
- 原文地址:https://blog.csdn.net/ifmylove2011/article/details/126228526
