-
JDBC与正则化
JDBC概述。
●基本介绍
1.JDBC为访问不同的数据库提供了统一的接口,为使用者屏蔽了细节问题。
2.Java程序员使用JDBC,可以连接任何提供了JDBC驱动程序的数据库系统,从而完成对数据库的各种操作。


JDBC快速入门
·JDBC程序编写步骤
1.注册驱动–加载Driver 类
2.获取连接-得到Connection
3.执行增删改查-发送SQL给mysql执行
4.释放资源–关闭相关连接

package com.myjdbc; import com.mysql.jdbc.Driver; import java.sql.Connection; import java.sql.SQLException; import java.sql.Statement; import java.util.Properties; /** * @author * @version 1.0 */ public class Jdbc01 { public static void main(String[] args) throws SQLException { // 前置工作:在项目下创建一个文件夹,比如lib // 将mysql.jar拷贝到该目录下。点击add to project....加入到项目中 // 1.注册驱动 Driver driver = new Driver();//创建driver对象 // 2.得到连接 //(1) jdbc :mysql:// 规定好表示协议,通过jdbc的方式连接mysql // (2)localhost 主机,可以是ip地址 //(3)3306表示mysql监听的端口 //(4) hsp_db02连接到mysql dbms的哪个数据库 // (5) mysql的连接本质就是前面学过的socket连接 String url = "jdbc:mysql://localhost:3306/dxl_db01"; // 将用户名和密码放入Properties对象 Properties properties = new Properties(); // user和password是规定好的,后面的值根据实际情况写 properties.setProperty("user","root");//用户 properties.setProperty("password",""); Connection connect = driver.connect(url, properties); // 3.执行sql // String sql = "insert into actor values(null,'刘德华','男','1968-02-05','125')"; // String sql = "update actor set name = '周星驰' where id = 1"; String sql = "delete from actor where id = 1"; //statement 用于执行静态sql语句并返回其生成的结果的对象 Statement statement = connect.createStatement(); int rows = statement.executeUpdate(sql);//如果是dml语句,返回受影响行数 System.out.println(rows > 0? "成功":"失败"); // 4.关闭连接资源 statement.close(); connect.close(); } }- 1
- 2
- 3
- 4
- 5
- 6
- 7
- 8
- 9
- 10
- 11
- 12
- 13
- 14
- 15
- 16
- 17
- 18
- 19
- 20
- 21
- 22
- 23
- 24
- 25
- 26
- 27
- 28
- 29
- 30
- 31
- 32
- 33
- 34
- 35
- 36
- 37
- 38
- 39
- 40
- 41
- 42
- 43
- 44
- 45
- 46
- 47
- 48
- 49
- 50
- 51
- 52
- 53


建议写上 Class.forName(“com.mysql.jdbc.Driver”);package com.myjdbc; import com.mysql.jdbc.Driver; import org.junit.jupiter.api.Test; import java.io.FileInputStream; import java.io.IOException; import java.sql.Connection; import java.sql.DriverManager; import java.sql.SQLException; import java.util.Properties; /** * @author * @version 1.0 */ public class JdbcCom { // 方式一 @Test public void connect01() throws SQLException { Driver driver = new Driver(); String url = "jdbc:mysql://localhost:3306/dxl_db01"; Properties properties = new Properties(); properties.setProperty("user","root"); properties.setProperty("password",""); Connection connection = driver.connect(url,properties); System.out.println(connection); } // 方式二 @Test public void connect02() throws ClassNotFoundException, InstantiationException, IllegalAccessException, SQLException { // 使用反射加载Driver类,动态加载,更加灵活,减少依赖性 Class<?> aClass = Class.forName("com.mysql.jdbc.Driver"); Driver driver = (Driver) aClass.newInstance(); String url = "jdbc:mysql://localhost:3306/dxl_db01"; Properties properties = new Properties(); properties.setProperty("user","root"); properties.setProperty("password",""); Connection connection = driver.connect(url,properties); System.out.println(connection); } // 方式三 @Test public void connect03() throws ClassNotFoundException, InstantiationException, IllegalAccessException, SQLException { // 使用DriverManager 替代 Diver 进行统一管理 // 使用反射加载Driver Class<?> aClass = Class.forName("com.mysql.jdbc.Driver"); Driver driver = (Driver) aClass.newInstance(); // 创建 url 和 user 和 password String url = "jdbc:mysql://localhost:3306/dxl_db01"; String user = "root"; String password = ""; DriverManager.registerDriver(driver);//注册Driver驱动 Connection connection = DriverManager.getConnection(url, user, password); System.out.println("第三种方式=" + connection); } // 第四种方式 推荐使用 最多 @Test public void connect04() throws ClassNotFoundException, SQLException { // 使用Class.forName 自动完成注册驱动,简化代码 // 使用反射加载类 /* 源码:1.静态代码块,在类加载时,会执行一次 2. DriverManager.registerDriver(new Driver()); 3.因此注册driver的工作已经完成了 static { try { DriverManager.registerDriver(new Driver()); } catch (SQLException var1) { throw new RuntimeException("Can't register driver!"); } } */ Class.forName("com.mysql.jdbc.Driver"); String url = "jdbc:mysql://localhost:3306/dxl_db01"; String user = "root"; String password = ""; Connection connection = DriverManager.getConnection(url, user, password); System.out.println("第四种方式= " + connection); } // 方式五 @Test public void connect05() throws IOException, ClassNotFoundException, SQLException { // 在方式4的基础上改进,增加配置文件,让连接mysql更加灵活 // 通过properties对象获取配置文件的信息 Properties properties = new Properties(); properties.load(new FileInputStream("src\\mysql.properties")); String user = properties.getProperty("user"); String password = properties.getProperty("password"); String driver = properties.getProperty("driver"); String url = properties.getProperty("url"); Class.forName(driver); Connection connection = DriverManager.getConnection(url, user, password); System.out.println("方式五" + connection); } }- 1
- 2
- 3
- 4
- 5
- 6
- 7
- 8
- 9
- 10
- 11
- 12
- 13
- 14
- 15
- 16
- 17
- 18
- 19
- 20
- 21
- 22
- 23
- 24
- 25
- 26
- 27
- 28
- 29
- 30
- 31
- 32
- 33
- 34
- 35
- 36
- 37
- 38
- 39
- 40
- 41
- 42
- 43
- 44
- 45
- 46
- 47
- 48
- 49
- 50
- 51
- 52
- 53
- 54
- 55
- 56
- 57
- 58
- 59
- 60
- 61
- 62
- 63
- 64
- 65
- 66
- 67
- 68
- 69
- 70
- 71
- 72
- 73
- 74
- 75
- 76
- 77
- 78
- 79
- 80
- 81
- 82
- 83
- 84
- 85
- 86
- 87
- 88
- 89
- 90
- 91
- 92
- 93
- 94
- 95
- 96
- 97
- 98
- 99
- 100
- 101
- 102
- 103
- 104
- 105
- 106
- 107


package com.myjdbc; import java.io.FileInputStream; import java.io.IOException; import java.sql.*; import java.util.Properties; import java.util.Scanner; /** * @author * @version 1.0 */ public class PreparedStatement_ { public static void main(String[] args) throws IOException, ClassNotFoundException, SQLException { Scanner scanner = new Scanner(System.in); // 让用户输入管理员和密码 System.out.println("请输入管理员的名字:");//next接收到’或空格就停止 String admin_name = scanner.nextLine();//如果希望看到SQL注入,就要用nextLine System.out.println("请输入管理员的密码:"); String admin_pwd = scanner.nextLine(); Properties properties = new Properties(); properties.load(new FileInputStream("src\\mysql.properties")); // 获取相关的值 String user = properties.getProperty("user"); String password = properties.getProperty("password"); String driver = properties.getProperty("driver"); String url = properties.getProperty("url"); // 1.注册驱动 Class.forName(driver); // 2.得到连接 Connection connection = DriverManager.getConnection(url,user,password); // 3.得到Statement Statement statement = connection.createStatement(); // 4.组织sql String sql = "select name,pwd from admin where name = '" + admin_name + "'and pwd='" + admin_pwd + "'"; ResultSet resultSet = statement.executeQuery(sql); if (resultSet.next()){//如果查询到一条记录,则说明管理存在 System.out.println("恭喜,登录成功"); }else { System.out.println("对不起,登录失败"); } } }- 1
- 2
- 3
- 4
- 5
- 6
- 7
- 8
- 9
- 10
- 11
- 12
- 13
- 14
- 15
- 16
- 17
- 18
- 19
- 20
- 21
- 22
- 23
- 24
- 25
- 26
- 27
- 28
- 29
- 30
- 31
- 32
- 33
- 34
- 35
- 36
- 37
- 38
- 39
- 40
- 41
- 42
- 43
- 44
- 45
- 46
- 47
- 48
- 49
- 50
- 51
- 52

PreparedStatement
预处理好处
1.不再使用+拼接sql语句,减少语法错误
2.有效的解决了sql注入问题!
3.大大减少了编译次数,效率较高package com.myjdbc; import java.io.FileInputStream; import java.io.IOException; import java.sql.*; import java.util.Properties; import java.util.Scanner; /** * @author * @version 1.0 */ public class PreparedStatement_ { public static void main(String[] args) throws IOException, ClassNotFoundException, SQLException { Scanner scanner = new Scanner(System.in); // 让用户输入管理员和密码 System.out.println("请输入管理员的名字:");//next接收到’或空格就停止 String admin_name = scanner.nextLine();//如果希望看到SQL注入,就要用nextLine System.out.println("请输入管理员的密码:"); String admin_pwd = scanner.nextLine(); Properties properties = new Properties(); properties.load(new FileInputStream("src\\mysql.properties")); // 获取相关的值 String user = properties.getProperty("user"); String password = properties.getProperty("password"); String driver = properties.getProperty("driver"); String url = properties.getProperty("url"); // 1.注册驱动 Class.forName(driver); // 2.得到连接 Connection connection = DriverManager.getConnection(url,user,password); // 3.得到PreparedStatement // 组织sql,sql 语句的 ? 就相当于占位符 String sql = "select name,pwd from admin where name =? and pwd=? "; // preparedStatement 对象实现了 PreparedStement 接口板的实现类的对象 PreparedStatement preparedStatement = connection.prepareStatement(sql); // 给 ? 问号赋值 preparedStatement.setString(1,admin_name); preparedStatement.setString(2,admin_pwd); // 4.执行select语句使用,executeQuery // 如果执行的是 dml(update, insert, delete) executeUpdate() // 这里执行 executeQuery ,不要写sql ResultSet resultSet = preparedStatement.executeQuery(); if (resultSet.next()){//如果查询到一条记录,则说明管理存在 System.out.println("恭喜,登录成功"); }else { System.out.println("对不起,登录失败"); } // 关闭连接 resultSet.close(); preparedStatement.close(); connection.close(); } }- 1
- 2
- 3
- 4
- 5
- 6
- 7
- 8
- 9
- 10
- 11
- 12
- 13
- 14
- 15
- 16
- 17
- 18
- 19
- 20
- 21
- 22
- 23
- 24
- 25
- 26
- 27
- 28
- 29
- 30
- 31
- 32
- 33
- 34
- 35
- 36
- 37
- 38
- 39
- 40
- 41
- 42
- 43
- 44
- 45
- 46
- 47
- 48
- 49
- 50
- 51
- 52
- 53
- 54
- 55
- 56
- 57
- 58
- 59
- 60
- 61
- 62
- 63
package com.myjdbc; import java.io.FileInputStream; import java.io.IOException; import java.sql.*; import java.util.Properties; import java.util.Scanner; /** * @author * @version 1.0 */ public class PreparedStatement_ { public static void main(String[] args) throws IOException, ClassNotFoundException, SQLException { Scanner scanner = new Scanner(System.in); // 让用户输入管理员和密码 System.out.println("请输入管理员的名字:");//next接收到’或空格就停止 String admin_name = scanner.nextLine();//如果希望看到SQL注入,就要用nextLine // System.out.println("请输入管理员的密码:"); // String admin_pwd = scanner.nextLine(); Properties properties = new Properties(); properties.load(new FileInputStream("src\\mysql.properties")); // 获取相关的值 String user = properties.getProperty("user"); String password = properties.getProperty("password"); String driver = properties.getProperty("driver"); String url = properties.getProperty("url"); // 1.注册驱动 Class.forName(driver); // 2.得到连接 Connection connection = DriverManager.getConnection(url,user,password); // 3.得到PreparedStatement // 组织sql,sql 语句的 ? 就相当于占位符 // 添加记录 // String sql = "insert into admin values(?,?)"; // String sql = "update admin set pwd = ? where name = ?"; String sql = "delete from admin where name = ?"; // preparedStatement 对象实现了 PreparedStement 接口板的实现类的对象 PreparedStatement preparedStatement = connection.prepareStatement(sql); // 给 ? 问号赋值 preparedStatement.setString(1,admin_name); // preparedStatement.setString(2,admin_name); // 4.执行select语句使用,executeQuery // 如果执行的是 dml(update, insert, delete) executeUpdate() // 这里执行 executeQuery ,不要写sql // ResultSet resultSet = preparedStatement.executeQuery(); // 执行 dml 语句使用 executeUpdate int rows = preparedStatement.executeUpdate(); System.out.println(rows > 0? "执行成功" : "执行失败"); // 关闭连接 preparedStatement.close(); connection.close(); } }- 1
- 2
- 3
- 4
- 5
- 6
- 7
- 8
- 9
- 10
- 11
- 12
- 13
- 14
- 15
- 16
- 17
- 18
- 19
- 20
- 21
- 22
- 23
- 24
- 25
- 26
- 27
- 28
- 29
- 30
- 31
- 32
- 33
- 34
- 35
- 36
- 37
- 38
- 39
- 40
- 41
- 42
- 43
- 44
- 45
- 46
- 47
- 48
- 49
- 50
- 51
- 52
- 53
- 54
- 55
- 56
- 57
- 58
- 59
- 60
- 61
- 62
- 63
- 64


封装JDBCUtils
说明
在jdbc操作中,获取连接和释放资源是经常使用到,可以将其封装DBC连接的工具类JDBCUtils。

工具类package com.myjdbc; import java.io.FileInputStream; import java.io.IOException; import java.sql.*; import java.util.Properties; /** * @author * @version 1.0 * 这是一个工具类,完成mysql的连接和关闭资源 */ public class JDBCUtils { // 定义相关的属性(4个),因为只需要一份,因此做成static private static String user;//用户名 private static String password;//密码 private static String url;//url private static String driver;//驱动名 // 在static代码块去初始化 static { try { Properties properties = new Properties(); properties.load(new FileInputStream("src\\mysql.properties")); // 读取相关的属性值 user = properties.getProperty("user"); password = properties.getProperty("password"); url = properties.getProperty("url"); driver = properties.getProperty("driver"); } catch (IOException e) { // 在实际开发中,会转成运行异常,抛出去 // 1.将编译异常转成运行异常 // 2.这是调用者,可以选择捕获该异常,也可以选择默认处理该异常,比较方便 throw new RuntimeException(e); } } //连接数据库,返回Connection public static Connection getConnection(){ try { return DriverManager.getConnection(url,user,password); } catch (SQLException e) { throw new RuntimeException(e); } } // 关闭相关资源 /* 1. ResultSet结果集 2. Statement或者PreparedStatement 3.Connection */ public static void close(ResultSet set, Statement statement,Connection connection){ // 判断是够为null try { if (set != null){ set.close(); } if (statement != null){ statement.close(); } if (connection != null){ connection.close(); } } catch (SQLException e) { throw new RuntimeException(e); } } }- 1
- 2
- 3
- 4
- 5
- 6
- 7
- 8
- 9
- 10
- 11
- 12
- 13
- 14
- 15
- 16
- 17
- 18
- 19
- 20
- 21
- 22
- 23
- 24
- 25
- 26
- 27
- 28
- 29
- 30
- 31
- 32
- 33
- 34
- 35
- 36
- 37
- 38
- 39
- 40
- 41
- 42
- 43
- 44
- 45
- 46
- 47
- 48
- 49
- 50
- 51
- 52
- 53
- 54
- 55
- 56
- 57
- 58
- 59
- 60
- 61
- 62
- 63
- 64
- 65
- 66
- 67
- 68
- 69
- 70
- 71
package com.myjdbc; import org.junit.jupiter.api.Test; import java.sql.Connection; import java.sql.PreparedStatement; import java.sql.SQLException; /** * @author * @version 1.0 * 该类演示如何使用JDBC工具类,完成dml和select */ public class JDBCUtils_Use { public static void main(String[] args) { } @Test public void testDML(){//insert,update,delete // 1.得到连接 Connection connection = null; // 2.组织一个sql String sql = "update actor set name = ? where id = ?"; // 3.创建PreparedStatement对象 PreparedStatement preparedStatement = null; try { connection = JDBCUtils.getConnection(); preparedStatement = connection.prepareStatement(sql); // 给占位符赋值 preparedStatement.setString(1,"周星驰"); preparedStatement.setInt(2,3); // 执行 preparedStatement.executeUpdate(); } catch (SQLException e) { e.printStackTrace(); }finally { // 关闭资源 JDBCUtils.close(null,preparedStatement,connection); } } } @Test public void testSelect(){//insert,update,delete // 1.得到连接 Connection connection = null; // 2.组织一个sql // String sql = "select * from actor"; String sql = "select * from actor where id = ?"; // 3.创建PreparedStatement对象 PreparedStatement preparedStatement = null; ResultSet set = null; try { connection = JDBCUtils.getConnection(); preparedStatement = connection.prepareStatement(sql); preparedStatement.setInt(1,2); // 执行 得到结果集 set = preparedStatement.executeQuery(); // 遍历该结果集 while (set.next()){ int id = set.getInt("id"); String name = set.getString("name"); String sex = set.getString("sex"); Date borndate = set.getDate("borndate"); String phone = set.getString("phone"); System.out.println(id + "\t" + name + "\t" + sex + "\t" +borndate + "\t" + phone); } } catch (SQLException e) { e.printStackTrace(); }finally { // 关闭资源 JDBCUtils.close(set,preparedStatement,connection); } }- 1
- 2
- 3
- 4
- 5
- 6
- 7
- 8
- 9
- 10
- 11
- 12
- 13
- 14
- 15
- 16
- 17
- 18
- 19
- 20
- 21
- 22
- 23
- 24
- 25
- 26
- 27
- 28
- 29
- 30
- 31
- 32
- 33
- 34
- 35
- 36
- 37
- 38
- 39
- 40
- 41
- 42
- 43
- 44
- 45
- 46
- 47
- 48
- 49
- 50
- 51
- 52
- 53
- 54
- 55
- 56
- 57
- 58
- 59
- 60
- 61
- 62
- 63
- 64
- 65
- 66
- 67
- 68
- 69
- 70
- 71
- 72
- 73
- 74
- 75
- 76
- 77
- 78
- 79
- 80
- 81
- 82
- 83
- 84
- 85
- 86
- 87
- 88
create table actor( id int primary key auto_increment, name varchar(32) not null default '', sex char(1) not null default '女', borndate datetime, phone varchar(12); ); insert into actor values(null,'jack','男','1990-10-11','113'); create table admin( name varchar(32) not null unique, pwd varchar(32) not null default '' )character set utf8; insert into admin values('tom','123'); -- sql注入 -- 输入用户名为 1' or -- 输入密码 为 or '1' = '1 select * from admin where name = '1' or' and pwd = ' or '1' = '1';- 1
- 2
- 3
- 4
- 5
- 6
- 7
- 8
- 9
- 10
- 11
- 12
- 13
- 14
- 15
- 16
- 17
- 18
- 19
- 20
- 21
- 22
- 23
- 24
- 25
事务
●基本介绍
1 JDBC程序中当一个Connection对象创建时,默认情况下是自动提交事务:每次执行一个SQL语句时,如果执行成功,就会向数据库自动提交,而不能回滚。
2.JDBC程序中为了让多个SQL语句作为一个整体执行,需要使用事务
3.调用Connection的setAutoCommit(false)可以取消自动提交事务
4.在所有的SQL语句都成功执行后,调用Connection的commit();方法提交事务
5.在其中某个操作失败或出现异常时,调用Connection的rollback();方法回滚事务create table ACCOUNT( id int primary key auto_increment, name varchar(32) not null default '', balance double not null default 0 )character set utf8; insert into account values(null,'马云',3000); insert into account values(null,'马化腾',50000); select * from account- 1
- 2
- 3
- 4
- 5
- 6
- 7
- 8
- 9
- 10
package com.myjdbc; import org.junit.jupiter.api.Test; import java.sql.*; /** * @author * @version 1.0 */ public class noTransaction { @Test public void noTransaction(){ // 1.得到连接 Connection connection = null; // 2.组织一个sql // String sql = "select * from actor"; String sql = "update account set balance = balance - 100 where id = 1"; String sql2 = "update account set balance = balance + 100 where id = 2"; // 3.创建PreparedStatement对象 PreparedStatement preparedStatement = null; ResultSet set = null; try { connection = JDBCUtils.getConnection();//默认情况下,自动提交 preparedStatement = connection.prepareStatement(sql); // preparedStatement.setInt(1,2); // set = preparedStatement.executeQuery(); preparedStatement.executeUpdate();// 执行 int i = 1/0;//会抛出异常,后面的语句不会执行 preparedStatement = connection.prepareStatement(sql2); preparedStatement.executeUpdate(); // 遍历该结果集 while (set.next()){ int id = set.getInt("id"); String name = set.getString("name"); String sex = set.getString("sex"); Date borndate = set.getDate("borndate"); String phone = set.getString("phone"); System.out.println(id + "\t" + name + "\t" + sex + "\t" +borndate + "\t" + phone); } } catch (SQLException e) { e.printStackTrace(); }finally { // 关闭资源 JDBCUtils.close(set,preparedStatement,connection); } } // 使用事务解决 @Test public void useTransaction(){ // 1.得到连接 Connection connection = null; // 2.组织一个sql // String sql = "select * from actor"; String sql = "update account set balance = balance - 100 where id = 1"; String sql2 = "update account set balance = balance + 100 where id = 2"; // 3.创建PreparedStatement对象 PreparedStatement preparedStatement = null; ResultSet set = null; try { connection = JDBCUtils.getConnection();//默认情况下,自动提交 // 将connection设置为不自动提交 connection.setAutoCommit(false);//开启事务 preparedStatement = connection.prepareStatement(sql); // preparedStatement.setInt(1,2); // set = preparedStatement.executeQuery(); preparedStatement.executeUpdate();// 执行 // int i = 1/0;//会抛出异常,后面的语句不会执行 preparedStatement = connection.prepareStatement(sql2); preparedStatement.executeUpdate(); // 没有发生异常,提交事务 connection.commit(); } catch (SQLException e) { // 这里进行回滚,即撤销执行的sql语句 System.out.println("执行发生了异常,撤销执行的sql"); try { connection.rollback();//默认回滚到事务开始的状态 } catch (SQLException ex) { ex.printStackTrace(); } e.printStackTrace(); }finally { // 关闭资源 JDBCUtils.close(null,preparedStatement,connection); } } }- 1
- 2
- 3
- 4
- 5
- 6
- 7
- 8
- 9
- 10
- 11
- 12
- 13
- 14
- 15
- 16
- 17
- 18
- 19
- 20
- 21
- 22
- 23
- 24
- 25
- 26
- 27
- 28
- 29
- 30
- 31
- 32
- 33
- 34
- 35
- 36
- 37
- 38
- 39
- 40
- 41
- 42
- 43
- 44
- 45
- 46
- 47
- 48
- 49
- 50
- 51
- 52
- 53
- 54
- 55
- 56
- 57
- 58
- 59
- 60
- 61
- 62
- 63
- 64
- 65
- 66
- 67
- 68
- 69
- 70
- 71
- 72
- 73
- 74
- 75
- 76
- 77
- 78
- 79
- 80
- 81
- 82
- 83
- 84
- 85
- 86
- 87
- 88
- 89
- 90
- 91
- 92
- 93
- 94
- 95
- 96
- 97
- 98
- 99
- 100
- 101
- 102
- 103
- 104
批处理
基本介绍
1.当需要成批插入或者更新记录时。可以采用Java的批量更新机制,这一机制允许多条语句一次性提交给数据库批量处理。通常情况下比单独提交处理更有效率。
2.JDBC的批量处理语句包括下面方法:
addBatch():添加需要批量处理的SQL语句或参数;
executeBatch():执行批量处理语句;
clearBatch():清空批处理包的语句;
3.JDBC连接MySQL时,如果要使用批处理功能,请再url中加参数?rewriteBatchedStatements=true
4.批处理往往和PreparedStatement一起搭配使用,可以既减少编译次数,又减少运行次数,效率大大提高


package com.myjdbc; import org.junit.jupiter.api.Test; import java.sql.Connection; import java.sql.PreparedStatement; import java.sql.SQLException; /** * @author * @version 1.0 */ public class Batch_ { // 传统方法,添加5000条数据到admin2 @Test public void noBatch() throws SQLException { Connection connection = JDBCUtils.getConnection(); String sql = "insert into admin2 values(null,?,?)"; PreparedStatement preparedStatement = connection.prepareStatement(sql); System.out.println("开始执行"); long start = System.currentTimeMillis(); for (int i = 0; i < 500; i ++){ preparedStatement.setString(1,"jack" + i); preparedStatement.setString(2,"666"); preparedStatement.executeUpdate(); } long end = System.currentTimeMillis(); System.out.println("传统方式 耗时= " + (end - start)); // 关闭连接 JDBCUtils.close(null,preparedStatement,connection); } // 批量处理 @Test public void batch() throws SQLException { Connection connection = JDBCUtils.getConnection(); String sql = "insert into admin2 values(null,?,?)"; PreparedStatement preparedStatement = connection.prepareStatement(sql); System.out.println("开始执行"); long start = System.currentTimeMillis(); for (int i = 0; i < 500; i ++){ preparedStatement.setString(1,"jack" + i); preparedStatement.setString(2,"666"); /* //1. //第一就创建 ArrayList - elementData => Object[] //2. elementData => Object[] 就会存放我们预处理的 sql 语句 //3. 当 elementData 满后,就按照 1.5 扩容 //4. 当添加到指定的值后,就 executeBatch //5. 批量处理会减少我们发送 sql 语句的网络开销,而且减少编译次数,因此效率提高 public void addBatch() throws SQLException { synchronized(this.checkClosed().getConnectionMutex()) { if (this.batchedArgs == null) { this.batchedArgs = new ArrayList(); } for(int i = 0; i < this.parameterValues.length; ++i) { this.checkAllParametersSet(this.parameterValues[i], this.parameterStreams[i], i); } this.batchedArgs.add(new PreparedStatement.BatchParams(this.parameterValues, this.parameterStreams, this.isStream, this.streamLengths, this.isNull)); } } */ // 将sql语句加入到批处理包 preparedStatement.addBatch(); // 当有100条记录时,在批量执行 if ((i + 1 )%100 == 0){ preparedStatement.executeBatch(); // 清空一下 preparedStatement.clearBatch(); } // preparedStatement.executeUpdate(); } long end = System.currentTimeMillis(); System.out.println("批量方式 耗时= " + (end - start)); // 关闭连接 JDBCUtils.close(null,preparedStatement,connection); } }- 1
- 2
- 3
- 4
- 5
- 6
- 7
- 8
- 9
- 10
- 11
- 12
- 13
- 14
- 15
- 16
- 17
- 18
- 19
- 20
- 21
- 22
- 23
- 24
- 25
- 26
- 27
- 28
- 29
- 30
- 31
- 32
- 33
- 34
- 35
- 36
- 37
- 38
- 39
- 40
- 41
- 42
- 43
- 44
- 45
- 46
- 47
- 48
- 49
- 50
- 51
- 52
- 53
- 54
- 55
- 56
- 57
- 58
- 59
- 60
- 61
- 62
- 63
- 64
- 65
- 66
- 67
- 68
- 69
- 70
- 71
- 72
- 73
- 74
- 75
- 76
- 77
- 78
- 79
- 80
- 81
- 82
- 83
- 84


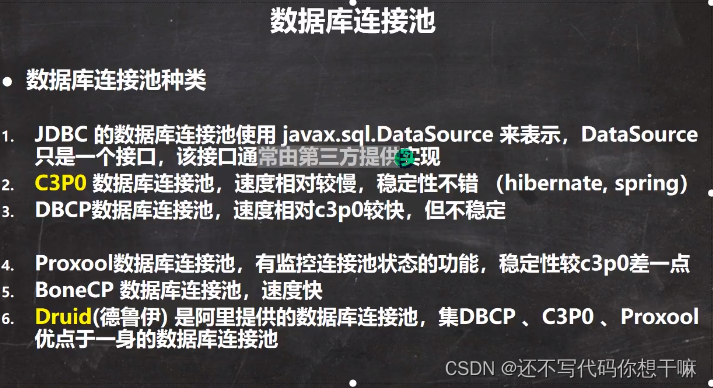
数据库连接池
传统获取Connection问题分析
1.传统的JDBC数据库连接使用 DriverManager来获取,每次向数据库建立连接的时候都要将Connection加载到内存中,再验证IP地址,用户名和密码(0.05S ~1s时间)。需要数据库连接的时候,就向数据库要求一个,频繁的进行数据库连接操作将占用很多的系统资源,容易造成服务器崩溃。
2.每一次数据库连接,使用完后都得断开,如果程序出现异常而未能关闭,将导致数据库内存泄漏,最终将导致重启数据库。
3.传统获取连接的方式,不能控制创建的连接数量,如连接过多,也可能导致内存泄漏,MySQL崩溃。
4.解决传统开发中的数据库连接问题,可以采用数据库连接池技术(connection pool)。数据库连接池
数据库连接池基本介绍
1.预先在缓冲池中放入一定数量的连接,当需要建立数据库连接时,只需从“缓冲池”中取出一个,使用完毕之后再放回去。
2.数据库连接池负责分配、管理和释放数据库连接,它允许应用程序重复使用一个现有的数据库连接,而不是重新建立一个。
3.当应用程序向连接池请求的连接数超过最大连接数量时,这些请求将被加入到等待队列中.


package com.myjdbc; import com.mchange.v2.c3p0.ComboPooledDataSource; import org.junit.jupiter.api.Test; import java.beans.PropertyVetoException; import java.io.FileInputStream; import java.io.IOException; import java.sql.Connection; import java.sql.SQLException; import java.util.Properties; /** * @author * @version 1.0 * 演示C3P0的使用 */ public class C3P0_ { // 方式1:相关参数在程序中指定,user,password,url等 @Test public void testC3P0_01() throws IOException, PropertyVetoException, SQLException { // 创建一个数据源对象 ComboPooledDataSource comboPooledDataSource = new ComboPooledDataSource(); // 通过配置文件mysql.properties 获取相关连接的信息 Properties properties = new Properties(); properties.load(new FileInputStream("src\\mysql.properties")); // 读取相关信息 String user = properties.getProperty("user"); String passwowrd = properties.getProperty("password"); String url = properties.getProperty("url"); String driver = properties.getProperty("driver"); // 给数据源 comboPooledDataSource 设置相关的参数 // 连接的管理是由 comboPooledDataSource 来管理 comboPooledDataSource.setDriverClass(driver); comboPooledDataSource.setJdbcUrl(url); comboPooledDataSource.setUser(user); comboPooledDataSource.setPassword(passwowrd); // 设置初始化连接数 comboPooledDataSource.setInitialPoolSize(1); // 最大连接数 comboPooledDataSource.setMaxPoolSize(5); // 测试连接池的效率,测试对mysql的连接 long start = System.currentTimeMillis(); for (int i = 0; i < 5000; i++) { Connection connection = comboPooledDataSource.getConnection();// 接口实现的方法 System.out.println("连接成功"); connection.close(); } long end = System.currentTimeMillis(); System.out.println("c3p0 5000次连接 耗时 = " + (end - start)); } } // 第二种方式 使用配置文件模板来完成连接 // 将c3p0 提供的 c3p0-config.xml 拷贝到 src 目录下 // 该文件指定了连接数据库和连接池的相关参数 @Test public void testC3P0_02() throws SQLException { ComboPooledDataSource comboPooledDataSource = new ComboPooledDataSource("dxl_db01"); // 连接测试5000次mysql long start = System.currentTimeMillis(); for (int i = 0; i < 5000; i++) { Connection connection = comboPooledDataSource.getConnection(); System.out.println("连接成功"); connection.close(); } long end = System.currentTimeMillis(); System.out.println("c3p0第二种方式 耗时= " + (end - start)); }- 1
- 2
- 3
- 4
- 5
- 6
- 7
- 8
- 9
- 10
- 11
- 12
- 13
- 14
- 15
- 16
- 17
- 18
- 19
- 20
- 21
- 22
- 23
- 24
- 25
- 26
- 27
- 28
- 29
- 30
- 31
- 32
- 33
- 34
- 35
- 36
- 37
- 38
- 39
- 40
- 41
- 42
- 43
- 44
- 45
- 46
- 47
- 48
- 49
- 50
- 51
- 52
- 53
- 54
- 55
- 56
- 57
- 58
- 59
- 60
- 61
- 62
- 63
- 64
- 65
- 66
- 67
- 68
- 69
- 70
- 71
- 72
- 73
- 74
- 75
package com.myjdbc; import com.alibaba.druid.pool.DruidDataSourceFactory; import org.junit.jupiter.api.Test; import javax.sql.DataSource; import java.io.FileInputStream; import java.sql.Connection; import java.util.Properties; /** * @author * @version 1.0 * 测试Druid的使用 */ public class Druid_ { @Test public void testDruid() throws Exception { // 1.加入 Druid jar 包 // 2.加入 配置文件 druid.properties ,将文件拷贝到src 目录 // 3.创建Properties 对象,读取配置文件 Properties properties = new Properties(); properties.load(new FileInputStream("src\\druid.properties")); // 4.创建一个指定参数的数据源 连接池 Druid的连接池 DataSource dataSource = DruidDataSourceFactory.createDataSource(properties); // 测试 long start = System.currentTimeMillis(); for (int i = 0; i < 5000; i++) { Connection connection = dataSource.getConnection(); // System.out.println("连接成功"); connection.close(); } long end = System.currentTimeMillis(); System.out.println("druid 操作5000 耗时=" + (end - start)); } }- 1
- 2
- 3
- 4
- 5
- 6
- 7
- 8
- 9
- 10
- 11
- 12
- 13
- 14
- 15
- 16
- 17
- 18
- 19
- 20
- 21
- 22
- 23
- 24
- 25
- 26
- 27
- 28
- 29
- 30
- 31
- 32
- 33
- 34
- 35
- 36
- 37
- 38
- 39
- 40

package com.myjdbc; import com.alibaba.druid.pool.DruidDataSourceFactory; import javax.sql.DataSource; import java.io.FileInputStream; import java.sql.Connection; import java.sql.ResultSet; import java.sql.SQLException; import java.sql.Statement; import java.util.Properties; /** * @author * @version 1.0 * 基于Druid数据连接池的工具类 */ public class JDBCUtilsByDruid { private static DataSource ds; // 在静态代码块完成 ds初始化 static{ Properties properties = new Properties(); try { properties.load(new FileInputStream("src\\druid.properties")); ds = DruidDataSourceFactory.createDataSource(properties); } catch (Exception e) { throw new RuntimeException(e); } } // 编写getConnection 方法 public static Connection getConnection() throws SQLException { return ds.getConnection(); } // 关闭连接,在数据库连接池技术中的关闭连接,close 不是真的断掉连接 // 而是把使用的Connection 对象放回连接池 public static void close(ResultSet resultSet, Statement statement, Connection connection){ try { if (resultSet != null){ resultSet.close(); } if (statement != null){ statement.close(); } if (connection != null){ connection.close(); } } catch (SQLException e) { throw new RuntimeException(e); } } }- 1
- 2
- 3
- 4
- 5
- 6
- 7
- 8
- 9
- 10
- 11
- 12
- 13
- 14
- 15
- 16
- 17
- 18
- 19
- 20
- 21
- 22
- 23
- 24
- 25
- 26
- 27
- 28
- 29
- 30
- 31
- 32
- 33
- 34
- 35
- 36
- 37
- 38
- 39
- 40
- 41
- 42
- 43
- 44
- 45
- 46
- 47
- 48
- 49
- 50
- 51
- 52
- 53
- 54
- 55
package com.myjdbc; import org.junit.jupiter.api.Test; import java.sql.*; /** * @author * @version 1.0 */ public class JDBCUtilsByDruid_use { @Test public void testSelect(){ // 1.得到连接 Connection connection = null; // 2.组织一个sql String sql = "select * from actor where id = ?"; PreparedStatement preparedStatement = null; ResultSet set = null; // 创建 PreparedStatement 对象 try { connection = JDBCUtilsByDruid.getConnection(); preparedStatement = connection.prepareStatement(sql); preparedStatement.setInt(1,2); // 执行,得到结果集 set = preparedStatement.executeQuery(); // 遍历得到的结果集 while (set.next()){ int id = set.getInt("id"); String name = set.getString("name"); String sex = set.getString("sex"); Date borndate = set.getDate("borndate"); String phone = set.getString("phone"); System.out.println(id + "\t" + name + "\t" + sex + "\t" + borndate + "\t" + phone); } } catch (SQLException e) { e.printStackTrace(); }finally { JDBCUtilsByDruid.close(set,preparedStatement,connection); } } }- 1
- 2
- 3
- 4
- 5
- 6
- 7
- 8
- 9
- 10
- 11
- 12
- 13
- 14
- 15
- 16
- 17
- 18
- 19
- 20
- 21
- 22
- 23
- 24
- 25
- 26
- 27
- 28
- 29
- 30
- 31
- 32
- 33
- 34
- 35
- 36
- 37
- 38
- 39
- 40
- 41
- 42
Apache~DBUtils
先分析一个问题
1.关闭connection后,resultSet结果集无法使用
2.resultSet不利于数据的管理

package com.myjdbc; import org.junit.jupiter.api.Test; import java.sql.*; import java.util.ArrayList; /** * @author * @version 1.0 */ public class JDBCUtilsByDruid_use { @Test public void testSelect(){ // 1.得到连接 Connection connection = null; // 2.组织一个sql String sql = "select * from actor where id = ?"; PreparedStatement preparedStatement = null; ResultSet set = null; // 创建 PreparedStatement 对象 try { connection = JDBCUtilsByDruid.getConnection(); preparedStatement = connection.prepareStatement(sql); preparedStatement.setInt(1,2); // 执行,得到结果集 set = preparedStatement.executeQuery(); // 遍历得到的结果集 while (set.next()){ int id = set.getInt("id"); String name = set.getString("name"); String sex = set.getString("sex"); Date borndate = set.getDate("borndate"); String phone = set.getString("phone"); System.out.println(id + "\t" + name + "\t" + sex + "\t" + borndate + "\t" + phone); } } catch (SQLException e) { e.printStackTrace(); }finally { JDBCUtilsByDruid.close(set,preparedStatement,connection); } } @Test // 使用土方法将ResultSet 封装到 Arraylist 集合中 public ArrayList<Actor> testSelectToArraylist(){ // 1.得到连接 Connection connection = null; // 2.组织一个sql String sql = "select * from actor "; PreparedStatement preparedStatement = null; ResultSet set = null; ArrayList<Actor> list = new ArrayList<>(); // 创建 PreparedStatement 对象 try { connection = JDBCUtilsByDruid.getConnection(); preparedStatement = connection.prepareStatement(sql); // preparedStatement.setInt(1,2); // 执行,得到结果集 set = preparedStatement.executeQuery(); // 遍历得到的结果集 while (set.next()){ int id = set.getInt("id"); String name = set.getString("name"); String sex = set.getString("sex"); Date borndate = set.getDate("borndate"); String phone = set.getString("phone"); // 把得到的resultset记录,封装到 Actor 对象,放入到 list 集合 list.add(new Actor(id, name, sex,borndate, phone)); } System.out.println("list 集合数据 = " + list); for (Actor actor: list){ System.out.println(actor.getSex()); } } catch (SQLException e) { e.printStackTrace(); }finally { JDBCUtilsByDruid.close(set,preparedStatement,connection); } // 因为ArrayList 和 connection 没有任何关联,所以集合可以复用 return list; } }- 1
- 2
- 3
- 4
- 5
- 6
- 7
- 8
- 9
- 10
- 11
- 12
- 13
- 14
- 15
- 16
- 17
- 18
- 19
- 20
- 21
- 22
- 23
- 24
- 25
- 26
- 27
- 28
- 29
- 30
- 31
- 32
- 33
- 34
- 35
- 36
- 37
- 38
- 39
- 40
- 41
- 42
- 43
- 44
- 45
- 46
- 47
- 48
- 49
- 50
- 51
- 52
- 53
- 54
- 55
- 56
- 57
- 58
- 59
- 60
- 61
- 62
- 63
- 64
- 65
- 66
- 67
- 68
- 69
- 70
- 71
- 72
- 73
- 74
- 75
- 76
- 77
- 78
- 79
- 80
- 81
- 82
- 83
- 84
- 85
- 86
- 87
- 88
- 89


package com.myjdbc; import org.apache.commons.dbutils.QueryRunner; import org.apache.commons.dbutils.handlers.BeanHandler; import org.apache.commons.dbutils.handlers.BeanListHandler; import org.apache.commons.dbutils.handlers.ScalarHandler; import org.junit.jupiter.api.Test; import java.sql.Connection; import java.sql.SQLException; import java.util.List; /** * @author * @version 1.0 */ public class DBUtils_use { // 使用apache-DBUtils工具类+druid 完成对表的crud操作 @Test public void testQueryMany() throws SQLException {//返回结果是多行的情况 // 1.得到 连接(druid) Connection connection = JDBCUtilsByDruid.getConnection(); // 2.使用DBUtils 类和接口,先引入DBUtils 相关的 jar,加入到项目中 // 3.创建一个QueryRunner QueryRunner queryRunner = new QueryRunner(); // 4.就可以执行相关的方法,返回一个 Arraylist结果集 String sql = "select * from actor where id >= ?"; // 注意:sql语句也可以查询部分列 // (1)query方法就是执行一个sql语句,得到 resultset 封装到 arrayList集合中 // (2)返回集合 // (3)connection:连接 // (4)sql:执行的sql语句 // (5)new BeanListHandle<>(Actor.class):在将resultset --> Actor 对象 --》 封装到ArrayList // 底层使用反射机制,去获取Actor 类的属性,然后进行封装 // (6)1 就是给sql语句中的?的,可以有多个值,因为是可变参数 // (7)底层得到的resultset 会在query中关闭,关闭preparedstement /* privateT query(Connection conn, boolean closeConn, String sql, ResultSetHandler List<Actor> list = queryRunner.query(connection, sql, new BeanListHandler<>(Actor.class), 1); System.out.println("输出集合的信息"); for (Actor actor : list){ System.out.println(actor); } // 释放资源 JDBCUtilsByDruid.close(null,null,connection); } //演示 apache-dbutils + druid 完成返回的结果是单行记录(单个对象) @Test public void testQuerySingle() throws SQLException { // 1.得到 连接(druid) Connection connection = JDBCUtilsByDruid.getConnection(); // 2.使用DBUtils 类和接口,先引入DBUtils 相关的 jar,加入到项目中 // 3.创建一个QueryRunner QueryRunner queryRunner = new QueryRunner(); // 4.就可以执行相关的方法,返回单个对象 String sql = "select * from actor where id = ?"; Actor actor = queryRunner.query(connection, sql, new BeanHandler<>(Actor.class), 2); System.out.println(actor); // 释放资源 JDBCUtilsByDruid.close(null,null,connection); } // 演示apache-dbutils + druid完成查询结果是单行单列-返回的就是object @Test public void testScalar() throws SQLException { // 1.得到 连接(druid) Connection connection = JDBCUtilsByDruid.getConnection(); // 2.使用DBUtils 类和接口,先引入DBUtils 相关的 jar,加入到项目中 // 3.创建一个QueryRunner QueryRunner queryRunner = new QueryRunner(); // 4.就可以执行相关的方法,返回单个对象 String sql = "select name from actor where id = ?"; // 因为返回的是一个对象,使用的Handler 是 ScalarHandler Object actor = queryRunner.query(connection, sql, new ScalarHandler(), 2); System.out.println(actor); // 释放资源 JDBCUtilsByDruid.close(null,null,connection); } @Test // 演示apache-dbutils + druid完成 dml (update,insert ,delete) public void testDML() throws SQLException { Connection connection = JDBCUtilsByDruid.getConnection(); QueryRunner queryRunner = new QueryRunner(); // 组织sql语句,完成update,insert,delete // String sql = "update actor set name = ? where id = ?"; // String sql = "insert into actor values(null,'林青霞','女','1996-10-10')"; // String sql = "insert into actor values(null,?,?,?,?)"; String sql = "delete from actor where id = ?"; //(1)执行dml操作是queryRunner. update() // (2)返回的值是受影响的行数 // int affectedRow = queryRunner.update(connection, sql, "张三丰", 2); // int affectedRow = queryRunner.update(connection, sql, "林青霞","女","1996-10-10","123"); int affectedRow = queryRunner.update(connection, sql, 2); System.out.println(affectedRow > 0? "执行成功" : "执行没有影响到表"); JDBCUtilsByDruid.close(null,null,connection); } }rsh, Object... params) throws SQLException { if (conn == null) { throw new SQLException("Null connection"); } else if (sql == null) { if (closeConn) { this.close(conn); } throw new SQLException("Null SQL statement"); } else if (rsh == null) { if (closeConn) { this.close(conn); } throw new SQLException("Null ResultSetHandler"); } else { PreparedStatement stmt = null;//定义PreparedStatement对象 ResultSet rs = null;//接收返回的 ResultSet Object result = null;//返回ArrayList try { stmt = this.prepareStatement(conn, sql);//创建prepareStatement this.fillStatement(stmt, params);//对sql 进行? 赋值 rs = this.wrap(stmt.executeQuery());//执行sql, 返回 resultset result = rsh.handle(rs);//返回的resultset -- 》ArrayList 使用到反射 } catch (SQLException var33) { this.rethrow(var33, sql, params); } finally { try { this.close(rs);//关闭resultset } finally { this.close(stmt);//关闭prepareStatement if (closeConn) { this.close(conn); } } } return result; } } */ - 1
- 2
- 3
- 4
- 5
- 6
- 7
- 8
- 9
- 10
- 11
- 12
- 13
- 14
- 15
- 16
- 17
- 18
- 19
- 20
- 21
- 22
- 23
- 24
- 25
- 26
- 27
- 28
- 29
- 30
- 31
- 32
- 33
- 34
- 35
- 36
- 37
- 38
- 39
- 40
- 41
- 42
- 43
- 44
- 45
- 46
- 47
- 48
- 49
- 50
- 51
- 52
- 53
- 54
- 55
- 56
- 57
- 58
- 59
- 60
- 61
- 62
- 63
- 64
- 65
- 66
- 67
- 68
- 69
- 70
- 71
- 72
- 73
- 74
- 75
- 76
- 77
- 78
- 79
- 80
- 81
- 82
- 83
- 84
- 85
- 86
- 87
- 88
- 89
- 90
- 91
- 92
- 93
- 94
- 95
- 96
- 97
- 98
- 99
- 100
- 101
- 102
- 103
- 104
- 105
- 106
- 107
- 108
- 109
- 110
- 111
- 112
- 113
- 114
- 115
- 116
- 117
- 118
- 119
- 120
- 121
- 122
- 123
- 124
- 125
- 126
- 127
- 128
- 129
- 130
- 131
- 132
- 133
- 134
- 135
- 136
- 137
- 138
- 139
- 140
- 141
- 142
- 143
- 144
- 145
- 146
- 147
- 148
- 149
- 150
- 151
- 152
- 153
- 154
- 155
- 156
- 157
- 158
- 159
- 160
- 161
- 162
- 163
- 164
- 165
- 166
- 167
- 168


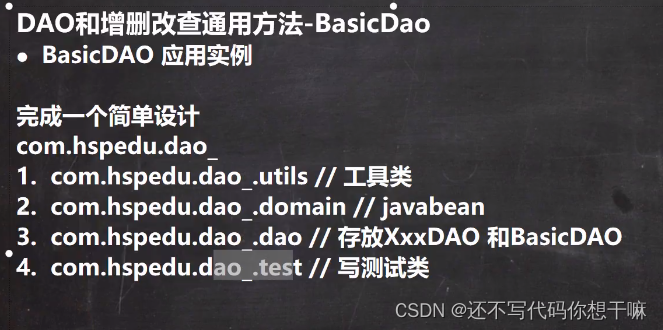


package com.dao_.utils; import com.alibaba.druid.pool.DruidDataSourceFactory; import javax.sql.DataSource; import java.io.FileInputStream; import java.sql.Connection; import java.sql.ResultSet; import java.sql.SQLException; import java.sql.Statement; import java.util.Properties; /** * @author * @version 1.0 * 基于Druid数据连接池的工具类 */ public class JDBCUtilsByDruid { private static DataSource ds; // 在静态代码块完成 ds初始化 static{ Properties properties = new Properties(); try { properties.load(new FileInputStream("src\\druid.properties")); ds = DruidDataSourceFactory.createDataSource(properties); } catch (Exception e) { throw new RuntimeException(e); } } // 编写getConnection 方法 public static Connection getConnection() throws SQLException { return ds.getConnection(); } // 关闭连接,在数据库连接池技术中的关闭连接,close 不是真的断掉连接 // 而是把使用的Connection 对象放回连接池 public static void close(ResultSet resultSet, Statement statement, Connection connection){ try { if (resultSet != null){ resultSet.close(); } if (statement != null){ statement.close(); } if (connection != null){ connection.close(); } } catch (SQLException e) { throw new RuntimeException(e); } } }- 1
- 2
- 3
- 4
- 5
- 6
- 7
- 8
- 9
- 10
- 11
- 12
- 13
- 14
- 15
- 16
- 17
- 18
- 19
- 20
- 21
- 22
- 23
- 24
- 25
- 26
- 27
- 28
- 29
- 30
- 31
- 32
- 33
- 34
- 35
- 36
- 37
- 38
- 39
- 40
- 41
- 42
- 43
- 44
- 45
- 46
- 47
- 48
- 49
- 50
- 51
- 52
- 53
- 54
- 55
package com.dao_.domain; import java.util.Date; /** * @author * @version 1.0 * Actor 对象 和 actor 表记录对应 */ public class Actor {//Javaben, POJO, Domain对象 private Integer id; private String name; private String sex; private Date borndate; private String phone; public Actor() {//一定要给一个无参构造器【反射需要】 } public Actor(Integer id, String name, String sex, Date borndate, String phone) { this.id = id; this.name = name; this.sex = sex; this.borndate = borndate; this.phone = phone; } public Integer getId() { return id; } public void setId(Integer id) { this.id = id; } public String getName() { return name; } public void setName(String name) { this.name = name; } public String getSex() { return sex; } public void setSex(String sex) { this.sex = sex; } public Date getBorndate() { return borndate; } public void setBorndate(Date borndate) { this.borndate = borndate; } public String getPhone() { return phone; } public void setPhone(String phone) { this.phone = phone; } @Override public String toString() { return "Actor{" + "id=" + id + ", name='" + name + '\'' + ", sex='" + sex + '\'' + ", borndate=" + borndate + ", phone='" + phone + '\'' + '}'; } }- 1
- 2
- 3
- 4
- 5
- 6
- 7
- 8
- 9
- 10
- 11
- 12
- 13
- 14
- 15
- 16
- 17
- 18
- 19
- 20
- 21
- 22
- 23
- 24
- 25
- 26
- 27
- 28
- 29
- 30
- 31
- 32
- 33
- 34
- 35
- 36
- 37
- 38
- 39
- 40
- 41
- 42
- 43
- 44
- 45
- 46
- 47
- 48
- 49
- 50
- 51
- 52
- 53
- 54
- 55
- 56
- 57
- 58
- 59
- 60
- 61
- 62
- 63
- 64
- 65
- 66
- 67
- 68
- 69
- 70
- 71
- 72
- 73
- 74
- 75
- 76
- 77
- 78
- 79
package com.dao_.dao; import com.myjdbc.JDBCUtilsByDruid; import org.apache.commons.dbutils.QueryRunner; import org.apache.commons.dbutils.handlers.BeanHandler; import org.apache.commons.dbutils.handlers.BeanListHandler; import org.apache.commons.dbutils.handlers.ScalarHandler; import java.sql.Connection; import java.sql.SQLException; import java.util.List; /** * @author * @version 1.0 * 开发BasicDAO,是其他DAO的父类 */ public class BasicDAO<T> {//泛型 指定具体类型 private QueryRunner qr = new QueryRunner(); // 开发通用的dml,针对任意的表 public int update(String sql,Object... parameters){ Connection connection = null; try { connection = JDBCUtilsByDruid.getConnection(); int update = qr.update(connection, sql, parameters); return update; } catch (SQLException e) { throw new RuntimeException(e);//将编译异常转成运行异常 }finally { JDBCUtilsByDruid.close(null,null,connection); } } // 返回多个对象(机查询的结果是多行的),针对任意表 /** * * @param sql sql语句,可以有? * @param clazz 传入一个类的Class对象比如 Actor.class * @param parameters 传入?的具体的值,可以是多个 * @return 根据Actor.class 返回对应的 ArrayList集合 */ public List<T> queryMulti(String sql,Class<T> clazz, Object... parameters){ Connection connection = null; try { connection = JDBCUtilsByDruid.getConnection(); return qr.query(connection, sql, new BeanListHandler<T>(clazz), parameters); } catch (SQLException e) { throw new RuntimeException(e); }finally { JDBCUtilsByDruid.close(null,null,connection); } } // 查询单行结果 public T querySingle(String sql, Class<T> clazz, Object... parameters){ Connection connection = null; try { connection = JDBCUtilsByDruid.getConnection(); return qr.query(connection,sql, new BeanHandler<T>(clazz), parameters); } catch (SQLException e) { throw new RuntimeException(e); }finally { JDBCUtilsByDruid.close(null,null,connection); } } // 查询单行单列的方法,即返回单值的方法 public Object queryScalar(String sql,Object... parameters){ Connection connection = null; try { connection = JDBCUtilsByDruid.getConnection(); return qr.query(connection,sql,new ScalarHandler(),parameters); } catch (SQLException e) { throw new RuntimeException(e); }finally { JDBCUtilsByDruid.close(null,null,connection); } } }- 1
- 2
- 3
- 4
- 5
- 6
- 7
- 8
- 9
- 10
- 11
- 12
- 13
- 14
- 15
- 16
- 17
- 18
- 19
- 20
- 21
- 22
- 23
- 24
- 25
- 26
- 27
- 28
- 29
- 30
- 31
- 32
- 33
- 34
- 35
- 36
- 37
- 38
- 39
- 40
- 41
- 42
- 43
- 44
- 45
- 46
- 47
- 48
- 49
- 50
- 51
- 52
- 53
- 54
- 55
- 56
- 57
- 58
- 59
- 60
- 61
- 62
- 63
- 64
- 65
- 66
- 67
- 68
- 69
- 70
- 71
- 72
- 73
- 74
- 75
- 76
- 77
- 78
- 79
- 80
- 81
- 82
- 83
- 84
- 85
- 86
- 87
package com.dao_.dao; /** * @author * @version 1.0 */ public class ActorDAO extends BasicDAO{ // 1.有 BasicDAO 的方法 // 2.根据业务需求写特有方法 }- 1
- 2
- 3
- 4
- 5
- 6
- 7
- 8
- 9
- 10
package com.dao_.test; import com.dao_.dao.ActorDAO; import com.dao_.domain.Actor; import org.junit.jupiter.api.Test; import java.util.List; /** * @author * @version 1.0 */ public class TestDAO { @Test public void testActorDAO(){ ActorDAO actorDAO = new ActorDAO(); // 1.查询 List<Actor> actors = actorDAO.queryMulti(" select * from actor where id >= ?", Actor.class, 1); System.out.println("查询结束:"); for (Actor actor : actors){ System.out.println(actor); } // 查询单行记录 Actor actor = (Actor) actorDAO.querySingle("select * from actor where id = ?" , Actor.class,3); System.out.println("查询结果:"); System.out.println(actor); // 查询单行单列 Object o = actorDAO.queryScalar("select name from actor where id = ?", 3); System.out.println("单列结果:"); System.out.println(o); // dml 操作,insert,update,delete int update = actorDAO.update("insert into actor values(null,?,?,?,?)", "悦悦", "女", "1995-12-12", "156"); if (update > 0){ System.out.println("执行成功"); }else{ System.out.println("执行没有影响"); } } }- 1
- 2
- 3
- 4
- 5
- 6
- 7
- 8
- 9
- 10
- 11
- 12
- 13
- 14
- 15
- 16
- 17
- 18
- 19
- 20
- 21
- 22
- 23
- 24
- 25
- 26
- 27
- 28
- 29
- 30
- 31
- 32
- 33
- 34
- 35
- 36
- 37
- 38
- 39
- 40
- 41
- 42
- 43
- 44
- 45
- 46
- 47
正则表达式

为什么要学习正则表达式
解决之道-正则表达式
1.为了解决上述问题,Java提供了正则表达式技术,专门用于处理类似文本处·理问题
2.简单的说:正则表达式是对字符串执行模式匹配的技术。
3.正则表达式:regular expression =》RegExp

package regexp; import java.util.regex.Matcher; import java.util.regex.Pattern; /** * @author * @version 1.0 * 正则表达式给文本处理带来的便利 */ public class Regexp_ { public static void main(String[] args) { // 假定从百度获取到的文本 // String content = "1995年,互联网的蓬勃发展给了Oak机会。业界为了使死板、单调的静态网页能够“灵" + // "活”起来,急需一种软件技术来开发一种程序,这种程序可以通过网络传播并且能够跨平台运行。于是," + // "世界各大IT企业为此纷纷投入了大量的人力、物力和财力。这个时候,Sun公司想起了那个被搁置起来" + // "很久的Oak,并且重新审视了那个用软件编写的试验平台,由于它是按照嵌入式系统硬件平台体系结构进行" + // "编写的,所以非常小,特别适用于网络上的传输系统,而Oak也是一种精简的语言,程序非常小,适合在网" + // "络上传输。Sun公司首先推出了可以嵌入网页并且可以随同网页在网络上传输的Applet(Applet是一种将" + // "小程序嵌入到网页中进行执行的技术),并将Oak更名为Java。5月23日,Sun公司在Sun world会议上正" + // "式发布Java和HotJava浏览器。IBM、Apple、DEC、Adobe、HP、Oracle、Netscape和微软等各大公司" + // "都纷纷停止了自己的相关开发项目,竞相购买了Java使用许可证,并为自己的产品开发了相应的Java平台。"; String content = "私有地址(Private address)属于非注册地址,专门为组织机构内部使用。\n" + "以下列出留用的内部私有地址\n" + "A类 10.0.0.0--10.255.255.255\n" + "B类 172.16.0.0--172.31.255.255\n" + "C类 192.168.0.0--192.168.255.255"; // 提取文章中所有的英文单词 // 1.传统方式,使用遍历方式,代码量大,效率不高 // 2.正则表达式技术 // 创建一个Pattern对象, 模式对象,可以理解成一个正则表达式对象 // Pattern pattern = Pattern.compile("[a-zA-Z]+"); // Pattern pattern = Pattern.compile("[0-9]+"); // Pattern pattern = Pattern.compile("([0-9]+)|([a-zA-Z]+)"); // Pattern pattern = Pattern.compile(" Pattern pattern = Pattern.compile("\\d+\\.\\d+\\.\\d+\\.\\d+"); // 创建匹配器对象 // 匹配器matcher 按照 pattern(模式/样式),到content 文本中去匹配 // 找到就返回true,否则就返回false Matcher matcher = pattern.matcher(content); // 开始循环匹配 while (matcher.find()){ // 匹配内容,文本 放到 m.group(0) System.out.println("找到:" + matcher.group(0)); // System.out.println("找到:" + matcher.group(1));//取标题 } } }- 1
- 2
- 3
- 4
- 5
- 6
- 7
- 8
- 9
- 10
- 11
- 12
- 13
- 14
- 15
- 16
- 17
- 18
- 19
- 20
- 21
- 22
- 23
- 24
- 25
- 26
- 27
- 28
- 29
- 30
- 31
- 32
- 33
- 34
- 35
- 36
- 37
- 38
- 39
- 40
- 41
- 42
- 43
- 44
- 45
- 46
- 47
- 48
- 49
- 50
- 51
- 52
- 53
- 54
- 55
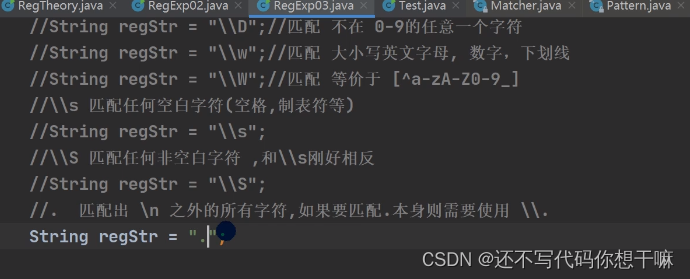
\d 表示任意的数字0-9之间


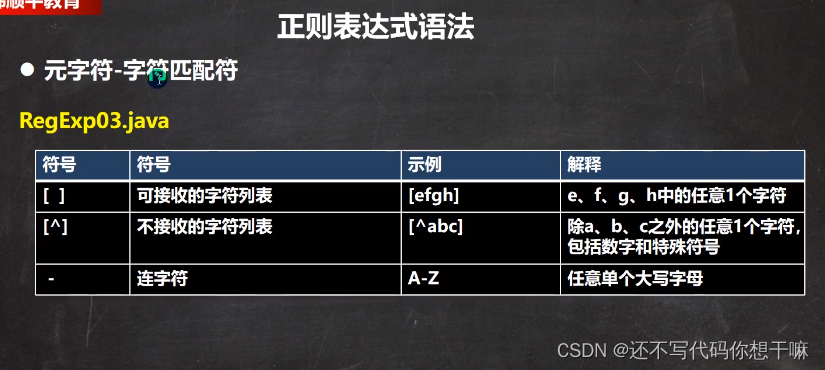
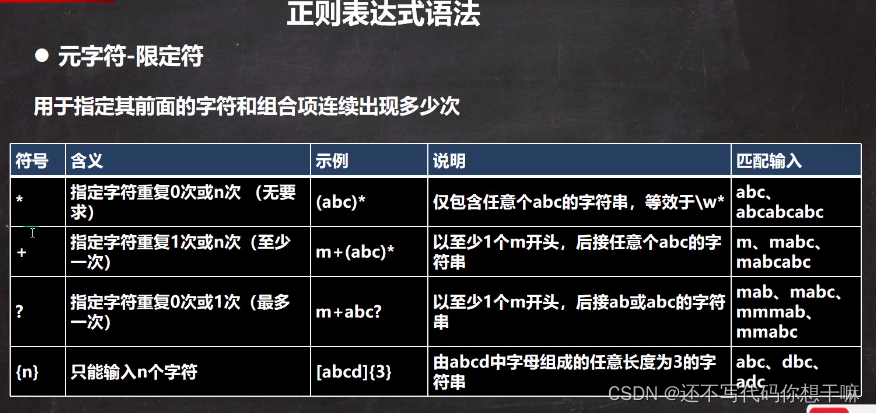
正则表达式语法
基本介绍
如果要想灵活的运用正则表达式,必须了解其中各种元字符的功能,元字符从功能上大致分为:
1.限定符
2.选择匹配符
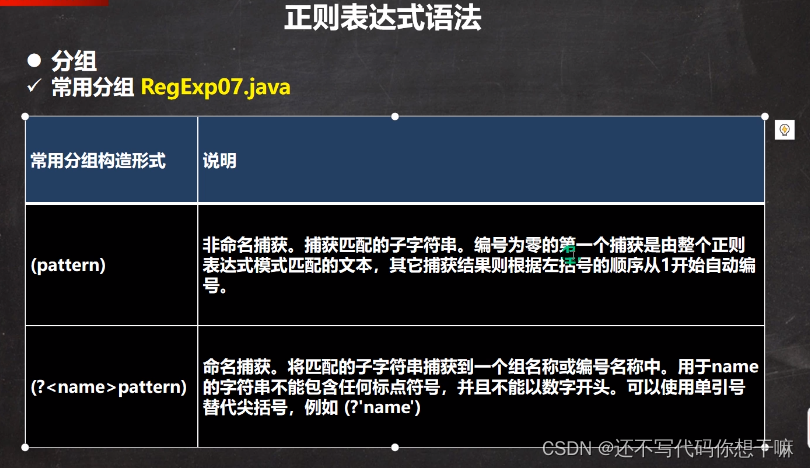
3.分组组合和反向引用符
4.特殊字符
5.字符匹配符
6.定位符

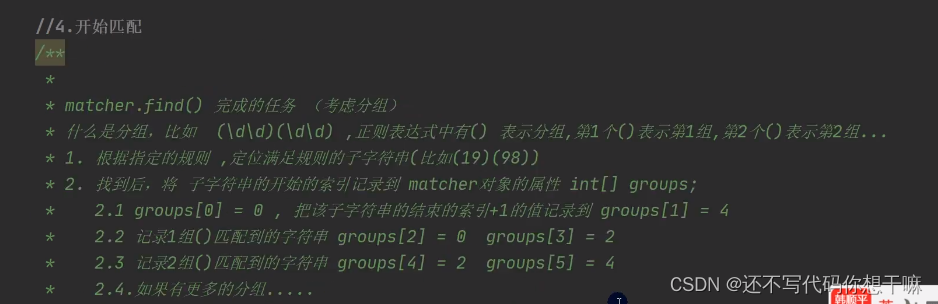
* 分析 java 的正则表达式的底层实现(重要.) */ public class RegTheory { public static void main(String[] args) { String content = "1998 年 12 月 8 日,第二代 Java 平台的企业版 J2EE 发布。1999 年 6 月,Sun 公司发布了" + "第二代 Java 平台(简称为 Java2)的 3 个版本:J2ME(Java2 Micro Edition,Java2 平台的微型" + "版),应用于移动、无线及有限资源的环境;J2SE(Java 2 Standard Edition,Java 2 平台的" + "标准版),应用于桌面环境;J2EE(Java 2Enterprise Edition,Java 2 平台的企业版),应" + "用 3443 于基于 Java 的应用服务器。Java 2 平台的发布,是 Java 发展过程中最重要的一个" + "里程碑,标志着 Java 的应用开始普及 9889 "; //目标:匹配所有四个数字 //说明 //1. \\d 表示一个任意的数字 String regStr = "(\\d\\d)(\\d\\d)"; //2. 创建模式对象[即正则表达式对象] Pattern pattern = Pattern.compile(regStr); //3. 创建匹配器 //说明:创建匹配器 matcher, 按照 正则表达式的规则 去匹配 content 字符串 Matcher matcher = pattern.matcher(content); //4.开始匹配 /** * * matcher.find() 完成的任务 (考虑分组) * 什么是分组,比如 (\d\d)(\d\d) ,正则表达式中有() 表示分组,第 1 个()表示第 1 组,第 2 个()表示第 2 组... * 1. 根据指定的规则 ,定位满足规则的子字符串(比如(19)(98)) * 2. 找到后,将 子字符串的开始的索引记录到 matcher 对象的属性 int[] groups; * 2.1 groups[0] = 0 , 把该子字符串的结束的索引+1 的值记录到 groups[1] = 4 * 2.2 记录 1 组()匹配到的字符串 groups[2] = 0 groups[3] = 2 * 2.3 记录 2 组()匹配到的字符串 groups[4] = 2 groups[5] = 4 * 2.4.如果有更多的分组..... * 3. 同时记录 oldLast 的值为 子字符串的结束的 索引+1 的值即 35, 即下次执行 find 时,就从 35 开始匹 配 * * matcher.group(0) 分析 * * 源码: * public String group(int group) { * if (first < 0) * throw new IllegalStateException("No match found"); * if (group < 0 || group > groupCount()) * throw new IndexOutOfBoundsException("No group " + group); * if ((groups[group*2] == -1) || (groups[group*2+1] == -1)) * return null; * return getSubSequence(groups[group * 2], groups[group * 2 + 1]).toString(); * } * 1. 根据 groups[0]=31 和 groups[1]=35 的记录的位置,从 content 开始截取子字符串返回 * 就是 [31,35) 包含 31 但是不包含索引为 35 的位置 * * 如果再次指向 find 方法.仍然安上面分析来执行 */ while (matcher.find()) { //小结 //1. 如果正则表达式有() 即分组 //2. 取出匹配的字符串规则如下 //3. group(0) 表示匹配到的子字符串 //4. group(1) 表示匹配到的子字符串的第一组字串 //5. group(2) 表示匹配到的子字符串的第 2 组字串 //6. ... 但是分组的数不能越界. System.out.println("找到: " + matcher.group(0)); System.out.println("第 1 组()匹配到的值=" + matcher.group(1)); System.out.println("第 2 组()匹配到的值=" + matcher.group(2)); } } }- 1
- 2
- 3
- 4
- 5
- 6
- 7
- 8
- 9
- 10
- 11
- 12
- 13
- 14
- 15
- 16
- 17
- 18
- 19
- 20
- 21
- 22
- 23
- 24
- 25
- 26
- 27
- 28
- 29
- 30
- 31
- 32
- 33
- 34
- 35
- 36
- 37
- 38
- 39
- 40
- 41
- 42
- 43
- 44
- 45
- 46
- 47
- 48
- 49
- 50
- 51
- 52
- 53
- 54
- 55
- 56
- 57
- 58
- 59
- 60
- 61
package regexp; import java.util.regex.Matcher; import java.util.regex.Pattern; /** * @author * @version 1.0 * 正则表达式给文本处理带来的便利 */ public class Regexp_ { public static void main(String[] args) { String content = "abc$(abc(123("; // 匹配( String regStr = "\\("; Pattern pattern = Pattern.compile(regStr); Matcher matcher = pattern.matcher(content); while (matcher.find()){ System.out.println("找到 " + matcher.group(0)); } } }- 1
- 2
- 3
- 4
- 5
- 6
- 7
- 8
- 9
- 10
- 11
- 12
- 13
- 14
- 15
- 16
- 17
- 18
- 19
- 20
- 21
- 22
- 23
- 24
- 25


package regexp; import java.util.regex.Matcher; import java.util.regex.Pattern; /** * @author * @version 1.0 * 正则表达式给文本处理带来的便利 */ public class Regexp_ { public static void main(String[] args) { String content = "abc$(abcABC(1.23("; // 匹配( // String regStr = "[a-z]";//不带+表示匹配任意一个字符 // String regStr = "[a-z]+"; // String regStr = "abc"; //默认区分大小写 // String regStr = "(?i)abc"; //不区分大小写 String regStr = "[^a-z]"; //匹配不是a-z之间的字符 Pattern pattern = Pattern.compile(regStr); // 1,当创建Pattern对象时,指定Pattern.CASE_INSENSITIVE,表示匹配是不区分字母大小写. // Pattern pattern = Pattern.compile(regStr,Pattern.CASE_INSENSITIVE); Matcher matcher = pattern.matcher(content); while (matcher.find()){ System.out.println("找到 " + matcher.group(0)); } } }- 1
- 2
- 3
- 4
- 5
- 6
- 7
- 8
- 9
- 10
- 11
- 12
- 13
- 14
- 15
- 16
- 17
- 18
- 19
- 20
- 21
- 22
- 23
- 24
- 25
- 26
- 27
- 28
- 29
- 30
- 31
- 32
- 33


package regexp; import java.util.regex.Matcher; import java.util.regex.Pattern; /** * @author * @version 1.0 * 正则表达式给文本处理带来的便利 */ public class Regexp_ { public static void main(String[] args) { String content = "adfhj以非法比较好吧 VN"; String regStr = "ad|非|好"; Pattern pattern = Pattern.compile(regStr); Matcher matcher = pattern.matcher(content); while (matcher.find()){ System.out.println("找到 " + matcher.group(0)); } } }- 1
- 2
- 3
- 4
- 5
- 6
- 7
- 8
- 9
- 10
- 11
- 12
- 13
- 14
- 15
- 16
- 17
- 18
- 19
- 20
- 21
- 22
- 23
- 24
- 25
- 26


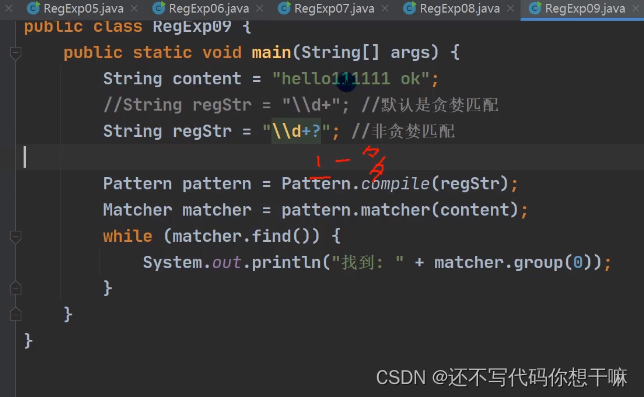
package regexp; import java.util.regex.Matcher; import java.util.regex.Pattern; /** * @author * @version 1.0 * 正则表达式给文本处理带来的便利 */ public class Regexp_ { public static void main(String[] args) { String content = "11111111111111aaaaaaa11"; // String regStr = "a{3}"; String regStr = "a{3,4}"; // java匹配是贪婪匹配,即尽可能的匹配多的 Pattern pattern = Pattern.compile(regStr); Matcher matcher = pattern.matcher(content); while (matcher.find()){ System.out.println("找到 " + matcher.group(0)); } } }- 1
- 2
- 3
- 4
- 5
- 6
- 7
- 8
- 9
- 10
- 11
- 12
- 13
- 14
- 15
- 16
- 17
- 18
- 19
- 20
- 21
- 22
- 23
- 24
- 25
- 26
- 27
- 28


package regexp; import java.util.regex.Matcher; import java.util.regex.Pattern; /** * @author * @version 1.0 * 正则表达式给文本处理带来的便利 */ public class Regexp_ { public static void main(String[] args) { String content = "1bc23abc"; // 以至少1个数字开头,后接任意个小写字母的字符串 // String regStr = "^[0-9]+[a-z]*"; // java匹配是贪婪匹配,即尽可能的匹配多的 // 以至少1个数字开头,必须以至少一个小写字母结束 // String regStr = "^[0-9]+[a-z]+$"; // String regStr = "^[0-9]+\\-[a-z]+$"; //表示匹配边界的bc[这里的边界是指:被匹配的字符串最后, // 也可以是空格的子字符串的后面] String regStr = "bc\\b"; Pattern pattern = Pattern.compile(regStr); Matcher matcher = pattern.matcher(content); while (matcher.find()){ System.out.println("找到 " + matcher.group(0)); } } }- 1
- 2
- 3
- 4
- 5
- 6
- 7
- 8
- 9
- 10
- 11
- 12
- 13
- 14
- 15
- 16
- 17
- 18
- 19
- 20
- 21
- 22
- 23
- 24
- 25
- 26
- 27
- 28
- 29
- 30
- 31
- 32
- 33
- 34
- 35
package regexp; import java.util.regex.Matcher; import java.util.regex.Pattern; /** * @author * @version 1.0 * 正则表达式给文本处理带来的便利 */ public class Regexp_ { public static void main(String[] args) { String content = "ahfeh 4895cj sds1112fb"; // String regStr = "(\\d\\d)(\\d\\d)"; String regStr = "(?\\d\\d)(? ; // 1. matcher.group(0)得到匹配到的字符串 // 2. matcher.group(1)得到匹配到的字符串的第1个分组内容 // 3. matcher. group(2)得到匹配到的字符串的第2个分组内容 Pattern pattern = Pattern.compile(regStr); Pattern pattern = Pattern.compile(regStr); Matcher matcher = pattern.matcher(content); while (matcher.find()){ System.out.println("找到=" + matcher.group(0)); System.out.println("找到=" + matcher.group(1)); System.out.println("找到(通过组名)=" + matcher.group("g1")); System.out.println("找到=" + matcher.group(2)); } } }\\d\\d)" - 1
- 2
- 3
- 4
- 5
- 6
- 7
- 8
- 9
- 10
- 11
- 12
- 13
- 14
- 15
- 16
- 17
- 18
- 19
- 20
- 21
- 22
- 23
- 24
- 25
- 26
- 27
- 28
- 29
- 30
- 31
- 32
- 33

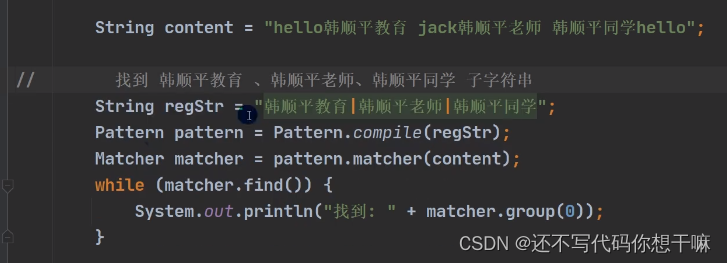
package regexp; import java.util.regex.Matcher; import java.util.regex.Pattern; /** * @author * @version 1.0 * 正则表达式给文本处理带来的便利 */ public class Regexp_ { public static void main(String[] args) { String content = "hello韩顺平教育 jack韩顺平老师 韩顺平同学hello\n"; // String regStr = "韩顺平教育|韩顺平老师|韩顺平同学"; //上面的写法可以等价非捕获分组,注意:不能matcher.group(1) // String regStr = "韩顺平(?:教育|老师|同学)"; // String regStr = "韩顺平(?=教育|老师)"; String regStr = "韩顺平(?!教育|老师)"; Pattern pattern = Pattern.compile(regStr); Matcher matcher = pattern.matcher(content); while (matcher.find()){ System.out.println("找到=" + matcher.group(0)); } } }- 1
- 2
- 3
- 4
- 5
- 6
- 7
- 8
- 9
- 10
- 11
- 12
- 13
- 14
- 15
- 16
- 17
- 18
- 19
- 20
- 21
- 22
- 23
- 24
- 25
- 26
- 27
- 28
- 29
- 30
- 31

package regexp; import java.util.regex.Matcher; import java.util.regex.Pattern; /** * @author * @version 1.0 * 正则表达式应用实例 */ public class Regexp_ { public static void main(String[] args) { // String content = "的接口监控杆"; // String content = "123456"; String content = "15487965211"; // 汉字 ^和$是定位符 // String regStr = "^[\u0391-\uffe5]+$"; // 邮政编码 // String regStr = "^[1-9]\\d{5}$"; // qq号 // String regStr = "^[1-9]\\d{4,9}$"; // 手机号码 String regStr = "^1[3|4|5|8]\\d{9}$"; Pattern pattern = Pattern.compile(regStr); Matcher matcher = pattern.matcher(content); if (matcher.find()) { System.out.println("满足格式"); }else{ System.out.println("不满足格式"); } } }- 1
- 2
- 3
- 4
- 5
- 6
- 7
- 8
- 9
- 10
- 11
- 12
- 13
- 14
- 15
- 16
- 17
- 18
- 19
- 20
- 21
- 22
- 23
- 24
- 25
- 26
- 27
- 28
- 29
- 30
- 31
- 32
- 33
- 34
- 35
- 36
- 37
- 38
- 39
- 40


package regexp; import java.util.regex.Matcher; import java.util.regex.Pattern; /** * @author * @version 1.0 * 正则表达式应用实例 */ public class Regexp_ { public static void main(String[] args) { String content = "https://www.bilibili.com/video/BV1fh411y7R8?p=894&spm_id_from=pageDriver&vd_source=45f80ee5f33f3671dfe6578fd2d16b35"; String regStr = "^((http|https)://)?([\\w-]+\\.)+[\\w-]+(\\/[\\w-?=&/%.#]*)?$";//在[.?*]表示匹配实际的字符 Pattern pattern = Pattern.compile(regStr); Matcher matcher = pattern.matcher(content); if (matcher.find()) { System.out.println("满足格式"); }else{ System.out.println("不满足格式"); } } }- 1
- 2
- 3
- 4
- 5
- 6
- 7
- 8
- 9
- 10
- 11
- 12
- 13
- 14
- 15
- 16
- 17
- 18
- 19
- 20
- 21
- 22
- 23
- 24
- 25
- 26
- 27
- 28
- 29
- 30

 用matcher.find()必须要加定位符
用Pattern.matchers(regStr,content)不用加定位符也可以

package regexp; import java.util.regex.Matcher; import java.util.regex.Pattern; /** * @author * @version 1.0 */ public class MetcherMethod { public static void main(String[] args) { String content = "hello dhf jack edu edu edu tom simth edu hello"; String regStr = "hello.*";//写上.* 之后匹配整个字符串,返回true,不写返回false Pattern pattern = Pattern.compile(regStr); Matcher matcher = pattern.matcher(content); while (matcher.find()){ System.out.println("=========================="); System.out.println(matcher.start()); System.out.println(matcher.end()); System.out.println("找到:" + content.substring(matcher.start(),matcher.end())); } //整体匹配方法,常用于,去校验某个字符串是否满足某个规则 System.out.println("整体匹配=" + matcher.matches()); // 完成如果 content 有 edu 替换成 教育 regStr = "edu"; pattern = Pattern.compile(regStr); matcher= pattern.matcher(content); //注意:返回的字符串才是替换后的字符串原来的 content不变化 String newContent = matcher.replaceAll("教育"); System.out.println("newContent= " + newContent); System.out.println("content= " + content); } }- 1
- 2
- 3
- 4
- 5
- 6
- 7
- 8
- 9
- 10
- 11
- 12
- 13
- 14
- 15
- 16
- 17
- 18
- 19
- 20
- 21
- 22
- 23
- 24
- 25
- 26
- 27
- 28
- 29
- 30
- 31
- 32
- 33
- 34
- 35
- 36
- 37
- 38


package regexp; import java.util.regex.Matcher; import java.util.regex.Pattern; /** * @author * @version 1.0 * 反向引用 */ public class MetcherMethod { public static void main(String[] args) { String content = "h1234e9876llo 12321-333999111dhf113333 jack edu2222 edu edu tom simth edu hello"; // String regStr = "(\\d)\\1{4}"; // String regStr = "(\\d)(\\d)\\2\\1"; String regStr = "\\d{5}-(\\d)\\1{2}(\\d)\\2{2}(\\d)\\3{2}" ; /* 请在字符串中检索商品编号,形式如:12321-333999111 这样的号码, 要求满足前面是一个五位数,然后一个-号,然后是一个九位数,连续的每三位要相同 */ Pattern pattern = Pattern.compile(regStr); Matcher matcher = pattern.matcher(content); while (matcher.find()){ System.out.println("找到:" + matcher.group(0)); } } }- 1
- 2
- 3
- 4
- 5
- 6
- 7
- 8
- 9
- 10
- 11
- 12
- 13
- 14
- 15
- 16
- 17
- 18
- 19
- 20
- 21
- 22
- 23
- 24
- 25
- 26
- 27
- 28
String类中使用正则表达式
替换功能
String类public String replaceAll(String regex,String replacement)package regexp; import java.util.regex.Matcher; import java.util.regex.Pattern; /** * @author * @version 1.0 * 反向引用 */ public class MetcherMethod { public static void main(String[] args) { String content = "我...我要....学学学学.....编程JAVA"; String regStr = "\\."; // 去掉所有 . Pattern pattern = Pattern.compile(regStr); Matcher matcher = pattern.matcher(content); content = matcher.replaceAll(""); System.out.println("content= " + content); // 去掉重复的字 我我要学学学学编程JAVA // 使用(.)\\1+ // 使用 反向引用 $1 来替换匹配到的内容 //注意:因为正则表达式变化,所以需要重置 pattern = Pattern.compile("(.)\\1+");//分组的捕获内容记录到$1 matcher = pattern.matcher(content); while (matcher.find()){ System.out.println("找到= " + matcher.group(0)); } // 使用 反向引用 $1 来替换匹配到的内容 content = matcher.replaceAll("$1"); System.out.println("content= " + content); //3.使用一条语句去掉重复的字我我要学学学学编程java! content = Pattern.compile("(.)\\1+").matcher(content).replaceAll("$1"); // while (matcher.find()){ // System.out.println("找到:" + matcher.group(0)); // } } }- 1
- 2
- 3
- 4
- 5
- 6
- 7
- 8
- 9
- 10
- 11
- 12
- 13
- 14
- 15
- 16
- 17
- 18
- 19
- 20
- 21
- 22
- 23
- 24
- 25
- 26
- 27
- 28
- 29
- 30
- 31
- 32
- 33
- 34
- 35
- 36
- 37
- 38
- 39
- 40
- 41
- 42
- 43
- 44
- 45
- 46

package regexp; /** * @author * @version 1.0 * 反向引用 */ public class MetcherMethod { public static void main(String[] args) { String content = "2000年5月,JDK1.3、JDK1.4和J2SE1.3相继发布,几周后其"+ "获得了Apple公司Mac 0S X的工业标准的支持。2001年9月24日,J2EE1.3发" +"布。" + "2002年2月26日,J2SE1.4发布。自此Java的计算能力有了大幅提升"; //使用正则表达式方式,将JDK1.3 和JDK1.4替换成JDK content = content.replaceAll("JDK1\\.3|JDK1\\.4","JDK"); System.out.println(content); content = "13888889999"; if (content.matches("1(38|39)\\d{8}")){ System.out.println("验证成功"); }else{ System.out.println("验证失败"); } //要求按照#或者–或者~或者数字来分割 content = "hello#abc-jack12smith~背景"; String[] split = content.split("#|~|-|\\d+"); for (String s:split){ System.out.println(s); } } }- 1
- 2
- 3
- 4
- 5
- 6
- 7
- 8
- 9
- 10
- 11
- 12
- 13
- 14
- 15
- 16
- 17
- 18
- 19
- 20
- 21
- 22
- 23
- 24
- 25
- 26
- 27
- 28
- 29
- 30
- 31
- 32
- 33
- 34
- 35
package regexp; /** * @author * @version 1.0 */ public class HomeWork { //规定电子邮件规则为 // 只能有一个@ //@前面是用户名,可以是a-z A-Z0-9_-字符 //@后面是域名,并且域名只能是英文字母,比如 sohu.com或者tsinghua.org.cn //写出对应的正则表达式,验证输入的字符串是否为满足规则 public static void main(String[] args) { String content = "jsx@edu.com"; String regStr = "^\\w-]+@([a-zA-Z]+\\.)+[a-zA-Z]+$"; //1.String 的 matches是整体匹配 //2.看看这个matches底层 /* String 的matches public boolean matches(String regex) { return Pattern .matches(regex, this); } Pattern public static boolean matches(String regex,CharSequence input){ Pattern p = Pattern.compile(regex); Natcher m = p.matcher(input); return m.matches() ; } Mather类 match Attempts to match the entire region against the pattern public boolean matches() { return match(from,END.ANCHOR); } */ if (content.matches(regStr)){ System.out.println("成功"); }else { System.out.println("失败"); } } }- 1
- 2
- 3
- 4
- 5
- 6
- 7
- 8
- 9
- 10
- 11
- 12
- 13
- 14
- 15
- 16
- 17
- 18
- 19
- 20
- 21
- 22
- 23
- 24
- 25
- 26
- 27
- 28
- 29
- 30
- 31
- 32
- 33
- 34
- 35
- 36
- 37
- 38
- 39
- 40
- 41
- 42
- 43
- 44
- 45
- 46
- 47
package regexp; /** * @author * @version 1.0 */ public class HomeWork { public static void main(String[] args) { String content = "123.89"; String regStr = "^[-+]?([1-9]\\d*|0)(\\.\\d+)?$"; if (content.matches(regStr)){ System.out.println("匹配成功"); }else{ System.out.println("匹配失败"); } } }- 1
- 2
- 3
- 4
- 5
- 6
- 7
- 8
- 9
- 10
- 11
- 12
- 13
- 14
- 15
- 16
- 17
- 18
- 19
- 20
package regexp; import java.util.regex.Matcher; import java.util.regex.Pattern; /** * @author * @version 1.0 */ public class HomeWork { public static void main(String[] args) { String content = "http://www.sohu.com:8080/abc/index.htm"; String regStr = "^([a-zA-Z]+)://([a-zA-Z.]+):(\\d+)[\\w-/]*/([\\w.@#$%^&*%]+)$"; Pattern pattern = Pattern.compile(regStr); Matcher matcher = pattern.matcher(content); if (matcher.matches()){ System.out.println("整体匹配=" + matcher.group(0)); System.out.println("协议:" + matcher.group(1)); System.out.println("域名:" + matcher.group(2)); System.out.println("端口:" + matcher.group(3)); System.out.println("文件:" + matcher.group(4)); }else{ System.out.println("匹配失败"); } } }- 1
- 2
- 3
- 4
- 5
- 6
- 7
- 8
- 9
- 10
- 11
- 12
- 13
- 14
- 15
- 16
- 17
- 18
- 19
- 20
- 21
- 22
- 23
- 24
- 25
- 26
- 27
- 28
- 29
-
相关阅读:
iOS开发M1芯片遇到的问题
windows11 生产力工具配置
天翼物联网平台(AIoT)量子安全能力发布,为物联网端到端安全加装“量子盾”!
Linux 线程池&单例模式&读写锁&自旋锁
SDUT 2022 summer team contest 6th(for 21)
JavaScript基础 JavaScript第一天 3. 数据类型
CADD课程学习(1)-- 药物设计基础知识
Docker 与 K8S学习笔记(二十五)—— Pod的各种调度策略(上)
Nginx配置文件及Nginx服务优化
Python3中启动简易HTTPServer
- 原文地址:https://blog.csdn.net/CSDN_xinger/article/details/126148757
