-
在linux下(CentOS7中)配置MySQL5.7数据库,且实现远程访问
任务目标:在虚拟机中部署MySQL,且可以实现远程访问。
VM版本:15.5.1 build-15018445 Linux版本:CentOS7 映像文件:CentOS-7-x86_64-DVD-1810.iso MySQL:mysql-5.7.26-1.el7.x86_64.rpm-bundle.tar- 1
- 2
- 3
- 4
1. 首先查看防火墙是否关闭【systemctl status firewalld】
查看防火墙是否关闭,若没有关闭则关闭并设置开机不自启动
i. 关闭防火墙【systemctl stop firewalld】 ii. 开机不自启动【systemctl disable firewalld】- 1
- 2

-
看系统是否存在MySQL以及mariadb,需要删除不然会有冲突
注:CentOS应有自带的mariadb-libs-5.5.60-1.el7_5.x86_64- 查看是否有与 MySQL 相关文件【rpm –qa | grep mysql】
- 查看是否有与 mariadb 相关文件【rpm –qa | grep mariadb】
- 如果存在mysql或mariadb的相关内容就删除
- 【rpm –e –nodeps [ 需要删除的内容 ]】

- 【rpm –e –nodeps [ 需要删除的内容 ]】
-
在/opt 创建两个文件夹 /software,/module

-
使用工具把MySQL的tar包上传到系统中
[我存放在/opt/software]

-
首先再/opt/module下建立一个MySQL的文件夹【mkdir mysql】

再把 tar 包分解出来放到 刚刚创建的 mysql文件夹中
【tar -xvf /opt/software/mysql-5.7.26-1.el7.x86_64.rpm-bundle.tar -C /opt/module/mysql/】

-
运行安装包
分别按照顺序执行
【rpm -ivh mysql-community-common-5.7.26-1.el7.x86_64.rpm】
【rpm -ivh mysql-community-libs-5.7.26-1.el7.x86_64.rpm】
【rpm -ivh mysql-community-client-5.7.26-1.el7.x86_64.rpm】
【rpm -ivh mysql-community-server-5.7.26-1.el7.x86_64.rpm】

-
启动MySQL服务【systemctl start mysql】

-
查看日志文件获取MySQL的临时密码
【cat /var/log/mysqld.log | grep password】

-
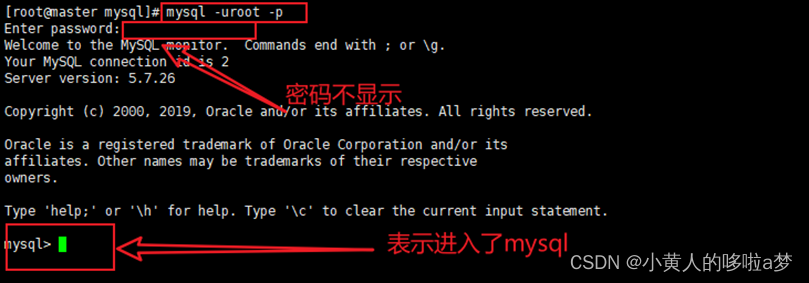
登录MySQL
a) 【mysql –uroot –p】密码即为刚刚看到的临时密码

-
需要修改密码强度的校验,不修改需要大写、小写、特殊字符,共八位的密码
把MySQL的密码校验强度改为低风险(注意下划线)
【set global validate_password_policy=LOW;】 -
修改MySQL的密码长度(注意下划线)
【set global validate_password_length=6;】 -
修改MySQL密码
【ALTER USER ‘root’@‘localhost’ IDENTIFIED BY ‘123456’;】

-
设置允许远程访问
-
切换到mysql数据【use mysql;】

-
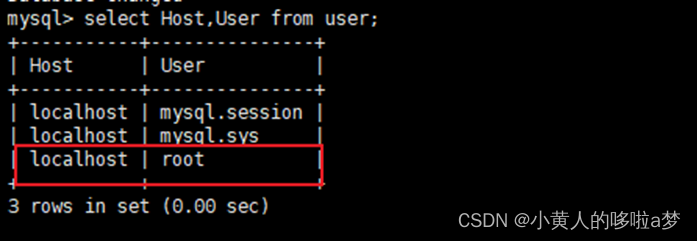
查看user表中的Host,和User字段
【select Host,User from user;】

发现root用户只允许localhost主机登录登录。
-
修改为允许任何地址访问
【update user set Host=‘%’ where User=‘root’;】

-
刷新权限【flush privileges;】

-
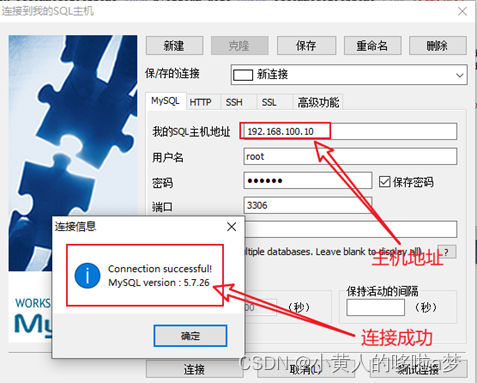
使用连接工具测试
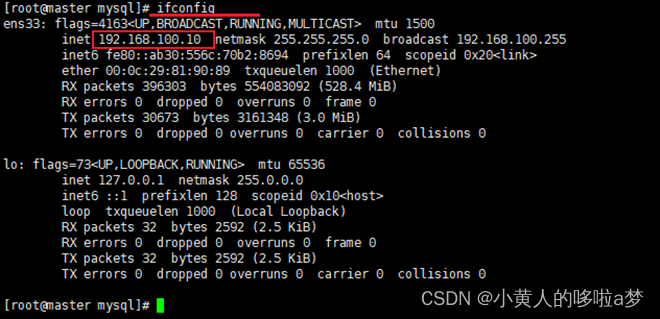
- 查看ip

- 使用远程数据库工具访问

- 查看ip
-
-
相关阅读:
数组第 k 大子序列
elementui表格el-table最右侧操作列展示不完全
java与es8实战之二:实战前的准备工作
Flink从Kafka写入Kafka
activiti7的数据表和字段的解释
深度 | 联手美邸、招商观颐等多家康养巨头,头部AI和机器人公司如何构建养老产业的智能新生态?
二十八、高级IO与多路转接之select
(四)进程管理:进程基本概念
Python到底适合什么后端团队和项目?
【Spring】——2、使用@ComponentScan自动扫描组件并指定扫描规则
- 原文地址:https://blog.csdn.net/weixin_52626164/article/details/126181854