-
微服务下token设计方案
背景介绍
项目初期(项目为微服务)为了快速开发使用了jwt生成token的无状态开发(未进行存储)并为生成的token指定一个过期时间为第二天的04:30,这样只要拿着今天生成的token就都可以用,这样不仅不利于项目自身安全,并且也无法实现以下功能。
需求一:是否支持并发登录
需求二:超时无操作过期设置
需求三:记录在线人数
为解决上述问题,微服务下需要管理有状态的token,并进行数据格式管理,实现上述需求。
1.token数据存储位置
token数据存储位置,首选当然是redis
2.微服务下的token一致性问题
一般情况下,生成并存储token的步骤都放在登录环节,一开始我也这么想的,后面在设计过程中,发现一个问题,在一套微服务集群下,有些微服务使用着不同的redis,这对于管理一致性的token有点困难。后面的解决办法是,在拦截部件(其实就是所有微服务都有的一个拦截器token验证有效性的拦截器)上进行token管理,并记录下所有token(为判断是否是第一次生成的token)。
3.token数据格式与存储格式
一、考虑不同设备的登录
由于现在存储token的位置是在拦截器上,是没有办法知道过来的请求是从哪个设备发来的,所以需要用到jwt的Claim,为了后期扩展,将Claim对象用一个map存储。代码如下
- /**
- * 生成签名
- *
- * @param userId 用户Id
- * @param secret 用户密码
- * @return 加密的token
- */
- public static String sign(Long userId, String userName, String secret, Map
- try {
- Algorithm algorithm = Algorithm.HMAC256(secret);
- JWTCreator.Builder builder = JWT.create()
- .withClaim(CLAIM_USER_ID, userId)
- .withClaim(CLAIM_USER_NAME, userName)
- .withClaim(CLAIM_LOGIN_TIME, System.currentTimeMillis());
- for (Map.Entry
- builder.withClaim(entry.getKey(), entry.getValue());
- }
- return builder.withExpiresAt(getExpiresTime())
- .sign(algorithm);
- } catch (UnsupportedEncodingException e) {
- return null;
- }
- }
这样token内就存在我们需要的信息,并且可以动态的获取,这边我们存在了一个设备信息,放在map中,后期如果想加其他的,就可以通过map来扩展。
二、考虑是否支持并发登录
这部分比较简单,即在不允许并发登录的情况下,建立一个映射对象,用户id->token集合的数据格式,当不允许并发登录开启时,获取id对应的token集合,并主动将对应的token状态变成顶下线,以下是部分代码,提供思路。
- if (!configurationFile.isConcurrent()) {
- String deviceEnums = getMapKey(tokenValue, JwtClaimKey.DEVICEENUMS);
- // --- 如果不允许并发登录,则将这个账号的历史登录标记为:被顶下线
- replaced(userId, deviceEnums);
- // ------ 开启session记录-获取 User-Session , 续期
- TokenSession session = getSessionByUserId(userId, true);
- // 在 User-Session 上记录token签名
- session.addTokenSign(tokenValue, deviceEnums);
- getSaasTokenDao().updateSession(session);
- }
- /**
- * 顶人下线,根据账号id 和 设备类型
- *
当对方再次访问系统时,会抛出NotLoginException异常,场景值=-4
- *
- * @param userId 账号id
- * @param deviceType 设备类型 (填null代表顶替所有设备类型)
- */
- private void replaced(Long userId, String deviceType) {
- TokenSession session = getSessionByUserId(userId, false);
- if (session != null) {
- for (TokenSign tokenSign : session.tokenSignListCopyByDevice(deviceType)) {
- // 清理: token签名、token最后活跃时间
- String tokenValue = tokenSign.getValue();
- if (session.removeTokenSign(tokenValue)) {
- getSaasTokenDao().updateSession(session);
- }
- // 将此 token 标记为已被顶替
- updateTokenToOffline(tokenValue, Authorize.BE_REPLACED);
- }
- }
- }
三、海量登录下的数据格式构造
由于现在存储token的位置是在拦截器上,所以是没办法对token进行redis的ttl(设置过期时间,自动消失),所以需要有一个统一的管理键。使用redis的hash格式

将过期的token放到 键为tokenOffline中进行统一管理。上面有说过,我们生成的token设定的过期时间是第二天的04:30,这个是不变的,所以我们需要管理的数据只是一天内的即可。这就是为什么我们的键值后面还上时间的原因。
四、超时无操作过期设置
判断出该token为第一次登录的前提下,进行 ( token - > 设定的过期时间除2 ) 的映射生成。

并且设置ttl为设定的过期时间。
我们来说一说为什么设定( token - > 设定的过期时间除2+当前时间戳 )这一个映射,(设定的过期时间除2+当前时间戳 = faultToleranceTime)是一个容错时间,每次访问时,获取这个映射,并与当前时间戳(current)进行判断,如果faultToleranceTime<=current则进行,更新( token - > 设定的过期时间除2+当前时间戳 )往后推。并且重新更新这个键值对的ttl为设定的过期时间。
五、记录在线人数
判断出该token为第一次登录的前提下,将新的token放到 键为tokenOnline中进行统一管理。
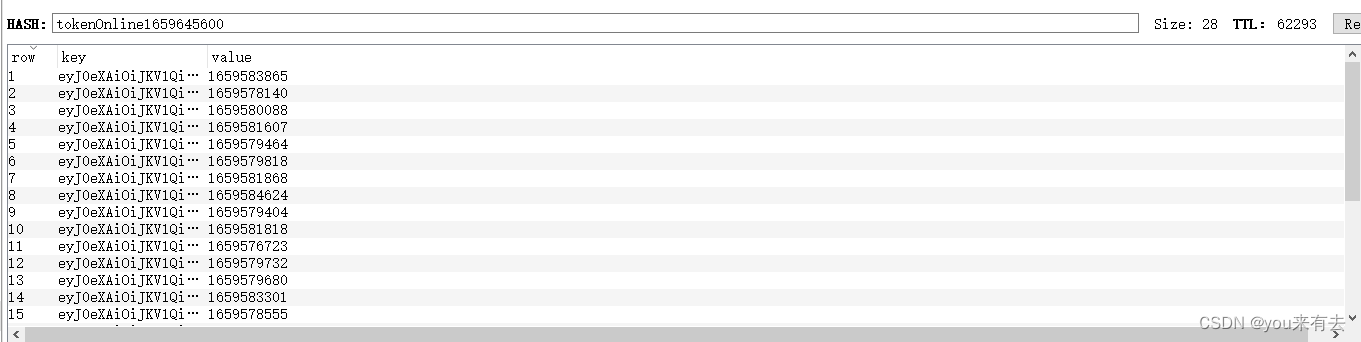 上面有说过,我们生成的token设定的过期时间是第二天的04:30,这个是不变的,所以我们需要管理的数据只是一天内的即可。这就是为什么我们的键值后面还上时间的原因。这个键值对,放着所有在线的集合。
问题:这样数据设计会出现一个问题,也就是token过期了,但是并没有放到tokenOffline的情况,这个时候就可以用上tokenOnline键值的value,与当前时间判断如果超过了时间,即认为已经离线即可。
4.考虑频繁访问redis问题
token验证存在问题有一个页面存在好几个请求,一起发过来,这样redis就获取几次,为了降低redis的获取频率,我们可以使用项目的内存,并且可以自动过期那种。我们这里使用的是谷歌guava
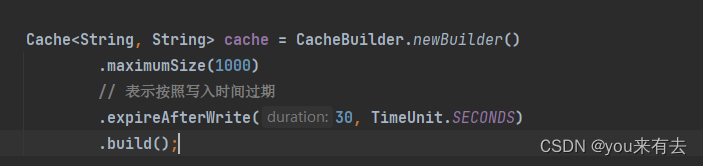
设置了30秒过期,这样在30秒内访问的请求都不会去连接redis。
5.考虑使用单独的redis连接
由于有可能存在数据量上大,并且访问量大的问题,所以作为扩展,我们还专门弄了为token管理的redis连接,这样也能在一定程度上分压。
- import org.slf4j.Logger;
- import org.slf4j.LoggerFactory;
- import org.springframework.boot.autoconfigure.data.redis.RedisProperties;
- import org.springframework.boot.context.properties.EnableConfigurationProperties;
- import org.springframework.context.annotation.Configuration;
- import org.springframework.data.redis.connection.RedisStandaloneConfiguration;
- import org.springframework.data.redis.connection.jedis.JedisConnectionFactory;
- import org.springframework.data.redis.core.RedisTemplate;
- import org.springframework.data.redis.serializer.StringRedisSerializer;
- import org.springframework.util.StringUtils;
- /**
- * @author kaixin
- * @version 1.0
- * @date 2022/7/27
- */
- @Configuration
- @EnableConfigurationProperties({TokenRedisProperties.class, RedisProperties.class})
- public class TokenRedisTemplateManager {
- private static final Logger LOGGER = LoggerFactory.getLogger(TokenRedisTemplateManager.class);
- private final TokenRedisProperties tokenRedisProperties;
- private final RedisProperties redisProperties;
- private RedisTemplate
- public TokenRedisTemplateManager(TokenRedisProperties tokenRedisProperties, RedisProperties redisProperties) {
- this.tokenRedisProperties = tokenRedisProperties;
- this.redisProperties = redisProperties;
- buildRedisTemplate();
- }
- private void buildRedisTemplate() {
- //单机模式
- RedisStandaloneConfiguration rsc = new RedisStandaloneConfiguration();
- if (!StringUtils.isEmpty(tokenRedisProperties.getHost())) {
- rsc.setPort(tokenRedisProperties.getPort());
- rsc.setPassword(tokenRedisProperties.getPassword());
- rsc.setHostName(tokenRedisProperties.getHost());
- rsc.setDatabase(tokenRedisProperties.getDatabase());
- LOGGER.info("==============token管理-启动token自带redis配置=============");
- } else {
- rsc.setPort(redisProperties.getPort());
- rsc.setPassword(redisProperties.getPassword());
- rsc.setHostName(redisProperties.getHost());
- rsc.setDatabase(redisProperties.getDatabase());
- LOGGER.info("==============token管理-启动spring默认redis配置=============");
- }
- RedisTemplate
- //单机模式
- JedisConnectionFactory fac = new JedisConnectionFactory(rsc);
- fac.afterPropertiesSet();
- template.setDefaultSerializer(new StringRedisSerializer());
- template.setConnectionFactory(fac);
- template.afterPropertiesSet();
- tokenRedisTemplate = template;
- }
- public RedisTemplate
- return tokenRedisTemplate;
- }
- }
该方式把RedisTemplate作为类的内部实现,并不会影响到全局的redis使用(这个方法其实我找了好久)
使用的时候,按照以下代码即可。
- @Resource
- private TokenRedisTemplateManager redisTemplateConcetion;
- /**
- * 获得在线token集合
- *
- * @return
- */
- public boolean checkOnlineByToken(String token) {
- return redisTemplateConcetion.get().opsForHash().hasKey(splicingLineTokenValue(ONLINE), token);
- }
作为自己的一个分享并记录,有什么意见或者建议可以留言跟我说。谢谢大家!!!
博主新推出的gitee免费开源项目(商城+APP+小程序+H5),有兴趣的小伙伴可以了解一下。
-
相关阅读:
petite-vue源码剖析-逐行解读@vue-reactivity之Map和Set的reactive
NLP模型的tokenize方法中return_tensors参数
Apache POI报表统计
java计算机毕业设计积分权益商城MyBatis+系统+LW文档+源码+调试部署
力扣——剑指 Offer II 092. 翻转字符
js获取当前日期并转化为yyyy-MM-dd hh:mm:ss 格式
Java基础知识点整理
[附源码]计算机毕业设计基于springboot架构的博客平台设计
数组实现单链表 Java详细讲解
倍市得受邀做客普华永道“技术驱动企业创新与增长”系列沙龙——用户体验管理专场
- 原文地址:https://blog.csdn.net/qq_38377190/article/details/126154154


 https://gitee.com/zhengkaixing/kxmall