-
docker+网桥+redis主从+哨兵模式
docker+网桥+redis主从+哨兵模式
我是在两台服务器上实验的,一台服务器的ip是192.168.213.144,另一台服务器的ip是192.168.213.145
1. 搭建网桥
关于第一部分搭建网桥可以参考我这篇博客,会稍微详细一点,https://blog.csdn.net/weixin_45753881/article/details/125973566
1.1 新建网桥
给主机192.168.213.144 网桥分配的网段是 172.20.144.0/24
给主机192.168.213.145 网桥分配的网段是 172.20.145.0/24#在主机144上执行 docker network create --subnet=172.20.144.0/24 --gateway 172.20.144.1 redisbridge #在主机145上执行 docker network create --subnet=172.20.145.0/24 --gateway 172.20.145.1 redisbridge- 1
- 2
- 3
- 4
1.2 添加路由
#在主机144上执行 route add -net 172.20.144.0/24 gw 172.20.144.1 #在主机145上执行 route add -net 172.20.145.0/24 gw 172.20.145.1- 1
- 2
- 3
- 4
1.3 配置iptables规则
#在主机144上执行 iptables -t nat -I PREROUTING -s 172.20.144.0/24 -d 172.20.145.0/24 -j DNAT --to 172.20.144.1 #在主机145上执行 iptables -t nat -I PREROUTING -s 172.20.145.0/24 -d 172.20.144.0/24 -j DNAT --to 172.20.145.1- 1
- 2
- 3
- 4
2. 配置redis.conf
2.1 下载redis.conf(主机144和主机145都执行)
# 如果没有安装yum,需要先安装yum yum -y install wget # 下载redis.conf,下载路径为/root/redis.conf,想下载到其它路径也可以,记得运行创建docker容器命令(步骤3.1和3.2)时也改成自己所下载的地址 wget http://download.redis.io/redis-stable/redis.conf # 在服务器的/root目录下创建redis.log文件,到其它路径也可以,记得运行创建docker容器命令(步骤3.1和3.2)时也改成自己所设置的地址 touch redis.log # 给redis.log赋予权限 chmod 777 redis.log- 1
- 2
- 3
- 4
- 5
- 6
- 7
- 8
2.2 配置redis.conf
2.2.1 配置redis主的redis.conf(主机144)
(1)注释 # bind 127.0.0.1
(2)关闭保护模式 protected-mode no
(3)(可选)设定密码 requirepass yourpwd
(4)配置日志路径,为了便于排查问题 logfile “/var/log/redis/redis.log”# bind 127.0.0.1 protected-mode no requirepass yourpwd logfile "/var/log/redis/redis.log"- 1
- 2
- 3
- 4
2.2.2 配置redis从的redis.conf(主机145)
(1)注释 # bind 127.0.0.1
(2)关闭保护模式 protected-mode no
(3)(可选)设定密码 requirepass yourpwd
(4)配置日志路径,为了便于排查问题 logfile “/var/log/redis/redis.log”
(5)配置主库的ip和端口 replicaof 192.xxx.xxx.xxx 6379
192.xxx.xxx.xxx 是主库所在服务器的ip,6379 是主库redis端口
(6)(视情况而定)如果主库配置了密码,那么这里就填写主库密码;如果主库没设定密码,就不用配 masterauth 主库密码# bind 127.0.0.1 protected-mode no requirepass yourpwd logfile "/var/log/redis/redis.log" replicaof 192.xxx.xxx.xxx 6379 # 这里记得替换ip masterauth 主库密码- 1
- 2
- 3
- 4
- 5
- 6
3. 部署redis主从
3.1 部署redis主节点
# --network redisbridge 是所使用的网桥 # -e TZ=Asia/Shanghai 设置时区 docker run --network redisbridge --name redis_master --restart=always -e TZ=Asia/Shanghai -v /root/redis.conf:/usr/local/etc/redis/redis.conf -v /root/redis.log:/var/log/redis/redis.log -d -p 6379:6379 redis:7.0.4 redis-server /usr/local/etc/redis/redis.conf- 1
- 2
- 3
3.2 部署redis从节点
docker run --network redisbridge --name redis_slave --restart=always -e TZ=Asia/Shanghai -v /root/redis.conf:/usr/local/etc/redis/redis.conf -v /root/redis.log:/var/log/redis/redis.log -d -p 6379:6379 redis:7.0.4 redis-server /usr/local/etc/redis/redis.conf- 1
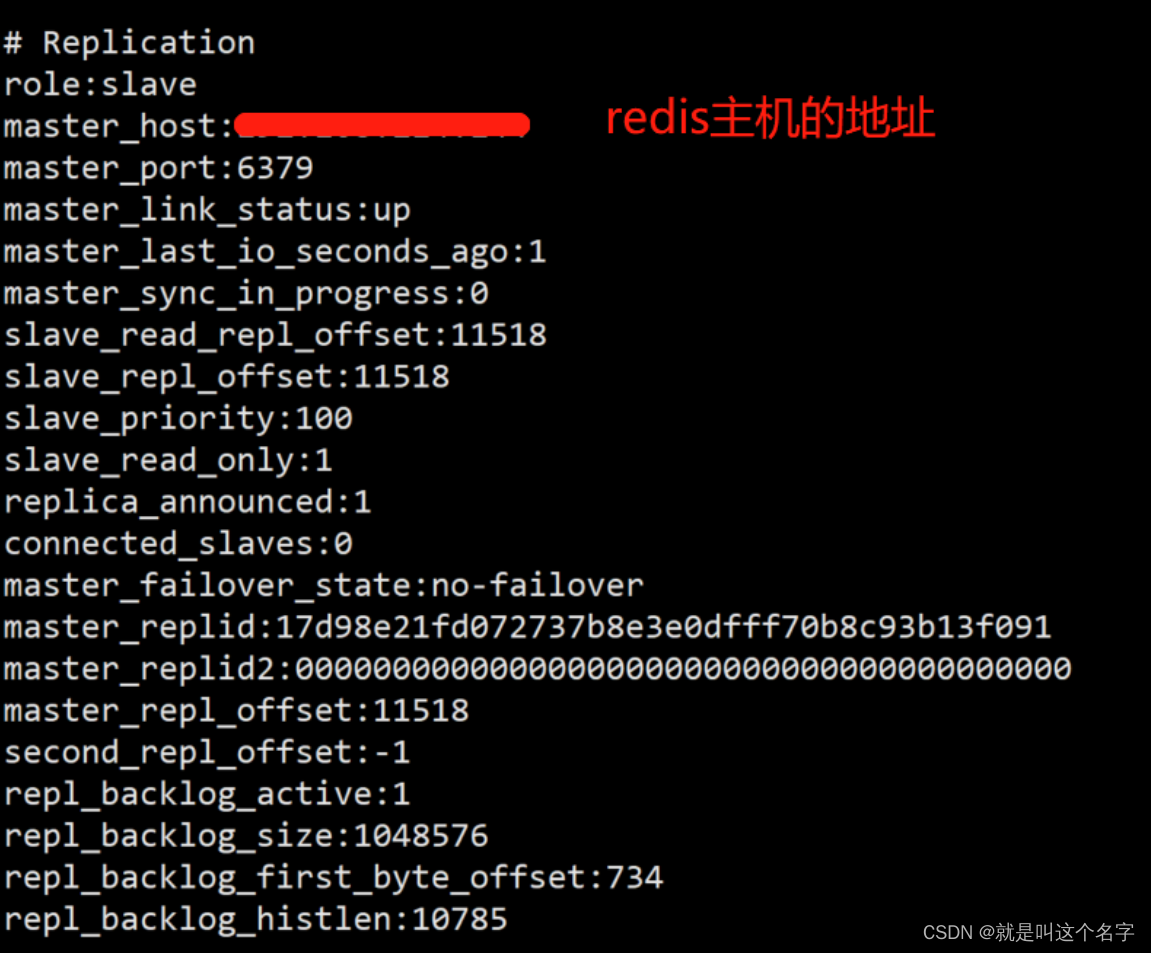
3.3 查看主从
# 进入redis从节点 docker exec -it redis_slave redis-cli # 如果redis配置了密码,则进行密码验证,验证通过则会打印OK auth 密码 # info进行查看 info- 1
- 2
- 3
- 4
- 5
- 6
4. 配置哨兵
4.1 配置sentinel.conf(所有主机上都执行)
# 下载sentinel.conf到/root路径下,想下载到其它路径也可以,记得运行创建docker容器命令(步骤4.2.1和4.2.2)时也改成自己所下载的地址 wget http://download.redis.io/redis-stable/sentinel.conf # 在服务器的/root目录下创建sentinel.log文件,到其它路径也可以,记得运行创建docker容器命令(步骤4.2.1和4.2.2)时也改成自己所设置的地址 touch sentinel.log # sentinel.log赋予权限 chmod 777 sentinel.log- 1
- 2
- 3
- 4
- 5
- 6
修改sentinel.conf以下几项
# 编辑sentinel.conf,进行以下配置,这里ip改成自己的服务器地址 sentinel monitor mymaster 192.168.213.144 6379 1 # 修改日志文件的路径 logfile "/var/log/redis/sentinel.log" # 修改监控的主redis服务器,最后一个1表示,1台机器判定主被动下线后,就进行failover(故障转移) sentinel monitor mymaster 192.168.213.144 6379 2- 1
- 2
- 3
- 4
- 5
- 6
4.2 创建sentinel容器
4.2.1 在redis主节点所在的主机上执行
docker run --network redisbridge --name sentinel_master --ip 172.20.144.3 -p 26379:26379 --restart=always -e TZ=Asia/Shanghai -v /root/sentinel.conf:/usr/local/etc/redis/sentinel.conf -v /root/sentinel.log:/var/log/redis/sentinel.log -d redis:7.0.4 redis-sentinel /usr/local/etc/redis/sentinel.conf- 1
4.2.2 在redis从节点所在的主机上执行
docker run --network redisbridge --name sentinel_slave --ip 172.20.145.3 -p 26379:26379 --restart=always -e TZ=Asia/Shanghai -v /root/sentinel.conf:/usr/local/etc/redis/sentinel.conf -v /root/sentinel.log:/var/log/redis/sentinel.log -d redis:7.0.4 redis-sentinel /usr/local/etc/redis/sentinel.conf- 1
4.3 测试哨兵
(1)停掉redis主节点,等30秒后,进入redis从节点用info查看从节点是否切换成主节点
(2)也可以在服务器上在/root路径下使用cat sentinel.log查看日志(/root/sentinel.log是前面步骤配置的)

-
相关阅读:
三维模型3DTile格式轻量化压缩模型变形浅析
AcWing 138. 兔子与兔子
Jenkins安装
软件测试自学,这就技术你get了吗?
[涉及项目搭建配置相关问题]
openjudge 1.5.1 求平均年龄
华为校招机试题- 机器人活动区域-2023年
重要变更 | Hugging Face Hub 的 Git 操作不再支持使用密码验证
“第五十三天”
【雷丰阳-谷粒商城 】【分布式高级篇-微服务架构篇】【25】【分布式事务】
- 原文地址:https://blog.csdn.net/weixin_45753881/article/details/126129295