-
LVS+NAT 负载均衡群集,NAT模式部署
文章目录
一,案例部署环境,所需机器配置信息
- LVS调度器作为Web服务器池的网关,LVS两块网卡,分别连接内外网,使用轮询®调度算法 (图片只是例子根据自己ip地址配置)
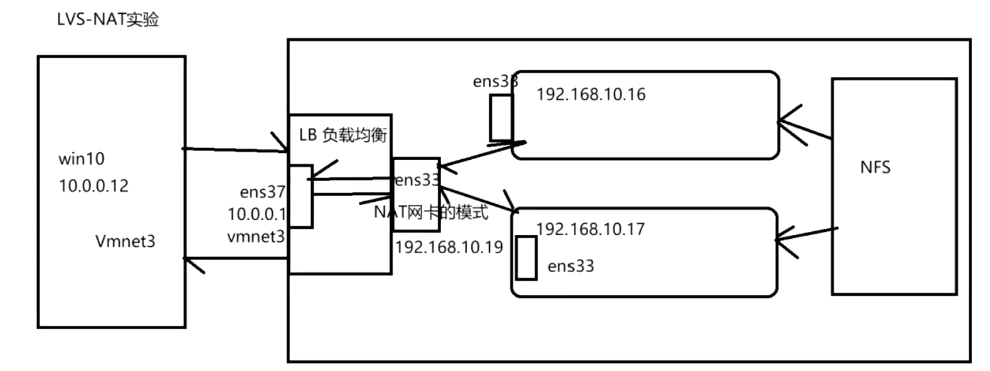
LVS负载均衡调节器: ens33:192.168.35.10 (Vmnet 8 NAT模式)
ens36:12.0.0.1(Vmnet 2 仅主机模式)
Web1 节点服务器:192.168.35.8 网关:192.168.35.10
Web2 节点服务器:192.168.35.7 网关:192.168.35.10
NFS服务器:192.168.113.113.126
客户端 win10:12.0.0.12 网关:12.0.0.1 (Vmnet 2 仅主机模式)
注:干净环境下配置
一.部署LVS负载均衡调节器(192.168.35.10)
1.添加双网卡
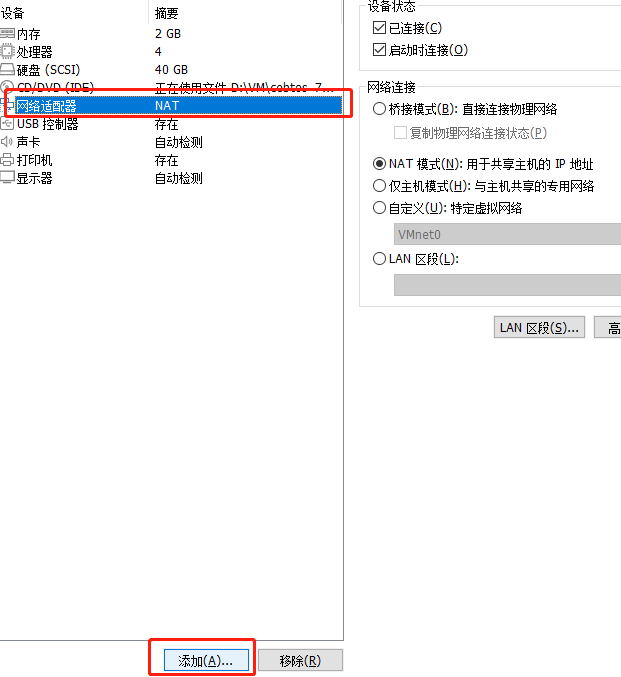
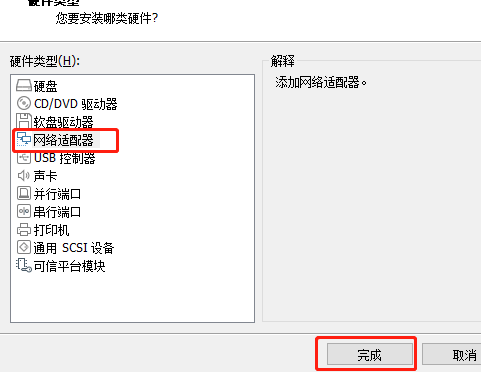
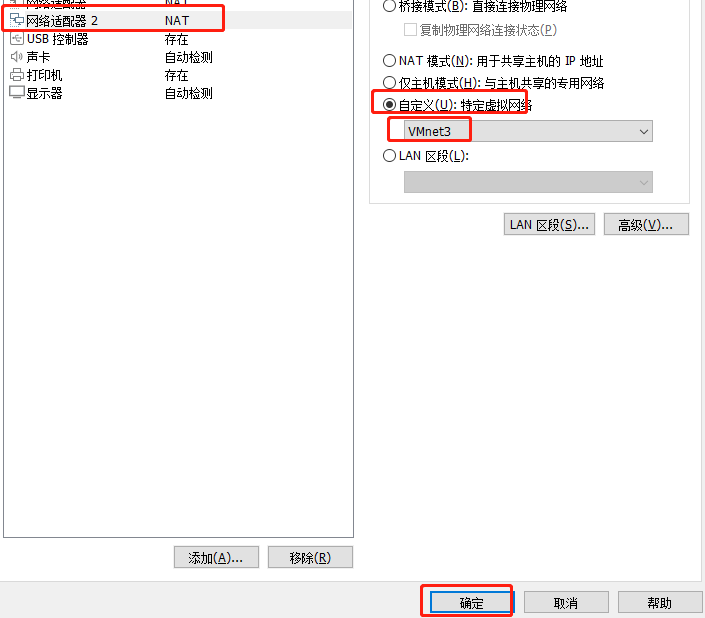
- 确认自己的VM2的IP地址

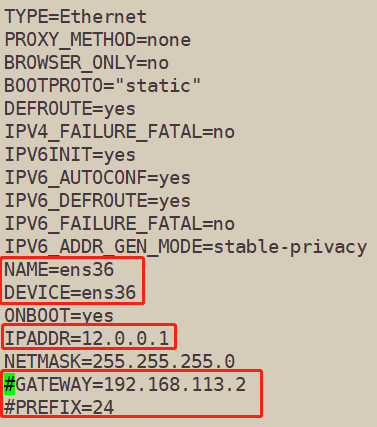
2.编辑ens36内容
[root@localhost ~]# cd /etc/sysconfig/network-scripts/ [root@localhost network-scripts]# cp ifcfg-ens33 ifcfg-ens36 [root@localhost network-scripts]# vim ifcfg-ens36- 1
- 2
- 3
- 去掉UUID,更改网卡名字,配置网关跟VM2一致,不需要的可以注释或删除,更改后图如下
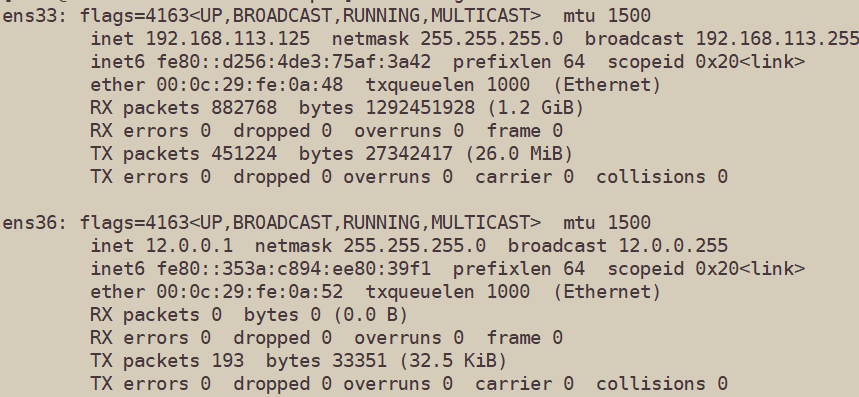
3.重启网卡,查看是否更改
[root@localhost network-scripts]# systemctl restart network [root@localhost network-scripts]# ifconfig- 1
- 2
二,部署共享存储(NFS 服务器 192.168.35.9)
1.关闭防火墙和开机自启,关闭核心防护
[root@localhost ~]# systemctl stop firewalld [root@localhost ~]# systemctl disable firewalld [root@localhost ~]# setenforce 0- 1
- 2
- 3
2.安装共享环境,另外俩也要安装,为了共享(切记关闭防火墙,核心防护)
##192.168.35.9安装 [root@localhost ~]# yum install -y nfs-utils rpcbind ##Web1 节点服务器:192.168.35.8 [root@server2 ~]# systemctl stop firewalld [root@server2 ~]# systemctl disable firewalld [root@server2 ~]# setenforce 0 [root@server2 ~]# yum install -y nfs-utils rpcbind ##Web2 节点服务器:192.168.35.7 [root@localhost ~]# systemctl stop firewalld [root@localhost ~]# systemctl disable firewalld [root@localhost ~]# setenforce 0 [root@localhost ~]# yum install -y nfs-utils rpcbind- 1
- 2
- 3
- 4
- 5
- 6
- 7
- 8
- 9
- 10
- 11
- 12
- 13
- 14
- 15
3.开启并开机自启动共享服务
##192.168.113.113.126 [root@localhost ~]# systemctl start nfs [root@localhost ~]# systemctl enable nfs [root@localhost ~]# systemctl start rpcbind [root@localhost ~]# systemctl enable rpcbind ##Web1 节点服务器:192.168.35.8 [root@server2 ~]# systemctl start nfs [root@server2 ~]# systemctl enable nfs [root@server2 ~]# systemctl start rpcbind [root@server2 ~]# systemctl enable rpcbind ##Web2 节点服务器:192.168.35.7 [root@localhost ~]# systemctl start nfs [root@localhost ~]# systemctl enable nfs [root@localhost ~]# systemctl start rpcbind [root@localhost ~]# systemctl enable rpcbind- 1
- 2
- 3
- 4
- 5
- 6
- 7
- 8
- 9
- 10
- 11
- 12
- 13
- 14
- 15
- 16
- 17
4.创建共享目录,并赋权
##NFS 服务器 192.168.35.9 [root@localhost ~]# mkdir /opt/dxj /opt/xtj [root@localhost ~]# chmod 777 /opt/dxj /opt/xtj [root@localhost ~]# ll /opt 总用量 0 drwxrwxrwx. 2 root root 6 7月 31 18:35 dxj drwxr-xr-x. 2 root root 6 9月 7 2017 rh drwxrwxrwx. 2 root root 6 7月 31 18:35 xtj ##添加给予共享的目录和网段地址,和权限 [root@localhost ~]# vim /etc/exports /opt/dxj 192.168.35.0/24(rw,sync) /opt/xtj 192.168.35.0/24(rw,sync) ##发布共享 [root@localhost ~]# exportfs -rv exporting 192.168.35.0/24:/opt/xtj exporting 192.168.35.0/24:/opt/dxj ##查看共享列表是否发布 [root@localhost ~]# showmount -e Export list for localhost.localdomain: /opt/xtj 192.168.35.0/24 /opt/dxj 192.168.35.0/24- 1
- 2
- 3
- 4
- 5
- 6
- 7
- 8
- 9
- 10
- 11
- 12
- 13
- 14
- 15
- 16
- 17
- 18
- 19
- 20
- 21
- 22
- 23
5.挂载共享目录
##测试是否能共享 ##Web1 节点服务器:192.168.35.8 [root@server2 ~]# showmount -e 192.168.35.9 Export list for 192.168.35.9: /opt/xtj 192.168.35.0/24 /opt/dxj 192.168.35.0/24 ##Web2 节点服务器:192.168.35.7 [root@localhost ~]# showmount -e 192.168.35.9 Export list for 192.168.35.9: /opt/xtj 192.168.35.0/24 /opt/dxj 192.168.35.0/24 ##Web1 节点服务器:192.168.35.8 ##安装httpd [root@server2 ~]# yum install -y httpd ##Web2 节点服务器:192.168.35.7 ##安装httpd [root@localhost ~]# yum install -y httpd ##挂载共享目录 ##Web1 节点服务器:192.168.35.8 [root@server2 ~]# mount.nfs 192.168.35.9:/opt/xtj /var/www/html ##查看挂载 [root@server2 ~]# df -h 192.168.35.9:/opt/xtj 47G 4.1G 43G 9% /var/www/html ##设置个页面在共享目录下,测试是否共享 [root@server2 ~]# echo 'this is xtj' > /var/www/html/index.html [root@server2 ~]# ls /var/www/html/ index.html ##挂载共享目录 ##Web2 节点服务器:192.168.35.7 [root@server2 ~]# mount.nfs 192.168.35.9:/opt/dxj /var/www/html ##查看挂载 [root@server2 ~]# df -h 192.168.35.9:/opt/dxj 47G 4.1G 43G 9% /var/www/html ##设置个页面在共享目录下 [root@server2 ~]# echo 'this is dxj' > /var/www/html/index.html [root@localhost ~]# ls /var/www/html/ index.html ##NFS 服务器 192.168.35.9查看 [root@localhost ~]# ls /opt/xtj index.html [root@localhost ~]# ls /opt/dxj index.html- 1
- 2
- 3
- 4
- 5
- 6
- 7
- 8
- 9
- 10
- 11
- 12
- 13
- 14
- 15
- 16
- 17
- 18
- 19
- 20
- 21
- 22
- 23
- 24
- 25
- 26
- 27
- 28
- 29
- 30
- 31
- 32
- 33
- 34
- 35
- 36
- 37
- 38
- 39
- 40
- 41
- 42
- 43
- 44
- 45
- 46
- 47
- 48
6.重启服务流量器访问测试
##Web1 节点服务器:192.168.35.8 [root@server2 ~]# systemctl start httpd ##Web2 节点服务器:192.168.35.7 [root@localhost ~]# systemctl start httpd- 1
- 2
- 3
- 4
- 5
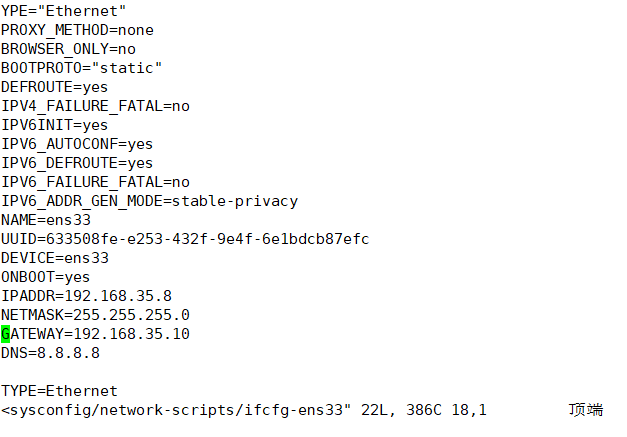
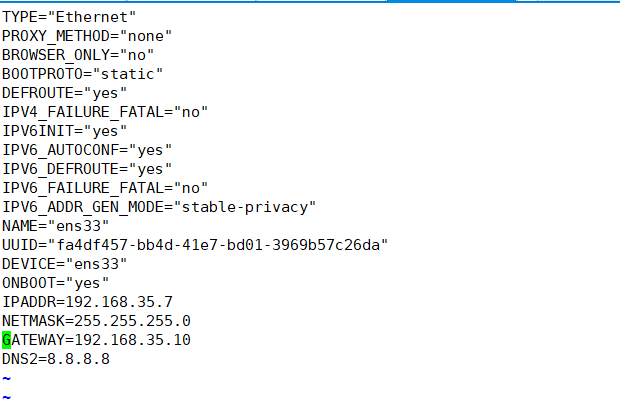
7.配置更改web1 web2 的网关
##Web1 节点服务器:192.168.35.8 [root@server2 ~]# vim /etc/sysconfig/network-scripts/ifcfg-ens33 [root@server2 ~]# systemctl restart network ##Web2 节点服务器:192.168.35.7 [root@localhost ~]# vim /etc/sysconfig/network-scripts/ifcfg-ens33 [root@localhost ~]# systemctl restart network- 1
- 2
- 3
- 4
- 5
- 6
- 7
- Web1 节点服务器:192.168.35.8配置图片如下
- Web2 节点服务器:192.168.35.7配置图片如下
三,配置SNAT转发规则
1.进入配置文件添加规则
- 192.168.35.10 机器配置
##行尾添加 [root@localhost network-scripts]# vim /etc/sysctl.conf net.ipv4.ip_forward=1 ##查看 [root@localhost network-scripts]# sysctl -p net.ipv4.ip_forward = 1- 1
- 2
- 3
- 4
- 5
- 6

2.安装iptables,并添加规则
[root@localhost network-scripts]# yum install -y iptables* [root@localhost network-scripts]# systemctl start iptables.service [root@localhost network-scripts]# iptables -F ##清空所有规则 [root@localhost network-scripts]# iptables -t nat -vnl ##查看 ##添加规则 [root@localhost network-scripts]# iptables -t nat -A POSTROUTING -s 192.168.35.0/24 -o ens36 -j SNAT --to-source 12.0.0.1 [root@localhost network-scripts]# iptables -t nat -vnL Chain POSTROUTING (policy ACCEPT 0 packets, 0 bytes) pkts bytes target prot opt in out source destination 0 0 SNAT all -- * ens36 192.168.35.0/24 0.0.0.0/0 to:12.0.0.1- 1
- 2
- 3
- 4
- 5
- 6
- 7
- 8
- 9
- 10
- 11
- 12
- 添加内容解析
nat表:修改数据包中的源、日标IP地址或湍口
POSTROUTING:在进行路由判断之"后"所要进行的规则(SNAT/MASQUERADE)
PREROUTING:在进行路由判断之"前"所要进行的规则(DNAT/REDIRECT)
-A: 在规则链的末尾加入新规则
-s: 匹配来源地址IP/MASK.
-o:K网卡名称匹配从这块网卡流出的数据
-i:网卡名称匹配从这块网卡流入的数据
-j:控制类型
3.加载LVS内核模块
##手动加载ip_vs模块 [root@localhost network-scripts]# modprobe ip_vs ##查看ip_vs版本信息 [root@localhost network-scripts]# cat /proc/net/ip_vs IP Virtual Server version 1.2.1 (size=4096) Prot LocalAddress:Port Scheduler Flags -> RemoteAddress:Port Forward Weight ActiveConn InActConn- 1
- 2
- 3
- 4
- 5
- 6
- 7
- 8

4.安装ipvsadm管理工具
[root@localhost network-scripts]# yum install -y ipvsadm ##注:启动服务前必须保存负载分配策略,否则将会保存 ipvsadm-save > /etc/sysconfig/ipvsadm 或者 ipvsadm --save > /etc/sysconfig/ipvsadm 或者 touch /etc/sysconfig/ipvsadm [root@localhost network-scripts]# ipvsadm-save > /etc/sysconfig/ipvsadm ##启动服务 [root@localhost network-scripts]# systemctl start ipvsadm.service- 1
- 2
- 3
- 4
- 5
- 6
- 7
- 8
- 9
- 10
- 11
- 12
5.配置负载分配策略
- NAT模式只要在服务器上配置,节点服务器不需要特殊配置
##清空原有策略 [root@localhost network-scripts]# ipvsadm -C ##添加新策略 [root@localhost network-scripts]# ipvsadm -A -t 12.0.0.1:80 -s rr [root@localhost network-scripts]# ipvsadm -a -t 12.0.0.1:80 -r 192.168.35.8:80 -m -w 1 [root@localhost network-scripts]# ipvsadm -a -t 12.0.0.1:80 -r 192.168.35.7:80 -m -w 1 ##启动服务 [root@localhost network-scripts]# ipvsadm IP Virtual Server version 1.2.1 (size=4096) Prot LocalAddress:Port Scheduler Flags -> RemoteAddress:Port Forward Weight ActiveConn InActConn TCP localhost.localdomain:http rr -> 192.168.35.8:http Masq 1 0 0 -> 192.168.35.7:http Masq 1 0 0 ##保存负载分配策略,防止重启机器策略丢失 [root@localhost network-scripts]# ipvsadm-save > /etc/sysconfig/ipvsadm- 1
- 2
- 3
- 4
- 5
- 6
- 7
- 8
- 9
- 10
- 11
- 12
- 13
- 14
- 15
- 16
- 17
- 18
- 19
- 添加选项说明
-A 添加虚拟服务器
-S 指定负载调度算法(轮询:rr、加权轮询:wrr、最少连接:1c、加权最少连接:w1c)
-a 表示添加真实服务器(后端节点服务器)
-t 指定VIP地址及TCP端口
-m 表示使用NAT群集模式
-W 设置权重(权重为0时表示暂停节点)
四,浏览器范围测试
1.更改win10网卡
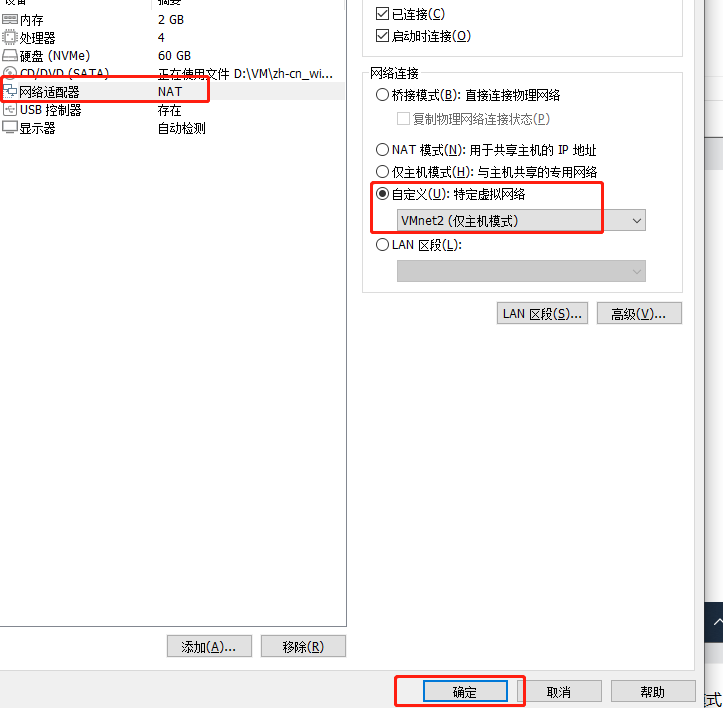

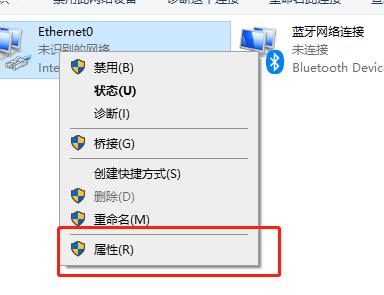
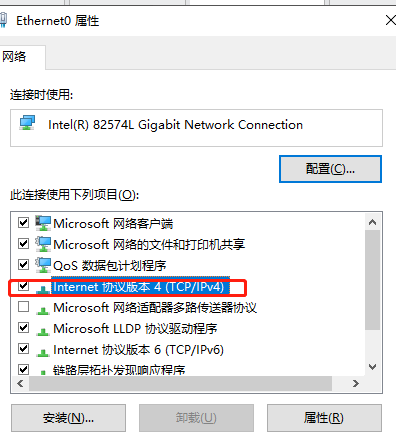
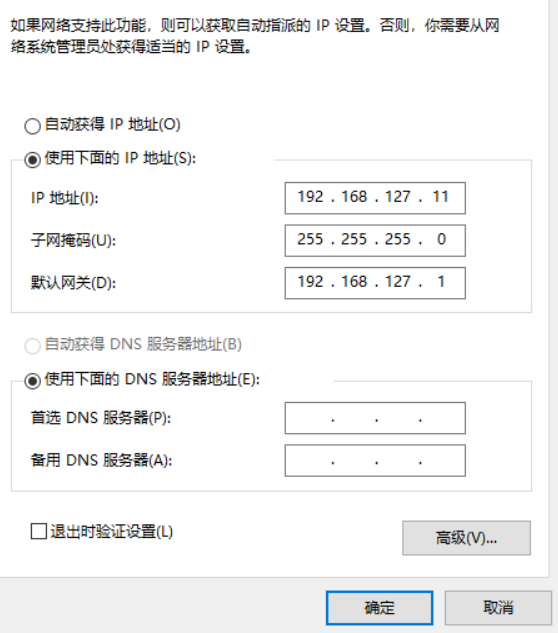
-a 表示添加真实服务器(后端节点服务器)
-t 指定VIP地址及TCP端口
-m 表示使用NAT群集模式
-W 设置权重(权重为0时表示暂停节点)
四,浏览器范围测试
1.更改win10网卡
[外链图片转存中…(img-PEMDZ4S3-1659442274964)]
[外链图片转存中…(img-pfKW8thB-1659442274965)]
[外链图片转存中…(img-GLOM02YZ-1659442274967)]
[外链图片转存中…(img-tn5isb53-1659442274968)]
[外链图片转存中…(img-6mPatPzi-1659442274969)]
在windows机器测试192.168.127.1
-
相关阅读:
JVM(三) 垃圾回收
Springboot毕设项目短视频网站r3k6x(java+VUE+Mybatis+Maven+Mysql)
批量更新Postgresql的序列
神经网络系列---损失函数
【Javascript】对象中的常规操作(增删改查)
MySQL-多表查询(关联查询)
Android 蓝牙BLE串口通信之高低位转换、16进制字符串转换float浮点型
Android热修复2(ASM技术的运用)
从零开始的Hadoop学习(六)| HDFS读写流程、NN和2NN工作机制、DataNode工作机制
自己写过比较蠢的代码:从失败中学习的经验
- 原文地址:https://blog.csdn.net/weixin_68579466/article/details/126129534
