-
springboot基础(60):完整的自定义ip-spring-boot-starter(包含yml提示功能)
前言
如何开发一个xxx-spring-boot-starter插件?
自定义starter如何开启yml提示功能?本章代码已分享至Gitee:https://gitee.com/lengcz/springboot-ip-starter02
第一节 功能描述
导入ip_spring_boot_starter依赖,不需要做任何操作,控制台即可打印ip的访问记录。

功能描述:- 每n秒在控制台输出一次
- 支持累计统计和清空统计
- 支持详细模式和简单模式输出
- 支持配置yml的配置文件提示
第二节 开发ip-spring-boot-starter插件
-
创建一个springboot模块,选择spring-web插件

-
导入需要的依赖
<dependency> <groupId>org.springframework.bootgroupId> <artifactId>spring-boot-starter-webartifactId> <version>2.7.0version> dependency> <dependency> <groupId>commons-langgroupId> <artifactId>commons-langartifactId> <version>2.6version> dependency> <dependency> <groupId>org.projectlombokgroupId> <artifactId>lombokartifactId> dependency>- 1
- 2
- 3
- 4
- 5
- 6
- 7
- 8
- 9
- 10
- 11
- 12
- 13
- 14
- 定义统计实体和配置实体
@Data public class IpCount { /** * ip */ private String ip; /** * 次数 */ private int count; /** * 最后更新时间 */ private Date lastUpateTime; }- 1
- 2
- 3
- 4
- 5
- 6
- 7
- 8
- 9
- 10
- 11
- 12
- 13
- 14
- 15
- 16
- 17
- 18
@Component("ipProperties") @ConfigurationProperties(prefix = "tools.ip") @Data public class IpProperties { /** * 日志输出周期 */ private Long cycle = 5L; /** * 是否周期性清空数据 */ private Boolean cycleReset = false; /** * 日志输出模式,detail 详细模式,simple 简单模式 */ private String model = LogModel.DETAIL.getValue(); public enum LogModel { DETAIL("detail"), SIMPLE("simple"); private String value; LogModel(String value) { this.value = value; } public String getValue() { return value; } } }- 1
- 2
- 3
- 4
- 5
- 6
- 7
- 8
- 9
- 10
- 11
- 12
- 13
- 14
- 15
- 16
- 17
- 18
- 19
- 20
- 21
- 22
- 23
- 24
- 25
- 26
- 27
- 28
- 29
- 30
- 31
- 32
- 33
- 34
- 35
- 36
- 定义实现类
import com.lcz.pojo.IpCount; import com.lcz.pojo.IpProperties; import com.lcz.util.DataPrinter; import org.springframework.beans.factory.annotation.Autowired; import org.springframework.scheduling.annotation.Scheduled; import javax.servlet.http.HttpServletRequest; import java.text.SimpleDateFormat; import java.util.*; public class IpCountService { Map<String, IpCount> ipCountMap = new HashMap<>(); @Autowired private HttpServletRequest httpServletRequest; public void count() { String ip = httpServletRequest.getRemoteAddr(); IpCount ipCount = ipCountMap.get(ip); if (null == ipCount) { ipCount = new IpCount(); ipCount.setCount(1); ipCount.setIp(ip); ipCount.setLastUpateTime(new Date()); } else { ipCount.setCount(ipCount.getCount() + 1); ipCount.setLastUpateTime(new Date()); } ipCountMap.put(ip,ipCount); } @Autowired private IpProperties ipProperties; @Scheduled(cron = "0/#{ipProperties.cycle} * * * * ?") //#{ipProperties.cycle}从baen中读取参数 public void print() { String topTitle = "IP访问监控"; if(ipProperties.getModel().equals(IpProperties.LogModel.DETAIL.getValue())){ String[] titles = {"IP", "Num", "Last Update Time"}; SimpleDateFormat simpleDateFormat = new SimpleDateFormat("yyyy-MM-dd HH:mm:ss"); List<Object[]> listObjects = new ArrayList<>(); ipCountMap.forEach((k, v) -> { String ip = v.getIp(); int count = v.getCount(); String timeStr = simpleDateFormat.format(v.getLastUpateTime()); listObjects.add(new Object[]{ip, count, timeStr}); }); DataPrinter dataPrinter = new DataPrinter(); dataPrinter.print(topTitle, titles, listObjects); }else if(ipProperties.getModel().equals(IpProperties.LogModel.SIMPLE.getValue())){ String[] titles = {"IP"}; List<Object[]> listObjects = new ArrayList<>(); ipCountMap.forEach((k, v) -> { String ip = v.getIp(); listObjects.add(new Object[]{ip}); }); DataPrinter dataPrinter = new DataPrinter(); dataPrinter.print(topTitle, titles, listObjects); } if(ipProperties.getCycleReset()){ ipCountMap.clear(); } } }- 1
- 2
- 3
- 4
- 5
- 6
- 7
- 8
- 9
- 10
- 11
- 12
- 13
- 14
- 15
- 16
- 17
- 18
- 19
- 20
- 21
- 22
- 23
- 24
- 25
- 26
- 27
- 28
- 29
- 30
- 31
- 32
- 33
- 34
- 35
- 36
- 37
- 38
- 39
- 40
- 41
- 42
- 43
- 44
- 45
- 46
- 47
- 48
- 49
- 50
- 51
- 52
- 53
- 54
- 55
- 56
- 57
- 58
- 59
- 60
- 61
- 62
- 63
- 64
- 65
- 66
- 67
- 68
- 辅助用的打印工具
import lombok.AllArgsConstructor; import lombok.Data; import lombok.NoArgsConstructor; import lombok.extern.slf4j.Slf4j; import org.apache.commons.lang.StringUtils; import java.util.ArrayList; import java.util.List; import java.util.Map; import java.util.function.Function; /** * 数据打印工具,支持控制台和日志打印,支持数据左对齐,居中和右对齐,默认右对齐。小标题自动居中(不支持设置) *
备注:大标题可以使用中文,小标题和内容不建议包含中文 */ @Slf4j @Data @NoArgsConstructor @AllArgsConstructor public class DataPrinter { /** * 日志输出模式(默认控制台输出) */ private LogOutputModel logOutputModel = LogOutputModel.CONSOLE; /** * 数据对齐模式(默认右对齐) */ private DataAlignModel dataAlignModel = DataAlignModel.RIGHT; /** * 是否显示行数 */ private boolean showRows = true; /** * 日志输出模式 */ public enum LogOutputModel { LOG, CONSOLE; } /** * 数据对齐模式 */ public enum DataAlignModel { LEFT, CENTER, RIGHT; } /** * 数据格式化输出 * @param topTitle 大标题 * @param titles 小标题 * @param data 数据集合 */ public void printListMap(String topTitle, String[] titles, List<Map<String, Object>> data) { List<Object[]> objsList = new ArrayList<>(); if (null != data) { for (Map<String, Object> map : data) { Object[] objs = new Object[titles.length]; for (int i = 0; i < titles.length; i++) { Object obj = map.get(titles[i]); objs[i] = obj; } objsList.add(objs); } } print(topTitle,titles,objsList); } /** * 数据格式化输出 * @param topTitle 大标题 * @param titles 小标题 * @param data 数据集合 */ public void print(String topTitle, String[] titles, List<Object[]> data) { topTitle = null == topTitle ? "Not Defined" : topTitle; /** * 控制日志输出 */ Function<String, Integer> outputLog_fun = (string) -> { if (this.getLogOutputModel() == LogOutputModel.CONSOLE) { System.out.println(string); } else if (this.getLogOutputModel() == LogOutputModel.LOG) { log.info(string); } return 1; }; /** * 1. 根据标题和内容计算每一列需要的最大宽度 */ Integer[] lineWidths = new Integer[titles.length]; int totalWidth = 0;//最大长度 for (int i = 0; i < lineWidths.length; i++) { int maxWidth = 0; // 默认最小长度 String title = titles[i]; if (null != title) { maxWidth = Math.max(maxWidth, title.length()); } else { titles[i] = ""; } if (null != data) { for (Object[] array : data) { Object obj = array[i]; if (null != obj) { maxWidth = Math.max(maxWidth, obj.toString().length()); } } } if (maxWidth + 4 < 10) { maxWidth = 10; } else { maxWidth = maxWidth + 4; //避免数据左右顶到表格 } lineWidths[i] = maxWidth; totalWidth = totalWidth + maxWidth; } /** * 2. 输出大标题 */ if (isShowRows()) { int dataSize = null != data ? data.size() : 0; outputLog_fun.apply(StringUtils.leftPad(topTitle + "(rows:" + dataSize + ")", (int) (totalWidth * 0.5))); } else { outputLog_fun.apply(StringUtils.leftPad(topTitle, (int) (totalWidth * 0.5))); } /** * 3. 输出标题头 */ StringBuffer head_sb = new StringBuffer("+"); for (int i = 0; i < titles.length; i++) { String title = titles[i]; String str = StringUtils.center(title, lineWidths[i], "-"); head_sb.append(str).append("+"); } outputLog_fun.apply(head_sb.toString()); /** * 4. 输出数据 */ if (null != data) { for (int i = 0; i < data.size(); i++) { Object[] array = data.get(i); StringBuffer data_sb = new StringBuffer("|"); for (int j = 0; j < array.length; j++) { Object obj = array[j]; String str = null; if (this.getDataAlignModel() == DataAlignModel.RIGHT) { str = String.format("%" + (lineWidths[j] - 2) + "s ", obj); } else if (this.getDataAlignModel() == DataAlignModel.CENTER) { str = StringUtils.center(obj + "", lineWidths[j]); } else if (this.getDataAlignModel() == DataAlignModel.LEFT) { str = String.format(" %-" + (lineWidths[j] - 2) + "s", obj); } data_sb.append(str).append("|"); } outputLog_fun.apply(data_sb.toString()); } } /** * 5.输出结尾 */ StringBuffer foot_sb = new StringBuffer("+"); for (int i = 0; i < titles.length; i++) { String str = StringUtils.center("", lineWidths[i], "-"); foot_sb.append(str).append("+"); } outputLog_fun.apply(foot_sb.toString()); } }- 1
- 2
- 3
- 4
- 5
- 6
- 7
- 8
- 9
- 10
- 11
- 12
- 13
- 14
- 15
- 16
- 17
- 18
- 19
- 20
- 21
- 22
- 23
- 24
- 25
- 26
- 27
- 28
- 29
- 30
- 31
- 32
- 33
- 34
- 35
- 36
- 37
- 38
- 39
- 40
- 41
- 42
- 43
- 44
- 45
- 46
- 47
- 48
- 49
- 50
- 51
- 52
- 53
- 54
- 55
- 56
- 57
- 58
- 59
- 60
- 61
- 62
- 63
- 64
- 65
- 66
- 67
- 68
- 69
- 70
- 71
- 72
- 73
- 74
- 75
- 76
- 77
- 78
- 79
- 80
- 81
- 82
- 83
- 84
- 85
- 86
- 87
- 88
- 89
- 90
- 91
- 92
- 93
- 94
- 95
- 96
- 97
- 98
- 99
- 100
- 101
- 102
- 103
- 104
- 105
- 106
- 107
- 108
- 109
- 110
- 111
- 112
- 113
- 114
- 115
- 116
- 117
- 118
- 119
- 120
- 121
- 122
- 123
- 124
- 125
- 126
- 127
- 128
- 129
- 130
- 131
- 132
- 133
- 134
- 135
- 136
- 137
- 138
- 139
- 140
- 141
- 142
- 143
- 144
- 145
- 146
- 147
- 148
- 149
- 150
- 151
- 152
- 153
- 154
- 155
- 156
- 157
- 158
- 159
- 160
- 161
- 162
- 163
- 164
- 165
- 166
- 167
- 168
- 169
- 170
- 171
- 172
- 173
- 174
- 175
- 176
- 177
- 178
- 179
- 180
- 181
- 182
- 需要定义IpAutoConfiguration,让第三方容器加载到
package com.lcz.autoconfig; import com.lcz.pojo.IpProperties; import com.lcz.service.IpCountService; import org.springframework.context.annotation.Bean; import org.springframework.context.annotation.Import; import org.springframework.scheduling.annotation.EnableScheduling; @EnableScheduling //@EnableConfigurationProperties(IpProperties.class) //需要放弃使用属性创建bean,改为import手动导入 @Import({IpProperties.class, MyWebMvcConfigurer.class}) //需要将MyWebMvcConfigurer导入,否则容器将不会加载到拦截器 public class IpAutoConfiguration { @Bean public IpCountService ipCountService(){ return new IpCountService(); } }- 1
- 2
- 3
- 4
- 5
- 6
- 7
- 8
- 9
- 10
- 11
- 12
- 13
- 14
- 15
- 16
- 17
- 18
- 这里还需要编写spring.factories文件,让引用者容器加载到IpAutoConfiguration
org.springframework.boot.autoconfigure.EnableAutoConfiguration=\ com.lcz.autoconfig.IpAutoConfiguration- 1
- 2

8 .因为引用者直接引入依赖即可实现监控,所以这里还需要定义拦截器,实现无侵入式编程
import com.lcz.service.IpCountService; import org.springframework.beans.factory.annotation.Autowired; import org.springframework.web.servlet.HandlerInterceptor; import javax.servlet.http.HttpServletRequest; import javax.servlet.http.HttpServletResponse; public class IpInterceptor implements HandlerInterceptor { @Autowired private IpCountService ipCountService; @Override public boolean preHandle(HttpServletRequest request, HttpServletResponse response, Object handler) throws Exception { ipCountService.count(); return true; } }- 1
- 2
- 3
- 4
- 5
- 6
- 7
- 8
- 9
- 10
- 11
- 12
- 13
- 14
- 15
- 16
- 17
- 18
mport org.springframework.context.annotation.Bean; import org.springframework.context.annotation.Configuration; import org.springframework.web.servlet.config.annotation.InterceptorRegistry; import org.springframework.web.servlet.config.annotation.WebMvcConfigurer; @Configuration public class MyWebMvcConfigurer implements WebMvcConfigurer { @Override public void addInterceptors(InterceptorRegistry registry) { registry.addInterceptor(ipInterceptor()).addPathPatterns("/**"); /** * 当然可以添加多个拦截器,需要拦截器的执行是有顺序的 */ // registry.addInterceptor(myInterceptor2()).addPathPatterns("/**"); // registry.addInterceptor(myInterceptor3()).addPathPatterns("/**"); } @Bean public IpInterceptor ipInterceptor(){ return new IpInterceptor(); } }- 1
- 2
- 3
- 4
- 5
- 6
- 7
- 8
- 9
- 10
- 11
- 12
- 13
- 14
- 15
- 16
- 17
- 18
- 19
- 20
- 21
- 22
- 23
- 24
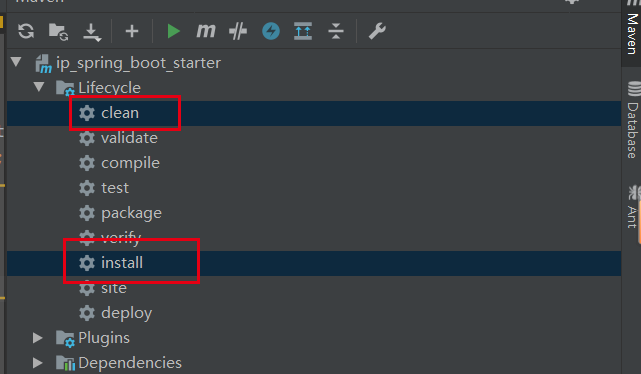
- 由于开发完后,插件并不会进入仓库,我们需要将插件安装到maven仓库。点击clean和install,将插件安装到本地的maven仓库中。
第三节 使用ip-spring-boot-starter插件
前面我们定义好了插件,下面使用这个插件。
- 首先这里有一个简单的springboot-hello工程(只要是springboot的工程即可)

- 导入依赖
<dependency> <groupId>com.lczgroupId> <artifactId>ip_spring_boot_starterartifactId> <version>0.0.1-SNAPSHOTversion> dependency>- 1
- 2
- 3
- 4
- 5
- 启动服务器,发起请求测试 http://localhost:8080/test,查看控制台

到这里使用ip-spring-boot-starter已经可以了,但是配置参数控制内容输出,没有yml的提示功能,怎么使用yml控制输出内容输出?下面将介绍如何开启yml提示功能。
第四节 开启yml提示功能
我们的starter支持参数的配置,配置格式
tools: ip: cycle: 1 model: "detail" cycle-reset: true- 1
- 2
- 3
- 4
- 5
但是我们在springboot-hello的配置文件下面配置这些参数,并不会有任何提示,这对于使用者而言很不友好。
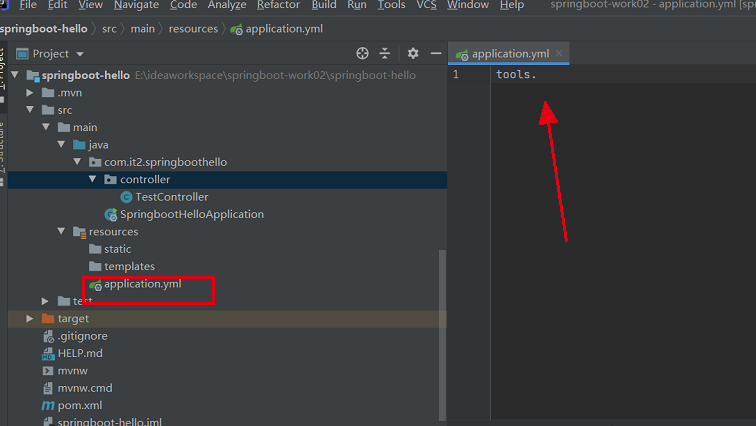
如何像其它starter一样开启参数提示?如何开启yml提示
- 进入到ip-spring-boot-starter工程,导入依赖
<dependency> <groupId>org.springframework.bootgroupId> <artifactId>spring-boot-configuration-processorartifactId> dependency>- 1
- 2
- 3
- 4
-
点击complie之后,在target\classes\META-INF目录下,生成了一个spring-configuration-metadata.json文件,将这个文件复制到resources\META-INF目录下。此时可以移除上面的spring-boot-configuration-processor这个依赖了。


-
此时,再去yml文件检查发现有提示了
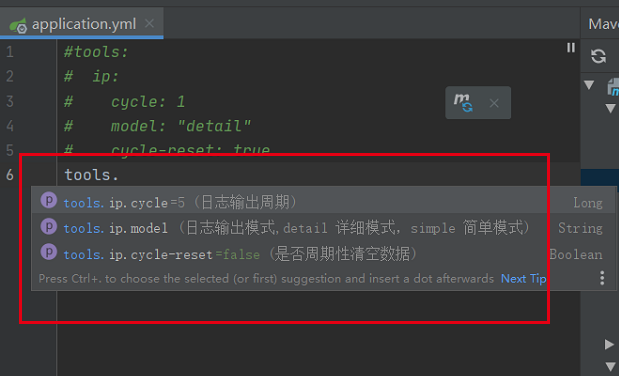
-
但是输入model 时,没有提示候选项。怎么添加候选项?
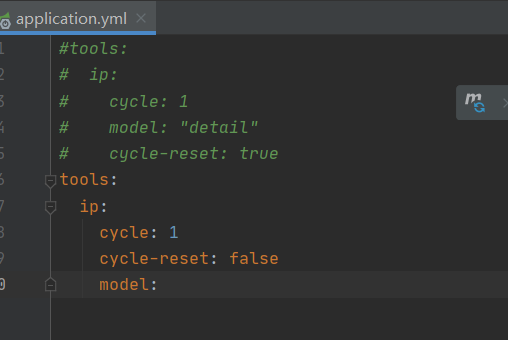
-
此时给model添加候选项,打开spring-configuration-metadata.json,找到hints,添加候选项
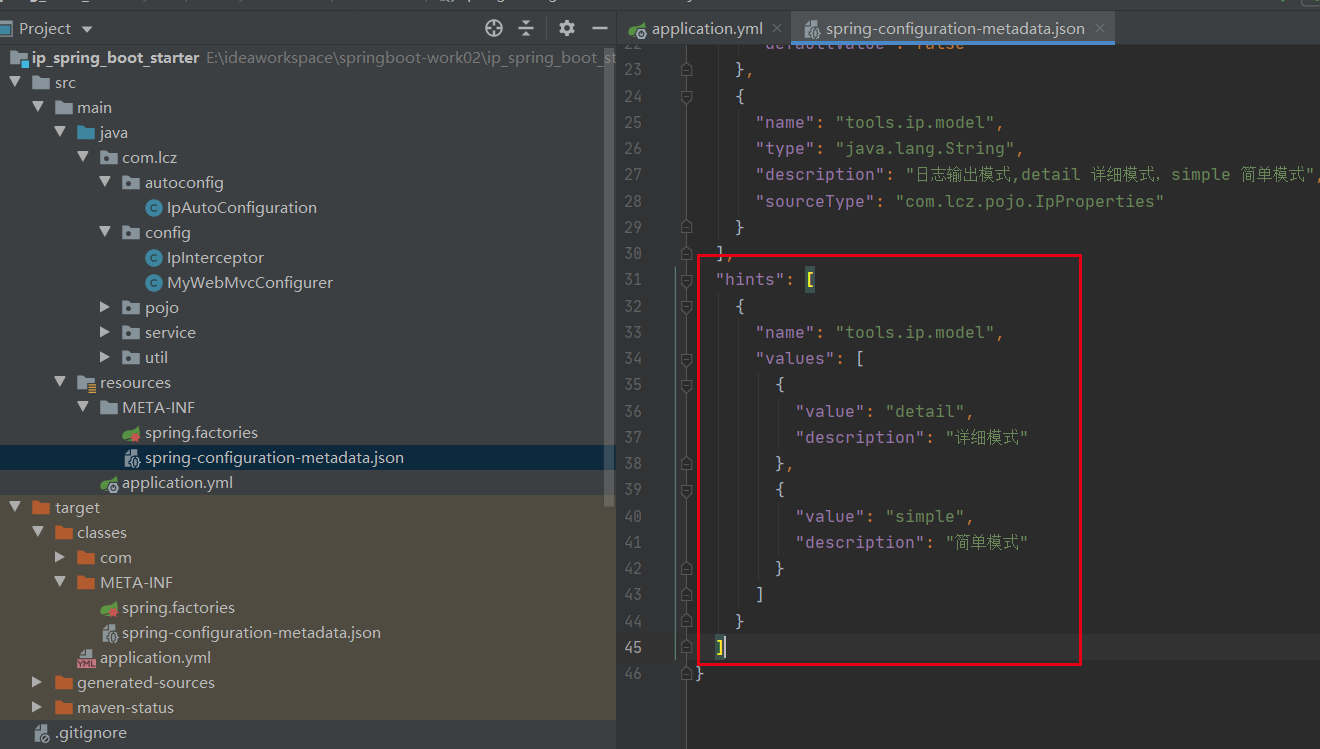
"hints": [ { "name": "tools.ip.model", "values": [ { "value": "detail", "description": "详细模式" }, { "value": "simple", "description": "简单模式" } ] } ]- 1
- 2
- 3
- 4
- 5
- 6
- 7
- 8
- 9
- 10
- 11
- 12
- 13
- 14
- 15
- 此时将ip-spring-boot-starter重新clean和install到仓库

- 进入到springboot-hello工程,在yml文件设置配置,可以看到model也有候选提示了。
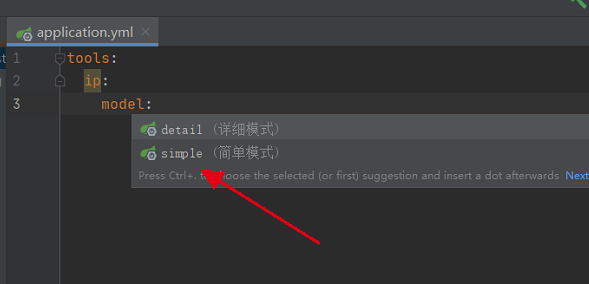
- yml提示功能大功告成。
遇到的问题
1. 导入ip-spring-boot-starter后,拦截器不生效,只见打印,但是统计不到数据
解决方案:请检查是否将MyWebMvcConfigurer导入到IpAutoConfiguration里面,如果没有导入,容器将不会加载拦截器,统计数据就没有数据。

2. yml提示有两遍
解决方案:移除依赖的spring-boot-configuration-processor包,并且,重新执行complie
-
相关阅读:
文献翻译平台(自用)
VSCode\\VS2017下CPP环境的配置
【JAVA】String类
eMMC5.1
如何化解35岁危机?华为云数据库首席架构师20年技术经验分享
RENAME,CHANGE,ALTER,MODIFY 四个字段的作用和区别
【安全边界】
JavaScript中this关键字
Zookeeper原理解析-单机模式
1024程序员节特色海报两张
- 原文地址:https://blog.csdn.net/u011628753/article/details/126126684
