-
web 面试高频考点 —— JavaScript 篇(一)【JS的三座大山 】 变量类型和计算、原型和原型链、作用域和闭包、异步
系列文章目录
变量类型和计算
JS 值类型和引用类型的区别
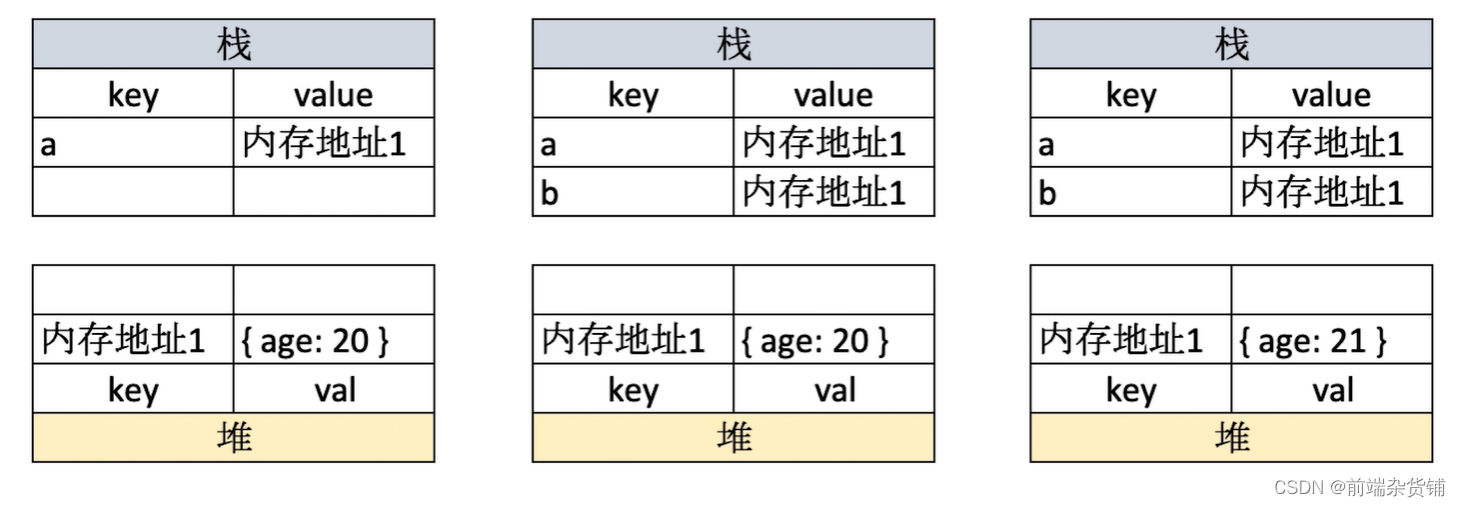
值类型
let a = 100 let b = a a = 200 console.log(b) // 100- 1
- 2
- 3
- 4
出处:https://coding.imooc.com/lesson/400.html#mid=30282

引用类型
let a = {age: 20} let b = a b.age = 21 console.log(a.age) // 21- 1
- 2
- 3
- 4
出处:https://coding.imooc.com/lesson/400.html#mid=30282

常见值类型(基本数据类型)
- 字符串(String)
- 数字(Number)
- 布尔(Boolean)
- 未定义(Undefined)
- 空(Null)
- Symbol
常见引用类型
- Object 类型
- Array 类型
- Function 类型
- Date 类型
- RegExp 类型
手写深拷贝
typeof 运算符
- 能判断所有的值类型
- 能判断函数
- 能识别引用类型(不能再继续识别)
示例 1:判断所有的值类型(基本数据类型)
let a = 'hello' let b = 11 let c = true let d let s = Symbol('hi') console.log(typeof a) // string console.log(typeof b) // number console.log(typeof c) // boolean console.log(typeof d) // undefined console.log(typeof s) // symbol- 1
- 2
- 3
- 4
- 5
- 6
- 7
- 8
- 9
- 10
示例 2:能判断函数
let x = console.log let y = function() {} console.log(typeof x) // function console.log(typeof y) // function- 1
- 2
- 3
- 4
示例 3:能识别引用类型(不能再继续识别)
console.log(typeof null) // object console.log(typeof ['hello']) // object console.log(typeof {age: 20}) // object- 1
- 2
- 3
手撕深拷贝
普通写法:
const obj1 = { age: 20, name: '张三', address: { city: '北京' }, arr: ['x', 'y', 'z'] } const obj2 = deepClone(obj1) obj2.address.city = '上海' obj2.arr[0] = 'a' console.log(obj1.address.city) // 北京 console.log(obj1.arr[0]) // x // 深拷贝 function deepClone(obj = {}) { if(typeof obj !== 'object' || obj == null) { // obj 是 null,或者不是对象和数组,直接返回 return obj } // 初始化返回结果 let result if(obj instanceof Array) { result = [] } else { result = {} } for(let key in obj) { // 保证 key 不是原型的属性 if(obj.hasOwnProperty(key)) { // 递归 result[key] = deepClone(obj[key]) } } // 返回结果 return result }- 1
- 2
- 3
- 4
- 5
- 6
- 7
- 8
- 9
- 10
- 11
- 12
- 13
- 14
- 15
- 16
- 17
- 18
- 19
- 20
- 21
- 22
- 23
- 24
- 25
- 26
- 27
- 28
- 29
- 30
- 31
- 32
- 33
- 34
- 35
- 36
- 37
- 38
- 39
- 40
- 41
- 42
简写形式:
// 深拷贝函数 function deepClone(obj) { // 1 判断是否是非引用类型或者null if (typeof obj !== 'object' || obj == null) return obj // 2 创建一个容器 let result = new obj.constructor() // 3 拿到对象的keys,给容器赋值 Object.keys(obj).forEach(v => result[key] = deepClone(obj[key])) // 4 返回容器 return result }- 1
- 2
- 3
- 4
- 5
- 6
- 7
- 8
- 9
- 10
- 11
变量计算 - 类型转换
- 字符串拼接
- ==
- if 语句
- 逻辑运算
示例 1:字符串拼接
const a = 100 + 10 // 110 const b = 100 + '10' // '10010' const c = true + '10' // 'true10'- 1
- 2
- 3
示例 2:==
100 == '100' // true 0 == '' // true 0 == false // true false == '' // true null = undefined // true- 1
- 2
- 3
- 4
- 5
示例 2 扩展:
除了
==null 之外,其他都用===const obj = {name: 'zhangsan'} if (obj.age == null) {} // 相当于: if (obj.age === null || obj.age === undefined) {}- 1
- 2
- 3
- 4
- 5
示例 3:truly 变量和 falsely 变量
- truly 变量:
!!a == true的变量 - falsely 变量:
!!a === false的变量
以下是 falsely 变量,除此之外都是 truly 变量
!!0 === false !!NaN === false !!'' === false !!null === false !!undefined == false !!false === false- 1
- 2
- 3
- 4
- 5
- 6
示例 4:逻辑判断
注:10 是 truly 变量,继续往后判断返回第二个值
console.log(10 && 0) // 0 console.log('' || 'abc') // 'abc' console.log(!window.abc) // true- 1
- 2
- 3
原型和原型链
class 类
- constructor
- 属性
- 方法
示例:
// 学生类 class Student { constructor(name, number) { this.name = name this.number = number } sayHi() { console.log(`姓名 ${this.name}, 学号 ${this.number}`); } } // 通过类 new 对象/实例 const xialu = new Student('夏洛', '2022') console.log(xialu.name) // 夏洛 console.log(xialu.number) // 2022 xialu.sayHi() // 姓名 夏洛, 学号 2022- 1
- 2
- 3
- 4
- 5
- 6
- 7
- 8
- 9
- 10
- 11
- 12
- 13
- 14
- 15
- 16
继承
- extends
- super
- 扩展或重写方法
示例:子类继承父类
// 父类 class People { constructor(name) { this.name = name } eat() { console.log(`${this.name} eat food`); } } // 子类 class Student extends People { constructor(name, number) { super(name) this.number = number } sayHi() { console.log(`姓名 ${this.name} 学号 ${this.number}`); } } // 子类 class Teacher extends People { constructor(name, major) { super(name) this.major = major } teach() { console.log(`${this.name} 教授 ${this.major}`) } } // 实例 const xialuo = new Student('夏洛', '2022') console.log(xialuo.name) // 夏洛 console.log(xialuo.number) // 2022 xialuo.sayHi() // 姓名 夏洛, 学号 2022 xialuo.eat() // 夏洛 eat food // 实例 const wanglaoshi = new Teacher('王老师', '语文') console.log(wanglaoshi.name) // 王老师 console.log(wanglaoshi.major) // 语文 wanglaoshi.teach() // 王老师 教授 语文 wanglaoshi.eat() // 王老师 eat food- 1
- 2
- 3
- 4
- 5
- 6
- 7
- 8
- 9
- 10
- 11
- 12
- 13
- 14
- 15
- 16
- 17
- 18
- 19
- 20
- 21
- 22
- 23
- 24
- 25
- 26
- 27
- 28
- 29
- 30
- 31
- 32
- 33
- 34
- 35
- 36
- 37
- 38
- 39
- 40
- 41
- 42
- 43
- 44
- 45
- 46
JS原型(隐式原型和显式原型)
类型判断 instanceof
console.log(xialuo instanceof Student) // true console.log(xialuo instanceof People) // true console.log(xialuo instanceof Object) // true- 1
- 2
- 3
原型
class 实际上是 函数
console.log(typeof Student) // 'function' console.log(typeof Teacher) // 'function' console.log(typeof People) // 'function'- 1
- 2
- 3
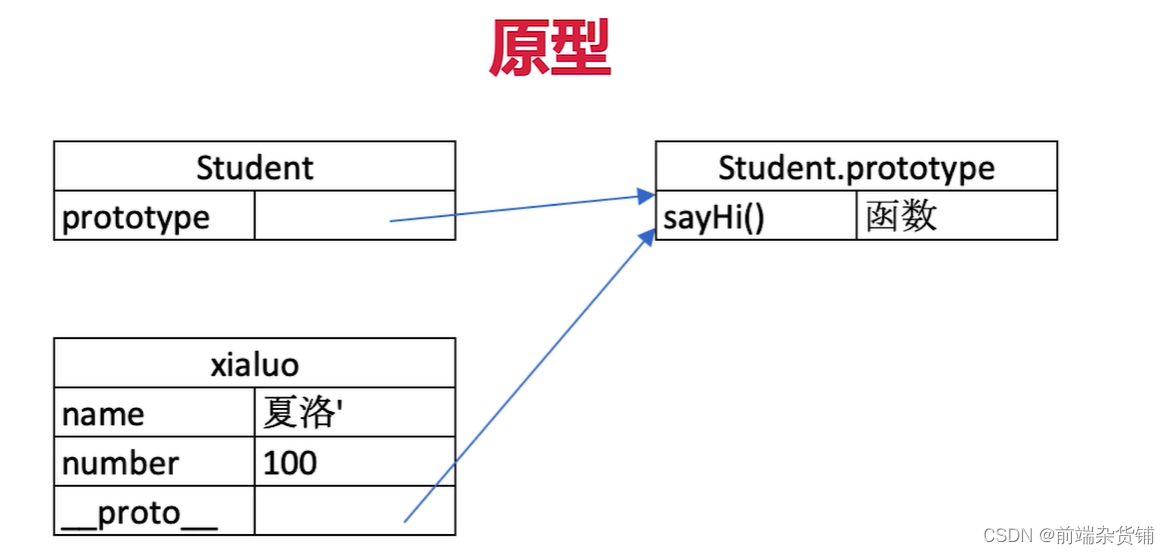
隐式原型和显式原型
- 隐式原型:
__prop__ - 显式原型:
prototype
实例对象的隐式原型等于对应构造函数的显示原型
console.log(xialuo.__proto__) // People {constructor: ƒ, sayHi: ƒ} console.log(Student.prototype) // People {constructor: ƒ, sayHi: ƒ} console.log(xialuo.__proto__ === Student.prototype) // true- 1
- 2
- 3
出处:https://coding.imooc.com/lesson/400.html#mid=30288

原型关系
- 每个 class 都有一个显式原型
prototype - 每个实例都有隐式原型
__proto__ - 实例的
__proto__指向对应 class 的prototype
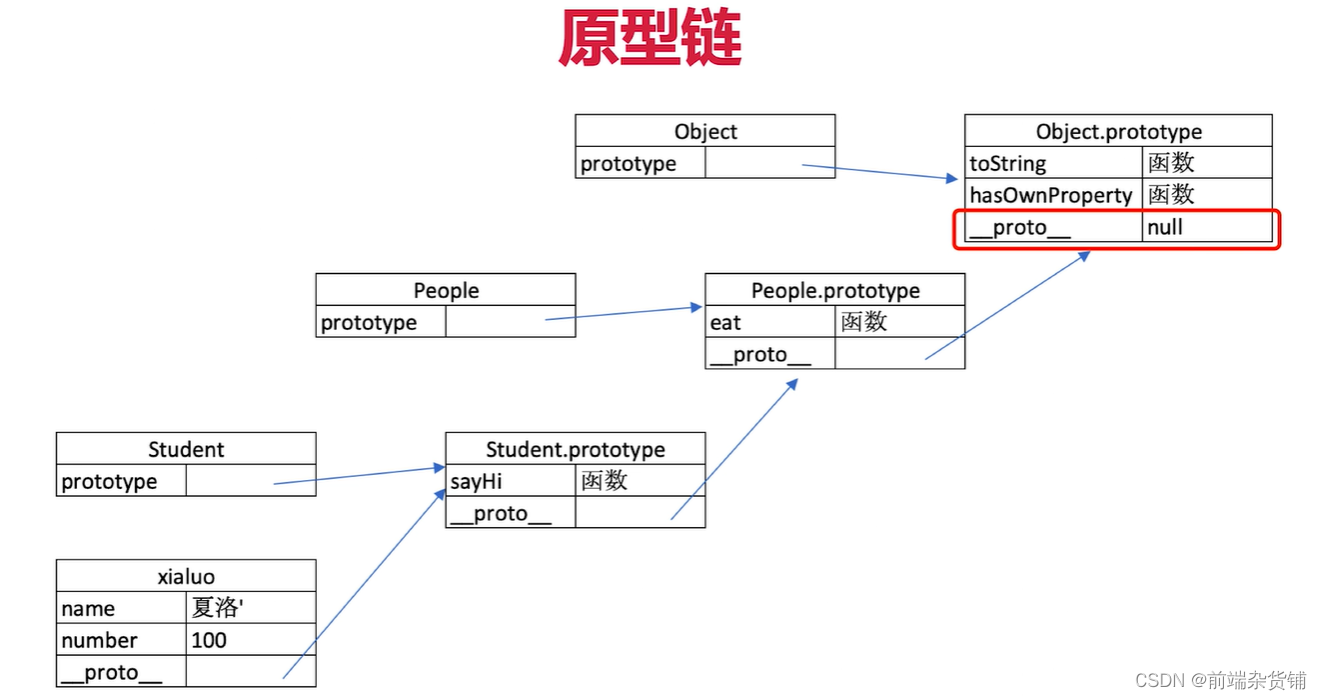
基于原型的执行规则
- 获取属性 xialuo.name 或执行方法 xialuo.sayHi 时
- 先在自身属性和方法寻找
- 如果找不到则自动去
__proto__中查找
原型链
instanceof 顺着隐式原型往上找,找到返回 true,找不到返回 false
出处:https://coding.imooc.com/lesson/400.html#mid=30289

hasOwnProperty
hasOwnProperty 会查找一个对象是否有某个属性,但是不会去查找它的原型链
console.log(xialuo.hasOwnProperty('name')) // true console.log(xialuo.hasOwnProperty('eat')) // false- 1
- 2
手写简易 jQuery
通过 class类 和 原型,手写 jQuery 部分功能
<p>第一段文字</p> <p>第二段文字</p> <p>第三段文字</p> class jQuery { constructor(selector) { const result = document.querySelectorAll(selector) const length = result.length for (let i = 0; i < length; i++) { this[i] = result[i] } this.length = length this.selector = selector } get(index) { return this[index] } each(fn) { for (let i = 0; i < this.length; i++) { const elem = this[i] fn(elem) } } on(type, fn) { return this.each(elem => { elem.addEventListener(type, fn, false) }) } // 扩展很多 DOM API } // 插件 jQuery.prototype.dialog = function (info) { alert(info) } // “造轮子” class myJQuery extends jQuery { constructor(selector) { super(selector) } // 扩展自己的方法 addClass(className) { } style(data) { } }- 1
- 2
- 3
- 4
- 5
- 6
- 7
- 8
- 9
- 10
- 11
- 12
- 13
- 14
- 15
- 16
- 17
- 18
- 19
- 20
- 21
- 22
- 23
- 24
- 25
- 26
- 27
- 28
- 29
- 30
- 31
- 32
- 33
- 34
- 35
- 36
- 37
- 38
- 39
- 40
- 41
- 42
- 43
- 44
- 45
- 46
- 47
- 48
- 49
测试:

作用域和闭包
作用域
- 全局作用域
- 函数作用域
- 块级作用域
全局作用域:如 window 对象、document 对象
函数作用域:只能在函数里面使用
块级作用域:在块内有效示例:全局作用域
在任何地方都能获取到
window.a = 'zhangsan' function fn() { console.log(window.a) } fn() // zhangsan- 1
- 2
- 3
- 4
- 5
示例:函数作用域
里面的函数能读取到外面函数的变量
function fn1() { let a = 'zhangsan' function fn2() { let b = 'lisi' console.log(a) } fn2() } fn1() // zhangsan- 1
- 2
- 3
- 4
- 5
- 6
- 7
- 8
- 9
外面的函数不能读取里面函数的变量
function fn1() { let a = 'zhangsan' console.log(b) function fn2() { let b = 'lisi' } fn2() } fn1() // 报错:b is not defined- 1
- 2
- 3
- 4
- 5
- 6
- 7
- 8
- 9
示例:块级作用域
在块之外读取不到变量
if (true) { let x = 100 } console.log(x) // 报错:x is not defined- 1
- 2
- 3
- 4
let a for(let i = 0; i < 10; i++) { a = document.createElement('a') a.innerHTML = i + '
' a.addEventListener('click', function (e) { e.preventDefault() alert(i) }) document.body.appendChild(a) }- 1
- 2
- 3
- 4
- 5
- 6
- 7
- 8
- 9
- 10

自由变量
- 一个变量在当前作用域没有定义,但被使用了
- 向上级作用域,一层一层依次寻找,直至找到为止
- 如果到全局作用域都没找到,则报错 xx is not defined
示例:不在当前作用域的就一层层往上找,a、b 都要往上层找
let a = 1 function fn1() { let b = 2 function fn2() { let c = 3 console.log(a + b + c) } fn2() } fn1() // 6- 1
- 2
- 3
- 4
- 5
- 6
- 7
- 8
- 9
- 10
闭包
作用域应用的特殊情况,有两种表现:
- 函数作为返回值被返回
- 函数作为参数被传递
总结:所有自由变量的查找,是在函数定义的地方,向上级作用域查找,不是执行的地方
示例:函数作为返回值
function create() { const a = 100 return function() { console.log(a) } } const fn = create() const a = 200 fn() // 100- 1
- 2
- 3
- 4
- 5
- 6
- 7
- 8
- 9
示例:函数作为参数
function print(fn) { const a = 200 fn() } const a = 100 function fn() { console.log(a) } print(fn) // 100- 1
- 2
- 3
- 4
- 5
- 6
- 7
- 8
- 9
this
- 作为普通函数:指向 window
- 使用 call apply bind :传入什么绑定什么(call、apply、bind的区别)
- 作为对象方法被调用:指向当前对象本身,异步指向 window,箭头函数的异步指向上级作用域
- 在 class 方法中调用:指向当前实例本身
- 箭头函数:取上级作用域 this 的值
注:this 的取值是在函数执行的时候确定的,不是在函数定义的时候确定的
示例 1:普通函数、使用 call、apply、bind
function fn1() { console.log(this) } fn1() // window- 1
- 2
- 3
- 4
示例 2:call、apply、bind 指定指向
function fn1() { console.log(this) } fn1() // window fn1.call({x: 100}) // {x: 100} const fn2 = fn1.bind({x: 200}) fn2() // {x: 200}- 1
- 2
- 3
- 4
- 5
- 6
- 7
- 8
- 9
示例 3:作为对象方法被调用、箭头函数
const zhangsan = { name: 'zhangsan', sayHi() { console.log(this) }, wait() { setTimeout(function() { console.log(this) }) }, waitAgain() { setTimeout(() => { console.log(this) }) } } zhangsan.sayHi() // this即当前对象 zhangsan.wait() // this === window zhangsan.waitAgain() // this即当前对象- 1
- 2
- 3
- 4
- 5
- 6
- 7
- 8
- 9
- 10
- 11
- 12
- 13
- 14
- 15
- 16
- 17
- 18
- 19

示例 4:在 class 方法中调用
class People { constructor(name) { this.name = name } sayHi() { console.log(this) } } const zhangsan = new People('张三') zhangsan.sayHi() // this 指向张三对象- 1
- 2
- 3
- 4
- 5
- 6
- 7
- 8
- 9
- 10

手写 bind
- 在函数原型上添加 bind1 方法,模拟 bind
- 将参数拆解为数组
- 通过 shift 方法挖走数组的第一项作为 this
- 把 this 赋值给 self,指向调用 bind 方法的函数
- 最后返回一个函数
// 模拟 bind Function.prototype.bind1 = function() { // 将参数拆解为数组 // const args = Array.prototype.slice.call(arguments) const args = Array.from(arguments) // 获取 this (数组第一项) const t = args.shift() // fn1.bind(...) 中的 fn1 const self = this // 返回一个函数 return function () { return self.apply(t, args) } } function fn1(a, b, c) { console.log('this', this) console.log(a, b, c) return 'this is fn1' } const fn2 = fn1.bind1({x: 100}, 10, 20, 30) const res = fn2() console.log(res)- 1
- 2
- 3
- 4
- 5
- 6
- 7
- 8
- 9
- 10
- 11
- 12
- 13
- 14
- 15
- 16
- 17
- 18
- 19
- 20
- 21
- 22
- 23
- 24
- 25
- 26

实际开发中闭包的应用
- 隐藏数据
- 如做一个简单的 cache 工具
// 闭包隐藏数据,只提供 API function createCache() { const data = {} // 闭包中的数据,被隐藏,不被外界访问 return { set: function (key, val) { data[key] = val }, get: function (key) { return data[key] } } } const c = createCache() c.set('a', 100)`在这里插入代码片` console.log(c.get('a')) // 100- 1
- 2
- 3
- 4
- 5
- 6
- 7
- 8
- 9
- 10
- 11
- 12
- 13
- 14
- 15
- 16
异步
同步和异步的不同
单线程和异步
- JS 是单线程语言,只能同时做一件事
- 浏览器和 nodejs 已支持 JS 启动进程,如 Web Worker
- JS 和 DOM 渲染共用同一个线程,因为 JS 可修改 DOM 元素
- 遇到等待(网络请求,定时任务)不能卡住
- 需要异步
- 回调 callback 函数形式
异步和同步
- 基于JS是单线程语言
- 异步不会阻塞代码执行
- 同步会阻塞代码执行
异步:callback 回调函数,等主线程任务执行完再执行
console.log(100) setTimeout(() => { console.log(200) }, 100) console.log(300) // 输出顺序:100 300 200- 1
- 2
- 3
- 4
- 5
- 6
同步:按顺序执行,前面没执行完后面的不会执行
console.log(100) alert(200) console.log(300)- 1
- 2
- 3

应用场景
- 网络请求,如 ajax、图片加载
- 定时任务,如 setTimeout
ajax:
console.log('start') $.get('xxx.json', function (data1) { console.log(data1) }) console.log('end')- 1
- 2
- 3
- 4
- 5
图片加载:
console.log('start') let img = document.createElement('img') img.onload = function () { console.log('loaded') } img.src = 'xxx.png' console.log('end')- 1
- 2
- 3
- 4
- 5
- 6
- 7
setTimeout:
console.log('start') setTimeout(function() { console.log('异步') }, 100) console.log('end')- 1
- 2
- 3
- 4
- 5
异步相关面试题
手写 Promise 加载一张图片
function loadImg(src) { const p = new Promise((resolve, reject) => { const img = document.createElement('img') img.onload = () => { resolve(img) } img.onerror = () => { const err = new Error(`图片加载失败 ${src}`) reject(err) } img.src = src // src 一赋值,立马触发图片的加载 document.body.appendChild(img) }) return p } const url1 = 'xxx.png' const url2 = 'xx.png' loadImg(url1).then(img1 => { console.log(img1.width) return img1 // 普通对象 }).then(img1 => { console.log(img1.height) return loadImg(url2) // promise 实例 }).then(img2 =>{ console.log(img2.width) return img2 }).then(img2 => { console.log(img2.height) }).catch(error => console.err(error))- 1
- 2
- 3
- 4
- 5
- 6
- 7
- 8
- 9
- 10
- 11
- 12
- 13
- 14
- 15
- 16
- 17
- 18
- 19
- 20
- 21
- 22
- 23
- 24
- 25
- 26
- 27
- 28
- 29
- 30
- 31
不积跬步无以至千里 不积小流无以成江海点个关注不迷路,持续更新中…
-
相关阅读:
DAC测试实验——FPGA学习笔记7
jmeter文件下载接口处理
【无标题】
猿创征文|Aixos的引入与基本使用
Java 对象排序(Object Ordering)
Mysql主从复制、读写分离
Git和Github的使用
Excel_字母数字混合排序(数字不符合预期)的一种解决方法
【JavaScript】JS开发中五个常用功能/案例(31-35)(牛客题解)
HDFS的JAVA API操作
- 原文地址:https://blog.csdn.net/qq_45902692/article/details/126077498
