-
【安卓开发】安卓布局控件
目录
- 一、布局的种类和页面的关系
- 二、显示一张图片
- 三、显示两张图片
- 四、相对布局RelativeLayout常用属性
- 五、基础控件之Button,TextView,EditText,ImageView制作一个登陆界面
- 六、padding和margin
- 七、相对布局综合小演练—智能家居刷卡界面
- 八、线性布局
一、布局的种类和页面的关系

打开布局相关代码 .xml 我们可以看到一些组件:
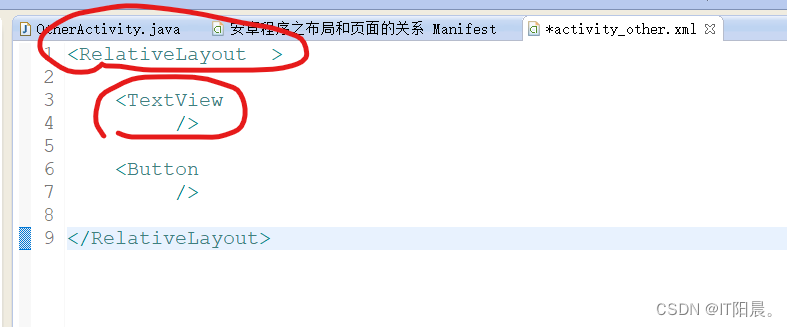
这些组件共同构成安卓页面的显示,我们可以用一张图来解释一下布局的原理:
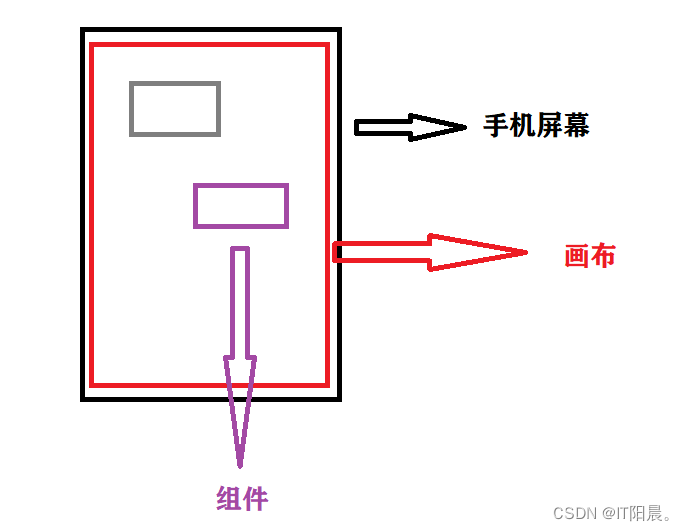
所有组件必须放在画布上面。
所有的组件都有其对应的属性,比如位置、大小、方向、颜色等等:

二、显示一张图片
- 首先建立一个工程:

- 打开布局文件,我们删除多余的代码:


- 随便去网上下载一张图片,保存在电脑中,在工程 res 文件下的 drawable-hdpi 文件中复制粘贴添加这张图片:

- 在组件属性中添加背景色,Alt + ‘/’ 添加 drawable/bg 图片文件:


- 打开模拟器中的APP,显示成功:

三、显示两张图片
我们先画一下布局原理图,显示两张图片,我们需要有一个总布局,相当于画布(红色框框),在画布中有两个子布局(绿色框框),这样我们就能实现显示两张图片。

- 新建一个工程,打开 .xml 布局代码,删除多余代码,新建两个布局(同上):

- 模仿总布局写出它的宽度、高度等属性:

- 想要上下显示两个美女,我们需要为上面的图片添加 id 属性(注意这是属性内容是 +id),并且在第二张图片的属性中添加位置属性 layout_below ,位置在第一张图片下面,位置属性内容是 @id/dp1 ,否则第二张图片会覆盖第一张图片:

- 下面我们看一下显示效果:

四、相对布局RelativeLayout常用属性
1. wrap_content
android:layout_width="wrap_content" android:layout_height="wrap_content"- 1
- 2
该属性是指显示实际图片的大小,fill_parent 和 match_parent 是适应屏幕大小,即撑满屏幕。

测试结果:

2. 相对于父控件,例如:android:layout_alignParentTop=“true”
android:layout_alignParentTop属性
android:layout_alignParentTop="true"- 1
该属性的作用是控件的顶部与父控件的顶部对齐。
测试结果:

该结果与上面结果没什么区别,因为默认是顶部对齐。
android:layout_alignParentBottom属性
android:layout_alignParentBottom="true"- 1
该属性的作用是控件的顶部与父控件的底部对齐。
测试结果:

android:layout_alignParentLeft属性
android:layout_alignParentLeft="true"- 1
该属性的作用是控件的顶部与父控件的左部对齐。
测试结果:

android:layout_alignParentRight属性
android:layout_alignParentRight="true"- 1
该属性的作用是控件的顶部与父控件的右部对齐。
测试结果:

3. 相对给定Id控件,例如:android:layout_above="@id/**"属性
android:layout_above属性
//为了看出效果我们将图片1放在底部 android:layout_alignParentBottom="true" //图片1放在父控件底部 android:layout_above="@id/dp1" //图片2 放在图片1上面- 1
- 2
- 3
- 4
该属性的作用是控件的底部置于给定ID的控件之上。
测试结果:

android:layout_below属性
android:layout_below="@id/dp1"- 1
该属性的作用是控件的底部置于给定ID的控件之下。
测试结果:
android:layout_toLeftOf属性
//为了看出效果,先将图片1放在父控件右侧 android:layout_alignParentRight="true" //图片1放在父控件右侧 android:layout_toLeftOf="@id/dp1" //图片2放在图片1左侧- 1
- 2
- 3
- 4
该属性的作用是控件的右边缘与给定ID的控件左边缘对齐。
测试结果:

android:layout_toRightOf属性
android:layout_toRightOf="@id/dp1"- 1
该属性的作用是控件的左边缘与给定ID的控件右边缘对齐。
测试结果:

android:layout_alignBaseline属性
android:layout_alignBaseline="@id/dp1"- 1
该属性的作用是控件的baseline与给定ID的baseline对齐。
测试结果:
android:layout_alignTop属性
在这里为了方便看清效果,我们交换一下图片,小图片是图片1,大图片是图片2,小图片相对大图片进行对齐。
android:layout_alignTop="@id/dp2"- 1
该属性的作用是控件的顶部边缘与给定ID的顶部边缘对齐。
测试结果:
android:layout_alignBottom属性
android:layout_alignBottom="@id/dp2"- 1
该属性的作用是控件的底部边缘与给定ID的底部边缘对齐。
测试结果:
android:layout_alignLeft属性
android:layout_alignLeft="@id/dp2"- 1
该属性的作用是控件的左边缘与给定ID的左边缘对齐。
测试结果:
android:layout_alignRight属性
android:layout_alignRight="@id/dp2"- 1
该属性的作用是控件的左边缘与给定ID的右边缘对齐。
测试结果:
4. 居中,例如:android:layout_centerInParent=“true”
android:layout_centerHorizontal属性
android:layout_centerHorizontal="true"- 1
该属性的作用是水平居中。
测试结果:

android:layout_centerVertical属性
android:layout_centerVertical="true"- 1
该属性的作用是垂直居中。
测试结果:

android:layout_centerInParent属性
android:layout_centerInParent="true"- 1
该属性的作用是位于父控件的中央。
测试结果:

五、基础控件之Button,TextView,EditText,ImageView制作一个登陆界面
需要用到的组件:
TextView:文本
EditText:文本框
Button:按钮具体实现过程如下:
<RelativeLayout xmlns:android="http://schemas.android.com/apk/res/android" xmlns:tools="http://schemas.android.com/tools" android:layout_width="match_parent" android:layout_height="match_parent" android:paddingBottom="@dimen/activity_vertical_margin" android:paddingLeft="@dimen/activity_horizontal_margin" android:paddingRight="@dimen/activity_horizontal_margin" android:paddingTop="@dimen/activity_vertical_margin" tools:context=".MainActivity" > <RelativeLayout android:layout_width="400dp" android:layout_height="150dp" android:layout_centerInParent="true" android:background="#ff0000" > <TextView android:id="@+id/user" android:layout_width="wrap_content" android:layout_height="wrap_content" android:text="用户" android:layout_marginTop="10dp" android:textSize="20dp" android:textColor="#ffffff" /> <EditText android:id="@+id/ed1" android:layout_width="320dp" android:layout_height="40dp" android:layout_toRightOf="@id/user" /> <TextView android:id="@+id/passwd" android:layout_width="wrap_content" android:layout_height="wrap_content" android:text="密码" android:layout_marginTop="10dp" android:textSize="20dp" android:layout_below="@id/user" android:textColor="#ffffff" /> <EditText android:id="@+id/ed2" android:layout_width="320dp" android:layout_height="40dp" android:layout_toRightOf="@id/user" android:layout_below="@id/ed1" /> <Button android:layout_width="wrap_content" android:layout_height="wrap_content" android:text="确定" android:layout_below="@id/ed2" android:layout_alignParentRight="true" /> RelativeLayout> RelativeLayout>- 1
- 2
- 3
- 4
- 5
- 6
- 7
- 8
- 9
- 10
- 11
- 12
- 13
- 14
- 15
- 16
- 17
- 18
- 19
- 20
- 21
- 22
- 23
- 24
- 25
- 26
- 27
- 28
- 29
- 30
- 31
- 32
- 33
- 34
- 35
- 36
- 37
- 38
- 39
- 40
- 41
- 42
- 43
- 44
- 45
- 46
- 47
- 48
- 49
- 50
- 51
- 52
- 53
- 54
- 55
- 56
- 57
- 58
- 59
- 60
- 61
- 62
- 63
- 64
效果图:

六、padding和margin
padding 英文翻译为衬料,衬垫的意思,在布局中被叫做内边距,margin 英文翻译为页边距的意思,在布局中为外边界的意思,具体可以用一张图来解释:

android:layout_marginLeft="**dp" android:layout_marginRight="**dp" android:layout_marginTop="**dp" android:layout_marginBottom="**dp" android:paddingLeft="**dp" android:paddingRight="**dp" android:paddingTop="**dp" android:paddingBottom="**dp"- 1
- 2
- 3
- 4
- 5
- 6
- 7
- 8
- 9
利用边距值调整对登录界面进行调整:
<RelativeLayout xmlns:android="http://schemas.android.com/apk/res/android" xmlns:tools="http://schemas.android.com/tools" android:layout_width="match_parent" android:layout_height="match_parent" android:paddingBottom="@dimen/activity_vertical_margin" android:paddingLeft="@dimen/activity_horizontal_margin" android:paddingRight="@dimen/activity_horizontal_margin" android:paddingTop="@dimen/activity_vertical_margin" tools:context=".MainActivity" > <RelativeLayout android:layout_width="400dp" android:layout_height="150dp" android:layout_centerInParent="true" android:background="#ffffff" android:layout_marginTop="10dp" > <ImageView android:id="@+id/img1" android:layout_width="25dp" android:layout_height="25dp" android:background="#ff0000" android:src="@drawable/user" android:layout_marginTop="10dp" /> <ImageView android:layout_width="25dp" android:layout_height="25dp" android:background="#ff0000" android:src="@drawable/passwd" android:layout_below="@id/img1" android:layout_marginTop="15dp" /> <TextView android:id="@+id/user" android:layout_width="wrap_content" android:layout_height="wrap_content" android:text="用户" android:layout_marginTop="10dp" android:layout_marginLeft="30dp" android:textSize="20dp" android:textColor="#000000" /> <EditText android:id="@+id/ed1" android:layout_width="320dp" android:layout_height="40dp" android:layout_toRightOf="@id/user" android:layout_marginLeft="5dp" /> <TextView android:id="@+id/passwd" android:layout_width="wrap_content" android:layout_height="wrap_content" android:text="密码" android:layout_marginTop="15dp" android:layout_marginLeft="30dp" android:textSize="20dp" android:layout_below="@id/user" android:textColor="#000000" /> <EditText android:id="@+id/ed2" android:layout_width="320dp" android:layout_height="40dp" android:layout_toRightOf="@id/user" android:layout_marginLeft="5dp" android:layout_below="@id/ed1" /> <Button android:id="@+id/btn2" android:layout_width="wrap_content" android:layout_height="wrap_content" android:text="取消" android:layout_below="@id/ed2" android:layout_alignParentRight="true" android:layout_marginRight="120dp" android:layout_marginTop="20dp" /> <Button android:layout_width="wrap_content" android:layout_height="wrap_content" android:text="确定" android:layout_marginRight="40dp" android:layout_below="@id/ed2" android:layout_toLeftOf="@id/btn2" android:layout_marginTop="20dp" /> RelativeLayout> RelativeLayout>- 1
- 2
- 3
- 4
- 5
- 6
- 7
- 8
- 9
- 10
- 11
- 12
- 13
- 14
- 15
- 16
- 17
- 18
- 19
- 20
- 21
- 22
- 23
- 24
- 25
- 26
- 27
- 28
- 29
- 30
- 31
- 32
- 33
- 34
- 35
- 36
- 37
- 38
- 39
- 40
- 41
- 42
- 43
- 44
- 45
- 46
- 47
- 48
- 49
- 50
- 51
- 52
- 53
- 54
- 55
- 56
- 57
- 58
- 59
- 60
- 61
- 62
- 63
- 64
- 65
- 66
- 67
- 68
- 69
- 70
- 71
- 72
- 73
- 74
- 75
- 76
- 77
- 78
- 79
- 80
- 81
- 82
- 83
- 84
- 85
- 86
- 87
- 88
- 89
- 90
- 91
- 92
- 93
- 94
- 95
- 96
- 97
- 98
- 99
- 100
- 101
- 102
- 103
效果显示:

七、相对布局综合小演练—智能家居刷卡界面
<RelativeLayout xmlns:android="http://schemas.android.com/apk/res/android" xmlns:tools="http://schemas.android.com/tools" android:layout_width="match_parent" android:layout_height="match_parent" android:background="@drawable/bg_shopping_menu" tools:context=".MainActivity" > <ImageView android:layout_width="wrap_content" android:layout_height="wrap_content" android:src="@drawable/bg_shopping_menu" /> <ImageView android:layout_width="wrap_content" android:layout_height="wrap_content" android:src="@drawable/pic_rf" android:layout_centerInParent="true" /> <ImageView android:layout_width="wrap_content" android:layout_height="wrap_content" android:src="@drawable/card" android:layout_centerInParent="true" android:paddingLeft="80dp" android:paddingBottom="15dp" /> <Button android:layout_width="wrap_content" android:layout_height="wrap_content" android:text="刷卡" android:layout_alignParentBottom="true" android:layout_centerHorizontal="true" android:layout_marginBottom="30dp" /> <RelativeLayout android:layout_width="match_parent" android:layout_height="35dp" android:background="#00ff00" > <TextView android:layout_width="match_parent" android:layout_height="wrap_content" android:text="智能家居刷卡界面" android:textSize="15dp" android:layout_marginTop="8dp" android:layout_marginLeft="15dp" /> <Button android:id="@+id/btn2" android:layout_width="wrap_content" android:layout_height="wrap_content" android:text="注册" android:textSize="15dp" android:layout_alignParentRight="true" android:layout_marginRight="10dp" /> <Button android:layout_width="wrap_content" android:layout_height="wrap_content" android:text="查询信息" android:textSize="15dp" android:layout_toLeftOf="@id/btn2" /> RelativeLayout> RelativeLayout>- 1
- 2
- 3
- 4
- 5
- 6
- 7
- 8
- 9
- 10
- 11
- 12
- 13
- 14
- 15
- 16
- 17
- 18
- 19
- 20
- 21
- 22
- 23
- 24
- 25
- 26
- 27
- 28
- 29
- 30
- 31
- 32
- 33
- 34
- 35
- 36
- 37
- 38
- 39
- 40
- 41
- 42
- 43
- 44
- 45
- 46
- 47
- 48
- 49
- 50
- 51
- 52
- 53
- 54
- 55
- 56
- 57
- 58
- 59
- 60
- 61
- 62
- 63
- 64
- 65
- 66
- 67
- 68
- 69
- 70
- 71
- 72
- 73
- 74
- 75
- 76
- 77
效果:

按键美化的小技巧(精美博文)
https://blog.csdn.net/tracydragonlxy/article/details/88552262
经过上述技巧美化以后:

八、线性布局
1. 介绍
线性布局,所有组件都按照线性排列,不是横,就是竖。
<LinearLayout xmlns:android="http://schemas.android.com/apk/res/android" xmlns:tools="http://schemas.android.com/tools" android:layout_width="match_parent" android:layout_height="match_parent" tools:context=".MainActivity" > </LinearLayout>- 1
- 2
- 3
- 4
- 5
- 6
- 7
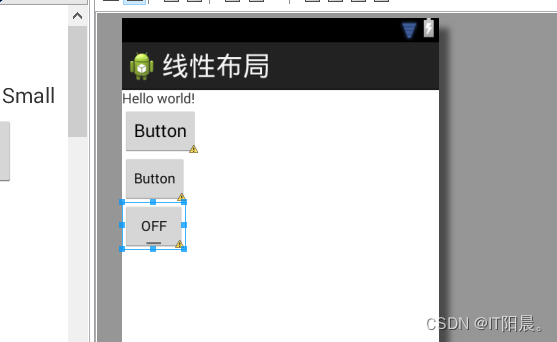

2. 线性布局常用属性

3. 线性布局登录框应用
<RelativeLayout xmlns:android="http://schemas.android.com/apk/res/android" xmlns:tools="http://schemas.android.com/tools" android:layout_width="match_parent" android:layout_height="match_parent" tools:context=".MainActivity" > <LinearLayout android:layout_width="200dp" android:layout_height="70dp" android:layout_centerInParent="true" android:layout_width="0dp" android:layout_height="70dp" android:orientation="vertical" android:divider="@drawable/fenge" android:dividerPadding="2dp" android:showDividers="middle|end" > <TextView android:gravity="center" android:layout_weight="1" /> <TextView android:gravity="center" android:layout_weight="1" /> LinearLayout> <LinearLayout android:layout_width="0dp" android:layout_height="70dp" android:orientation="vertical" android:divider="@drawable/fenge" android:dividerPadding="2dp" android:showDividers="middle|end" > <EditText android:layout_height="0dp" android:layout_weight="1" /> <EditText android:layout_height="0dp" android:layout_weight="1" /> LinearLayout> LinearLayout> RelativeLayout>- 1
- 2
- 3
- 4
- 5
- 6
- 7
- 8
- 9
- 10
- 11
- 12
- 13
- 14
- 15
- 16
- 17
- 18
- 19
- 20
- 21
- 22
- 23
- 24
- 25
- 26
- 27
- 28
- 29
- 30
- 31
- 32
- 33
- 34
- 35
- 36
- 37
- 38
- 39
- 40
- 41
- 42
- 43
- 44
- 45
- 46
- 47
- 48
- 49
- 50
- 51
- 52
- 53
- 54
- 55
- 56
- 57
- 58
- 59
- 60
- 61
- 62
- 63
- 64
- 65
- 66
- 67
- 68
- 69
- 70
- 71
- 72
- 73
- 74
- 75
- 76
- 77
- 78
- 79
- 80
- 81
- 82
- 83
- 84
- 85
- 86
- 87
- 88
- 89
- 90
- 91
分割线文件:(不常用)
<shape xmlns:android="http://schemas.android.com/apk/res/android" <stroke android:color="#00ff00"/> shape>- 1
- 2
- 3
- 4
- 5
- 6
- 7
- 8
- 9
- 10
- 11
- 12
- 13
- 14
- 15
- 16
注意:
android:layout_width/height="0dp"和ndroid:layout_weight="n"要搭配使用才能达到比例分配效果。android:orientation=“”表示线性排列方式,分为水平和垂直。Layout_gravity是针对父控件子控件的对齐方式,gravity针对自己的子空间的对齐方式。
效果图:

添加分割线以后的效果:(不常用)

-
相关阅读:
git分支
华为OD机试 - 单词接龙 - 数据结构map、list (Java 2023 B卷 100分)
算法小讲堂之二叉排序树|二叉搜索树|BST
使用阿里PAI DSW部署Stable Diffusion WebUI
我们需要重新想象区块链的未来
java计算机毕业设计基于安卓Android/微信小程序的智能停车场管理系统APP
TCP 协议的相关(部分)特性
[JavaWeb学习] Spring Ioc和DI概念思想
Java实现飞机大战游戏
GD32F10x的输出模式
- 原文地址:https://blog.csdn.net/qq_62361050/article/details/126083622
