-
【神经网络】一文带你轻松解析神经网络(附实例恶搞女友)
😊😊😊欢迎来到本博客😊😊😊
本次博客内容将讲解关于神经网络的相关知识
🎉作者简介:⭐️⭐️⭐️目前计算机研究生在读。主要研究方向是人工智能和群智能算法方向。目前熟悉python网页爬虫、机器学习、计算机视觉(OpenCV)、群智能算法。然后正在学习深度学习的相关内容。以后可能会涉及到网络安全相关领域,毕竟这是每一个学习计算机的梦想嘛!
📝目前更新:🌟🌟🌟目前已经更新了关于网络爬虫的相关知识、机器学习的相关知识、本次更新神经网络的相关知识。
💛💛💛本文摘要💛💛💛首先我们先来看一下人脑的神经网络是什么样的。
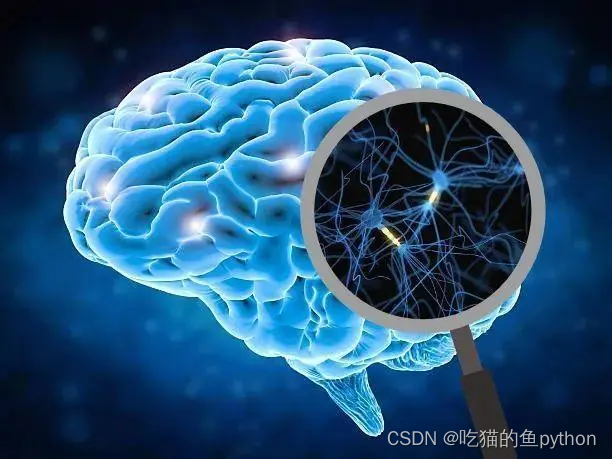
在生物学上的生物神经网络就是人工神经网络的技术原型。一个成人的大脑中大概有1000亿个神经元。而人工神经网络它的主要任务是根据生物神经网络的原理和实际应用的需要建造实用的人工神经网络模型,设计相应的学习算法,模拟人脑的某种智能活动,然后在技术上实现出来用以解决实际问题。
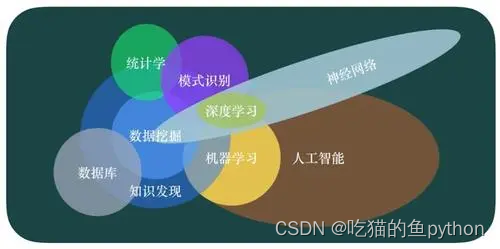
让我们来看一下神经网络的归属图。它类属于深度学习,而我们常说的深度学习又类属于机器学习的一部分。所以我们先来看一下机器学习的流程是什么样的。
而对于机器学习的流程:大概就是这样
- 数据获取。
这个过程我们可以使用网络爬虫来进行操作,目前对于反爬虫做的特别厉害的,一般网站都是可以进行爬取的。对于目前数据大爆炸的这个时代,给机器喂养数据这个已经不是难事。数据获取还可以通过一些开源的一些网站获取。
- 特征工程
特征工程是整个机器学习流程中最重要的一个部分,他可以决定整个模型的上限。而深度学习就是机器学习的一部分,解决了特征工程的一部分。预处理和特征提取是最核心的部分。
- 建立模型
对于不同的任务,不同的项目建立不同的模型。
- 评估和应用
我们刚才说到数据的预处理和特征提取也就是特征工程部分是最核心的部分,决定了模型的上限,那么算法的参数设置和选择决定了逼近这个上限的程度。
🎁一、前言
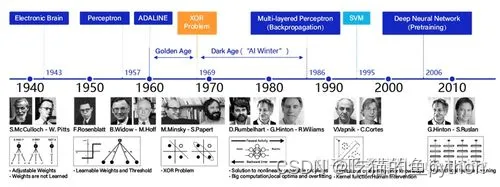
先看一下神经网络得发展历程
我们先来看一下一个典型的神经网络的模型。左边的这是一个典型的神经网络结构,其中包括输入层,输入层也就是我们将数据获取之后进行预处理操作进行输入,然后输入层传入到中间隐层,这个部分我们通常称之为黑盒子。他们之间每一个神经元都对下一层其他的神经元做了一个连接。最后经过处理传入到输出层。右边就是深度学习神经网络。
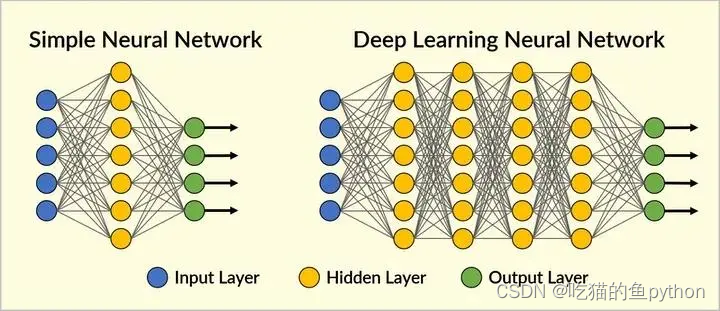
在我们设计一个神经网络的时候,通常输入的节点和输出的节点时已经固定下来的。这个根据具体任务而定,对于中间节点层,可以自己进行设定,但是如果中间的隐层设定的越多,那么就意味这计算量越大,计算量大的话,对应训练的时间就越长。
还有就是结构中的最重要的不是神经元,而是传输过程,我们在人工神经网络中在传输过程是有一个权重参数的,这个是整个神经网络的核心所在。权重参数是什么呢?它有关于整体神经网络的工作准确性,以及整个模型的好坏。
先简单的说一下它是一个什么东西吧,我们直到,神经网络是一个学习网络,就是通过不断的去学习数据,我们通过大量的数据喂养它,然后他不断的去学习,这个学习的过程是什么呢?就是我们首先随机的设定一些中间权重参数,然后在输入层输入数据,最后走了一遍中间隐层之后,得到了结果,然后我们和实际结果一对比发现这个结果相差巨大,这个是用什么来衡量的呢?就是损失函数!!!那么就需要我们对权重参数进行更新,让他学习好一点!通过不断的训练、学习。最后得到一个理想的结果。这个过程是不断重复的。这就是一个大致的流程,我们后续还会继续展开介绍。🎁二、通俗解释神经元模型
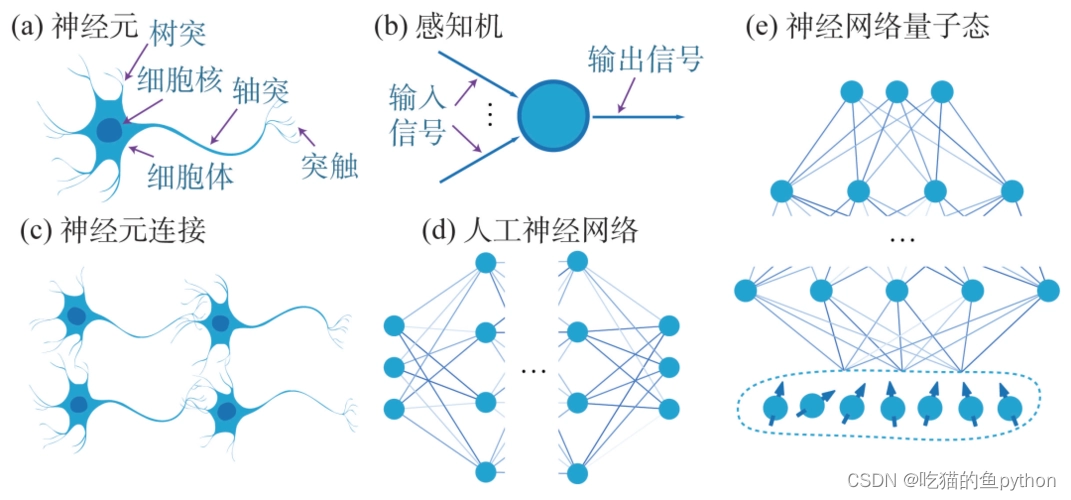
我们通过a图可以看到在生物角度大概是分为树突,轴突和突触这三个部分。人工神经网络也大概是按照这个来做,输入得神经元可以看作是树突。然后箭头部分可以表示为轴突。最后得输出端可以看作是突触。

🎁三、神经网络前向传播
这里我们对应三个输入端,中间隐层可以看作是三个箭头,每一个箭头对应一个权重数值,然后传入到下一个神经元的时候得时候对权重进行求和,最后进行输出。
一个神经网络的训练算法就是让权重的值调整到最佳,以使得整个网络的预测效果最好。
简单来看,从输入到输出可以映射为一个非线性函数,通过很多个权重w,还有偏置项b。最终来确定输出得数值。细致一点得来说中间得计算过程就是线性代数中得矩阵得简单运算,但是计算量是巨大得,必须需要计算机来完成这个工作。
比如我们现在用神经网络做一个图片分类任务。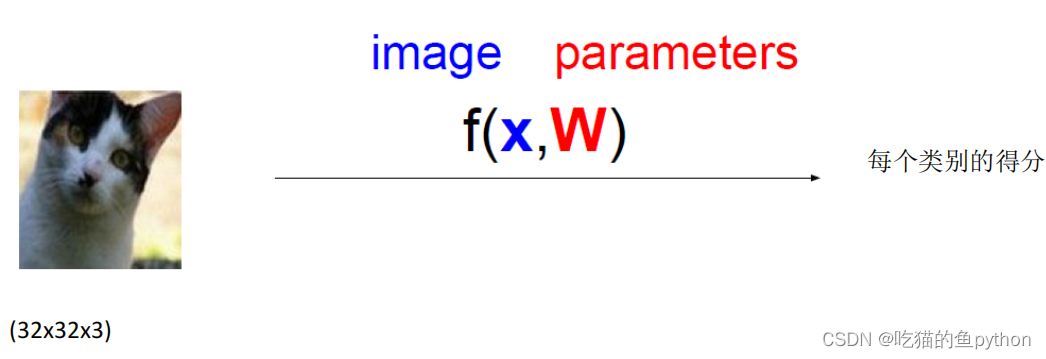
输入层通俗解释:比如说传进来一个小猫得图像,这个传输进来得图像就是经过数据预处理之后得图像他是一个32323得格式,也就是长是32,宽是32,然后channel是3道,也就是一个彩色图像,他就是和输出层神经元对应的。
中间隐层通俗解释:然后经过了箭头部分,可以看到箭头部分进行了权重的设置,最最开始权重参数是随机的,也可以是我们自己设置的,比如说迁移学习,就是说利用别人曾经训练好的最终权重参数来当我的开始训练参数,这里必须保证一点就是我们做的任务很相似!最终结果当然是好的,这里我们不过多介绍。那么这个随机参数设置结束后,经过权重参数运算之后就传入到了中间隐层部分。
输出层通俗解释:然后中间隐层继续传输,我们这里认为中间隐层就一层,然后最终经过了全连接层最终输出结果,这个全连接层有一个很重要的作用就是我们最终要做几分类,从这里可以完成。这里的三个操作完成了就相当于完成了一次前向传播。
比如说我们传入的是一张猫的图像,我们需要最终进行一个三分类的任务,比如是猫、狗、老鹰。
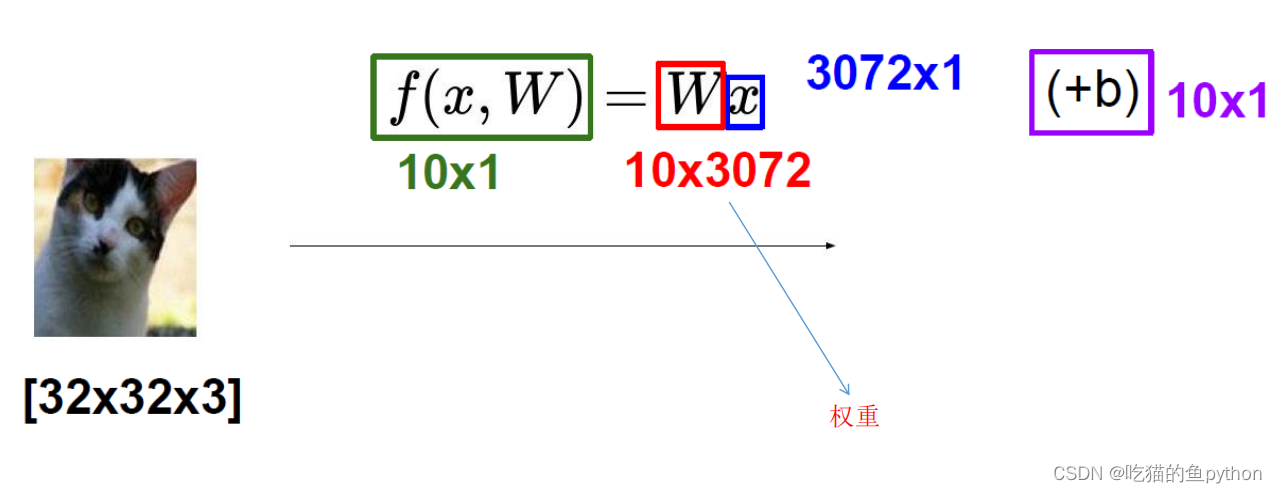
假如说我们现在的权重矩阵是一个103072的一个矩阵,然后我们最终想做一个10分类的结果,那么我们就要在全连接的层做一个相乘30721的,最终得到一个101的一个矩阵,然后我们还有做一个相应的微调,也就是偏置项b。因为做的是一个相加的操作,所以也是一个101的矩阵。这样最终对应的10中分类的得分我们就可以知道了。🎁三、神经网络损失函数
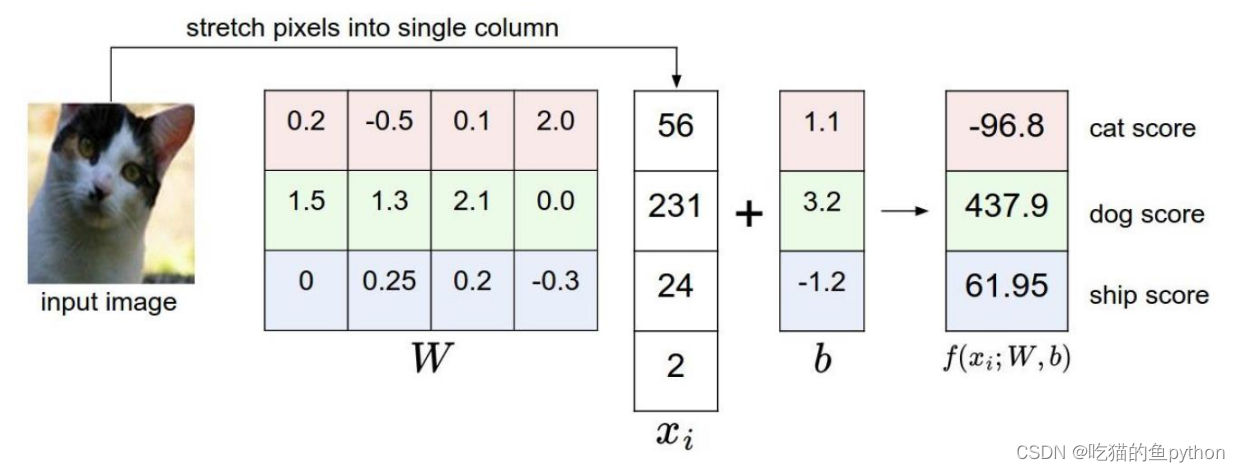
加入这里我们得到了三种类别的得分,那么很明显它预测的不对!就说明他学习学的并不好,那么怎么让他学习学的更好呢?核心所在一定是我们这个权重矩阵了,那就是说怎么让这个权重矩阵越做越牛呢!那么我们就要对这个矩阵进行更新操作,这个操作就是我们所讲的神经网络的反向传播过程。具体是怎么样的呢?
说到反向传播,那么我们一定要说到的一点就是损失函数。
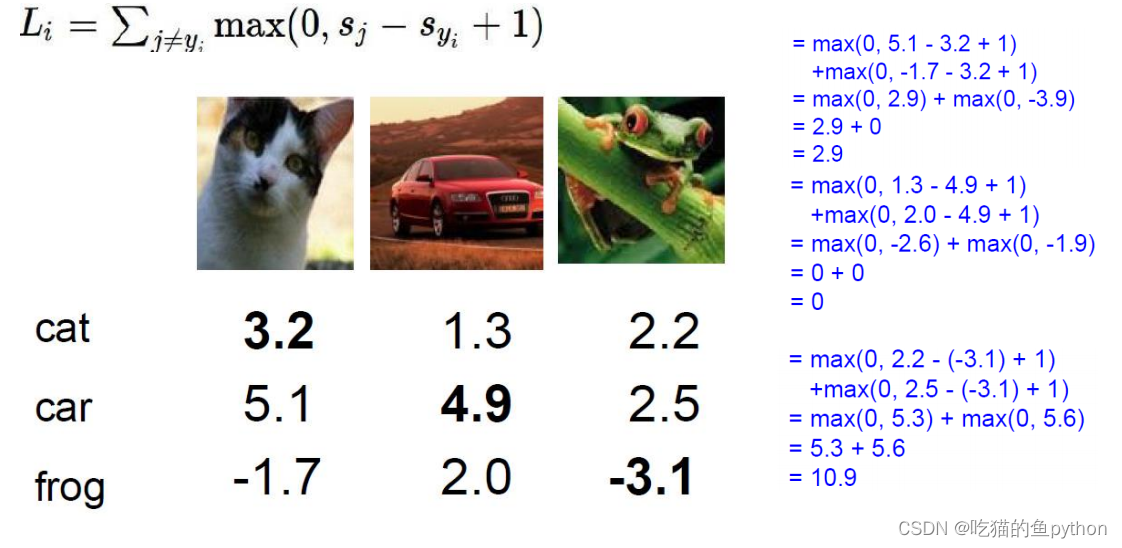
损失函数得分正值表示促进作用,负值表示对结果抑制作用。对应的公式右方通过他的计算过程也展现出来了!然后我们可以看得出来预测正确的损失函数最小,为0。那么预测错误的就不为0,相差的越大,损失值越大。
公式后面的+1表示容忍程度,表示至少要相差1以上。
当我们进行训练的时候,选择的模型要趋向于稳定,不要变异,我们要关注全局,而不是局部。
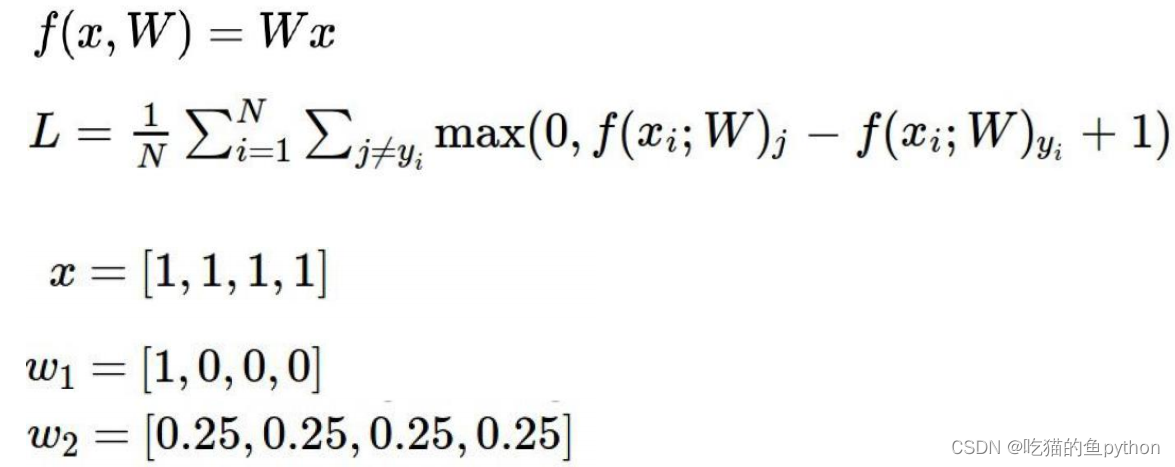
这里两个权重数值,W1,W2两个权重矩阵,然后计算出来的损失函数是一样的,但是两个矩阵很明显w2要比w1要更加稳定,更加适合。所以我们在计算损失函数的时候一定要进行正则化惩罚项。

这个就是计算损失函数的最终公式。
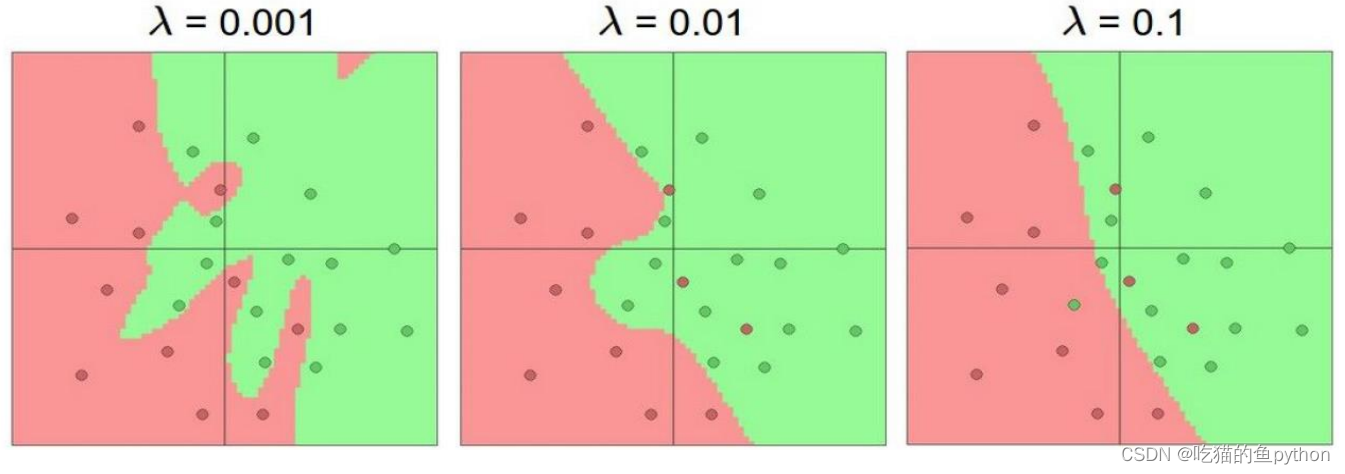
正则化项在神经网络中的重要作用:
🎁四、神经网络分类器
- Softmax分类器
Softmax分类器简单来说他就是一个多分类,像逻辑回归一样!
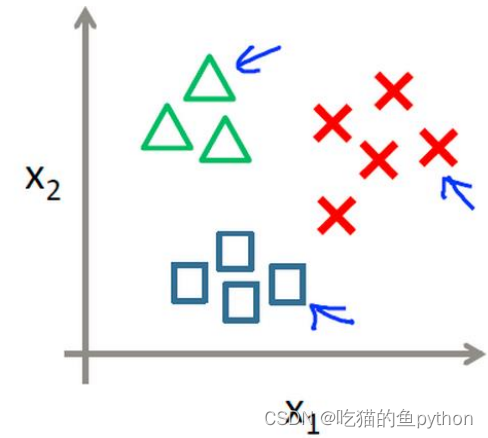
Softmax分类器输出的是概率值。 - Sigmoid分类器
Sigmoid分类器就类似于二分类,是或者不是,可以或者不可以,能或者不能这样!输出的数值是0或者1.
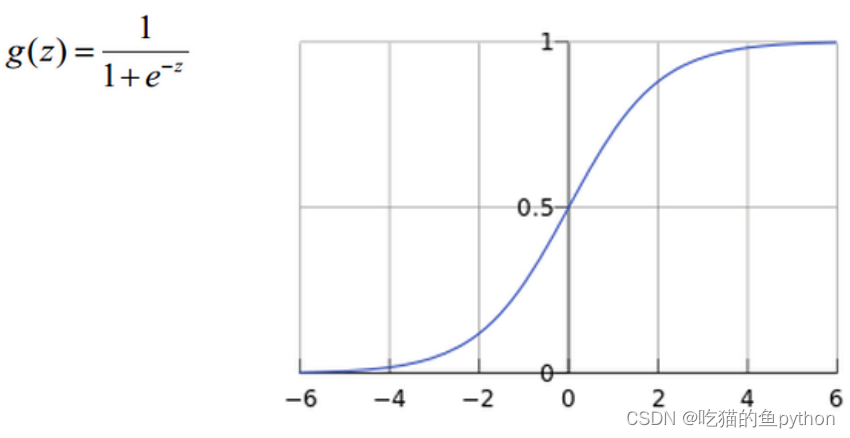
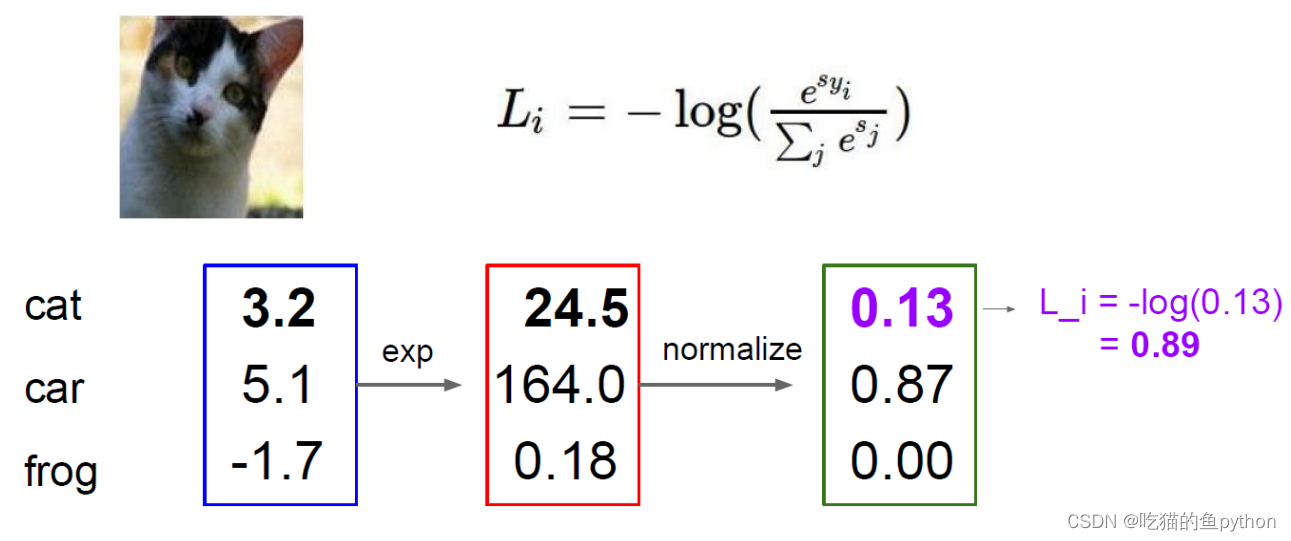
损失函数我们一般都用交叉熵损失函数。这里我们对得分进行归一化的一个处理,就是先对得分进行以e为底,得分的幂数。然后进行一个归一化处理,就是计算各自的百分数,最后通过softmax公式计算概率。
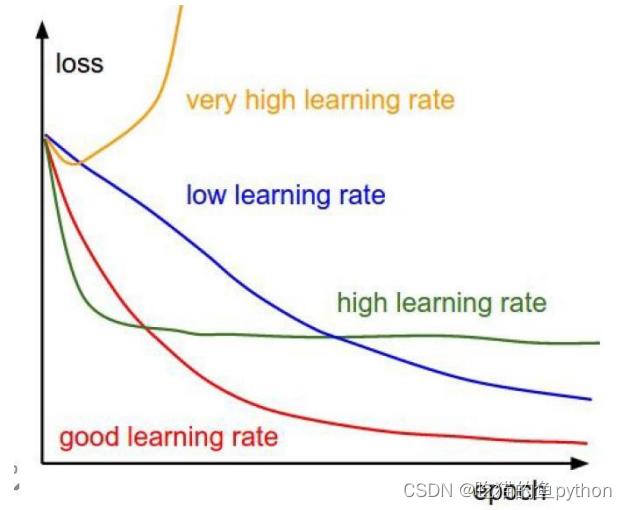
训练网络时的LOSS值视化结果。
🎁五、神经网络反向传播
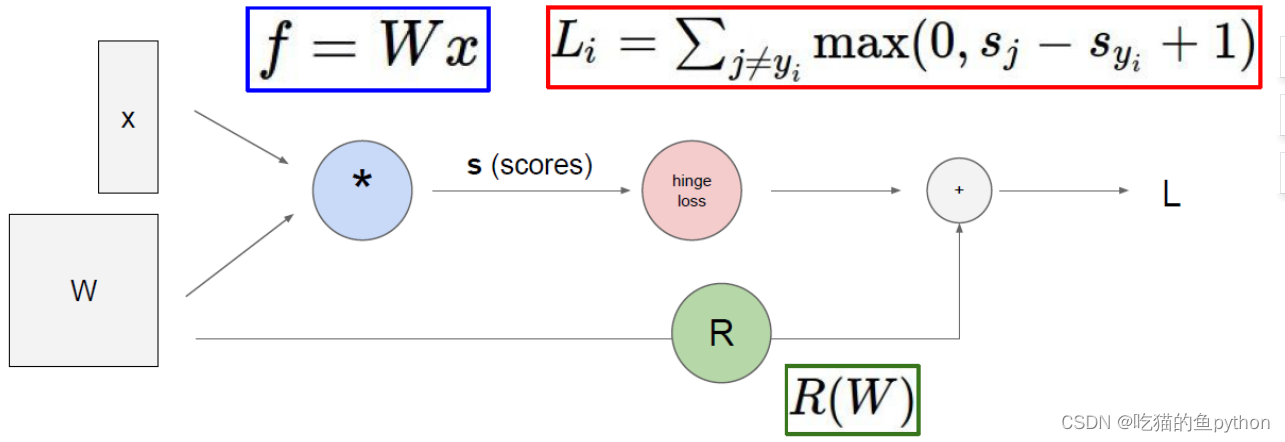
我们走完了前向传播之后呢,得到了各自分类的损失函数,但是由于我们最开始设置的权重矩阵参数W是随机设置的,所以得到的结果一定不是好的,所以我们要根据最终得到的结果与真实结果进行对比,然后回头更新权重参数,然后让预测结果更准确。这就是反向传播的大概流程。
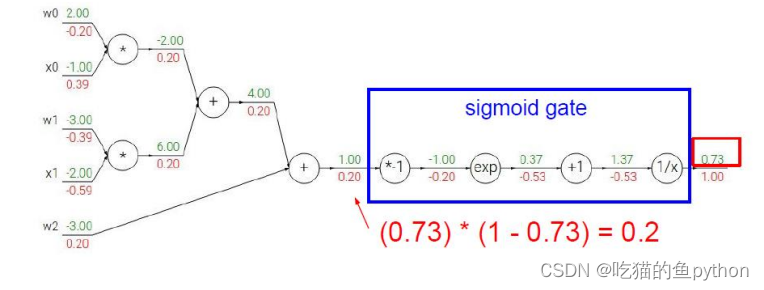
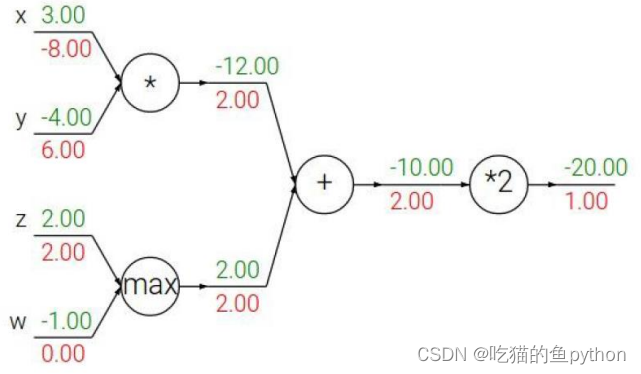
这里的绿色数字是前向传播的结果,通过前向传播得到下一个的得分。然后红色的数字是方向传播的结果,我们以最后一个为例子,就是
- 加法门单元:均等分配
- MAX门单元:给最大的
- 乘法门单元:互换的感觉
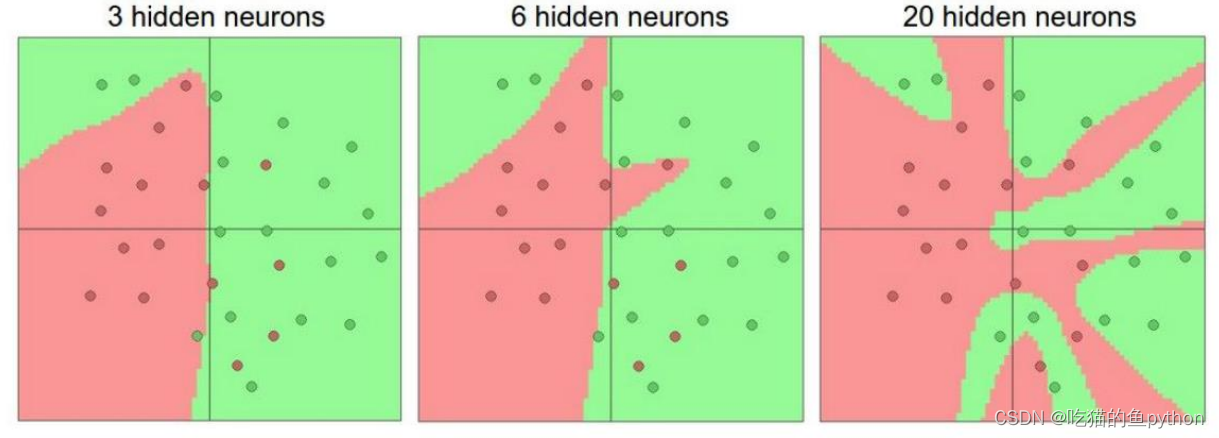
越多的神经元,就越能够表达能复杂的模型
我们刚开始的时候就说到了这个神经网络的一个特性,就是数据的预处理和特征工程会决定整个网络的高度。
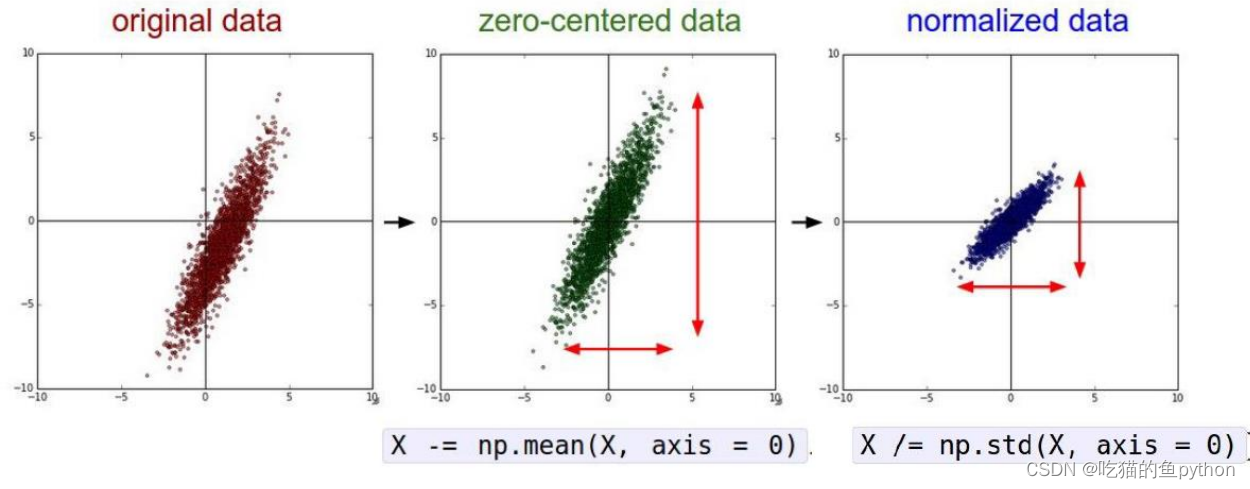
🎁六、神经网络分类实战
预测模块
from keras.models import load_model import argparse import pickle import cv2 #--image images/dog.jpg --model output/simple_nn.model --label-bin output/simple_nn_lb.pickle --width 32 --height 32 --flatten 1 #--image images/dog.jpg --model output_cnn/vggnet.model --label-bin output_cnn/vggnet_lb.pickle --width 64 --height 64 # 设置输入参数 ap = argparse.ArgumentParser() ap.add_argument("-i", "--image", required=True, help="path to input image we are going to classify") ap.add_argument("-m", "--model", required=True, help="path to trained Keras model") ap.add_argument("-l", "--label-bin", required=True, help="path to label binarizer") ap.add_argument("-w", "--width", type=int, default=28, help="target spatial dimension width") ap.add_argument("-e", "--height", type=int, default=28, help="target spatial dimension height") ap.add_argument("-f", "--flatten", type=int, default=-1, help="whether or not we should flatten the image") args = vars(ap.parse_args()) # 加载测试数据并进行相同预处理操作 image = cv2.imread(args["image"]) output = image.copy() image = cv2.resize(image, (args["width"], args["height"])) # scale the pixel values to [0, 1] image = image.astype("float") / 255.0 # 是否要对图像就行拉平操作 if args["flatten"] > 0: image = image.flatten() image = image.reshape((1, image.shape[0])) # CNN的时候需要原始图像 else: image = image.reshape((1, image.shape[0], image.shape[1], image.shape[2])) # 读取模型和标签 print("[INFO] loading network and label binarizer...") model = load_model(args["model"]) lb = pickle.loads(open(args["label_bin"], "rb").read()) # 预测 preds = model.predict(image) i = preds.argmax(axis=1)[0] label = lb.classes_[i] text = "{}: {:.2f}%".format(label, preds[0][i] * 100) cv2.putText(output, text, (10, 30), cv2.FONT_HERSHEY_SIMPLEX, 0.7, (0, 0, 255), 2) cv2.imshow("Image", output) cv2.waitKey(0)- 1
- 2
- 3
- 4
- 5
- 6
- 7
- 8
- 9
- 10
- 11
- 12
- 13
- 14
- 15
- 16
- 17
- 18
- 19
- 20
- 21
- 22
- 23
- 24
- 25
- 26
- 27
- 28
- 29
- 30
- 31
- 32
- 33
- 34
- 35
- 36
- 37
- 38
- 39
- 40
- 41
- 42
- 43
- 44
- 45
- 46
- 47
- 48
- 49
- 50
- 51
- 52
- 53
- 54
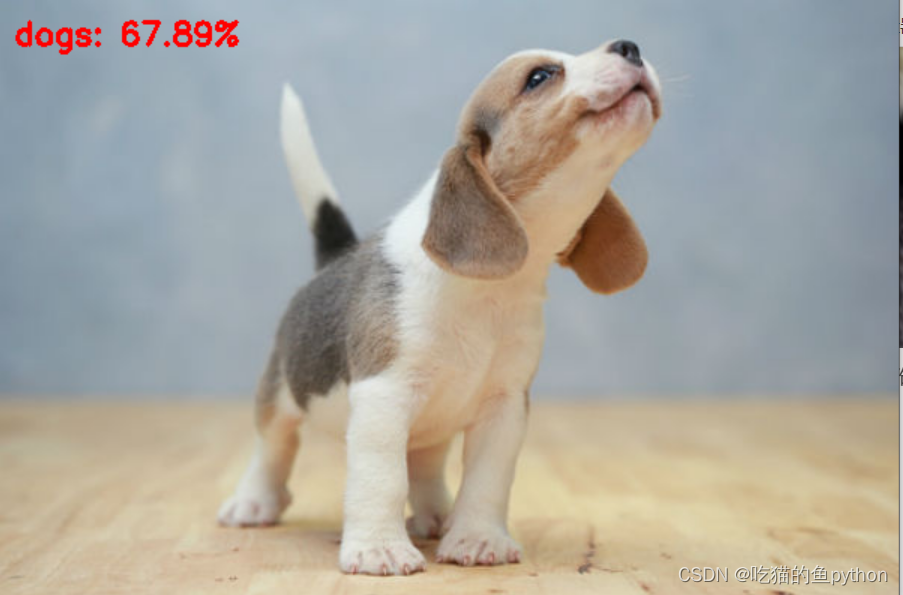
这里就是我们预测函数,训练模型我们已经训练好了!然后走一遍前向传播。结果是这样的!
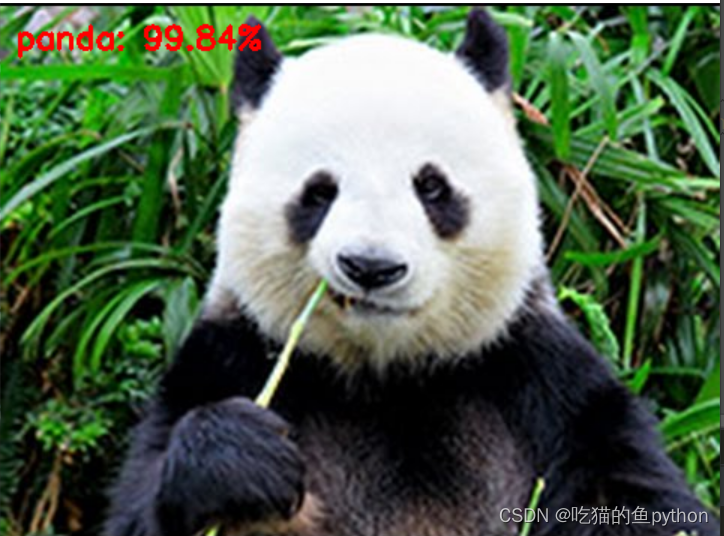
这个分类模型主要用了VGG16,然后我们主要是做猫,狗,熊猫三种分类!
然后我又找了一个猫和老鼠里面的tom猫的照片。然后我们一起来看一下效果!
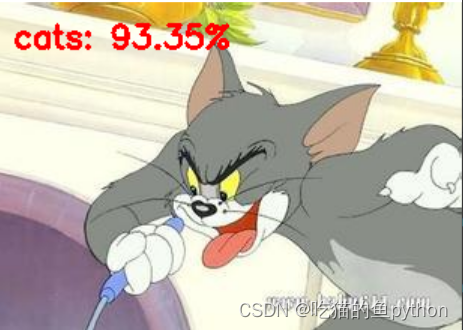
检测效果非常nice!!!
然后呢我又用了自己女朋友的照片试了一下!

果然!!!果然是这样!!!训练模块
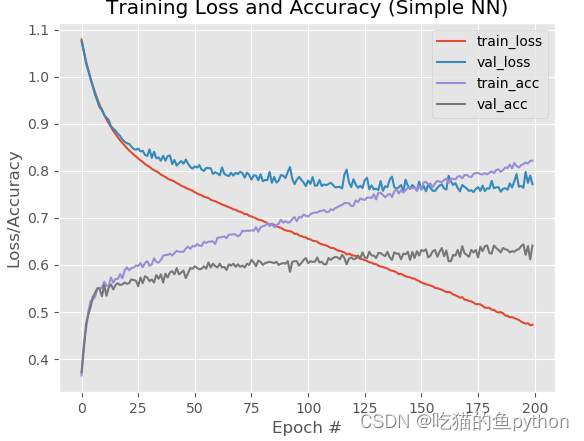
from sklearn.preprocessing import LabelBinarizer from sklearn.model_selection import train_test_split from sklearn.metrics import classification_report#综合结果对比 from keras.models import Sequential from keras.layers import Dropout from keras.layers.core import Dense from keras.optimizers import SGD from keras import initializers#初始化权重参数 from keras import regularizers#正则化 from my_utils import utils_paths#图像路径的操作 import matplotlib.pyplot as plt import numpy as np import argparse import random import pickle import cv2 import os #--dataset --model --label-bin --plot # 输入参数 ap = argparse.ArgumentParser() ap.add_argument("-d", "--dataset", required=True, help="path to input dataset of images") ap.add_argument("-m", "--model", required=True, help="path to output trained model") ap.add_argument("-l", "--label-bin", required=True, help="path to output label binarizer") ap.add_argument("-p", "--plot", required=True, help="path to output accuracy/loss plot") args = vars(ap.parse_args()) print("[INFO] 开始读取数据") data = [] labels = [] # 拿到图像数据路径,方便后续读取 imagePaths = sorted(list(utils_paths.list_images(args["dataset"]))) random.seed(42) random.shuffle(imagePaths) # 遍历读取数据 for imagePath in imagePaths: # 读取图像数据,由于使用神经网络,需要给定成一维 image = cv2.imread(imagePath) image = cv2.resize(image, (32, 32)).flatten() data.append(image) # 读取标签 label = imagePath.split(os.path.sep)[-2] labels.append(label) # scale图像数据 data = np.array(data, dtype="float") / 255.0 labels = np.array(labels) # 数据集切分 (trainX, testX, trainY, testY) = train_test_split(data, labels, test_size=0.25, random_state=42) # 转换标签,one-hot格式 lb = LabelBinarizer() trainY = lb.fit_transform(trainY) testY = lb.transform(testY) # 网络模型结构:3072-512-256-3 model = Sequential() # kernel_regularizer=regularizers.l2(0.01) # keras.initializers.TruncatedNormal(mean=0.0, stddev=0.05, seed=None) # initializers.random_normal # #model.add(Dropout(0.8)) model.add(Dense(512, input_shape=(3072,), activation="relu" ,kernel_initializer = initializers.TruncatedNormal(mean=0.0, stddev=0.05, seed=None),kernel_regularizer=regularizers.l2(0.01))) model.add(Dropout(0.5)) model.add(Dense(256, activation="relu",kernel_initializer = initializers.TruncatedNormal(mean=0.0, stddev=0.05, seed=None),kernel_regularizer=regularizers.l2(0.01))) model.add(Dropout(0.5)) model.add(Dense(len(lb.classes_), activation="softmax",kernel_initializer = initializers.TruncatedNormal(mean=0.0, stddev=0.05, seed=None),kernel_regularizer=regularizers.l2(0.01))) # 初始化参数 INIT_LR = 0.001 EPOCHS = 200 # 给定损失函数和评估方法 print("[INFO] 准备训练网络...") opt = SGD(lr=INIT_LR) model.compile(loss="categorical_crossentropy", optimizer=opt, metrics=["accuracy"]) # 训练网络模型 H = model.fit(trainX, trainY, validation_data=(testX, testY), epochs=EPOCHS, batch_size=32) # 测试网络模型 print("[INFO] 正在评估模型") predictions = model.predict(testX, batch_size=32) print(classification_report(testY.argmax(axis=1), predictions.argmax(axis=1), target_names=lb.classes_)) # 当训练完成时,绘制结果曲线 N = np.arange(0, EPOCHS) plt.style.use("ggplot") plt.figure() #plt.plot(N[150:], H.history["loss"][150:], label="train_loss") #plt.plot(N[150:], H.history["val_loss"][150:], label="val_loss") plt.plot(N[150:], H.history["accuracy"][150:], label="train_acc") plt.plot(N[150:], H.history["val_accuracy"][150:], label="val_acc") plt.title("Training Loss and Accuracy (Simple NN)") plt.xlabel("Epoch #") plt.ylabel("Loss/Accuracy") plt.legend() plt.savefig(args["plot"]) # 保存模型到本地 print("[INFO] 正在保存模型") model.save(args["model"]) f = open(args["label_bin"], "wb") f.write(pickle.dumps(lb)) f.close()- 1
- 2
- 3
- 4
- 5
- 6
- 7
- 8
- 9
- 10
- 11
- 12
- 13
- 14
- 15
- 16
- 17
- 18
- 19
- 20
- 21
- 22
- 23
- 24
- 25
- 26
- 27
- 28
- 29
- 30
- 31
- 32
- 33
- 34
- 35
- 36
- 37
- 38
- 39
- 40
- 41
- 42
- 43
- 44
- 45
- 46
- 47
- 48
- 49
- 50
- 51
- 52
- 53
- 54
- 55
- 56
- 57
- 58
- 59
- 60
- 61
- 62
- 63
- 64
- 65
- 66
- 67
- 68
- 69
- 70
- 71
- 72
- 73
- 74
- 75
- 76
- 77
- 78
- 79
- 80
- 81
- 82
- 83
- 84
- 85
- 86
- 87
- 88
- 89
- 90
- 91
- 92
- 93
- 94
- 95
- 96
- 97
- 98
- 99
- 100
- 101
- 102
- 103
- 104
- 105
- 106
- 107
- 108
- 109
- 110
- 111
- 112
- 113
- 114
- 115
- 116
这里的卷积过程我们直接用vgg16这个来做了。
VGG
from model_name.simple_vggnet import SimpleVGGNet from sklearn.preprocessing import LabelBinarizer from sklearn.model_selection import train_test_split from sklearn.metrics import classification_report from keras.optimizers import SGD from keras.preprocessing.image import ImageDataGenerator from my_utils import utils_paths import matplotlib.pyplot as plt import numpy as np import argparse import random import pickle import cv2 import os import warnings warnings.filterwarnings("ignore") # 设置参数 ap = argparse.ArgumentParser() ap.add_argument("-d", "--dataset", required=True, help="path to input dataset of images") ap.add_argument("-m", "--model", required=True, help="path to output trained model") ap.add_argument("-l", "--label-bin", required=True, help="path to output label binarizer") ap.add_argument("-p", "--plot", required=True, help="path to output accuracy/loss plot") args = vars(ap.parse_args()) # 读取数据和标签 print("[INFO] loading images...") data = [] labels = [] # 拿到路径 imagePaths = sorted(list(utils_paths.list_images(args["dataset"]))) random.seed(42) random.shuffle(imagePaths) # 读取数据 for imagePath in imagePaths: image = cv2.imread(imagePath) image = cv2.resize(image, (64, 64)) data.append(image) label = imagePath.split(os.path.sep)[-2] labels.append(label) # 预处理 data = np.array(data, dtype="float") / 255.0 labels = np.array(labels) # 数据集切分 (trainX, testX, trainY, testY) = train_test_split(data, labels, test_size=0.25, random_state=42) # 标签转换 lb = LabelBinarizer() trainY = lb.fit_transform(trainY) testY = lb.transform(testY) # 数据增强 # aug = ImageDataGenerator(rotation_range=30, width_shift_range=0.1, # height_shift_range=0.1, shear_range=0.2, zoom_range=0.2, # horizontal_flip=True, fill_mode="nearest") # 建立卷积神经网络 model = SimpleVGGNet.build(width=64, height=64, depth=3, classes=len(lb.classes_)) # 初始化超参数 INIT_LR = 0.01 EPOCHS = 30 BS = 32 # 损失函数 print("[INFO] 训练网络...") opt = SGD(lr=INIT_LR, decay=INIT_LR / EPOCHS) model.compile(loss="categorical_crossentropy", optimizer=opt, metrics=["accuracy"]) # 训练网络 # H = model.fit_generator(aug.flow(trainX, trainY, batch_size=BS), # validation_data=(testX, testY), steps_per_epoch=len(trainX) // BS, # epochs=EPOCHS) H = model.fit(trainX, trainY, validation_data=(testX, testY), epochs=EPOCHS, batch_size=32) # 测试 print("[INFO] 测试网络...") predictions = model.predict(testX, batch_size=32) print(classification_report(testY.argmax(axis=1), predictions.argmax(axis=1), target_names=lb.classes_)) # 展示结果 N = np.arange(0, EPOCHS) plt.style.use("ggplot") plt.figure() plt.plot(N, H.history["loss"], label="train_loss") plt.plot(N, H.history["val_loss"], label="val_loss") plt.plot(N, H.history["accuracy"], label="train_acc") plt.plot(N, H.history["val_accuracy"], label="val_acc") plt.title("Training Loss and Accuracy (SmallVGGNet)") plt.xlabel("Epoch #") plt.ylabel("Loss/Accuracy") plt.legend() plt.savefig(args["plot"]) # 保存模型 print("[INFO] 保存模型...") model.save(args["model"]) f = open(args["label_bin"], "wb") f.write(pickle.dumps(lb)) f.close()- 1
- 2
- 3
- 4
- 5
- 6
- 7
- 8
- 9
- 10
- 11
- 12
- 13
- 14
- 15
- 16
- 17
- 18
- 19
- 20
- 21
- 22
- 23
- 24
- 25
- 26
- 27
- 28
- 29
- 30
- 31
- 32
- 33
- 34
- 35
- 36
- 37
- 38
- 39
- 40
- 41
- 42
- 43
- 44
- 45
- 46
- 47
- 48
- 49
- 50
- 51
- 52
- 53
- 54
- 55
- 56
- 57
- 58
- 59
- 60
- 61
- 62
- 63
- 64
- 65
- 66
- 67
- 68
- 69
- 70
- 71
- 72
- 73
- 74
- 75
- 76
- 77
- 78
- 79
- 80
- 81
- 82
- 83
- 84
- 85
- 86
- 87
- 88
- 89
- 90
- 91
- 92
- 93
- 94
- 95
- 96
- 97
- 98
- 99
- 100
- 101
- 102
- 103
- 104
- 105
- 106
- 107
- 108
- 109
- 110
- 111
- 112
- 113
- 114
- 115
- 116
- 117
- 118
网络架构(VGG16神经网络架构)
每一个卷积过程包括了,卷积层然后后面接上relu层,然后归一化操作,还可以进行dropout(七伤拳),就是随机的杀死一些神经元。这样做可以大大的节省计算的时间,成本。后期我们会继续介绍。结果三层卷积过程,然后连接上一层全连接层,最后使用softmax进行分类就完事。
class SimpleVGGNet: @staticmethod def build(width, height, depth, classes): # 不同工具包颜色通道位置可能不一致 model = Sequential() inputShape = (height, width, depth) chanDim = -1 if K.image_data_format() == "channels_first": inputShape = (depth, height, width) chanDim = 1 # CONV => RELU => POOL 在特征图上做卷积 model.add(Conv2D(32, (3, 3), padding="same", input_shape=inputShape)) model.add(Activation("relu")) model.add(BatchNormalization(axis=chanDim)) model.add(MaxPooling2D(pool_size=(2, 2))) #model.add(Dropout(0.25)) # (CONV => RELU) * 2 => POOL model.add(Conv2D(64, (3, 3), padding="same")) model.add(Activation("relu")) model.add(BatchNormalization(axis=chanDim)) model.add(Conv2D(64, (3, 3), padding="same")) model.add(Activation("relu")) model.add(BatchNormalization(axis=chanDim)) model.add(MaxPooling2D(pool_size=(2, 2))) #model.add(Dropout(0.25)) # (CONV => RELU) * 3 => POOL model.add(Conv2D(128, (3, 3), padding="same")) model.add(Activation("relu")) model.add(BatchNormalization(axis=chanDim)) model.add(Conv2D(128, (3, 3), padding="same")) model.add(Activation("relu")) model.add(BatchNormalization(axis=chanDim)) model.add(Conv2D(128, (3, 3), padding="same")) model.add(Activation("relu")) model.add(BatchNormalization(axis=chanDim)) model.add(MaxPooling2D(pool_size=(2, 2))) #model.add(Dropout(0.25)) # FC层 model.add(Flatten()) model.add(Dense(512)) model.add(Activation("relu")) model.add(BatchNormalization()) #model.add(Dropout(0.6)) # softmax 分类,kernel_initializer=TruncatedNormal(mean=0.0, stddev=0.01) model.add(Dense(classes)) model.add(Activation("softmax")) return model- 1
- 2
- 3
- 4
- 5
- 6
- 7
- 8
- 9
- 10
- 11
- 12
- 13
- 14
- 15
- 16
- 17
- 18
- 19
- 20
- 21
- 22
- 23
- 24
- 25
- 26
- 27
- 28
- 29
- 30
- 31
- 32
- 33
- 34
- 35
- 36
- 37
- 38
- 39
- 40
- 41
- 42
- 43
- 44
- 45
- 46
- 47
- 48
- 49
- 50
- 51
- 52
- 53
- 54
- 55
🔎支持:🎁🎁🎁如果觉得博主的文章还不错或者您用得到的话,可以免费的关注一下博主,如果三连收藏支持就更好啦!这就是给予我最大的支持!
-
相关阅读:
Python:实现merge sort归并排序算法(附完整源码)
Puppeteer实战指南:自动化抓取网页中的图片资源
docker镜像详解
猿创征文 第二季| #「笔耕不辍」--生命不息,写作不止#
连连看核心算法与基本思想(附全部项目代码链接与代码详细注释)
在 Visual Studio 中使用远程 MacOS 调试功能
线性回归(linear regression)
Maven学习笔记(十三)-maven-dependency-plugin插件
【chainlit】使用chainlit部署chatgpt
《Effective C++》《构造/析构/赋值运算——9、绝不在构造和析构过程中调用virtual函数》
- 原文地址:https://blog.csdn.net/m0_37623374/article/details/125976290
