-
Minecraft 1.18.1、1.18.2模组开发 23.3D动画盔甲制作
Minecraft 1.16.5模组开发3D盔甲
Minecraft 1.12.2模组开发3D盔甲
我们本次在1.18.2的版本中实现具有动画效果的3D盔甲
1.首先,为了实现这些效果,我们需要首先使用到一个模组:geckolib(下载地址)
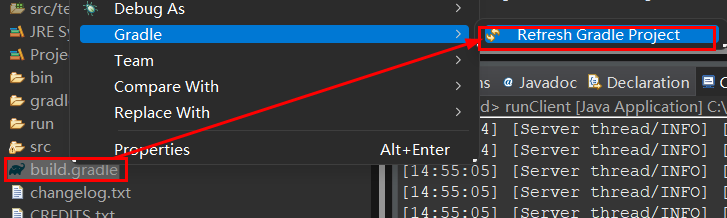
找到项目的
build.gradle文件,在repositories和dependencies中添加依赖。repositories { //添加这个 maven { url 'https://dl.cloudsmith.io/public/geckolib3/geckolib/maven/' } } dependencies { minecraft 'net.minecraftforge:forge:1.18.2-40.1.0' //添加这个 implementation fg.deobf('software.bernie.geckolib:geckolib-1.18-forge:3.0.18') }- 1
- 2
- 3
- 4
- 5
- 6
- 7
- 8
- 9
- 10
- 11
- 12
- 13

之后我们重新构建gradle项目
构建好了项目后在项目的Main类中添加一句geckolib的初始化语句:
Main.javapublic Main() { IEventBus bus = FMLJavaModLoadingContext.get().getModEventBus(); ItemInit.ITEMS.register(bus); //添加GeckoLib初始化函数 GeckoLib.initialize(); MinecraftForge.EVENT_BUS.register(this); }- 1
- 2
- 3
- 4
- 5
- 6
- 7
- 8
- 9
- 10
- 11
- 12
2.之后,与之前的教程一样,我们需要在blockbench中制作一个模组中的3D盔甲:
进入软件后我们要找到一个插件按钮,然后再搜索栏中输入
GeckoLib Animation Utils,并下载这个插件
将我们制作好的生物实体进行模型转换工作,找到
Convert Project,之后选择Geckolib Animated Model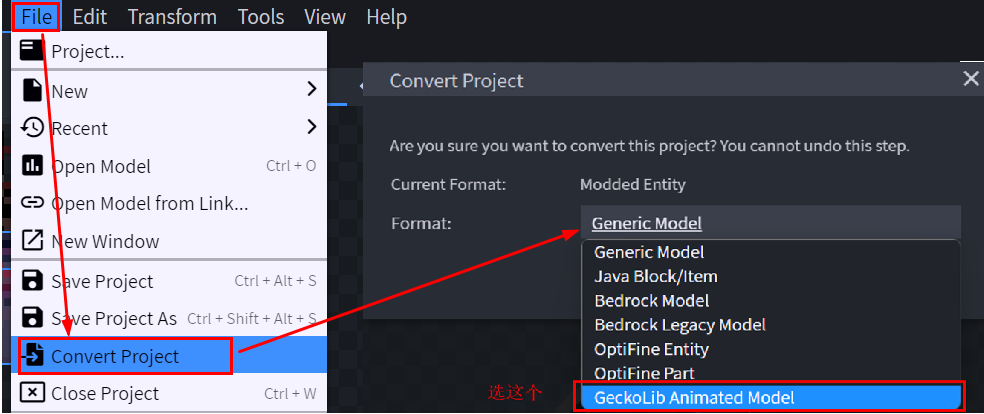
在这之后,你会发现你的生物实体栏多了一个
Animate栏,点击进去:
具体动作制作的视频:Blockbench动画制作
注:我们的盔甲的要完全按照这种进行制作:

在制作好所有的动画后我们导出模型和动画json文件。

3.模型制作完成,接下来需要制作我们的盔甲类
在items包中新建armor包 -> armor包中新建我们的套装类
HeisensuitArmorItemHeisensuitArmorItem.javapackage com.joy187.re8joymod.items.armor; import java.util.ArrayList; import java.util.Arrays; import java.util.List; import java.util.Map; import com.google.common.collect.ImmutableMap; import com.joy187.re8joymod.Main; import com.joy187.re8joymod.init.EffectInit; import com.joy187.re8joymod.init.ItemInit; import com.joy187.re8joymod.util.CustomArmorMaterial; import net.minecraft.world.effect.MobEffectInstance; import net.minecraft.world.effect.MobEffects; import net.minecraft.world.entity.EquipmentSlot; import net.minecraft.world.entity.LivingEntity; import net.minecraft.world.entity.decoration.ArmorStand; import net.minecraft.world.entity.player.Player; import net.minecraft.world.item.ArmorItem; import net.minecraft.world.item.ArmorMaterial; import net.minecraft.world.item.Item; import net.minecraft.world.item.ItemStack; import net.minecraft.world.level.Level; import software.bernie.geckolib3.core.IAnimatable; import software.bernie.geckolib3.core.PlayState; import software.bernie.geckolib3.core.builder.AnimationBuilder; import software.bernie.geckolib3.core.controller.AnimationController; import software.bernie.geckolib3.core.event.predicate.AnimationEvent; import software.bernie.geckolib3.core.manager.AnimationData; import software.bernie.geckolib3.core.manager.AnimationFactory; import software.bernie.geckolib3.item.GeoArmorItem; public class HeisensuitArmorItem extends GeoArmorItem implements IAnimatable{ private AnimationFactory factory = new AnimationFactory(this); public HeisensuitArmorItem(ArmorMaterial materialIn, EquipmentSlot slot, Properties builder) { super(materialIn, slot, builder.tab(Main.TUTORIAL_TAB)); } //动画状态机,判断每个时刻我们的盔甲的动画状态 @SuppressWarnings("unused") privatePlayState predicate(AnimationEvent
event) { // This is all the extradata this event carries. The livingentity is the entity // that's wearing the armor. The itemstack and equipmentslottype are self // explanatory. List
slotData = event.getExtraDataOfType(EquipmentSlot.class); List stackData = event.getExtraDataOfType(ItemStack.class); LivingEntity livingEntity = event.getExtraDataOfType(LivingEntity.class).get(0); // Always loop the animation but later on in this method we'll decide whether or // not to actually play it event.getController().setAnimation(new AnimationBuilder().addAnimation("animation.heisensuit.idle", true)); // If the living entity is an armorstand just play the animation nonstop if (livingEntity instanceof ArmorStand) { return PlayState.CONTINUE; } // The entity is a player, so we want to only play if the player is wearing the // full set of armor else if (livingEntity instanceof Player) { Player player = (Player) livingEntity; // Get all the equipment, aka the armor, currently held item, and offhand item List - equipmentList = new ArrayList<>(); player.getAllSlots().forEach((x) -> equipmentList.add(x.getItem())); // 包含四个盔甲位置 List
- armorList = equipmentList.subList(2, 6); //如果玩家穿上了所有的套装就会播放相应的动画 // Make sure the player is wearing all the armor. If they are, continue playing // the animation, otherwise stop //ItemInit.HEISEN_BOOTS.get(), ItemInit.HEISEN_LEGGINGS.get(),ItemInit.HEISEN_CHEST.get(), ItemInit.HEISEN_HEAD.get() boolean isWearingAll = armorList .containsAll(Arrays.asList(ItemInit.HEISEN_BOOTS.get(), ItemInit.HEISEN_LEGG.get() ,ItemInit.HEISEN_SUIT.get(), ItemInit.HEISEN_HEAD.get())); return isWearingAll ? PlayState.CONTINUE : PlayState.STOP; } return PlayState.STOP; } //将我们的待机动画进行注册 @SuppressWarnings({ "unchecked", "rawtypes" }) @Override public void registerControllers(AnimationData data) { data.addAnimationController(new AnimationController(this, "controller", 20, this::predicate)); } @Override public AnimationFactory getFactory() { return this.factory; } private static final Map
- 1
- 2
- 3
- 4
- 5
- 6
- 7
- 8
- 9
- 10
- 11
- 12
- 13
- 14
- 15
- 16
- 17
- 18
- 19
- 20
- 21
- 22
- 23
- 24
- 25
- 26
- 27
- 28
- 29
- 30
- 31
- 32
- 33
- 34
- 35
- 36
- 37
- 38
- 39
- 40
- 41
- 42
- 43
- 44
- 45
- 46
- 47
- 48
- 49
- 50
- 51
- 52
- 53
- 54
- 55
- 56
- 57
- 58
- 59
- 60
- 61
- 62
- 63
- 64
- 65
- 66
- 67
- 68
- 69
- 70
- 71
- 72
- 73
- 74
- 75
- 76
- 77
- 78
- 79
- 80
- 81
- 82
- 83
- 84
- 85
- 86
- 87
- 88
- 89
- 90
- 91
- 92
- 93
- 94
- 95
- 96
- 97
- 98
- 99
- 100
- 101
- 102
- 103
- 104
- 105
- 106
- 107
- 108
- 109
- 110
- 111
- 112
- 113
- 114
- 115
- 116
- 117
- 118
- 119
- 120
- 121
- 122
- 123
- 124
- 125
- 126
- 127
- 128
- 129
- 130
- 131
- 132
- 133
- 134
- 135
- 136
- 137
- 138
- 139
- 140
- 141
- 142
- 143
- 144
- 145
- 146
- 147
- 148
- 149
- 150
- 151
- 152
- 153
- 154
- 155
之后我们需要在armor包中新建model包->model包中新建我们的盔甲的模型类
ModelHeisensuit:ModelHeisensuit.javapackage com.joy187.re8joymod.items.armor.model; import com.joy187.re8joymod.Main; import com.joy187.re8joymod.items.armor.HeisensuitArmorItem; import net.minecraft.resources.ResourceLocation; import software.bernie.geckolib3.model.AnimatedGeoModel; public class ModelHeisensuit extends AnimatedGeoModel{ //盔甲模型文件地址 @Override public ResourceLocation getModelLocation(HeisensuitArmorItem object) { return new ResourceLocation(Main.MOD_ID, "geo/heisensuit.geo.json"); } //盔甲材质文件地址 @Override public ResourceLocation getTextureLocation(HeisensuitArmorItem object) { return new ResourceLocation(Main.MOD_ID, "textures/models/armor/heisensuit_layer_1.png"); } //盔甲动画文件地址 @Override public ResourceLocation getAnimationFileLocation(HeisensuitArmorItem animatable) { return new ResourceLocation(Main.MOD_ID, "animations/heisensuit.animation.json"); } } - 1
- 2
- 3
- 4
- 5
- 6
- 7
- 8
- 9
- 10
- 11
- 12
- 13
- 14
- 15
- 16
- 17
- 18
- 19
- 20
- 21
- 22
- 23
- 24
- 25
- 26
- 27
- 28
- 29
之后我们需要在armor包中新建render包->render包中新建我们的盔甲的模型类
ModelHeisensuit:``
package com.joy187.re8joymod.items.armor.render; import com.joy187.re8joymod.items.armor.HeisensuitArmorItem; import com.joy187.re8joymod.items.armor.model.ModelHeisensuit; import software.bernie.geckolib3.renderers.geo.GeoArmorRenderer; public class RenderHeisensuit extends GeoArmorRenderer{ //渲染盔甲穿在身上的每一个部位的效果 public RenderHeisensuit() { super(new ModelHeisensuit()); //这里要和第二步你blockbench中建模的名称一一对应 this.headBone = "Head"; this.bodyBone = "chestplate"; this.rightArmBone = "rightArm"; this.leftArmBone = "leftArm"; this.rightLegBone = "rightLeg"; this.leftLegBone = "leftLeg"; this.rightBootBone = "rightBoot"; this.leftBootBone = "leftBoot"; } } - 1
- 2
- 3
- 4
- 5
- 6
- 7
- 8
- 9
- 10
- 11
- 12
- 13
- 14
- 15
- 16
- 17
- 18
- 19
- 20
- 21
- 22
- 23
- 24
4.在
ClientModEventSubscriber类中将我们的盔甲渲染类进行注册:ClientModEventSubscriber.java@Mod.EventBusSubscriber(modid = Main.MOD_ID, value = Dist.CLIENT, bus = Mod.EventBusSubscriber.Bus.MOD) public class ClientModEventSubscriber extends ModEventSubscriber{ @OnlyIn(Dist.CLIENT) @SubscribeEvent public static void registerRenderers(final EntityRenderersEvent.AddLayers event) { //渲染类进行注册 GeoArmorRenderer.registerArmorRenderer(HeisensuitArmorItem.class, new RenderHeisensuit()); } }- 1
- 2
- 3
- 4
- 5
- 6
- 7
- 8
- 9
- 10
- 11
5.在ItemInit类中将我们的盔甲进行声明,盔甲属性请参考之前的教程1.18.2 盔甲套装:
ItemInit.java//头盔 public static final RegistryObjectHEISEN_HEAD = ITEMS.register("heisenhead", () -> new HeisensuitArmorItem(CustomArmorMaterial.ARMOR_MATERIAL_HEISENSUIT, EquipmentSlot.HEAD, new Item.Properties())); //胸甲 public static final RegistryObject HEISEN_SUIT = ITEMS.register("heisensuit", () -> new HeisensuitArmorItem(CustomArmorMaterial.ARMOR_MATERIAL_HEISENSUIT, EquipmentSlot.CHEST, new Item.Properties())); //护腿 public static final RegistryObject HEISEN_LEGG = ITEMS.register("heisenlegg", () -> new HeisensuitArmorItem(CustomArmorMaterial.ARMOR_MATERIAL_HEISENSUIT, EquipmentSlot.LEGS, new Item.Properties())); //靴子 public static final RegistryObject HEISEN_BOOTS = ITEMS.register("heisenboots", () -> new HeisensuitArmorItem(CustomArmorMaterial.ARMOR_MATERIAL_HEISENSUIT, EquipmentSlot.FEET, new Item.Properties())); - 1
- 2
- 3
- 4
- 5
- 6
- 7
- 8
- 9
- 10
- 11
- 12
- 13
6.代码部分结束,之后来到材质包制作环节:
在
resources\assets\你的modid中的lang包中的en_us.json添加盔甲的英文名称:"item.re8joymod.heisenhead":"H", "item.re8joymod.heisensuit":"H", "item.re8joymod.heisenlegg":"Hei", "item.re8joymod.heisenboots":"Heis",- 1
- 2
- 3
- 4
在
models\item包中添加所有盔甲的模型文件:头盔
heisenhead.json{ "parent": "item/generated", "textures": { "layer0": "re8joymod:item/heisenhead" } }- 1
- 2
- 3
- 4
- 5
- 6
胸甲
heisensuit.json{ "parent": "item/generated", "textures": { "layer0": "re8joymod:item/heisensuit" } }- 1
- 2
- 3
- 4
- 5
- 6
护腿
heisenlegg.json{ "parent": "item/generated", "textures": { "layer0": "re8joymod:item/heisenlegg" } }- 1
- 2
- 3
- 4
- 5
- 6
靴子
heisenboots.json{ "parent": "item/generated", "textures": { "layer0": "re8joymod:item/heisenboots" } }- 1
- 2
- 3
- 4
- 5
- 6
在
textures\item中添加盔甲的手持贴图:
在
textures\models\armor中添加盔甲的穿戴后贴图:
在
assets\minecraft\textures\models\armor中同样添加我们的穿戴后贴图:
新建一个geo包和animation包,把第二步中的模型和动画文件分别放进去

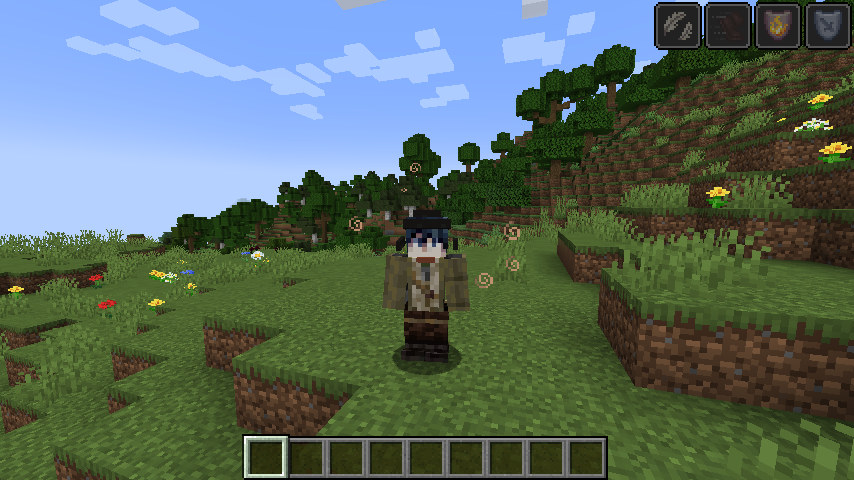
8.保存所有文件 -> 进行测试:
穿上盔甲,如果可以正常显示,就说明我们成功了!
-
相关阅读:
从 VLAN 到 IPVLAN: 聊聊虚拟网络设备及其在云原生中的应用
react hook---钩子函数的使用,useState,useReducer,useEffect,useRef,useContext,自定义hook
Kubuesphere部署Ruoyi(二):部署kubesphere
神经网络之万能定理python-pytorch实现,可以拟合任意曲线
Postman 做测试的 6 个常见问题
中原银行实时风控体系建设实践
数电再回顾
Linux中提高效率的环境配置
车载双向认证框架设计
Django ORM进阶应用
- 原文地址:https://blog.csdn.net/Jay_fearless/article/details/126077095
