-
一文解析 Pinia 和 Vuex,带你全面理解这两个 Vue 状态管理模式
Pinia和Vuex一样都是是vue的全局状态管理器。其实Pinia就是Vuex5,只不过为了尊重原作者的贡献就沿用了这个看起来很甜的名字Pinia。
本文将通过Vue3的形式对两者的不同实现方式进行对比,让你在以后工作中无论使用到Pinia还是Vuex的时候都能够游刃有余。
既然我们要对比两者的实现方式,那么我们肯定要先在我们的Vue3项目中引入这两个状态管理器(实际项目中千万不要即用Vuex又用Pinia,不然你会被同事请去喝茶的。下面就让我们看下它们的使用方式吧
安装
- Vuex
npm i vuex -S 复制代码- 1
- 2
- Pinia
npm i pinia -S 复制代码- 1
- 2
挂载
Vuex
在src目录下新建vuexStore,实际项目中你只需要建一个store目录即可,由于我们需要两种状态管理器,所以需要将其分开并创建两个store目录
新建vuexStore/index.js
import { createStore } from 'vuex' export default createStore({ //全局state,类似于vue种的data state() { return { vuexmsg: "hello vuex", name: "xiaoyue", }; }, //修改state函数 mutations: { }, //提交的mutation可以包含任意异步操作 actions: { }, //类似于vue中的计算属性 getters: { }, //将store分割成模块(module),应用较大时使用 modules: { } }) 复制代码- 1
- 2
- 3
- 4
- 5
- 6
- 7
- 8
- 9
- 10
- 11
- 12
- 13
- 14
- 15
- 16
- 17
- 18
- 19
- 20
- 21
- 22
- 23
- 24
- 25
- 26
- 27
- 28
- 29
main.js引入
import { createApp } from 'vue' import App from './App.vue' import store from '@/store' createApp(App).use(store).mount('#app') 复制代码- 1
- 2
- 3
- 4
- 5
- 6
App.vue测试
复制代码- 1
- 2
- 3
- 4
- 5
- 6
- 7
- 8
- 9
- 10
页面正常打印hello vuex说明我们的Vuex已经挂载成功了
Pinia
- main.js引入
import { createApp } from "vue"; import App from "./App.vue"; import {createPinia} from 'pinia' const pinia = createPinia() createApp(App).use(pinia).mount("#app"); 复制代码- 1
- 2
- 3
- 4
- 5
- 6
- 7
- 创建Store
src下新建piniaStore/storeA.js
import { defineStore } from "pinia"; export const storeA = defineStore("storeA", { state: () => { return { piniaMsg: "hello pinia", }; }, getters: {}, actions: {}, }); 复制代码- 1
- 2
- 3
- 4
- 5
- 6
- 7
- 8
- 9
- 10
- 11
- 12
- 13
- App.vue使用
复制代码- 1
- 2
- 3
- 4
- 5
- 6
- 7
- 8
- 9
从这里我们可以看出pinia中没有了mutations和modules,pinia不必以嵌套(通过modules引入)的方式引入模块,因为它的每个store便是一个模块,如storeA,storeB… 。在我们使用Vuex的时候每次修改state的值都需要调用mutations里的修改函数(下面会说到),因为Vuex需要追踪数据的变化,这使我们写起来比较繁琐。而pinia则不再需要mutations,同步异步都可在actions进行操作,至于它没有了mutations具体是如何最终到state变化的,这里我们不过多深究,大概好像应该是通过hooks回调的形式解决的把(我也没研究过,瞎猜的。
修改状态
获取state的值从上面我们已经可以一目了然的看到了,下面让我们看看他俩修改state的方法吧
vuex
vuex在组件中直接修改state,如App.vue
{{vuexStore.state.vuexmsg}}复制代码- 1
- 2
- 3
- 4
- 5
- 6
- 7
- 8
- 9
- 10
- 11
- 12
可以看出我们是可以直接在组件中修改state的而且还是响应式的,但是如果这样做了,vuex不能够记录每一次state的变化记录,影响我们的调试。当vuex开启严格模式的时候,直接修改state会抛出错误,所以官方建议我们开启严格模式,所有的state变更都在vuex内部进行,在mutations进行修改。例如vuexStore/index.js:
import { createStore } from "vuex"; export default createStore({ strict: true, //全局state,类似于vue种的data state: { vuexmsg: "hello vuex", }, //修改state函数 mutations: { setVuexMsg(state, data) { state.vuexmsg = data; }, }, //提交的mutation可以包含任意异步操作 actions: {}, //类似于vue中的计算属性 getters: {}, //将store分割成模块(module),应用较大时使用 modules: {}, }); 复制代码- 1
- 2
- 3
- 4
- 5
- 6
- 7
- 8
- 9
- 10
- 11
- 12
- 13
- 14
- 15
- 16
- 17
- 18
- 19
- 20
- 21
- 22
- 23
- 24
- 25
- 26
- 27
当我们需要修改vuexmsg的时候需要提交setVuexMsg方法,如App.vue
{{ vuexStore.state.vuexmsg }}复制代码- 1
- 2
- 3
- 4
- 5
- 6
- 7
- 8
- 9
- 10
- 11
或者我们可以在actions中进行提交mutations修改state:
import { createStore } from "vuex"; export default createStore({ strict: true, //全局state,类似于vue种的data state() { return { vuexmsg: "hello vuex", } }, //修改state函数 mutations: { setVuexMsg(state, data) { state.vuexmsg = data; }, }, //提交的mutation可以包含任意异步操作 actions: { async getState({ commit }) { //const result = await xxxx 假设这里进行了请求并拿到了返回值 commit("setVuexMsg", "hello juejin"); }, } }); 复制代码- 1
- 2
- 3
- 4
- 5
- 6
- 7
- 8
- 9
- 10
- 11
- 12
- 13
- 14
- 15
- 16
- 17
- 18
- 19
- 20
- 21
- 22
- 23
- 24
- 25
- 26
- 27
组件中使用dispatch进行分发actions
{{ vuexStore.state.vuexmsg }}复制代码- 1
- 2
- 3
- 4
- 5
- 6
- 7
- 8
- 9
- 10
一般来说,vuex中的流程是首先actions一般放异步函数,拿请求后端接口为例,当后端接口返回值的时候,actions中会提交一个mutations中的函数,然后这个函数对vuex中的状态(state)进行一个修改,组件中再渲染这个状态,从而实现整个数据流程都在vuex内部进行便于检测。直接看图,一目了然

Pinia
- 直接修改
相比于Vuex,Pinia是可以直接修改状态的,并且调试工具能够记录到每一次state的变化,如App.vue
{{ piniaStoreA.piniaMsg }}复制代码- 1
- 2
- 3
- 4
- 5
- 6
- 7
- 8
- 9
- 10
- 11
- 12
- 13
- 14
- $patch
使用$patch方法可以修改多个state中的值,比如我们在piniaStore/storeA.js中的state增加一个name
import { defineStore } from "pinia"; export const storeA = defineStore("storeA", { state: () => { return { piniaMsg: "hello pinia", name: "xiaoyue", }; }, getters: {}, actions: {}, }); 复制代码- 1
- 2
- 3
- 4
- 5
- 6
- 7
- 8
- 9
- 10
- 11
- 12
- 13
- 14
然后我们在App.vue中进行修改这两个state
import { storeA } from '@/piniaStore/storeA' let piniaStoreA = storeA() console.log(piniaStoreA.name); //xiaoyue piniaStoreA.$patch({ piniaMsg: 'hello juejin', name: 'daming' }) console.log(piniaStoreA.name);//daming 复制代码- 1
- 2
- 3
- 4
- 5
- 6
- 7
- 8
- 9
- 10
当然也是支持修改单个状态的如
piniaStoreA.$patch({ name: 'daming' }) 复制代码- 1
- 2
- 3
- 4
$patch还可以使用函数的方式进行修改状态
import { storeA } from '@/piniaStore/storeA' let piniaStoreA = storeA() cartStore.$patch((state) => { state.name = 'daming' state.piniaMsg = 'hello juejin' }) 复制代码- 1
- 2
- 3
- 4
- 5
- 6
- 7
- 8
- 在actions中进行修改
不同于Vuex的是,Pinia去掉了mutations,所以在actions中修改state就行Vuex在mutations修改state一样。其实这也是我比较推荐的一种修改状态的方式,就像上面说的,这样可以实现整个数据流程都在状态管理器内部,便于管理。
在piniaStore/storeA.js的actions添加一个修改name的函数
import { defineStore } from "pinia"; export const storeA = defineStore("storeA", { state: () => { return { piniaMsg: "hello pinia", name: "xiao yue", }; }, actions: { setName(data) { this.name = data; }, }, }); 复制代码- 1
- 2
- 3
- 4
- 5
- 6
- 7
- 8
- 9
- 10
- 11
- 12
- 13
- 14
- 15
- 16
组件App.vue中调用不需要再使用dispatch函数,直接调用store的方法即可
import { storeA } from '@/piniaStore/storeA' let piniaStoreA = storeA() piniaStoreA.setName('daming') 复制代码- 1
- 2
- 3
- 4
- 重置state
Pinia可以使用$reset将状态重置为初始值
import { storeA } from '@/piniaStore/storeA' let piniaStoreA = storeA() piniaStoreA.$reset() 复制代码- 1
- 2
- 3
- 4
- 5
Pinia解构(storeToRefs)
当我们组件中需要用到state中多个参数时,使用解构的方式取值往往是很方便的,但是传统的ES6解构会使state失去响应式,比如组件App.vue,我们先解构取得name值,然后再去改变name值,然后看页面是否变化
{{ name }}复制代码- 1
- 2
- 3
- 4
- 5
- 6
- 7
- 8
- 9
- 10
- 11
- 12
- 13
浏览器展示如下

我们可以发现浏览器并没有更新页面为daming
为了解决这个问题,Pinia提供了一个结构方法storeToRefs,我们将组件App.vue使用storeToRefs解构
{{ name }}复制代码- 1
- 2
- 3
- 4
- 5
- 6
- 7
- 8
- 9
- 10
- 11
- 12
- 13
- 14
再看下页面变化

我们发现页面已经被更新成daming了
getters
其实Vuex中的getters和Pinia中的getters用法是一致的,用于自动监听对应state的变化,从而动态计算返回值(和vue中的计算属性差不多),并且getters的值也具有缓存特性
Pinia
我们先将piniaStore/storeA.js改为
import { defineStore } from "pinia"; export const storeA = defineStore("storeA", { state: () => { return { count1: 1, count2: 2, }; }, getters: { sum() { console.log('我被调用了!') return this.count1 + this.count2; }, }, }); 复制代码- 1
- 2
- 3
- 4
- 5
- 6
- 7
- 8
- 9
- 10
- 11
- 12
- 13
- 14
- 15
- 16
- 17
- 18
然后在组件App.vue中获取sum
{{ piniaStoreA.sum }}复制代码- 1
- 2
- 3
- 4
- 5
- 6
- 7
- 8
- 9
- 10
让我们来看下什么是缓存特性。首先我们在组件多次访问sum再看下控制台打印
import { storeA } from '@/piniaStore/storeA' let piniaStoreA = storeA() console.log(piniaStoreA.sum) console.log(piniaStoreA.sum) console.log(piniaStoreA.sum) piniaStoreA.count1 = 2 console.log(piniaStoreA.sum) 复制代码- 1
- 2
- 3
- 4
- 5
- 6
- 7
- 8
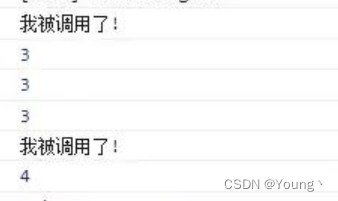
从打印结果我们可以看出只有在首次使用用或者当我们改变sum所依赖的值的时候,getters中的sum才会被调用
Vuex
Vuex中的getters使用和Pinia的使用方式类似,就不再进行过多说明,写法如下vuexStore/index.js
import { createStore } from "vuex"; export default createStore({ strict: true, //全局state,类似于vue种的data state: { count1: 1, count2: 2, }, //类似于vue中的计算属性 getters: { sum(state){ return state.count1 + state.count2 } } }); 复制代码- 1
- 2
- 3
- 4
- 5
- 6
- 7
- 8
- 9
- 10
- 11
- 12
- 13
- 14
- 15
- 16
- 17
- 18
- 19
- 20
- 21
modules
如果项目比较大,使用单一状态库,项目的状态库就会集中到一个大对象上,显得十分臃肿难以维护。所以Vuex就允许我们将其分割成模块(modules),每个模块都拥有自己state,mutations,actions…。而Pinia每个状态库本身就是一个模块。
Pinia
Pinia没有modules,如果想使用多个store,直接定义多个store传入不同的id即可,如:
import { defineStore } from "pinia"; export const storeA = defineStore("storeA", {...}); export const storeB = defineStore("storeB", {...}); export const storeC = defineStore("storeB", {...}); 复制代码- 1
- 2
- 3
- 4
- 5
- 6
- 7
Vuex
一般来说每个module都会新建一个文件,然后再引入这个总的入口index.js中,这里为了方便就写在了一起
import { createStore } from "vuex"; const moduleA = { state: () => ({ count:1 }), mutations: { setCount(state, data) { state.count = data; }, }, actions: { getuser() { //do something }, }, getters: { ... } } const moduleB = { state: () => ({ ... }), mutations: { ... }, actions: { ... } } export default createStore({ strict: true, //全局state,类似于vue种的data state() { return { vuexmsg: "hello vuex", name: "xiaoyue", }; }, modules: { moduleA, moduleB }, }); 复制代码- 1
- 2
- 3
- 4
- 5
- 6
- 7
- 8
- 9
- 10
- 11
- 12
- 13
- 14
- 15
- 16
- 17
- 18
- 19
- 20
- 21
- 22
- 23
- 24
- 25
- 26
- 27
- 28
- 29
- 30
- 31
- 32
- 33
- 34
- 35
- 36
- 37
- 38
- 39
- 40
使用moduleA
import { useStore } from 'vuex' let vuexStore = useStore() console.log(vuexStore.state.moduleA.count) //1 vuexStore.commit('setCount', 2) console.log(vuexStore.state.moduleA.count) //2 vuexStore.dispatch('getuser')- 1
- 2
- 3
- 4
- 5
- 6
一般我们为了防止提交一些mutation或者actions中的方法重名,modules一般会采用命名空间的方式 namespaced: true 如moduleA:
const moduleA = { namespaced: true, state: () => ({ count: 1, }), mutations: { setCount(state, data) { state.count = data; }, }, actions: { getuser() { //do something }, }, }- 1
- 2
- 3
- 4
- 5
- 6
- 7
- 8
- 9
- 10
- 11
- 12
- 13
- 14
- 15
- 16
此时如果我们再调用setCount或者getuser
vuexStore.commit('moduleA/setCount', 2) vuexStore.dispatch('moduleA/getuser')- 1
- 2
-
相关阅读:
JAVA基础一些问题总结
离散化,矩阵快速幂,广义矩阵乘法
如何在React项目中使用TypeScript
Hive中的常用函数
聊聊 flink 的时间窗口
正则表达式
redis使用
Mac下flutter工程配置Gitlab cicd打包(暂时仅限android侧)
java计算机毕业设计web二手交易平台源码+mysql数据库+系统+lw文档+部署
JAVA基于微信小程序的校园信息共享平台毕业设计-附源码211615
- 原文地址:https://blog.csdn.net/agonie201218/article/details/114028857
