-
这应该是最全的Spring Boot启动原理源码剖析了
概念&原理:(滑到文末有惊喜哦)

源码:
SpringBoot 事假监听器发布顺序:
1.ApplicationStartingEvent在运行开始时发送,但在进行任何处理之前(侦听器和初始化程序的注册除外)发送。
2.在创建上下文之前,将发送ApplicationEnvironmentPreparedEvent。
3.准备ApplicationContext并调用ApplicationContextInitializers之后,将发送ApplicationContextInitializedEvnt。
4.读取完配置类后发送ApplicationPreparedEvent。
5.在刷新上下文之后但在调用任何应用程序和命令行运行程序之前,将发送ApplicationStartedEvent。
6.紧随其后发送带有LivenessState.CORRECT的AvailabilityChangeEvent,以指示该应用程序被视为处于活动状态。
7.在调用任何应用程序和命令行运行程序之后,将发送ApplicationReadyEvent。
8.紧随其后发送ReadabilityState.ACCEPTING_TRAFFIC的AvailabilityChangeEvent,以指示应用程序已准备就绪,可以处理请求。
9 如果启动时发生异常,则发送ApplicationFailedEvent。- ApplicationStartingEvent
- ApplicationEnvironmentPreparedEvent

1 调用SpringApplication.run启动springboot应用
1 SpringApplication.run(Application.class, args);- 1
- 使用自定义SpringApplication进行启动
1 public static ConfigurableApplicationContext run(Class<?>[] primarySources, String[] args) { 2 return new SpringApplication(primarySources).run(args); 3 }- 1
- 2
- 3
- 创建SpringApplication
new SpringApplication(primarySources)
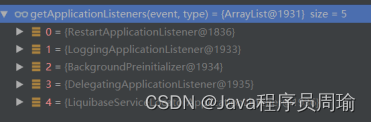
1 public SpringApplication(ResourceLoader resourceLoader, Class<?>... primarySources) { 2 this.resourceLoader = resourceLoader; 3 Assert.notNull(primarySources, "PrimarySources must not be null"); 4 // 将启动类放入primarySources 5 this.primarySources = new LinkedHashSet<>(Arrays.asList(primarySources)); 6 // 根据classpath 下的类,推算当前web应用类型(webFlux, servlet) 7 this.webApplicationType = WebApplicationType.deduceFromClasspath(); 8 // 就是去spring.factories 中去获取所有key:org.springframework.context.ApplicationContextInitializer 9 setInitializers((Collection) getSpringFactoriesInstances(ApplicationContextInitializer.class)); 10 //就是去spring.factories 中去获取所有key: org.springframework.context.ApplicationListener 11 setListeners((Collection) getSpringFactoriesInstances(ApplicationListener.class)); 12 // 根据main方法推算出mainApplicationClass 13 this.mainApplicationClass = deduceMainApplicationClass(); 14 }- 1
- 2
- 3
- 4
- 5
- 6
- 7
- 8
- 9
- 10
- 11
- 12
- 13
- 14
org.springframework.context.ApplicationContextInitializer

org.springframework.context.ApplicationListener

总结:
- 获取启动类
- 获取web应用类型
- 读取了对外扩展的ApplicationContextInitializer ,ApplicationListener
- 根据main推算出所在的类就是去初始化了一些信息
2. 启动
run
启动springboot最核心的逻辑1 public ConfigurableApplicationContext run(String... args) { 2 // 用来记录当前springboot启动耗时 3 StopWatch stopWatch = new StopWatch(); 4 // 就是记录了启动开始时间 5 stopWatch.start(); 6 // 它是任何spring上下文的接口, 所以可以接收任何ApplicationContext实现 7 ConfigurableApplicationContext context = null; 8 Collection<SpringBootExceptionReporter> exceptionReporters = new ArrayList<>(); 9 // 开启了Headless模式: 10 configureHeadlessProperty(); 11 // 去spring.factroies中读取了SpringApplicationRunListener 的组件, 就是用来发布事件或者运行监听器 12 SpringApplicationRunListeners listeners = getRunListeners(args); 13 // 发布1.ApplicationStartingEvent事件,在运行开始时发送 14 listeners.starting(); 15 try { 16 // 根据命令行参数 实例化一个ApplicationArguments 17 ApplicationArguments applicationArguments = new DefaultApplicationArguments(args); 18 // 预初始化环境: 读取环境变量,读取配置文件信息(基于监听器) 19 ConfigurableEnvironment environment = prepareEnvironment(listeners, applicationArguments); 20 // 忽略beaninfo的bean 21 configureIgnoreBeanInfo(environment); 22 // 打印Banner 横幅 23 Banner printedBanner = printBanner(environment); 24 // 根据webApplicationType创建Spring上下文 25 context = createApplicationContext(); 26 exceptionReporters = getSpringFactoriesInstances(SpringBootExceptionReporter.class, 27 new Class[] { ConfigurableApplicationContext.class }, context); 28 //预初始化spring上下文 29 prepareContext(context, environment, listeners, applicationArguments, printedBanner); 30 // 加载spring ioc 容器 **相当重要 由于是使用AnnotationConfigServletWebServerApplicationContext 启动的sring容器所以springboot对它做了扩展: 31 // 加载自动配置类:invokeBeanFactoryPostProcessors , 创建servlet容器onRefresh 32 refreshContext(context); 33 afterRefresh(context, applicationArguments); 34 stopWatch.stop(); 35 if (this.logStartupInfo) { 36 new StartupInfoLogger(this.mainApplicationClass).logStarted(getApplicationLog(), stopWatch); 37 } 38 listeners.started(context); 39 callRunners(context, applicationArguments); 40 } 41 catch (Throwable ex) { 42 handleRunFailure(context, ex, exceptionReporters, listeners); 43 throw new IllegalStateException(ex); 44 } 45 46 try { 47 listeners.running(context); 48 } 49 catch (Throwable ex) { 50 handleRunFailure(context, ex, exceptionReporters, null); 51 throw new IllegalStateException(ex); 52 } 53 return context; 54 }- 1
- 2
- 3
- 4
- 5
- 6
- 7
- 8
- 9
- 10
- 11
- 12
- 13
- 14
- 15
- 16
- 17
- 18
- 19
- 20
- 21
- 22
- 23
- 24
- 25
- 26
- 27
- 28
- 29
- 30
- 31
- 32
- 33
- 34
- 35
- 36
- 37
- 38
- 39
- 40
- 41
- 42
- 43
- 44
- 45
- 46
- 47
- 48
- 49
- 50
- 51
- 52
- 53
- 54
prepareEnvironment
1 private ConfigurableEnvironment prepareEnvironment(SpringApplicationRunListeners listeners, 2 ApplicationArguments applicationArguments) { 3 // 根据webApplicationType 创建Environment 创建就会读取: java环境变量和系统环境变量 4 ConfigurableEnvironment environment = getOrCreateEnvironment(); 5 // 将命令行参数读取环境变量中 6 configureEnvironment(environment, applicationArguments.getSourceArgs()); 7 // 将@PropertieSource的配置信息 放在第一位, 因为读取配置文件@PropertieSource优先级是最低的 8 ConfigurationPropertySources.attach(environment); 9 // 发布了ApplicationEnvironmentPreparedEvent 的监听器 读取了全局配置文件 10 listeners.environmentPrepared(environment); 11 // 将所有spring.main 开头的配置信息绑定SpringApplication 12 bindToSpringApplication(environment); 13 if (!this.isCustomEnvironment) { 14 environment = new EnvironmentConverter(getClassLoader()).convertEnvironmentIfNecessary(environment, 15 deduceEnvironmentClass()); 16 } 17 //更新PropertySources 18 ConfigurationPropertySources.attach(environment); 19 return environment; 20 }- 1
- 2
- 3
- 4
- 5
- 6
- 7
- 8
- 9
- 10
- 11
- 12
- 13
- 14
- 15
- 16
- 17
- 18
- 19
- 20
prepareContext
预初始化上下文1 private void prepareContext(ConfigurableApplicationContext context, ConfigurableEnvironment environme t, 2 SpringApplicationRunListeners listeners, ApplicationArguments applicationArguments, Banner printedBa ner) { 3 context.setEnvironment(environment); 4 postProcessApplicationContext(context); 5 // 拿到之前读取到所有ApplicationContextInitializer的组件, 循环调用initialize方法 6 applyInitializers(context); 7 // 发布了ApplicationContextInitializedEvent 8 listeners.contextPrepared(context); 9 if (this.logStartupInfo) { 10 logStartupInfo(context.getParent() == null); 11 logStartupProfileInfo(context); 12 } 13 // 获取当前spring上下文beanFactory (负责创建bean) 14 ConfigurableListableBeanFactory beanFactory = context.getBeanFactory(); 15 beanFactory.registerSingleton("springApplicationArguments", applicationArguments); 16 if (printedBanner != null) { 17 beanFactory.registerSingleton("springBootBanner", printedBanner); 18 } 19 // 在Spring下 如果出现2个重名的bean, 则后读取到的会覆盖前面 20 // 在SpringBoot 在这里设置了不允许覆盖, 当出现2个重名的bean 会抛出异常 21 if (beanFactory instanceof DefaultListableBeanFactory) { 22 ((DefaultListableBeanFactory) beanFactory) 23 .setAllowBeanDefinitionOverriding(this.allowBeanDefinitionOverriding); 24 } 25 // 设置当前spring容器是不是要将所有的bean设置为懒加载 26 if (this.lazyInitialization) { 27 context.addBeanFactoryPostProcessor(new LazyInitializationBeanFactoryPostProcessor()); 28 } 29 // Load the sources 30 Set<Object> sources = getAllSources(); 31 Assert.notEmpty(sources, "Sources must not be empty"); 32 // 读取主启动类 (因为后续要根据配置类解析配置的所有bean) 33 load(context, sources.toArray(new Object[0])); 34 //4.读取完配置类后发送ApplicationPreparedEvent。 35 listeners.contextLoaded(context); 36 }- 1
- 2
- 3
- 4
- 5
- 6
- 7
- 8
- 9
- 10
- 11
- 12
- 13
- 14
- 15
- 16
- 17
- 18
- 19
- 20
- 21
- 22
- 23
- 24
- 25
- 26
- 27
- 28
- 29
- 30
- 31
- 32
- 33
- 34
- 35
- 36
总结:
- 初始化SpringApplication 从spring.factories 读取 listener ApplicationContextInitializer 。
- 运行run方法
- 读取 环境变量 配置信息…
- 创建springApplication上下文:ServletWebServerApplicationContext
- 预初始化上下文 : 读取启动类
- 调用refresh 加载ioc容器加载所有的自动配置类创建servlet容器
- 在这个过程中springboot会调用很多监听器对外进行
最后
至此咱们的spring启动原理源码就讲完了,在此小编也整理了很多springboot资料来供大家学习,了解更多Java知识可关注微信公众号“老周扯IT”
- ApplicationStartingEvent
-
相关阅读:
MACOS arco design 初学者踩坑指南
力扣刷题记录(Java)(四)
【AI视野·今日CV 计算机视觉论文速览 第249期】Tue, 19 Sep 202
新手树莓派4B安装Supervised+Home Assistant
python中dir()和help()的作用
WPS 字符串拼接详解(concat、concatenate)
如何优化前端性能:提高网页加载速度的实用技巧
掌握分布式环境缓存更新策略,提高缓存与数据库数据一致性
条件变量condition_variable实现线程同步
微分方程数值解法(PID仿真用一阶被控对象库PLC算法实现)
- 原文地址:https://blog.csdn.net/weixin_51702416/article/details/126056964
