-
学废Elasticsearch(一)
前提
1:为了模拟真实场景,我们将在linux下安装Elasticsearch。 虚拟机(需要JDK1.8以上)。
2:先新建一个用户(出于安全考虑,elasticsearch默认不允许以root账号运行)。创建用户:useradd esuser 设置密码:passwd esuser- 1
- 2

3:官网下载,选择linux版本。上传安装包并解压
解压:tar -zxvf elasticsearch-7.3.2-linux-x86_64.tar.gz 目录重命名:mv elasticsearch-7.3.2 elasticsearch- 1
- 2
一、搭建环境、资源下载
二、部署
- 修改配置
cd config- 1

Elasticsearch基于Lucene的,而Lucene底层是java实现,因此我们需要配置jvm参数。编辑jvm.options
vi jvm.options- 1
修改默认配置:-Xms1g -Xmx1g为

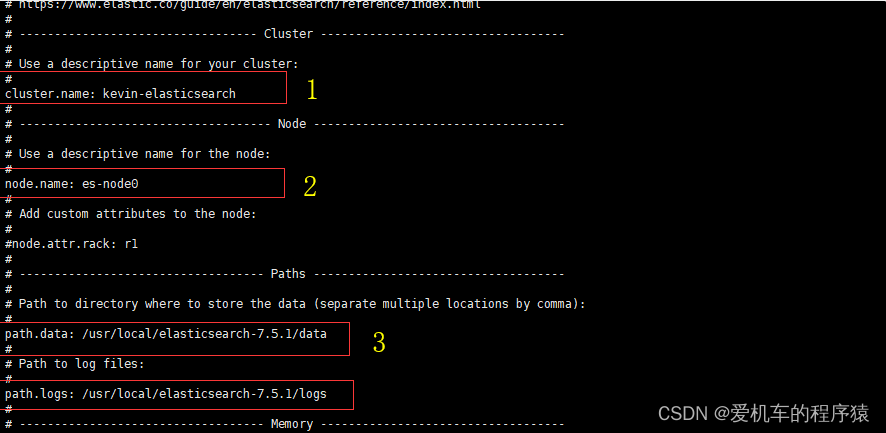
编辑elasticsearch.yml修改数据和日志目录vi elasticsearch.yml- 1


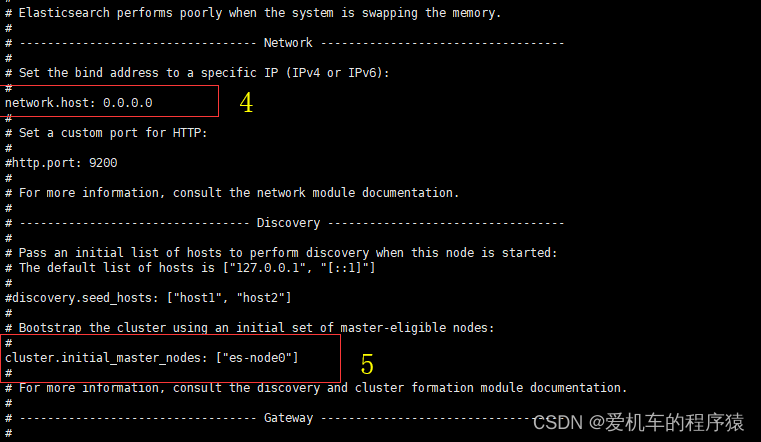
elasticsearch.yml的其它可配置信息:

修改/etc/security/limits.conf文件 增加配置vi /etc/security/limits.conf- 1
在文件最后,增加如下配置:
* soft nofile 65536 * hard nofile 65536- 1
- 2
在/etc/sysctl.conf文件最后添加一行 vm.max_map_count=655360 添加完毕之后,执行命令: sysctl -p
vi /etc/sysctl.conf sysctl -p- 1
- 2
- 启动
先将es文件夹下的所有目录的所有权限迭代给esuser用户
useradd esuser chown -R esuser:esuser /usr/local/elasticsearch-7.5.1 su esuser --却换 cd elasticsearch/bin --进入bin sh elasticsearch --启动- 1
- 2
- 3
- 4
- 5

三、实例

报错总结
**报错1:**bootstrap check failure [1] of [2]: max virtual memory areas vm.max_map_count [65530] is too low, increase to at least [262144]
解决:在 /etc/sysctl.conf 追加最大虚拟空间限制 vm.max_map_count=655360 ,记得 sysctl -p 使系统配置生效。提示无权限时,使用sudo vi和wq! 保存**报错2:**bootstrap check failure [2] of [2]: the default discovery settings are unsuitable for production use; at least one of [discovery.seed_hosts, discovery.seed_providers, cluster.initial_master_nodes] must be configured
解决:elasticsearch.yml增加配置cluster.initial_master_nodes: [“node-1”]报错3:[node-1] exception during geoip databases update
解决:elasticsearch.yml增加配置 ingest.geoip.downloader.enabled: false报错4:
第一种:无法IP:9200端口进入,找了很多资料,说的是修改配置文件elasticsearch.yml,加上network.host: 0.0.0.0,加上这条配置后es无法启动,最后查到需要加上如下四条配置,只加一条无法启动。network.host: 0.0.0.0 http.port: 9200 transport.host: localhost transport.tcp.port: 9300- 1
- 2
- 3
- 4
第二种:无法访问通过关闭防火墙
解决方案:
在root用户下关闭防火墙:centos6:chkconfig iptables off
centos7:systemctl stop firewalld.service
建议为了直接再次操作方便:使用shell启动elasticsearch,虚拟机界面环境root用户下关闭防火墙报错5:
访问IP:端口出现[es-node0] received plaintext http traffic on an https channel, closing connection Netty4HttpChannel{localAddress=/172.16.13.161:9200, remoteAddress=/172.16.13.5:64500}

解决方案:找到config/目录下面的elasticsearch.yml配置文件,把安全认证开关从原先的true都改成false,实现免密登录访问即可,修改这两处都为false后:

-
相关阅读:
cspj2022 T4 上升点列(point)题解(floyd)
ODC现已开源:与开发者共创企业级的数据库协同开发工具
【CIKM 2023】扩散模型加速采样算法OLSS,大幅提升模型推理速度
C#开发的OpenRA游戏之金钱系统(3)
缓存的设计
Linux介绍
硅芯思见:“软约束”到底有多“软”
如何用 Markdown 写出可以在各个平台兼容方便查看并且非常好看的readme或文章?附详细举例图文说明、工具、模版
苹果所有设备参数大全
添加nfc读卡器测试程序
- 原文地址:https://blog.csdn.net/weixin_45067120/article/details/126031838