-
[linux]、ssh服务详解
目录
一、引入
1. ssh是什么?
secure shell,建立在应用层基础上的安全协议
2. 作用
远程控制服务器,使用在Linux/unix系统
3. 如何搭建ssh服务?
OpenSSH是使用SSH协议进行远程登录的首要连接工具。它对所有通信进行加密,以消除窃听、连接劫持和其他攻击。此外,OpenSSH提供了大量的安全隧道功能、几种身份验证方法和复杂的配置选项。
4. rpm(redhat package managment 红帽公司出品)
Linux中的一个软件管理命令,在redhat/centos中使用
-q 查询query
a 所有
rpm -qa 查询在本机已经安装的所有软件
- [root@nginx-kafka01 etc]# rpm -qa |grep openssh
- openssh-clients-7.4p1-21.el7.x86_64
- openssh-7.4p1-21.el7.x86_64
- openssh-server-7.4p1-21.el7.x86_64
更新
[root@nginx-kafka01 ~]# yum update openssh openssh-clients openssh-server5. 配置文件
sshd_config 服务器端的进程的配置文件
ssh 客户端命令的配置文件
- [root@nginx-kafka01 etc]# cd /etc/ssh
- [root@nginx-kafka01 ssh]# ls
- moduli sshd_config ssh_host_ecdsa_key.pub ssh_host_ed25519_key.pub ssh_host_rsa_key.pub
- ssh_config ssh_host_ecdsa_key ssh_host_ed25519_key ssh_host_rsa_key
6. 如何知道ssh服务是否启动
1. 进程
- [root@nginx-kafka01 ssh]# ps aux|grep sshd
- root 986 0.0 0.2 112900 4324 ? Ss 11:57 0:00 /usr/sbin/sshd -D
- root 1515 0.0 0.3 161512 6084 ? Ss 11:58 0:00 sshd: root@pts/0
- root 1845 0.0 0.0 112828 988 pts/0 S+ 17:18 0:00 grep --color=auto sshd
2. 端口
- COMMAND PID USER FD TYPE DEVICE SIZE/OFF NODE NAME
- sshd 986 root 3u IPv4 18119 0t0 TCP *:ssh (LISTEN)
- sshd 986 root 4u IPv6 18121 0t0 TCP *:ssh (LISTEN)
- sshd 1515 root 3u IPv4 20677 0t0 TCP nginx-kafka01:ssh->192.168.182.1:58405 (ESTABLISHED)
- [root@nginx-kafka01 ssh]# netstat -anplut |grep sshd
- tcp 0 0 0.0.0.0:22 0.0.0.0:* LISTEN 986/sshd
- tcp 0 36 192.168.182.132:22 192.168.182.1:58405 ESTABLISHED 1515/sshd: root@pts
- tcp6 0 0 :::22 :::* LISTEN 986/sshd
3. 直接访问
4. 日志
7. 启动ssh服务
systemctl enable sshd 设置开机自启动
systemctl start sshd 启动
systemctl restart sshd 重启
8. sshd名字由来 ==> ssh daemon
守护进程:daemon:一直运行在内存中,除非人为停止
二、配置
2.1 配置文件
查看配置文件
- [root@nginx-kafka01 ~]# cd /etc/ssh
- [root@nginx-kafka01 ssh]# vim sshd_config
===文件内容===
>默认端口 前面的数字是在文件中的行号
17 #Port 22
18 #AddressFamily any
>默认监听地址,IPV4,0.0.0.0表示本机任意IP地址
19 #ListenAddress 0.0.0.0
>IPV6
20 #ListenAddress ::
>是否允许root用户ssh登录
38 #PermitRootLogin yes
>是否限制密码登录
65 PasswordAuthentication yes
2.1.1 修改ssh服务的端口
- [root@nginx-kafka01 ssh]# vim /etc/ssh/sshd_config # Port 2299 将端口号改为2299
- [root@nginx-kafka01 ssh]# systemctl restart sshd # 重启ssh服务
- [root@nginx-kafka01 ssh]# netstat -antplu |grep 2299
- tcp 0 0 0.0.0.0:2299 0.0.0.0:* LISTEN 16257/sshd
- tcp6 0 0 :::2299 :::* LISTEN 16257/sshd
> 修改端口后ssh服务无法启动,可能是因为开启了selinux
- getenforce #查看selinux状态
- ->enforcing:强制模式,permissive:宽容模式,disabled:关闭
- setenforce 0 #临时修改为宽容模式
- vim /etc/selinux/config ==> SELINUX=disabled #修改配置文件--永久修改
> 在xshell开启新的会话连接连接不上,原因有2:(1)连接端口没有改为修改后的;(2)防火墙限制,需要关闭防火墙
- service firewalld stop # 关闭防火墙
- systemctl disabled firewalld # 关闭开机自启
2.2 限制root用户登录ssh
- vim /etc/ssh/sshd_config
- PermitRootLogin yes修改为PermitRootLogin no
不能远程连接,但可以先用普通用户连接,再su - root 切换到root用户
原因:su不经过ssh,可以通过pstree -p查看进程树,可以看到pid
如何断开这个连接:杀死对应的bash进程
2.2.3 日志
/var/log/secure> 显示Faild passwd :表示登录失败
三、命令
3.1 ssh认证方式
1. 密码认证
/etc/passwd + /etc/shadow
ssh服务依赖Linux系统的用户名和密码
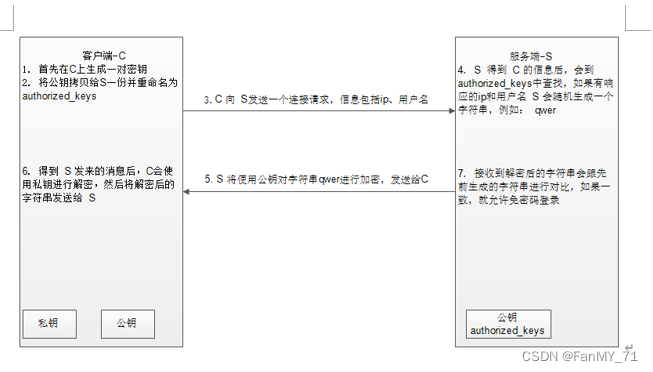
2. 密钥认证
公钥(public key)和私钥(private key)是一对文件,文件里面是一段字符串,用来给加密算法提供参数。


公钥存储路径:/root/.ssh/know_hosts
将服务器上的sshd守护进程的公钥复制到本地,每行存放一台服务器的公钥,用来验证服务器的身份。
四、建立免密通道
A:192.168.29.155
B:192.168.29.128
root - root

第一步:生成密钥对,在A机器上使用root用户生成密钥对
- [root@nginx-kafka02 .ssh]# ssh-keygen -t rsa # 选择不同的加密算法
- # 这里直接敲击回车就行了
- Generating public/private rsa key pair.
- Enter file in which to save the key (/root/.ssh/id_rsa):
- Enter passphrase (empty for no passphrase):
- Enter same passphrase again:
- [root@nginx-kafka02 .ssh]# cd /root/.ssh
- [root@nginx-kafka02 .ssh]# ls
- id_rsa id_rsa.pub known_hosts
- [root@nginx-kafka02 .ssh]# ll
- 总用量 12
- -rw-------. 1 root root 1679 7月 27 16:46 id_rsa # 这个私钥只有自己才能使用,千万不要动它的权限
- -rw-r--r--. 1 root root 400 7月 27 16:46 id_rsa.pub
- -rw-r--r--. 1 root root 731 7月 27 12:00 known_hosts
第二步:上传公钥
有scp和ssh-copy-id两种方式上传
- [root@nginx-kafka02 .ssh]# ssh-copy-id -i id_rsa.pub root@192.168.29.128 # -i,指定公钥文件
- # 这条命令相比于scp的要指定公钥路径,可以自动在B机器上生成对应的公钥路径
检查
- [root@nginx-kafaka03 ~]# cd ~/.ssh
- [root@nginx-kafaka03 .ssh]# ls
- authorized_keys known_hosts
authorized_keys是用来linux系统登录使用的
known_hosts是第一次连接服务器发送过来的东西
第三步:测试
- [root@nginx-kafka02 .ssh]# ssh 192.168.29.128
- Last login: Wed Jul 27 14:52:44 2022 from 192.168.29.1
- # 我们现在能够使用A机器连接B机器不需要密码,但是B机器连接A机器需要密码,所以这是单向信任关系。
4.1、ssh
远程连接命令
不指定登录用户时,默认使用当前用户
- # 不指定
- ssh 192.168.1.173
- # 指定
- ssh cali@192.168.1.173
-p 指定端口号
写脚本推荐使用ssh,建立免密通道后,无需使用密码
- # 登录的同时在远端机器上新建目录
- ssh cali@192.168.1.173 mkdir /home/cali/test -p
退出:exit
建立了免密通道之后,我们可以使用":ssh ip bash 命令",来操作别的机器运行代码
4.2、scp
远程文件传输命令
- # 将192.168.1.173的/etc/passwd文件复制到本机的/etc/ssh
- # 复制文件夹的时候需要接-r,递归复制目录
- [root@nginx-kafka01 ~]# scp cali@192.168.1.173:/etc/passwd /etc/ssh
- cali@192.168.1.173's password:
- passwd 100% 1217 81.0KB/s 00:00
- # 将本机/etc/ssh/passwd文件复制给192.168.1.173cali的家目录下
- [root@nginx-kafka01 ssh]# scp /etc/ssh/passwd cali@192.168.1.173:~
- cali@192.168.1.173's password:
- passwd 100% 1217 64.7KB/s 00:00
4.3、sftp
基于ssh协议的ftp功能,底层使用ssh协议
提供文件的上传(put)和下载(get)
- [root@nginx-kafka01 ssh]# sftp cali@192.168.1.173
- cali@192.168.1.173's password:
- Connected to 192.168.1.173.
- # 查看在远程机器的哪个目录
- sftp> pwd
- Remote working directory: /home/cali
- # 查看远程机器当前目录下的文件
- sftp> ls
- fengdeyong passwd shiyq
- # 将本机的/var/log/secure文件传至远程机器
- sftp> put /var/log/secure
- Uploading /var/log/secure to /home/cali/secure
- /var/log/secure 100% 5118 200.3KB/s 00:00
- sftp> ls
- fengdeyong hosts passwd secure shiyq
- # 查看现在在当前机器的哪个目录
- sftp> lpwd
- Local working directory: /etc/ssh
- # 查看有哪些命令
- sftp>
- ?
- # 查看本机所在目录下有哪些文件
- sftp> !ls
- moduli ssh_config ssh_host_ecdsa_key ssh_host_ed25519_key ssh_host_rsa_key
- passwd sshd_config ssh_host_ecdsa_key.pub ssh_host_ed25519_key.pub ssh_host_rsa_key.pub
- # 进入本机的/lianxi目录
- sftp> lcd /lianxi
- sftp> !ls
- 0408 0617 0701 0704 75 76 code linux python-test scrip script shell-test
- # 下载hosts文件
- sftp> get hosts
- # 递归上传linux目录
- sftp> put -r linux
五、加固服务

六、signal
man 7 signal
- Signal Value Action Comment
- ──────────────────────────────────────────────────────────────────────
- SIGHUP 1 Term Hangup detected on controlling terminal
- or death of controlling process
- SIGINT 2 Term Interrupt from keyboard
- SIGQUIT 3 Core Quit from keyboard
- SIGILL 4 Core Illegal Instruction
- SIGABRT 6 Core Abort signal from abort(3)
- SIGFPE 8 Core Floating point exception
- SIGKILL 9 Term Kill signal
- SIGSEGV 11 Core Invalid memory reference
- SIGPIPE 13 Term Broken pipe: write to pipe with no
- readers
- SIGALRM 14 Term Timer signal from alarm(2)
- SIGTERM 15 Term Termination signal
- SIGUSR1 30,10,16 Term User-defined signal 1
- SIGUSR2 31,12,17 Term User-defined signal 2
- SIGCHLD 20,17,18 Ign Child stopped or terminated
- SIGCONT 19,18,25 Cont Continue if stopped
- SIGSTOP 17,19,23 Stop Stop process
- SIGTSTP 18,20,24 Stop Stop typed at terminal
- SIGTTIN 21,21,26 Stop Terminal input for background process
- SIGTTOU 22,22,27 Stop Terminal output for background process
-
相关阅读:
【电脑讲解】NVIDIA发布GeForce RTX SUPER系列显卡,游戏玩家福利来了!
Git的安装以及基础使用方法
2.3队列
智能升降桌控制主板开发,解锁办公家居新场景
[Dubbo3.0.8源码解析系列]-24- Dubbo应用级服务发现
ElasticSearch万字入门教程 一天上手ElasticSearch
提升网络安全防御能力的几个方面
从零开始利用MATLAB进行FPGA设计(一):建立脉冲检测模型的Simulink模型2
CentOS8安装部署DzzOffice协同办公平台
公司职位描述
- 原文地址:https://blog.csdn.net/m0_48638643/article/details/126028871
