-
js滚动条触底加载更多#js懒加载数据#步骤条布局懒加载
引言
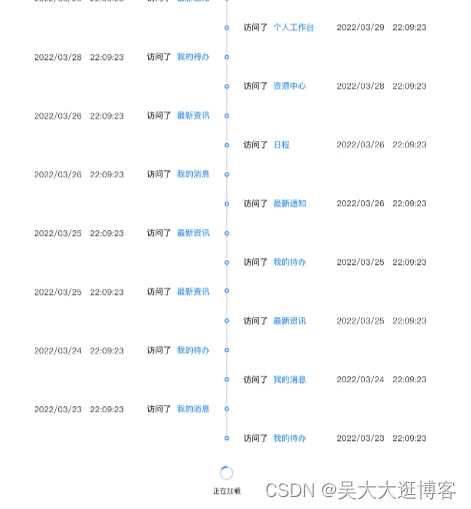
不浪费大家时间,兄弟们先看效果图,如果是你们想要的就看,不是想要的效果就去下家

.
.
.
.
这次实现的是步骤条式的懒加载效果,滚动条到底实现触发接口;
说加载前先说下步骤条样式的实现思路,具体代码有点杂,有需要的可以留言dd步骤条布局:
思路:div不浮动竖排排列,或者用flex布局的纵向轴,第一层的每个div上下紧靠这里不可以用magin-top和button,然后设置个border-left或者border-right样式,这时一条不间断长线就会形成,然后设置圆圈,圆圈的样式可以使用定位,和第一层的div进行定位布局,会形成带圆圈的一条长线。但是此时每个div写上内容的时候发现不会对齐圆圈,这时要将第一层div里面的内容进行margin-top:一个负值,让其移上去一些距离,实现和圆圈对齐。
这时,一个简单的步骤条就实现了哦,要实现左右布局的效果,再去用奇偶选择去设置transform: translateX(xx);
算了,上个代码吧,可能要改,但是希望对你有帮助qaq,这里是vue的哈布局:这里的f f-d-c等样式是封装的flex样式,后面贴上
<div class="record-one f" v-for="i in 20"> <div class="f"> <div class="f f-d-c f-a-c tx"> <div class="circle"></div> <div class="line"></div> </div> <div class="f text"> <div></div> <div class="f f-a-c"> <div class="content">访问了 <span style="color: #368fff">资源中心</span></div> <div class="time">2022年08月28日 <span class="mar-left-20">09:09:09</span></div> </div> </div> </div> </div>- 1
- 2
- 3
- 4
- 5
- 6
- 7
- 8
- 9
- 10
- 11
- 12
- 13
- 14
- 15
css:less或scss
.record-one{ &:nth-child(2n+1) .text{ transform: translateX(-100% - 2px); text-align: right; //padding-right: 20px; justify-content: space-between; //color: red; } .tx{ //margin-top: -5px; } .circle{ width: 6px; height: 6px; border-radius: 50%; background: #FFFFFF; border: 2px solid #368FFF; flex-shrink: 0; } .line{ width: 2px; min-height: 100%; background-color: #D9DCE2; } .text{ width: 442px; margin-bottom: 20px; >div:last-child{ margin-top: -17px; padding: 10px 10px; border-radius: 4px; &:hover{ cursor: pointer; background: #D2E6FF; } } } .content{ min-width: 70px; margin-left: 8px; //margin-top: -7px; } .time{ margin-left: 21px; //margin-top: -7px; color: #333333; } &:last-child .tx .line{ display: none; } }- 1
- 2
- 3
- 4
- 5
- 6
- 7
- 8
- 9
- 10
- 11
- 12
- 13
- 14
- 15
- 16
- 17
- 18
- 19
- 20
- 21
- 22
- 23
- 24
- 25
- 26
- 27
- 28
- 29
- 30
- 31
- 32
- 33
- 34
- 35
- 36
- 37
- 38
- 39
- 40
- 41
- 42
- 43
- 44
- 45
- 46
- 47
- 48
- 49
- 50
- 51
- 52
flex封装
.f { display: flex; /* 设置为flex布局 */ } .f-a-c { align-items: center; /* 交叉轴上如何对齐,每个div中心轴对齐 */ } .f-a-b { align-items: baseline; } .f-d-c { flex-direction: column; /* 排列方式,垂直 */ } .f-w-w { flex-wrap: wrap; /*ie浏览器不支持--父元素要加个宽度*/ /* 换行方式 */ } .f-j-c { justify-content: center; /* 居中 */ } .f-j-b { justify-content: space-between; /* 两边排列 */ } .f-j-a { justify-content: space-around; /* 靠近两边,没有接触到旁边 */ } .f-j-s { justify-content: start; /* 靠近左侧 */ } .f-s-1 { flex-shrink: 1; } .f-s-0 { flex-shrink: 0; } .f-1 { flex: 1; } .mar-top-10 { margin-top: 10px; } .mar-top-20 { margin-top: 20px; } .mar-left-10 { margin-left: 10px; } .mar-left-20 { margin-left: 20px; }- 1
- 2
- 3
- 4
- 5
- 6
- 7
- 8
- 9
- 10
- 11
- 12
- 13
- 14
- 15
- 16
- 17
- 18
- 19
- 20
- 21
- 22
- 23
- 24
- 25
- 26
- 27
- 28
- 29
- 30
- 31
- 32
- 33
- 34
- 35
- 36
- 37
- 38
- 39
- 40
- 41
- 42
- 43
- 44
- 45
- 46
- 47
- 48
- 49
- 50
- 51
- 52
- 53
- 54
- 55
- 56
步骤条布局到此结束,有问题的留言dd,
.
.
.
.
.触底加载
下面说触底加载思路,这里当时调研了,主要有两个简单的方法:
①如果你项目中用了elementUI这里可以去用其中的无限滚动组件InfiniteScroll,当然这里面也有小坑,但是不大,好摸索;
②js计算高度实现,直接上代码吧,代码里有注释mounted() { this.scrollFunc(); }, destroyed() { //销毁scroll事件监听 $(document).unbind("scroll"); }, methods:{ scrollFunc(){ $(document).scroll(()=>{ var viewH =$(document).height(),//body文档流的总高度 screenHeight=$(window).height(),//窗口屏幕的高度 scrollHeight =$(document).scrollTop();//滚动高度 /*触底加载条件=>[文档流高度-(滚动高度+屏幕高度)< 10px]*/ if(viewH-(screenHeight+scrollHeight)<2){ //进行截流-(这里可以写个正规的截流函数) if(this.lock === true){ return ; } console.log('触底加载'); this.lock = true; setTimeout(()=>{ //模拟数据请求 this.times ++; this.lock=false; },2000) } }); }, }- 1
- 2
- 3
- 4
- 5
- 6
- 7
- 8
- 9
- 10
- 11
- 12
- 13
- 14
- 15
- 16
- 17
- 18
- 19
- 20
- 21
- 22
- 23
- 24
- 25
- 26
- 27
- 28
- 29
- 30
拜拜
-
相关阅读:
内存问题难定位,那是因为你没用ASAN
数据结构题型17-树、森林
什么是 Microsoft Office 365? Excel on Cloud 的好处
FPV眼镜和VR眼镜的区别,穿越机搭配FPV眼镜优缺点分析
JSP第三篇 -----JSP浅聊JSTL标签库
Web 性能优化:TLS
RT-Thread STM32F407 ADC
sudo apt update 后会出现的一堆问题的解决
C语言数组在内存中是怎样表示的?
Python之第六章 内置容器 --- 字典(映射)
- 原文地址:https://blog.csdn.net/weixin_44524243/article/details/126029051
