-
Spring进行时——Spring项目创建与Bean的存储与读取
⭐️前面的话⭐️
本篇文章将介绍Spring项目的创建,IDEA国内源的配置以及Bean的存储与读取,所谓的Bean其实就是对象的意思,更详细地说Spring Bean是被实例的,组装的及被Spring 容器管理的Java对象。
📒博客主页:未见花闻的博客主页
🎉欢迎关注🔎点赞👍收藏⭐️留言📝
📌本文由未见花闻原创,CSDN首发!
📆首发时间:🌴2022年7月24日🌴
✉️坚持和努力一定能换来诗与远方!
💭推荐书籍:📚《Spring实战》
💬参考在线编程网站:🌐牛客网🌐力扣
博主的码云gitee,平常博主写的程序代码都在里面。
博主的github,平常博主写的程序代码都在里面。
🍭作者水平很有限,如果发现错误,一定要及时告知作者哦!感谢感谢!

本文思维导图:

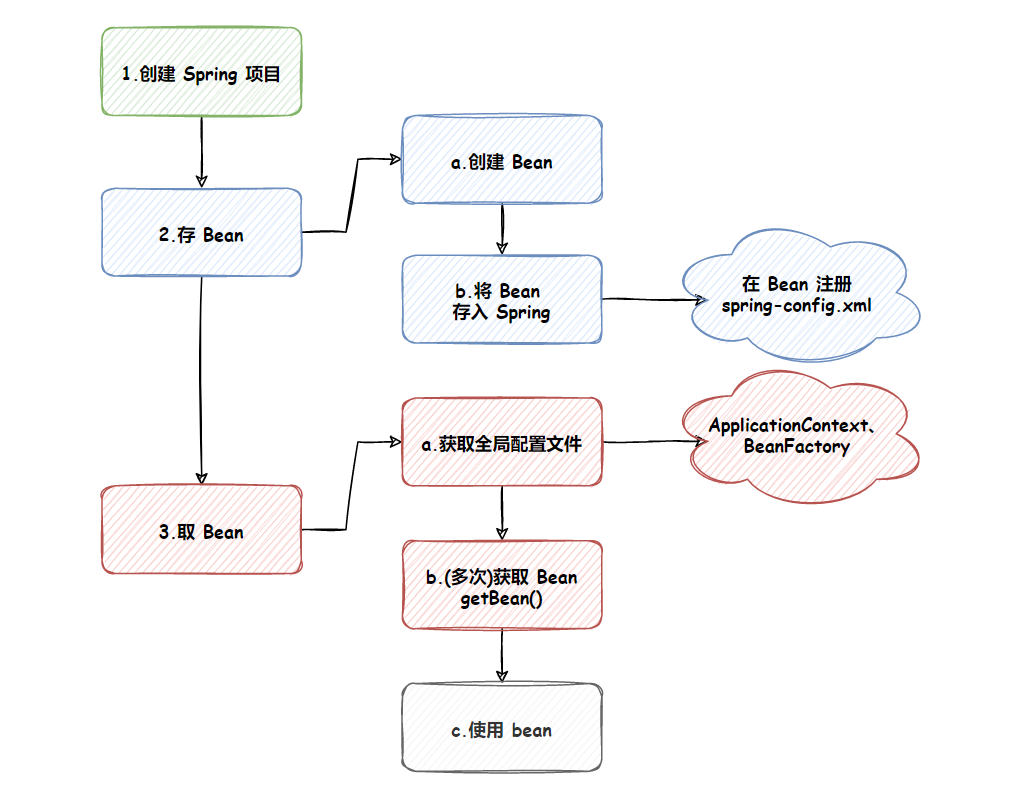
1.Spring项目的创建
1.1创建Maven项目
第一步,创建Maven项目,Spring也是基于Maven的。


1.2添加spring依赖
第二步,在Maven项目中添加Spring的支持(spring-context, spring-beans)
在
pom.xml文件添加依赖项。<dependencies> <dependency> <groupId>org.springframeworkgroupId> <artifactId>spring-contextartifactId> <version>5.2.3.RELEASEversion> dependency> <dependency> <groupId>org.springframeworkgroupId> <artifactId>spring-beansartifactId> <version>5.2.3.RELEASEversion> dependency> dependencies>- 1
- 2
- 3
- 4
- 5
- 6
- 7
- 8
- 9
- 10
- 11
- 12
- 13
刷新等待加载完成。

1.3创建启动类
第三步,创建启动类与main,用来做简单的测试
在java目录创建类,写代码即可,因为这里只演示怎么创建Spring项目和介绍Spring的简单使用,就不依赖那些Tomcat什么的了,直接写一个Main类更直观。

1.4配置国内源
由于国外源不稳定,可能第二步引入spring依赖会失败,所以下面介绍如何配置国内镜像源。


现成的settings.xml文件链接:
地址1:github
地址2:语雀如果你已经有了settings文件,但没有配置
mirror,配置内容如下:<mirror> <id>alimavenid> <name>aliyun mavenname> <url>http://maven.aliyun.com/nexus/content/groups/public/url> <mirrorOf>centralmirrorOf> mirror>- 1
- 2
- 3
- 4
- 5
- 6
2.储存或读取Bean对象
2.1添加spring配置文件
添加spring配置文件(首次才需要,非首次可忽略此步骤)
右键resources目录,新建一个
.xml配置文件,文件名推荐spring.xml或者spring-config.xml。

创建一个spring.xml配置文件,配置内容:<?xml version="1.0" encoding="UTF-8"?> <beans xmlns="http://www.springframework.org/schema/beans" xmlns:xsi="http://www.w3.org/2001/XMLSchema-instance" xsi:schemaLocation="http://www.springframework.org/schema/beans http://www.springframework.org/schema/beans/spring-beans.xsd"> </beans>- 1
- 2
- 3
- 4
- 5
- 6
2.2创建Bean对象
第一步,创建
Bean对象。
比如我们要注入一个User对象,就先的创建一个User类。package com.bean; public class User { public void sayHi(String name) { System.out.println("你好!" + name); } }- 1
- 2
- 3
- 4
- 5
- 6
- 7
将
Bean通过配置文件,注入到spring中,即在spring配置文件中通过以下语句注入。<bean id="user" class="com.bean.User"></bean>- 1
spring中对象的储存是通过键值对来存储的,其中
key为id,value为class。
命名规范:id使用小驼峰命名,如userid,class使用大驼峰命名,如userId。2.3读取Bean对象
想要从spring中将
Bean对象读取出来,先要得到spring上下文对象,相当于得到了spring。再通过spring上下文对象提供的方法获取需要使用的Bean对象。最后就能使用Bean对象了。import com.bean.User; import org.springframework.context.ApplicationContext; import org.springframework.context.support.ClassPathXmlApplicationContext; public class Main { public static void main(String[] args) { //1.得到上下文对象 ApplicationContext context = new ClassPathXmlApplicationContext("spring.xml"); //2.获取bean对象,此处是根据id获取 User user = (User) context.getBean("user"); //3.使用bean user.sayHi("zhangsan"); } }- 1
- 2
- 3
- 4
- 5
- 6
- 7
- 8
- 9
- 10
- 11
- 12
- 13
- 14
运行结果:
你好!zhangsan Process finished with exit code 0- 1
- 2
- 3
还可以使用Bean工厂(旧)来获取Bean。
import com.bean.User; import org.springframework.beans.factory.BeanFactory; import org.springframework.beans.factory.xml.XmlBeanFactory; import org.springframework.core.io.ClassPathResource; public class Main2 { public static void main(String[] args) { //1.得到Bean工厂 BeanFactory factory = new XmlBeanFactory(new ClassPathResource("spring.xml")); //2.获取Bean User user = (User) factory.getBean("user"); //3.使用 user.sayHi("李四"); } }- 1
- 2
- 3
- 4
- 5
- 6
- 7
- 8
- 9
- 10
- 11
- 12
- 13
- 14
- 15
- 16
- 17
虽然Bean工厂XmlBeanFactory类现在已经废弃了,但是目还能使用的,当然创建Bean工厂有新的方式,但老的方式比较直观,因此演示采用老的方式创建。
运行结果:
你好!李四 Process finished with exit code 0- 1
- 2
- 3
发现
ApplicationContext与BeanFactory都可以从容器中获取Bean,都提供了getBean方法,那问题来了,ApplicationContext与BeanFactory有什么区别?
相同点:都可以从容器中获取Bean,都提供了getBean方法。不同点:
BeanFactory是ApplicationContext的父类,BeanFactory只提供了基础访问Bean对象的功能,而ApplicationContext除了拥有BeanFactory的全部功能,还有其他额外功能的实现,如国际化,资源访问等功能实现。- 从性能方面来说是不同的,
BeanFactory按需加载Bean,属于懒汉方式,ApplicationContext是饿汉方式,在创建时会将所有的Bean都加载,以备使用。
证明:
我们在bean目录下添加一个Blog类,并完善Blog与User类的构造方法,当类被构造时会发出一些信号,在获取上下文或工厂时根据这些信号让我们感知到它是否会被构造。
import org.springframework.context.ApplicationContext; import org.springframework.context.support.ClassPathXmlApplicationContext; public class Main3 { public static void main(String[] args) { //1.得到上下文对象 ApplicationContext context = new ClassPathXmlApplicationContext("spring.xml"); } }- 1
- 2
- 3
- 4
- 5
- 6
- 7
- 8
- 9
运行结果:

ApplicationContext创建时,会将所有的对象都构造,饿汉的方式。import org.springframework.beans.factory.BeanFactory; import org.springframework.beans.factory.xml.XmlBeanFactory; import org.springframework.core.io.ClassPathResource; public class Main4 { public static void main(String[] args) { //1.得到Bean工厂 BeanFactory factory = new XmlBeanFactory(new ClassPathResource("spring.xml")); } }- 1
- 2
- 3
- 4
- 5
- 6
- 7
- 8
- 9
- 10

BeanFactory创建时,什么都没有,说明是懒汉的方式。ApplicationContext中的多种getBean方法:
方法1:根据bean name获取bean。User user = (User) context.getBean("user");- 1
方法2:根据
bean type获取bean。User user = (User) context.getBean(User.class);- 1
只有beans中只有一个类的实例没有问题,但是个有多个同类的实例,会有问题,即在spring中注入多个同一个类的对象,就会报错。
我们来试一试,首先在Spring配置文件,注入多个
User对象:

然后我们再通过这种方式来获取对象,我们发现报错了,报错信息如下:Exception in thread "main" org.springframework.beans.factory.NoUniqueBeanDefinitionException: No qualifying bean of type 'com.bean.User' available: expected single matching bean but found 3: user,user1,user2- 1
抛出了一个
NoUniqueBeanDefinitionException异常,表示注入的对象不是唯一的。方法3:综合上述两种,可以根据
bean name与bean type来获取bean
相比方法1,更加健壮。User user = context.getBean("user", User.class);- 1
小结:
觉得文章写得不错的老铁们,点赞评论关注走一波!谢谢啦! 
-
相关阅读:
Python(9)面对对象高级编程
html静态网站基于品优购电商购物网站网页设计与实现共计3个页面 html+css+javascript网页设计实例 企业网站制作
代码随想录算法训练营第十一天| 20. 有效的括号,1047. 删除字符串中的所有相邻重复项,150. 逆波兰表达式求值
金蝶EAS、EAS Cloud远程代码执行漏洞
Kubernetes 部署发布镜像(cubefile:0.4.0)
react-redux action传参 多个state处理
Spark(OOM问题,数据倾斜问题)
云原生微服务架构及实现技术
蓝桥杯递推与递归法|斐波那契数列|数字三角形|42点问题|数的计算|数的划分(C++)
【编译原理】-- 第二章(三)(文法的化简改造、无用产生式、产生式的消除、文法的其他表示方法、例题)
- 原文地址:https://blog.csdn.net/m0_59139260/article/details/125862295
