-
Linux驱动开发(七)---树莓派按键驱动开发
前文回顾
《Linux驱动开发(一)—环境搭建与hello world》
《Linux驱动开发(二)—驱动与设备的分离设计》
《Linux驱动开发(三)—设备树》
《Linux驱动开发(四)—树莓派内核编译》
《Linux驱动开发(五)—树莓派设备树配合驱动开发》
《Linux驱动开发(六)—树莓派配合硬件进行字符驱动开发》
继续宣传一下韦老师的视频
70天30节Linux驱动开发快速入门系列课程【实战教学、技术讨论、直播答疑】

本章目的
前面已经进行了GPIO的驱动开发,能够进行GPIO控制输出高低电平。那么本章就来介绍一下利用GPIO实现输入控制,硬件的话就使用了一个简单的触动开关。顺带来讲一下APP如何来获得驱动中的此类消息,大概有几种方法。
并且这次,我们不再通过操作寄存器的方式来配置GPIO或者读取GPIO,而是通过GPIO子系统来进行。

GPIO子系统
上一篇文章中我们通过寄存器来操作的GPIO,地址通过了三次转化,才成功配置了GPIO,这种方法太慢了,而且要手动查询一些转化地址。
所以这些工作在芯片的BSP工程师就已经给封装过了,GPIO子系统就可以为
我们提供一组接口,- 通过读取设备树,
- 用来获取GPIO,配置GPIO的方向,设置高低电平等。
以上两点,就显得格外珍贵,省去了很多开发的烦恼。

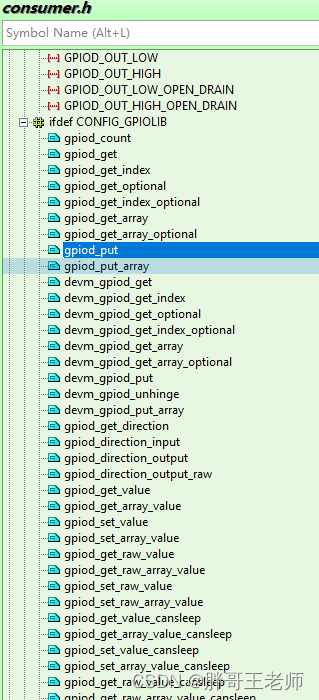
GPIO子系统提供了如下的函数功能 标准操作 带资源自动回收操作 获得GPIO gpiod_get devm_gpiod_get 获得GPIO gpiod_get_index devm_gpiod_get_index 获得GPIO gpiod_get_array devm_gpiod_get_array 设置方向 入 gpiod_direction_input 设置方向 出 gpiod_direction_output 读值 gpiod_get_value 写值 gpiod_set_value 释放GPIO gpiod_put devm_gpiod_put 释放GPIO gpiod_put_array devm_gpiod_put_array 有前缀“devm_”的含义是“设备资源管理”(Managed Device Resource),这是一种自动释放资源的机制。它的思想是“资源是属于设备的,设备不存在时资源就可以自动释放”。
具体可以参看consumer.h

设备树编写
这里就很简单,和之前的类似,GPIO还是用的17引脚。

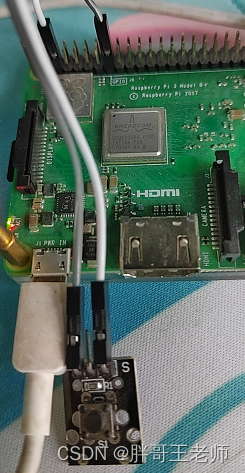
硬件连接
就是在高电平和ping17之间,接了一个按键。按下就是高电平

驱动编写-查询法
这里的驱动,就有多种写法了,涉及到了用户与内核的消息同步方式。首先来讲最简单的,查询法。
那就是我们在read函数中,直接返回button的状态,是高电平还是电平,用户查询就返回值,简单干脆。首先是probe函数,这里面需要进行设备树信息获取和存储,方便read函数工作
static int gpio_button_probe(struct platform_device *pdev) { printk("%s %s line %d\n", __FILE__, __FUNCTION__, __LINE__); button_handle = gpiod_get(&pdev->dev, NULL, 0); gpiod_direction_input(button_handle); /* 注册file_operations */ major = register_chrdev(0, "pgg_button", &gpio_button_drv); /* /dev/gpio_key */ gpio_button_class = class_create(THIS_MODULE, "gpio_button_class"); if (IS_ERR(gpio_button_class)) { printk("%s %s line %d\n", __FILE__, __FUNCTION__, __LINE__); unregister_chrdev(major, "pgg_button"); return PTR_ERR(gpio_button_class); } device_create(gpio_button_class, NULL, MKDEV(major, 0), NULL, "pgg_button"); return 0; }- 1
- 2
- 3
- 4
- 5
- 6
- 7
- 8
- 9
- 10
- 11
- 12
- 13
- 14
- 15
- 16
- 17
- 18
- 19
- 20
- 21
- 22
- 23
然后是remove函数,需要在其中释放对应的class和gpio
static int gpio_button_remove(struct platform_device *pdev) { printk("%s %s line %d\n", __FILE__, __FUNCTION__, __LINE__); device_destroy(gpio_button_class, MKDEV(major, 0)); class_destroy(gpio_button_class); unregister_chrdev(major, "pgg_button"); gpiod_put(button_handle); return 0; }- 1
- 2
- 3
- 4
- 5
- 6
- 7
- 8
- 9
最后是read函数,读取gpio,然后根据结果输出返回
static ssize_t gpio_button_drv_read (struct file *file, char __user *buf, size_t size, loff_t *offset) { printk("%s %s line %d\n", __FILE__, __FUNCTION__, __LINE__); int val; int len =2; val = gpiod_get_value(button_handle); if(val == 1) { copy_to_user(buf, "1", 2); } else { copy_to_user(buf, "0", 2); } return len; }- 1
- 2
- 3
- 4
- 5
- 6
- 7
- 8
- 9
- 10
- 11
- 12
- 13
- 14
- 15
- 16
- 17
展示
用户侧程序
int main(int argc, char **argv) { int fd; char buf[1024]; int len; int ret; /* 1. 判断参数 */ if (argc < 2) { printf("Usage: %s -w\n" , argv[0]); printf(" %s -r\n", argv[0]); return -1; } /* 2. 打开文件 */ fd = open("/dev/pgg_button", O_RDWR); if (fd == -1) { printf("can not open file /dev/pgg_button\n"); return -1; } printf("open file /dev/pgg_button ok\n"); /* 3. 写文件或读文件 */ if ((0 == strcmp(argv[1], "-w")) && (argc == 3)) { len = strlen(argv[2]) + 1; len = len < 1024 ? len : 1024; ret = write(fd, argv[2], len); printf("write driver: %d\n", ret); } else { len = read(fd, buf, 1024); printf("read driver: %d\n", len); buf[1023] = '\0'; printf("APP read : %s\n", buf); } close(fd); return 0; }- 1
- 2
- 3
- 4
- 5
- 6
- 7
- 8
- 9
- 10
- 11
- 12
- 13
- 14
- 15
- 16
- 17
- 18
- 19
- 20
- 21
- 22
- 23
- 24
- 25
- 26
- 27
- 28
- 29
- 30
- 31
- 32
- 33
- 34
- 35
- 36
- 37
- 38
- 39
- 40
- 41
- 42
- 43
- 44
- 45
- 46
pgg@raspberrypi:~/work/dirver $ sudo ./mybutton_user -r open file /dev/pgg_button ok read driver: 2 APP read : 0 pgg@raspberrypi:~/work/dirver $ sudo ./mybutton_user -r open file /dev/pgg_button ok read driver: 2 APP read : 1- 1
- 2
- 3
- 4
- 5
- 6
- 7
- 8
按下的时候,得到了1。没毛病。

驱动编写-休眠唤醒法
轮循去读当然不是最好的办法,相比而言,中断效率就提高了。我们在读取这个值的时候,如果没有发生等到我们想要的结果,就不会返回值,直到我们收到想要的结果,例如一个上升沿或者一个下降沿。
本次就用一个上升沿的终端,控制数据的返回。
probe函数修改如下,增加了注册中断static int gpio_button_probe(struct platform_device *pdev) { struct device_node *node = pdev->dev.of_node; enum of_gpio_flags flag; printk("%s %s line %d\n", __FILE__, __FUNCTION__, __LINE__); gpio_num = of_get_gpio_flags(node, 0, &flag); button_handle = gpiod_get(&pdev->dev, NULL, 0); gpiod_direction_input(button_handle); button_irq = gpio_to_irq(gpio_num); request_irq(button_irq, gpio_button_isr, IRQF_TRIGGER_RISING, "pgg_button_irq", NULL);//IRQF_TRIGGER_RISING | IRQF_TRIGGER_FALLING /* 注册file_operations */ major = register_chrdev(0, "pgg_button", &gpio_button_drv); /* /dev/gpio_key */ gpio_button_class = class_create(THIS_MODULE, "gpio_button_class"); if (IS_ERR(gpio_button_class)) { printk("%s %s line %d\n", __FILE__, __FUNCTION__, __LINE__); unregister_chrdev(major, "pgg_button"); return PTR_ERR(gpio_button_class); } device_create(gpio_button_class, NULL, MKDEV(major, 0), NULL, "pgg_button"); /* /dev/100ask_gpio_key */ return 0; }- 1
- 2
- 3
- 4
- 5
- 6
- 7
- 8
- 9
- 10
- 11
- 12
- 13
- 14
- 15
- 16
- 17
- 18
- 19
- 20
- 21
- 22
- 23
- 24
- 25
- 26
- 27
- 28
- 29
- 30
- 31
- 32
- 33
中断处理函数,读取电平,并且唤醒中断。
static irqreturn_t gpio_button_isr(int irq, void *dev_id) { int val; val = gpiod_get_value(button_handle); printk("key value %d\n", val); g_button_value = val; wake_up_interruptible(&gpio_key_wait); return IRQ_HANDLED; }- 1
- 2
- 3
- 4
- 5
- 6
- 7
- 8
- 9
- 10
- 11
- 12
- 13
读取函数,等待中断,然后传递电平值。
static ssize_t gpio_button_drv_read (struct file *file, char __user *buf, size_t size, loff_t *offset) { printk("%s %s line %d\n", __FILE__, __FUNCTION__, __LINE__); //printk("%s %s line %d\n", __FILE__, __FUNCTION__, __LINE__); int err; wait_event_interruptible(gpio_key_wait, g_button_value); err = copy_to_user(buf, &g_button_value, 4); g_button_value = 0; return 4; }- 1
- 2
- 3
- 4
- 5
- 6
- 7
- 8
- 9
- 10
- 11
- 12
- 13
- 14
用户侧程序
int main(int argc, char **argv) { int fd; int val; /* 1. 判断参数 */ if (argc != 2) { printf("Usage: %s\n" , argv[0]); return -1; } /* 2. 打开文件 */ fd = open(argv[1], O_RDWR); if (fd == -1) { printf("can not open file %s\n", argv[1]); return -1; } while (1) { /* 3. 读文件 */ read(fd, &val, 4); printf("get button : 0x%x\n", val); } close(fd); return 0; }- 1
- 2
- 3
- 4
- 5
- 6
- 7
- 8
- 9
- 10
- 11
- 12
- 13
- 14
- 15
- 16
- 17
- 18
- 19
- 20
- 21
- 22
- 23
- 24
- 25
- 26
- 27
- 28
- 29
- 30
- 31
- 32
效果,读取之后,每次按下按键,都会得到一个消息。
pgg@raspberrypi:~/work/dirver $ sudo insmod mybutton_irq.ko pgg@raspberrypi:~/work/dirver $ sudo ./mybutton_irq_user /dev/pgg_button get button : 0x1 get button : 0x1 get button : 0x1- 1
- 2
- 3
- 4
- 5

驱动编写-休眠唤醒POLL法
POLL,就是一种带超时的等待,允许用户在等待的间隙,做一些其他的操作。
这里晚上一下poll函数static unsigned int gpio_button_drv_poll(struct file *fp, poll_table * wait) { printk("%s %s line %d\n", __FILE__, __FUNCTION__, __LINE__); poll_wait(fp, &gpio_key_wait, wait); if(g_button_value) return POLLIN | POLLRDNORM; else return 0; }- 1
- 2
- 3
- 4
- 5
- 6
- 7
- 8
- 9
- 10
- 11
主要的使用,在于用户侧的代码
int main(int argc, char **argv) { int fd; int val; struct pollfd fds[1]; int timeout_ms = 5000; int ret; /* 1. 判断参数 */ if (argc != 2) { printf("Usage: %s\n" , argv[0]); return -1; } /* 2. 打开文件 */ fd = open(argv[1], O_RDWR); if (fd == -1) { printf("can not open file %s\n", argv[1]); return -1; } fds[0].fd = fd; fds[0].events = POLLIN; while (1) { /* 3. 读文件 */ ret = poll(fds, 1, timeout_ms); if ((ret == 1) && (fds[0].revents & POLLIN)) { read(fd, &val, 4); printf("get button : 0x%x\n", val); } else { printf("timeout\n"); } } close(fd); return 0; }- 1
- 2
- 3
- 4
- 5
- 6
- 7
- 8
- 9
- 10
- 11
- 12
- 13
- 14
- 15
- 16
- 17
- 18
- 19
- 20
- 21
- 22
- 23
- 24
- 25
- 26
- 27
- 28
- 29
- 30
- 31
- 32
- 33
- 34
- 35
- 36
- 37
- 38
- 39
- 40
- 41
这里就允许超时5秒,间隙中可以做一些别的操作,不过还是会丢失数据。
不知道是不是因为没有下拉电阻的原因,我用的这个按键,碰到就会有反应,暂且先不处理。

驱动编写-异步通知
这里就到了比较主要的用法,为程序注册一个异步通知,当用户注册之后,就可以去做别的事情了,按键按下的时候,会触发中断并发消息给用户进程,这就免去了等待的过程,算是最有效率的做法了。
完善fasync函数
static int gpio_button_drv_fasync(int fd, struct file *file, int on) { printk("%s %s line %d\n", __FILE__, __FUNCTION__, __LINE__); if (fasync_helper(fd, file, on, &button_fasync) >= 0) return 0; else return -EIO; }- 1
- 2
- 3
- 4
- 5
- 6
- 7
- 8
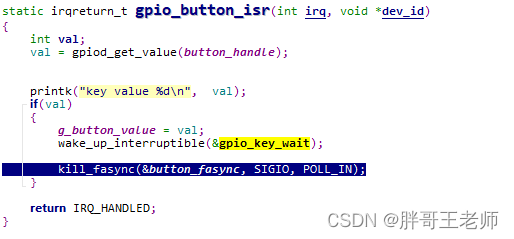
中断中添加下面关键一行,发送中断给用户进程

效果
pgg@raspberrypi:~/work/dirver $ sudo insmod mybutton_irq_fasync.ko pgg@raspberrypi:~/work/dirver $ gcc -o mybutton_irq_fasync_user mybutton_irq_fasync_user.c pgg@raspberrypi:~/work/dirver $ sudo ./mybutton_irq_fasync_user /dev/pgg_button in while in while in while get button : 0x1 get button : 0x1 in while get button : 0x1- 1
- 2
- 3
- 4
- 5
- 6
- 7
- 8
- 9
- 10

完整过程总结

模块注册-》调用注册driver-》执行参数中probe函数-》注册字符设备-》关联file_operation-》打开读写等操作。这样看就清楚多了。

上面的所有驱动可以在这里下载
传送门结束语
最近感觉实在是有点胖了,难道又要开始减肥了吗?
不过都说游泳锻炼身体,游了两次,还确实挺累的,游完泳都感觉浑身酸疼,像中毒了一样,感觉和喝了游泳池的水有关系,一嘴的消毒水味道。

今天看到的新闻,学习这么重要,我尊重她的选择。

-
相关阅读:
Matlab的多项式留数与极点的计算
11月30日:linux服务器安装以及部署项目
钉钉微应用 - - - - - 钉钉内打开新页签
C#(Csharp)我的基础教程(三)(我的菜鸟教程笔记)-控件对象与窗体容器集合(Control)的探究与学习
使用Caffeine做JVM缓存,提升字典类查询性能
需求调研,是做好商业智能BI的第一步
帧间预测单元划分流程
Redis Insight 版本 2.32 翻译中文
微信小程序开发之入门级02(带你进一步了解微信小程序开发)
一个注解解决ShardingJdbc不支持复杂SQL
- 原文地址:https://blog.csdn.net/baidu_19348579/article/details/125973090
