-
vscode插件开发
目录
deactivate:这是插件被销毁时调用的方法,比如释放内存等。
插件在 VSCode 中能做什么
- 主题
- 界面和文本(TextMate 语法)主题色
- 图标样式
- 通用功能
- 添加命令
- 添加配置项
- 添加快捷键
- 添加菜单项
- 添加右键菜单
- 从文本输入框获取输入(QuickPick)
- 存储数据(localStorage)
- 工作区扩展
- 活动栏项目
- 显示提示框
- 状态栏信息
- 显示进度条
- 打开文件
- 显示网页(web view)
- 程序语言
- 实现新语言的高亮
- 实现新语言的调试器
- 代码库管理
- 定义和执行 Task
- 定义 snippet
1、发布应用市场
对于一个初学者来说,我们先了解下vscode的应用市场,做好开发前的准备工作
Visual Studio Code的应用市场基于微软自己的
Azure DevOps,插件的身份验证、托管和管理都是在这里。- 要发布到应用市场首先得有应用市场的
publisher账号; - 而要有发布账号首先得有
Azure DevOps组织; - 而创建组织之前,首先得创建
Azure账号; - 创建
Azure账号首先得有Microsoft账号;
我们来梳理下:
- 一个Microsoft账号可以创建多个
Azure组织; - 一个组织可以创建多个
publisher账号; - 同时一个组织可以创建多个
PAT(Personal Access Token,个人访问令牌);
1、申请Microsoft账号
访问 Sign in to your Microsoft account 登录你的
Microsoft账号,没有的先注册一个

2、创建
Azure DevOps组织访问: https://aka.ms/SignupAzureDevOps

点击继续,默认会创建一个以邮箱前缀为名的组织。
3、创建令牌
进入组织的主页后,点击右上角的
Security,点击创建新的个人访问令牌,这里特别要注意Organization要选择all accessible organizations,Scopes要选择Full access,否则后面发布会失败。


创建令牌成功后你需要本地记下来,因为网站是不会帮你保存的,后面有可能会用到,如果没保存,后面需要用到的话,就只能重新创建令牌了
4、创建发布账号
访问https://aka.ms/vscode-create-publisher


保存无反应,可以f12看下控制台报什么错误,如果是无法加载recaptcha,可以下载安装火狐浏览器,使用firefox浏览器下载插件gooreplacer – 下载 🦊 Firefox 扩展(zh-CN)
安装完成后就可在firefox浏览器右上角看到此插件
配置gooreplacer的设置页面
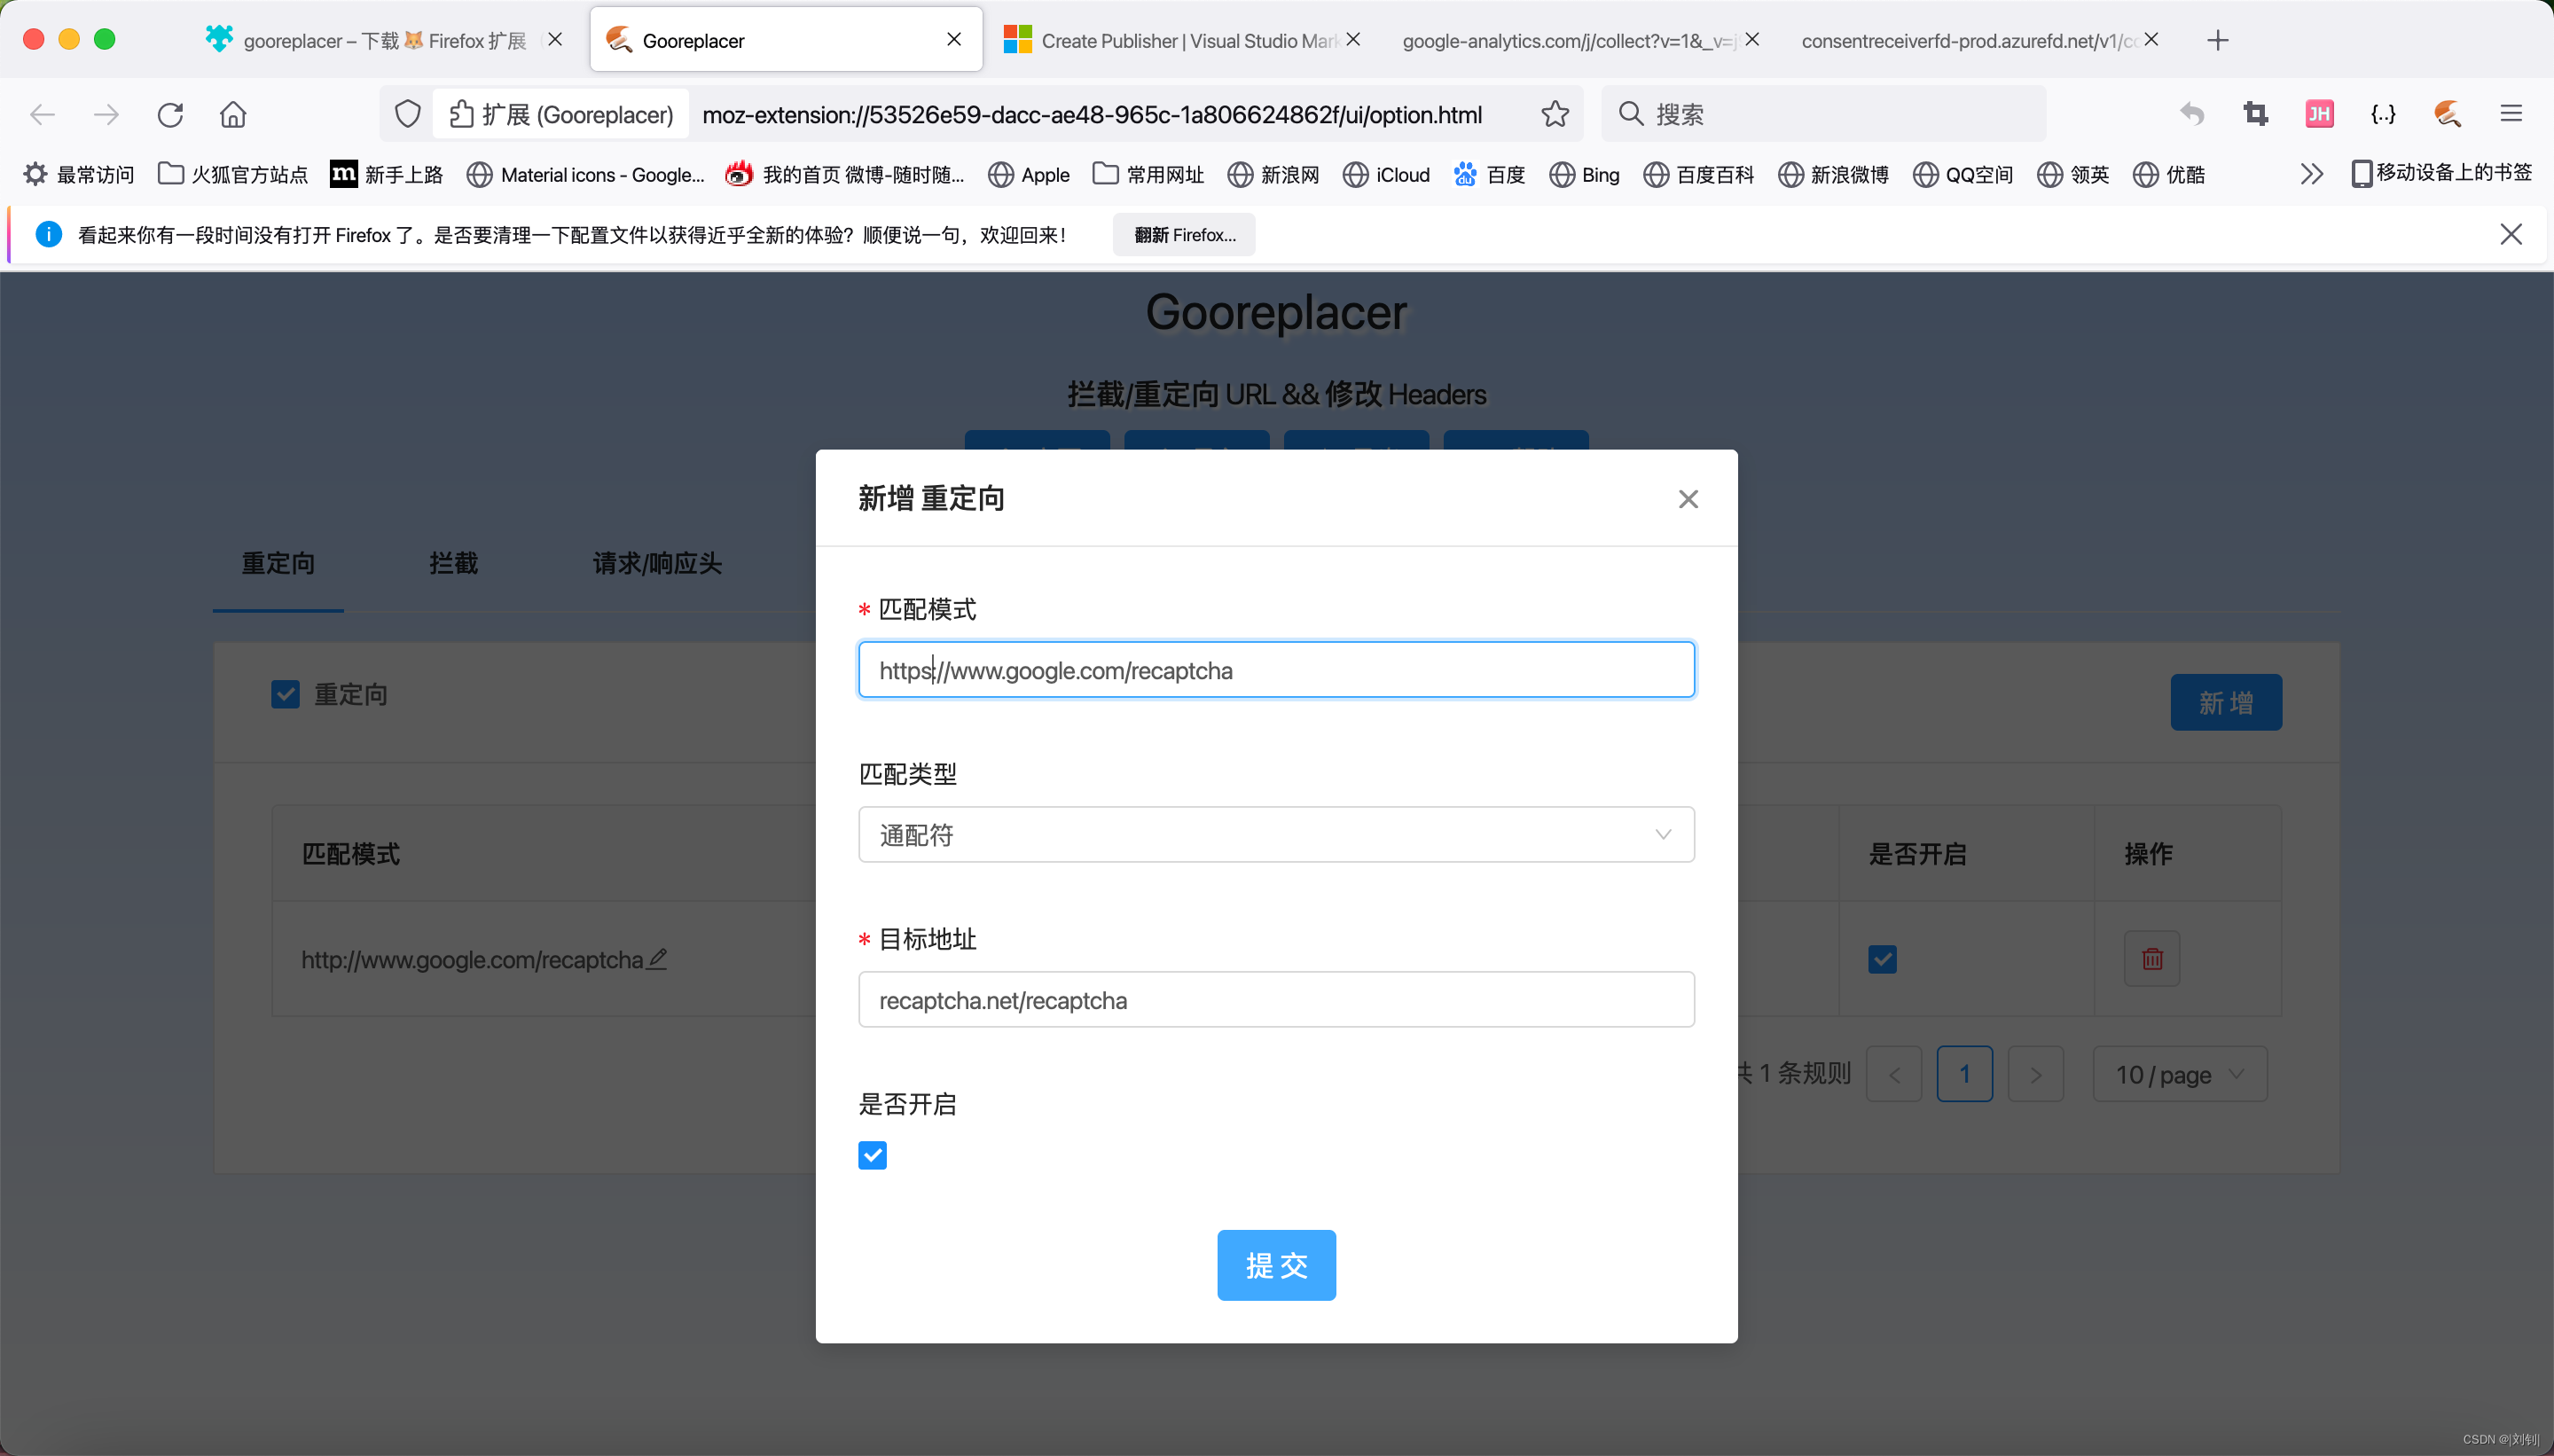
当然也可以写全路径

然后在火狐浏览器中访问上述链接就通了

输入完成后点击Submit完成后,接下来再试试,之前无法加载的recaptcha应该就正常了 ;
这里需要注意,使用vsce命令创建会报错,只能使用上面的网页方式
具体步骤如下:
先全局安装vsce
npm i vsce -g创建发布者:
vsce create-publisher fuyunlzfuyun是发布者的名字,然后就会报如下错误,提示让走网页方式创建:

5、发布应用市场
上面一切准备好后,package.json中添加刚刚创建的发布者,就可以发布了
对应项目目录终端输入命令
vsce publish
等个几分钟就可以看到发布的应用了
 在vscode的应用市场上搜索一下,已经有了
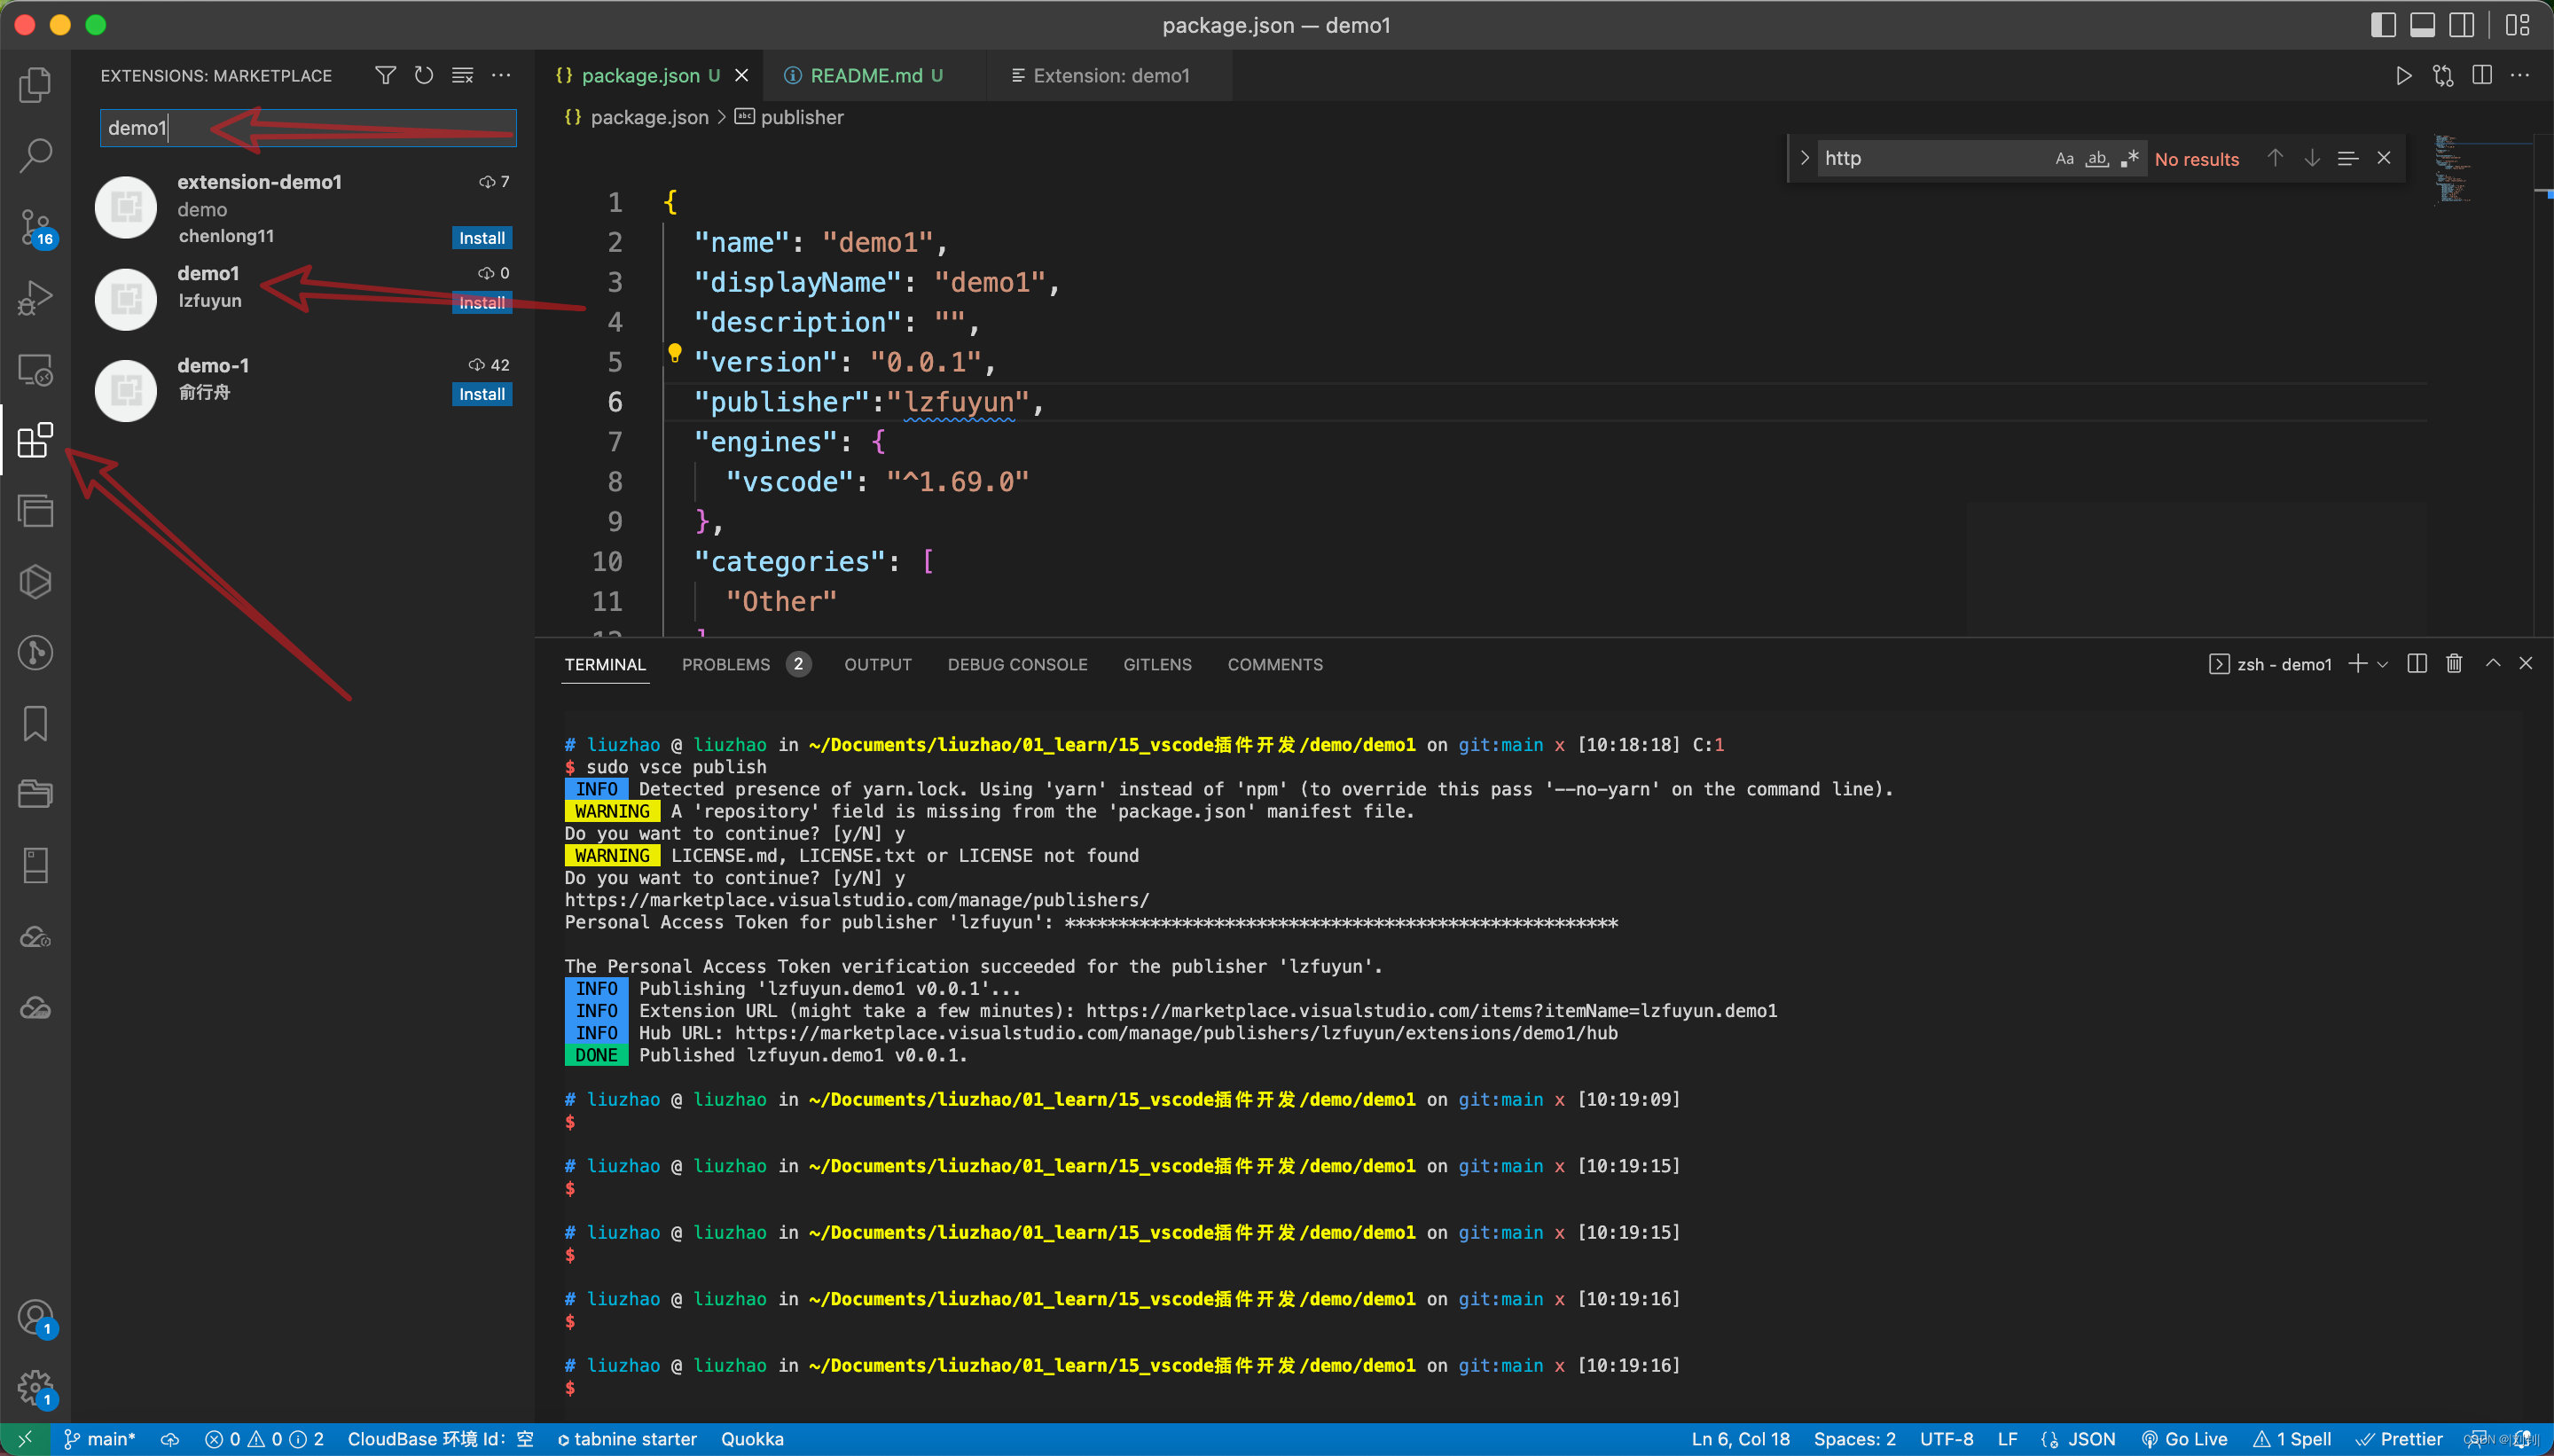
2、本地打包不发布
本地打包安装是在不能公开的,私密性比较高的应用,使用本地打包后,把包发给需要使用的人,手动导入安装到自己的vscode中;
1、本地打包
打包之前需要在package.json中配置发布人: “publisher”:“fuyun”
注意:如果不需要发布应用市场的话,这里的publisher可以随便取个名字,也不需要想上面发布应用市场一样申请一堆东西的长流程。

然后把README.md删干净,随便添加一句话就行,如果不删除会报错提示你打包之前需要先编辑README.md文件

准备就绪,就可以打包了,终端执行命令:
vsce package然后一路y下去就行ok了

vsix就生成了

2、导入应用商店

选择本地刚刚生成的vsix文件,就安装成功了
 3、插件开发前的环境准备
在前面我们已经准备好了发布的账号、Personal Access Token、以及创建发布者后,我们就可以开始准备我们的开发环境了
1、安装依赖
官方为了方便开发人员进行vscode插件的开发,提供了对yo应的脚手架来生成对应的项目。vscode 扩展开发官方文档
- // 全局安装需要的包
- npm install -g yo generator-code
在 mac 安装失败,报错没有权限
permission denied字眼的时候,可以加sudo来授权- // 全局安装需要的包
- sudo npm install -g yo generator-code
上述命令其实安装了两个包(
yo和generator-code),这两个包用途如下:- yo模块全局安装后就安装了Yeoman,Yeoman是通用型项目脚手架工具,可以根据一套模板,生成一个对应的项目结构
- generator-code模块是VS Code扩展生成器,与yo配合使用才能构建项目。
2、项目初始化
- // 运行
- yo code
执行 yo code之后,会有下面几个选项:

- ? What type of extension do you want to create(您想要创建什么类型的扩展?)? New Extension (
JavaScript) - ? What's the name of your extension(你的分机名是什么,也就是项目名)?
demo - ? What's the identifier of your extension(你的扩展的标识符是什么)?
demo - ? What's the description of your extension(什么是您的扩展的描述)?
learn vscode plugin - ? Enable JavaScript type checking in 'jsconfig.json'(在'jsconfig.json'中启用JavaScript类型检查)?
Yes - ? Initialize a git repository(初始化一个git仓库)?
Yes - ? bundel the source code with webpack (是否用webpack打包源码)?
Yes - ? Which package manager to use(使用哪个包管理器)? yarn
在项目生成之后,目录结构如下所示

3、运行项目
然后,在编辑器中,按
F5。这将在新的扩展开发主机窗口中编译和运行扩展。在新窗口中从命令面板 ( shift + win + p )运行
Hello World命令:您 vscode 界面会看到
Hello World from HelloWorld!显示的通知。成功!
注意:如果按键F5无法启动台调试,鼠标点击debug

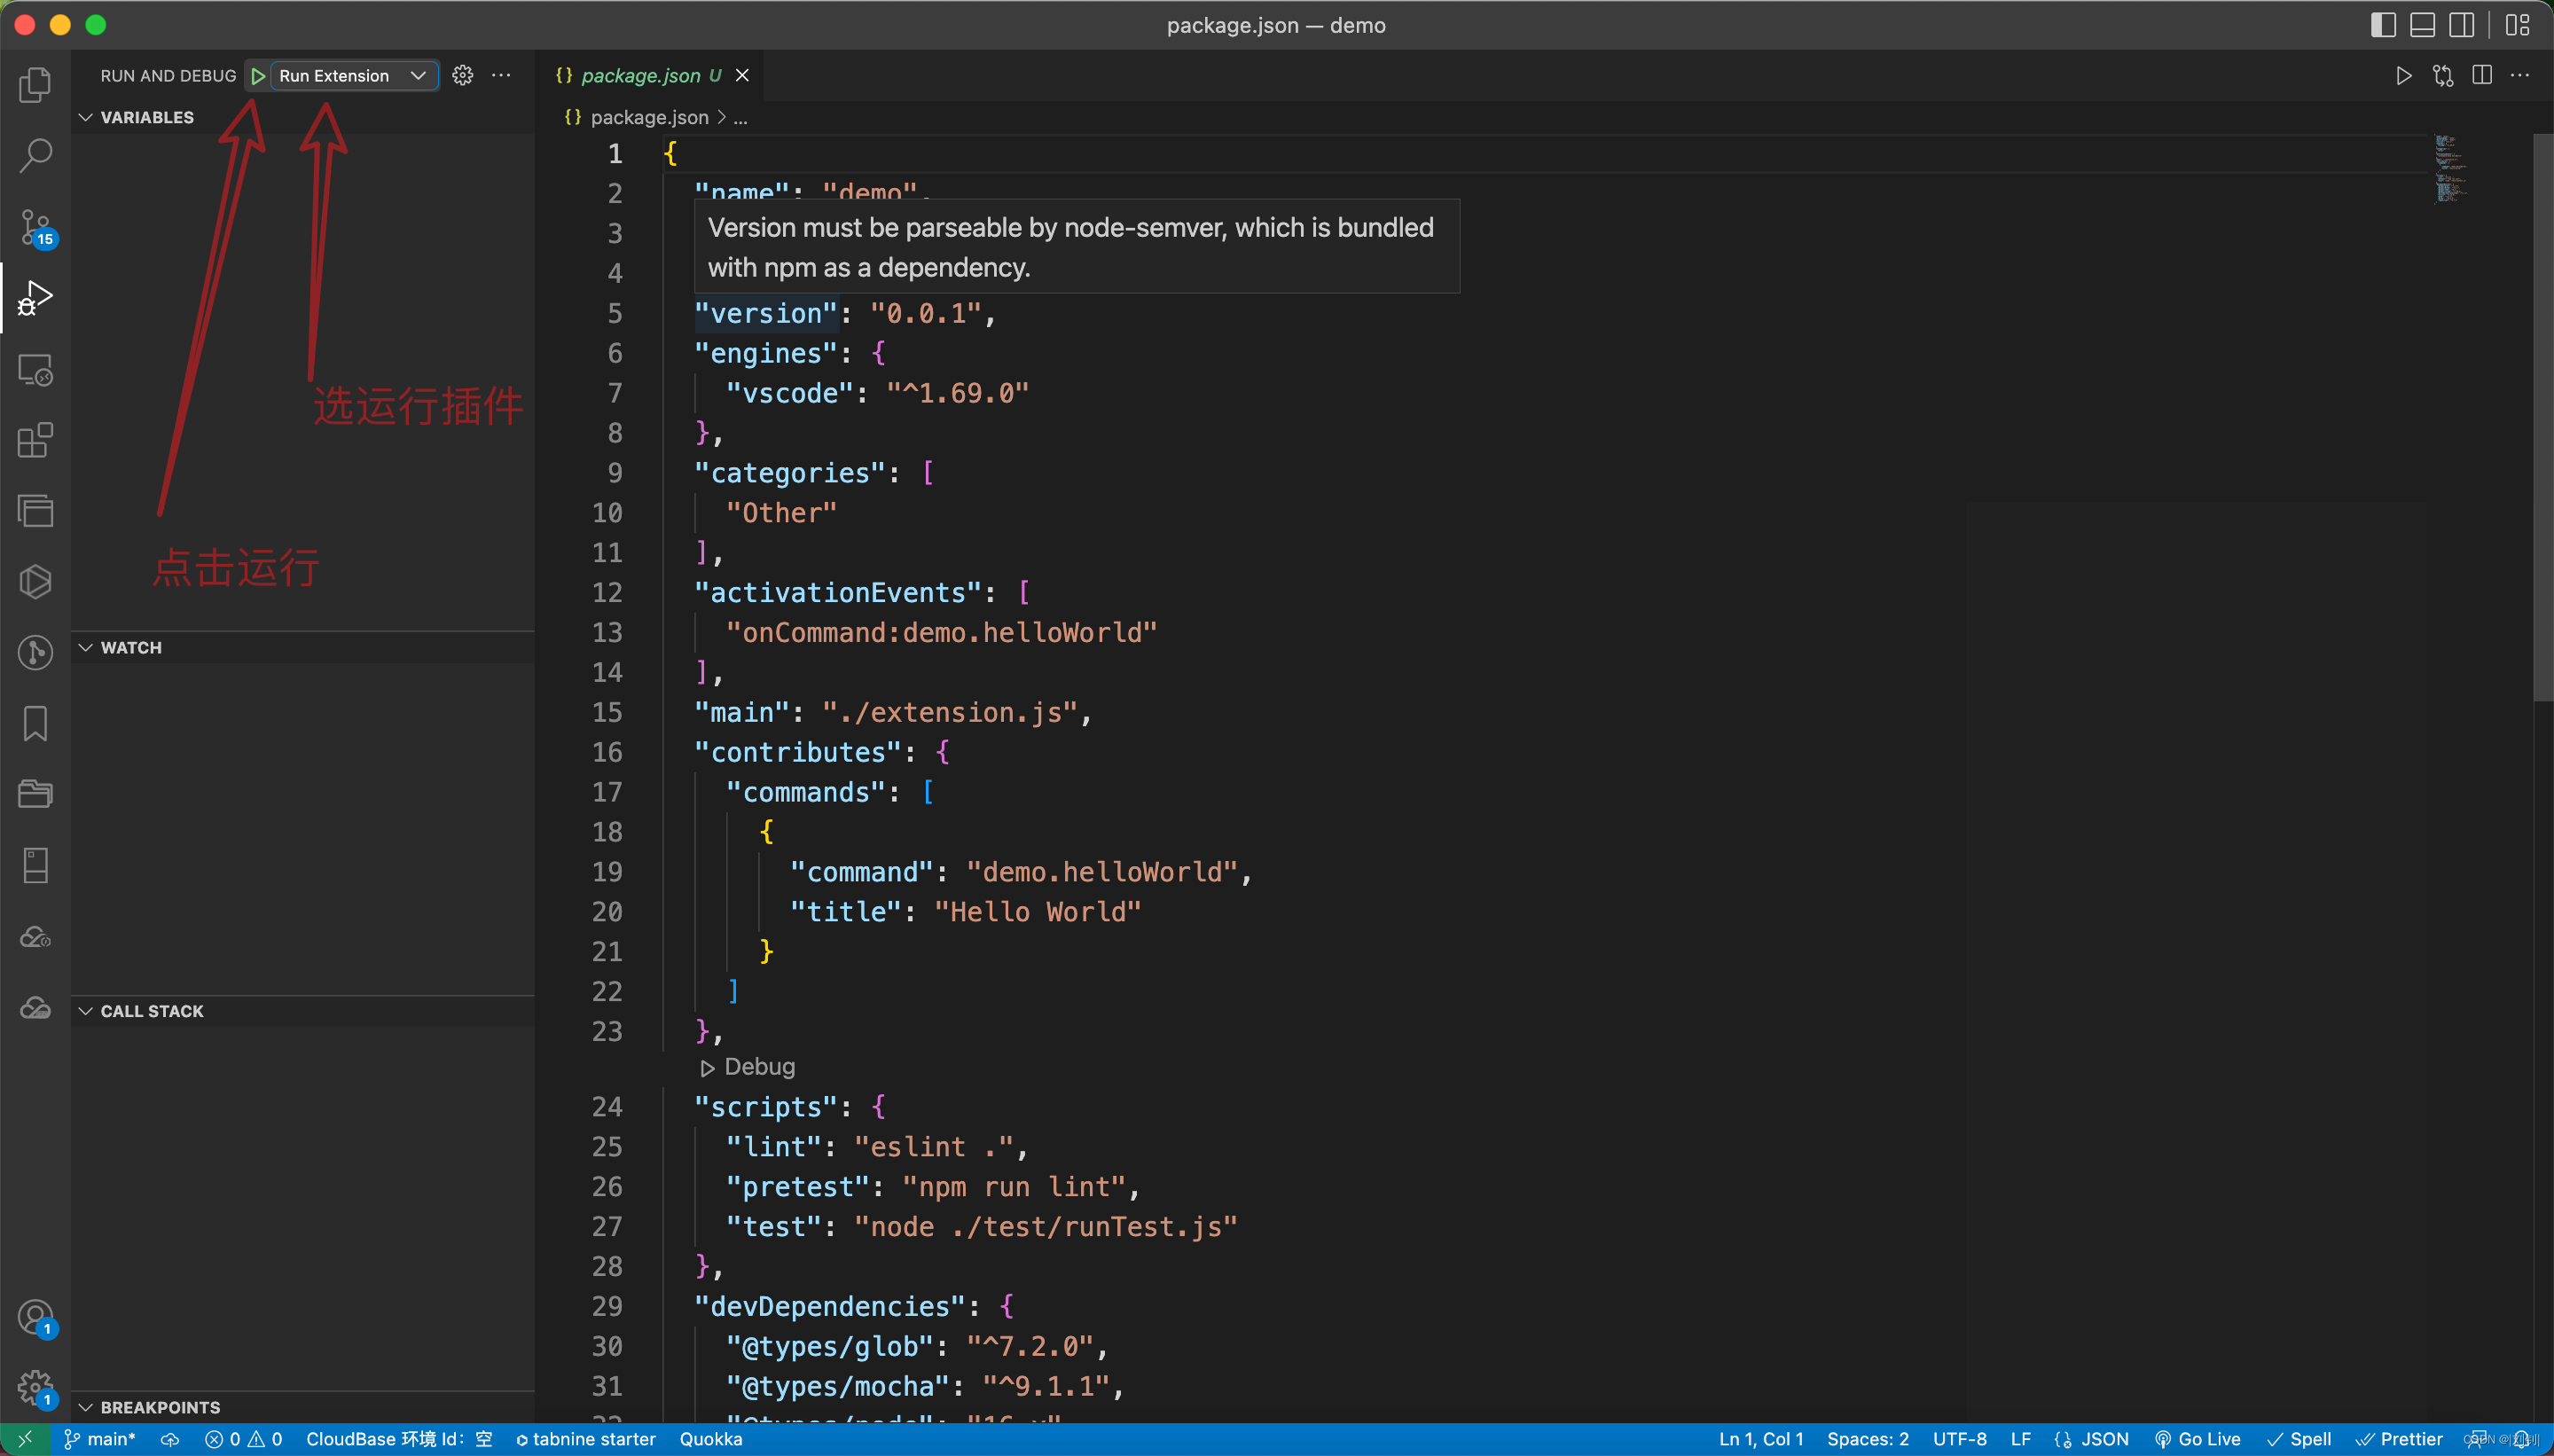
这样下次直接点击F5就会直接运行插件4、文件介绍
1、package.json
该文件是vscode扩展的清单文件,里面有很多字段,官方 (opens new window)对每个字段都进行了详细阐述,本次我们重点阐述以下初始化后期清单文件。
- {
- "name": "demo", // 插件名
- "displayName": "demo", // 显示在应用市场的名字
- "description": "learn vscode plugin", // 具体描述
- "version": "0.0.1", // 插件的版本号
- "publisher": "lzfuyun", // 发布publisher账户名
- "engines": {
- "vscode": "^1.60.0" // 最低支持的vscode版本
- },
- "categories": [
- "Other" // 扩展类别
- ],
- // 激活事件组,在那些事件情况下被激活
- "activationEvents": [
- "onCommand:hello.helloWorld"
- ],
- // 插件的主入口文件
- "main": "./extension.js",
- // 贡献点
- "contributes": {
- // 命令
- "commands": [
- {
- "command": "hello.helloWorld",
- "title": "Hello World"
- }
- ]
- },
- "scripts": {
- "lint": "eslint .",
- "pretest": "npm run lint",
- "test": "node ./test/runTest.js"
- },
- // 开发依赖项
- "devDependencies": {
- "@types/vscode": "^1.63.0",
- "@types/glob": "^7.1.4",
- "@types/mocha": "^9.0.0",
- "@types/node": "14.x",
- "eslint": "^8.1.0",
- "glob": "^7.1.7",
- "mocha": "^9.1.3",
- "typescript": "^4.4.4",
- "@vscode/test-electron": "^1.6.2"
- }
- }
- {
- // 插件的名字,应全部小写,不能有空格
- "name": "vscode-plugin-demo",
- // 插件的友好显示名称,用于显示在应用市场,支持中文
- "displayName": "VSCode插件demo",
- // 描述
- "description": "VSCode插件demo集锦",
- // 关键字,用于应用市场搜索
- "keywords": ["vscode", "plugin", "demo"],
- // 版本号
- "version": "1.0.0",
- // 发布者,如果要发布到应用市场的话,这个名字必须与发布者一致
- "publisher": "sxei",
- // 表示插件最低支持的vscode版本
- "engines": {
- "vscode": "^1.27.0"
- },
- // 插件应用市场分类,可选值: [Programming Languages, Snippets, Linters, Themes, Debuggers, Formatters, Keymaps, SCM Providers, Other, Extension Packs, Language Packs]
- "categories": [
- "Other"
- ],
- // 插件图标,至少128x128像素
- "icon": "images/icon.png",
- // 扩展的激活事件数组,可以被哪些事件激活扩展,后文有详细介绍
- "activationEvents": [
- "onCommand:extension.sayHello"
- ],
- // 插件的主入口
- "main": "./src/extension",
- // 贡献点,整个插件最重要最多的配置项
- "contributes": {
- // 插件配置项
- "configuration": {
- "type": "object",
- // 配置项标题,会显示在vscode的设置页
- "title": "vscode-plugin-demo",
- "properties": {
- // 这里我随便写了2个设置,配置你的昵称
- "vscodePluginDemo.yourName": {
- "type": "string",
- "default": "guest",
- "description": "你的名字"
- },
- // 是否在启动时显示提示
- "vscodePluginDemo.showTip": {
- "type": "boolean",
- "default": true,
- "description": "是否在每次启动时显示欢迎提示!"
- }
- }
- },
- // 命令
- "commands": [
- {
- "command": "extension.sayHello",
- "title": "Hello World"
- }
- ],
- // 快捷键绑定
- "keybindings": [
- {
- "command": "extension.sayHello",
- "key": "ctrl+f10",
- "mac": "cmd+f10",
- "when": "editorTextFocus"
- }
- ],
- // 菜单
- "menus": {
- // 编辑器右键菜单
- "editor/context": [
- {
- // 表示只有编辑器具有焦点时才会在菜单中出现
- "when": "editorFocus",
- "command": "extension.sayHello",
- // navigation是一个永远置顶的分组,后面的@6是人工进行组内排序
- "group": "navigation@6"
- },
- {
- "when": "editorFocus",
- "command": "extension.demo.getCurrentFilePath",
- "group": "navigation@5"
- },
- {
- // 只有编辑器具有焦点,并且打开的是JS文件才会出现
- "when": "editorFocus && resourceLangId == javascript",
- "command": "extension.demo.testMenuShow",
- "group": "z_commands"
- },
- {
- "command": "extension.demo.openWebview",
- "group": "navigation"
- }
- ],
- // 编辑器右上角图标,不配置图片就显示文字
- "editor/title": [
- {
- "when": "editorFocus && resourceLangId == javascript",
- "command": "extension.demo.testMenuShow",
- "group": "navigation"
- }
- ],
- // 编辑器标题右键菜单
- "editor/title/context": [
- {
- "when": "resourceLangId == javascript",
- "command": "extension.demo.testMenuShow",
- "group": "navigation"
- }
- ],
- // 资源管理器右键菜单
- "explorer/context": [
- {
- "command": "extension.demo.getCurrentFilePath",
- "group": "navigation"
- },
- {
- "command": "extension.demo.openWebview",
- "group": "navigation"
- }
- ]
- },
- // 代码片段
- "snippets": [
- {
- "language": "javascript",
- "path": "./snippets/javascript.json"
- },
- {
- "language": "html",
- "path": "./snippets/html.json"
- }
- ],
- // 自定义新的activitybar图标,也就是左侧侧边栏大的图标
- "viewsContainers": {
- "activitybar": [
- {
- "id": "beautifulGirl",
- "title": "美女",
- "icon": "images/beautifulGirl.svg"
- }
- ]
- },
- // 自定义侧边栏内view的实现
- "views": {
- // 和 viewsContainers 的id对应
- "beautifulGirl": [
- {
- "id": "beautifulGirl1",
- "name": "国内美女"
- },
- {
- "id": "beautifulGirl2",
- "name": "国外美女"
- },
- {
- "id": "beautifulGirl3",
- "name": "人妖"
- }
- ]
- },
- // 图标主题
- "iconThemes": [
- {
- "id": "testIconTheme",
- "label": "测试图标主题",
- "path": "./theme/icon-theme.json"
- }
- ]
- },
- // 同 npm scripts
- "scripts": {
- "postinstall": "node ./node_modules/vscode/bin/install",
- "test": "node ./node_modules/vscode/bin/test"
- },
- // 开发依赖
- "devDependencies": {
- "typescript": "^2.6.1",
- "vscode": "^1.1.6",
- "eslint": "^4.11.0",
- "@types/node": "^7.0.43",
- "@types/mocha": "^2.2.42"
- },
- // 后面这几个应该不用介绍了
- "license": "SEE LICENSE IN LICENSE.txt",
- "bugs": {
- "url": "https://github.com/sxei/vscode-plugin-demo/issues"
- },
- "repository": {
- "type": "git",
- "url": "https://github.com/sxei/vscode-plugin-demo"
- },
- // 主页
- "homepage": "https://github.com/sxei/vscode-plugin-demo/blob/master/README.md"
- }
在这
package.json文件中,重点关注的主要有三部分内容:activationEvents、main以及contributes,其是整个文件中的重中之重。1、main
指明了该插件的主入口在哪,只有找到主入口整个项目才能正常的运转
2、activationEvents
指明该插件在何种情况下才会被激活,因为只有激活后插件才能被正常使用,官网已经指明了激活的时机 (opens new window),这样我们就可以按需设置对应时机。(具体每个时机用的时候详细查看即可)
- onLanguage 打开解析为特定语言文件时被激活,例如"onLanguage:python"
- onCommand 在调用命令时被激活
- onDebug 在启动调试话之前被激活
- onDebugInitialConfigurations
- onDebugResolve
- workspaceContains 每当打开文件夹并且该文件夹包含至少一个与 glob 模式匹配的文件时
- onFileSystem 每当读取来自特定方案的文件或文件夹时
- onView 每当在 VS Code 侧栏中展开指定 id 的视图
- onUri 每当打开该扩展的系统范围的 Uri 时
- onWebviewPanel
- onCustomEditor
- onAuthenticationRequest
- 只要一启动vscode,插件就会被激活
- onStartupFinished
3、contributes
通过扩展注册contributes用来扩展Visual Studio Code中的各项技能,其有多个配置,如下所示:
- breakpoints 断点
- colors 主题颜色
- commands 命令
- configuration 配置
- configurationDefaults 默认的特定于语言的编辑器配置
- customEditors 自定义编辑器
- debuggers
- grammars
- iconThemes
- jsonValidation
- keybindings 快捷键绑定
- languages
- menus
- problemMatchers
- problemPatterns
- productIconThemes
- resourceLabelFormatters
- snippets 特定语言的片段
- submenus
- taskDefinitions
- themes 颜色主题
- typescriptServerPlugins
- views
- viewsContainers
- viewsWelcome
- walkthroughs
2、extension.js
该文件时其入口文件,即
package.json中main字段对应的文件(不一定叫extension.js这个名字),该文件中将导出两个方法:activate和deactivate,两个方法的执行时机如下所示:5、实战-小试牛刀
需求:实现简单的选中大小写转换(document-editing)
1、package.json
- {
- "name": "demo",
- "displayName": "demo",
- "description": "demo",
- "version": "0.0.1",
- "engines": {
- "vscode": "^1.69.0"
- },
- "categories": [
- "Other"
- ],
- "activationEvents": [
- "*"
- ],
- "main": "./extension",
- "contributes": {
- "commands": [
- {
- "command": "extension.toLowerCase",
- "title": "Lower"
- },
- {
- "command": "extension.toUpperCase",
- "title": "Upper"
- }
- ]
- },
- "scripts": {
- "vscode:prepublish": "npm run compile",
- "compile": "tsc -p ./",
- "lint": "eslint . --ext .ts,.tsx",
- "watch": "tsc -watch -p ./"
- },
- "devDependencies": {
- "@types/glob": "^7.2.0",
- "@types/mocha": "^9.1.1",
- "@types/node": "16.x",
- "@types/vscode": "^1.69.0",
- "@vscode/test-electron": "^2.1.5",
- "eslint": "^8.18.0",
- "glob": "^8.0.3",
- "mocha": "^10.0.0",
- "typescript": "^4.7.4"
- }
- }
配置两个命令一个转大些,一个转小写,如果有多个事件组,activationEvents就可以用✳️代替
- "activationEvents": [
- "*"
- ],
- /*
- * @Descripttion: automobile
- * @version: 1.0
- * @Author: 刘钊
- * @Date: 2022-07-23 10:51:31
- */
- const vscode = require('vscode');
- /**
- * @param {vscode.ExtensionContext} context
- */
- function activate(context) {
- let lowerCase = vscode.commands.registerCommand('extension.toLowerCase',toLowerCase);
- let upperCase = vscode.commands.registerCommand('extension.toUpperCase',toUpperCase);
- context.subscriptions.push(lowerCase);
- context.subscriptions.push(upperCase);
- }
- function toLowerCase() {
- toLowerCaseOrUpperCase('toLowerCase');
- }
- function toUpperCase() {
- toLowerCaseOrUpperCase('toUpperCase');
- }
- //转小写
- function toLowerCaseOrUpperCase(command) {
- //获取activeTextEditor
- const editor = vscode.window.activeTextEditor;
- if (editor) {
- const document = editor.document;
- const selection = editor.selection;
- //获取选中单词文本
- const word = document.getText(selection);
- //文本转大小写
- const newWord = command == 'toLowerCase' ? word.toLowerCase() : word.toUpperCase();
- //替换原来文本
- editor.edit((editBuilder) => {
- editBuilder.replace(selection, newWord);
- });
- }
- }
- // this method is called when your extension is deactivated
- function deactivate() {}
- module.exports = {
- activate,
- deactivate,
- };
我们运行看看效果

- 主题
-
相关阅读:
工业相机飞拍模式介绍及相机曝光值计算
虚拟机安装问题,遇到报错,求解
ATC‘22顶会论文RunD:高密高并发的轻量级 Serverless 安全容器运行时 | 龙蜥技术
makefile相关知识的讲解
Oracle 运维篇+应用容器数据库的install、upgrade、patch、uninstall
C++,java,python异同 快速入手其他语言 功能查询
python+pytest接口自动化之token关联登录
Leetcode之第294场周赛小记
苹果 AirPods Pro 2 耳机新固件(6A305)
linux获取文件的属性
- 原文地址:https://blog.csdn.net/weixin_40200876/article/details/125941307
