-
Spring-AOP
Spring-AOP
大家好呀!我是小笙,本节我来讲述一下AOP的机制以及实现
AOP
代理模式为另一个对象提供一个替身或占位符以控制对这个对象的访问,被代理的对象可以是远程对象,创建开销大的对象或需要安全控制的对象
--《Head First 设计模式》
概述
AOP 英文:Aspect Oriented Programming 即 面向切面编程 和Ioc一样是一种设计思想
目的:处理OOP在解决侵入式业务上的不足 (什么是侵入性业务?类似日志统计、性能分析等就属于侵入性业务)
代理模式: 静态代理 动态代理
动态代理
- 创建一个代理类,用来管理实现了该接口的类和对象
- 可以在该接口类的实现方法前后添加业务并且可以动态创建

代码示例 - 无参构造器
VehicleProxyProvider 代理类
public class VehicleProxyProvider { /** * targetVehicle 表示真正要执行的对象的指向 */ private Vehicle targetVehicle; public VehicleProxyProvider(Vehicle targetVehicle) { this.targetVehicle = targetVehicle; } /** * public static Object newProxyInstance( * ClassLoader loader, 类的加载器 * Class[] interfaces, 要代理的对象接口信息 * InvocationHandler h) 调用处理器/对象 * @return 一个代理对象 */ public Vehicle getProxy(){ // 1.得到类加载器 ClassLoader ClassLoader classLoader = targetVehicle.getClass().getClassLoader(); System.out.println(classLoader); // 2.要代理的对象接口信息,底层是用接口来完成调用 Class<?>[] interfaces = targetVehicle.getClass().getInterfaces(); // 3.创建InvocationHandler,调用处理器/对象 // 因为InvocationHandler是接口,我们可以通过匿名对象的方式来创建该对象 InvocationHandler invocationHandler = new InvocationHandler(){ /** * 执行到 targetVehicle 的方法时候会调用 * @param proxy 表示代理对象 * @param method 表示将来通过代理对象调用方法时候会调用 * @param args 表示调用的时候传入的参数 * @return */ @Override public Object invoke(Object proxy, Method method, Object[] args) throws Throwable { System.out.println("开始运行..."); Object result = method.invoke(targetVehicle, args); System.out.println("停止运行..."); return result; } }; Vehicle v = (Vehicle)Proxy.newProxyInstance(classLoader, interfaces, invocationHandler); return v; } }- 1
- 2
- 3
- 4
- 5
- 6
- 7
- 8
- 9
- 10
- 11
- 12
- 13
- 14
- 15
- 16
- 17
- 18
- 19
- 20
- 21
- 22
- 23
- 24
- 25
- 26
- 27
- 28
- 29
- 30
- 31
- 32
- 33
- 34
- 35
- 36
- 37
- 38
- 39
- 40
- 41
- 42
- 43
- 44
- 45
- 46
- 47
- 48
- 49
- 50
- 51
- 52
被代理的接口以及实现该接口的对象
interface Vehicle { public void run(); } public class Car implements Vehicle{ @Override public void run() { System.out.println("小汽车哒哒哒..."); } } public class Ship implements Vehicle{ @Override public void run() { System.out.println("轮船嘟嘟嘟..."); } }- 1
- 2
- 3
- 4
- 5
- 6
- 7
- 8
- 9
- 10
- 11
- 12
- 13
- 14
- 15
测试类
@Test public void run(){ Vehicle car = new Car(); VehicleProxyProvider proxy = new VehicleProxyProvider(car); proxy.getProxy().run(); //开始运行... //小汽车哒哒哒... //停止运行... }- 1
- 2
- 3
- 4
- 5
- 6
- 7
- 8
- 9
代码示例 - 有参构造器
加法减法的运算
CalculatorProxy代理类
public class CalculatorProxy { private Calculator targetCalculator; public CalculatorProxy(Calculator targetCalculator) { this.targetCalculator = targetCalculator; } public Calculator getProxy(){ // 1.获取类加载器 ClassLoader classLoader = targetCalculator.getClass().getClassLoader(); // 2.获取接口信息 Class<?>[] interfaces = targetCalculator.getClass().getInterfaces(); // 3.创建InvocationHandler,调用处理器/对象 InvocationHandler invocationHandler = new InvocationHandler(){ @Override public Double invoke(Object proxy, Method method, Object[] args) throws Throwable { Double result = null; try { // 前置通知 System.out.println("方法执行开始-日志-方法名-" + method.getName() + "-参数" + Arrays.toString(args)); result = (Double)method.invoke(targetCalculator, args); // 返回通知 System.out.println("方法执行正常结束-日志-方法名-" + method.getName() + "-结果" + result); } catch (Exception e) { e.printStackTrace(); // 如果反射执行方法时出现异常 - 异常通知 System.out.println("方法执行异常-日志-方法名-" + method.getName() + "异常信息" + e.getMessage()); } finally { // 最终通知 System.out.println("方法执行最终结束-日志-方法名-" + method.getName()); } return result; } }; return (Calculator) Proxy.newProxyInstance(classLoader,interfaces,invocationHandler); } }- 1
- 2
- 3
- 4
- 5
- 6
- 7
- 8
- 9
- 10
- 11
- 12
- 13
- 14
- 15
- 16
- 17
- 18
- 19
- 20
- 21
- 22
- 23
- 24
- 25
- 26
- 27
- 28
- 29
- 30
- 31
- 32
- 33
- 34
- 35
- 36
- 37
- 38
- 39
- 40
被代理的接口以及实现该接口的对象
public interface Calculator { public double calculatorResult(double num1,double num2); } public class Add implements Calculator{ @Override public double calculatorResult(double num1, double num2) { return num1 + num2; } } public class Sub implements Calculator{ @Override public double calculatorResult(double num1, double num2) { return num1 - num2; } }- 1
- 2
- 3
- 4
- 5
- 6
- 7
- 8
- 9
- 10
- 11
- 12
- 13
- 14
- 15
- 16
- 17
测试类
public class CalculatorTest { @Test public void test(){ CalculatorProxy calculatorProxy = new CalculatorProxy(new Sub()); calculatorProxy.getProxy().calculatorResult(10.0,2.0); //方法执行开始-日志-方法名-calculatorResult-参数[10.0, 2.0] //方法执行正常结束-日志-方法名-calculatorResult-结果8.0 //方法执行最终结束-日志-方法名-calculatorResult } }- 1
- 2
- 3
- 4
- 5
- 6
- 7
- 8
- 9
- 10
运用简易AOP思想优化简易计算器
上述存在的问题:代码的耦合性太高,很难拓展代码等
将前置代码,后置代码,异常代码,最终代码脱离出代理类,更加灵活运用
public class LnsAOP { public static void before(Method method, Object[] args){ // 前置通知 System.out.println("方法执行开始-日志-方法名-" + method.getName() + "-参数" + Arrays.toString(args)); } public static void after(Method method, Object[] args){ // 前置通知 System.out.println("方法执行开始-日志-方法名-" + method.getName() + "-参数" + Arrays.toString(args)); } public static void abnormal(Method method, Exception e){ // 如果反射执行方法时出现异常 - 异常通知 System.out.println("方法执行异常-日志-方法名-" + method.getName() + "异常信息" + e.getMessage()); } public static void last(Method method){ // 最终通知 System.out.println("方法执行最终结束-日志-方法名-" + method.getName()); } }- 1
- 2
- 3
- 4
- 5
- 6
- 7
- 8
- 9
- 10
- 11
- 12
- 13
- 14
- 15
- 16
- 17
- 18
- 19
- 20
- 21
public class CalculatorProxy { private Calculator targetCalculator; public CalculatorProxy(Calculator targetCalculator) { this.targetCalculator = targetCalculator; } public Calculator getProxy(){ // 1.获取类加载器 ClassLoader classLoader = targetCalculator.getClass().getClassLoader(); // 2.获取接口信息 Class<?>[] interfaces = targetCalculator.getClass().getInterfaces(); // 3.创建InvocationHandler,调用处理器/对象 InvocationHandler invocationHandler = new InvocationHandler(){ @Override public Double invoke(Object proxy, Method method, Object[] args) throws Throwable { Double result = null; try { LnsAOP.before(method,args); result = (Double)method.invoke(targetCalculator, args); LnsAOP.after(method,args); } catch (Exception e) { e.printStackTrace(); LnsAOP.abnormal(method,e); } finally { LnsAOP.last(method); } return result; } }; return (Calculator) Proxy.newProxyInstance(classLoader,interfaces,invocationHandler); } }- 1
- 2
- 3
- 4
- 5
- 6
- 7
- 8
- 9
- 10
- 11
- 12
- 13
- 14
- 15
- 16
- 17
- 18
- 19
- 20
- 21
- 22
- 23
- 24
- 25
- 26
- 27
- 28
- 29
- 30
- 31
- 32
- 33
- 34
- 35
- 36
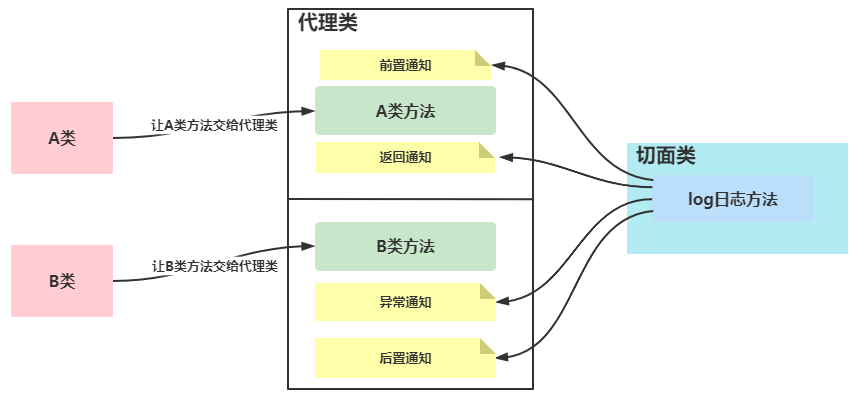
面向切面编程 AOP
将被代理的类和相关日志杂糅在代理类中,动态组合
快速入门
首先引入四个包

配置类
<beans xmlns="http://www.springframework.org/schema/beans" xmlns:xsi="http://www.w3.org/2001/XMLSchema-instance" xmlns:context="http://www.springframework.org/schema/context" xmlns:aop="http://www.springframework.org/schema/aop" xsi:schemaLocation="http://www.springframework.org/schema/beans http://www.springframework.org/schema/beans/spring-beans.xsd http://www.springframework.org/schema/context https://www.springframework.org/schema/context/spring-context.xsd http://www.springframework.org/schema/aop https://www.springframework.org/schema/aop/spring-aop.xsd"> <context:component-scan base-package="com.Al_tair.proxy.calculatorAOP" /> <aop:aspectj-autoproxy/> beans>- 1
- 2
- 3
- 4
- 5
- 6
- 7
- 8
- 9
- 10
- 11
被代理类
public interface Calculator { public double calculatorResult(double num1,double num2); } @Component // 用于注入到ioc容器 public class Add implements Calculator{ @Override public double calculatorResult(double num1, double num2) { return num1 + num2; } } @Component public class Sub implements Calculator{ @Override public double calculatorResult(double num1, double num2) { return num1 - num2; } }- 1
- 2
- 3
- 4
- 5
- 6
- 7
- 8
- 9
- 10
- 11
- 12
- 13
- 14
- 15
- 16
- 17
切面类
@Component @Aspect public class AspectJ { /** * 切入方法 * @Before: 表示前置通知 还有 @After 最后通知 @AfterThrowing 异常通知 @AfterReturning 返回通知 * execution(public double com.Al_tair.proxy.calculatorAOP.Add.calculatorResult(double,double)) * 指定执行哪个类中的哪个方法:execution( 访问修饰符 + 返回类型 + 类的全路径 + 方法名 + (形参列表)) * @param joinPoint 连接器:将方法参数等信息封装成joinPoint对象,方 便在切面方法中使用 */ @Before(value = "execution(public double com.Al_tair.proxy.calculatorAOP.Add.calculatorResult(double,double))") public static void log1(JoinPoint joinPoint){ System.out.println(joinPoint.getSignature() + ": 前置通知~"); } @After(value = "execution(public double com.Al_tair.proxy.calculatorAOP.Add.calculatorResult(double,double))") public static void log2(JoinPoint joinPoint){ System.out.println(joinPoint.getTarget()+ ": 后置通知~"); } @Before(value = "execution(public double com.Al_tair.proxy.calculatorAOP.Sub.calculatorResult(double,double))") public static void log3(JoinPoint joinPoint){ System.out.println(joinPoint.getSignature() + ": 前置通知~"); } @After(value = "execution(public double com.Al_tair.proxy.calculatorAOP.Sub.calculatorResult(double,double))") public static void log4(JoinPoint joinPoint){ System.out.println(joinPoint.getTarget()+ ": 后置通知~"); } }- 1
- 2
- 3
- 4
- 5
- 6
- 7
- 8
- 9
- 10
- 11
- 12
- 13
- 14
- 15
- 16
- 17
- 18
- 19
- 20
- 21
- 22
- 23
- 24
- 25
- 26
- 27
- 28
- 29
- 30
测试类
public class AOPTest { @Test public void test(){ ApplicationContext ioc = new ClassPathXmlApplicationContext("bean4.xml"); Calculator add = ioc.getBean("add", Calculator.class); Calculator sub = ioc.getBean("sub", Calculator.class); // 编译: Add类型 运行: Proxy代理类型 System.out.println(add); // com.Al_tair.proxy.calculatorAOP.Add@61d6015a System.out.println(add.getClass()); // class com.sun.proxy.$Proxy14 add.calculatorResult(3,2); sub.calculatorResult(4,2); //double com.Al_tair.proxy.calculatorAOP.Calculator.calculatorResult(double,double): 前置通知~ //com.Al_tair.proxy.calculatorAOP.Add@61d6015a: 后置通知~ //double com.Al_tair.proxy.calculatorAOP.Calculator.calculatorResult(double,double): 前置通知~ //com.Al_tair.proxy.calculatorAOP.Sub@3315d2d7: 后置通知~ } }- 1
- 2
- 3
- 4
- 5
- 6
- 7
- 8
- 9
- 10
- 11
- 12
- 13
- 14
- 15
- 16
- 17
注意:需要jdk1.8(版本不要太高)
@Before
@Retention(RetentionPolicy.RUNTIME) @Target({ElementType.METHOD}) public @interface Before { String value(); String argNames() default ""; }- 1
- 2
- 3
- 4
- 5
- 6
- 7
代码示例
@Before(value = "execution(public double com.Al_tair.proxy.calculatorAOP.Add.calculatorResult(double,double))") public static void log1(JoinPoint joinPoint){ System.out.println(joinPoint.getSignature() + ": 前置通知~"); }- 1
- 2
- 3
- 4
@AfterReturning
@Retention(RetentionPolicy.RUNTIME) @Target({ElementType.METHOD}) public @interface AfterReturning { String value() default ""; String pointcut() default ""; String returning() default ""; // 接收方法返回值 String argNames() default ""; }- 1
- 2
- 3
- 4
- 5
- 6
- 7
- 8
- 9
- 10
- 11
代码示例
// returning 指定返回值的引用名 @AfterReturning(value = "execution(public double com.Al_tair.proxy.calculatorAOP.Add.calculatorResult(double,double))",returning = "res") public static void log2(JoinPoint joinPoint,Object res){ System.out.println(res.toString()+ ": 返回通知~"); }- 1
- 2
- 3
- 4
- 5
@AfterThrowing
@Retention(RetentionPolicy.RUNTIME) @Target({ElementType.METHOD}) public @interface AfterThrowing { String value() default ""; String pointcut() default ""; String throwing() default ""; // 接收异常信息 String argNames() default ""; }- 1
- 2
- 3
- 4
- 5
- 6
- 7
- 8
- 9
- 10
- 11
代码示例
// throwing 指定异常引用名 @AfterThrowing(value = "execution(public double com.Al_tair.proxy.calculatorAOP.Add.calculatorResult(double,double))", throwing = "throwable") public void log3(JoinPoint joinPoint, Throwable throwable) { Signature signature = joinPoint.getSignature(); System.out.println("异常通知~")- 1
- 2
- 3
- 4
- 5
@After
@Retention(RetentionPolicy.RUNTIME) @Target({ElementType.METHOD}) public @interface After { String value(); String argNames() default ""; }- 1
- 2
- 3
- 4
- 5
- 6
- 7
代码示例
@After(value = "execution(public double com.Al_tair.proxy.calculatorAOP.Sub.calculatorResult(double,double))") public static void log4(JoinPoint joinPoint){ System.out.println(joinPoint.getTarget()+ ": 后置通知~"); }- 1
- 2
- 3
- 4
@Around
@Retention(RetentionPolicy.RUNTIME) @Target({ElementType.METHOD}) public @interface Around { String value(); String argNames() default ""; }- 1
- 2
- 3
- 4
- 5
- 6
- 7
代码示例
//1. @Around: 表示这是一个环绕通知[完成其它四个通知的功能] @Around(value = "execution(public double com.Al_tair.proxy.calculatorAOP.Sub.calculatorResult(double,double))") public Object doAround(ProceedingJoinPoint joinPoint) { Object result = null; String methodName = joinPoint.getSignature().getName(); try { //1.相当于前置通知完成的事情 Object[] args = joinPoint.getArgs(); List<Object> argList = Arrays.asList(args); System.out.println("AOP环绕通知[-前置通知]" + methodName + "方法开始了--参数有:" + argList); //在环绕通知中一定要调用joinPoint.proceed()来执行目标方法 result = joinPoint.proceed(); //2.相当于返回通知完成的事情 System.out.println("AOP环绕通知[-返回通知]" + methodName + "方法结束了--结果是:" + result); } catch (Throwable throwable) { //3.相当于异常通知完成的事情 System.out.println("AOP环绕通知[-异常通知]" + methodName + "方法抛异常了--异常对象:" + throwable); } finally { //4.相当于最终通知完成的事情 System.out.println("AOP环绕通知[-后置通知]" + methodName + "方法最终结束了..."); } return result; //AOP环绕通知[-前置通知]calculatorResult方法开始了--参数有:[4.0, 2.0] //AOP环绕通知[-返回通知]calculatorResult方法结束了--结果是:2.0 //AOP环绕通知[-后置通知]calculatorResult方法最终结束了 }- 1
- 2
- 3
- 4
- 5
- 6
- 7
- 8
- 9
- 10
- 11
- 12
- 13
- 14
- 15
- 16
- 17
- 18
- 19
- 20
- 21
- 22
- 23
- 24
- 25
- 26
@Pointcut
思考:execution()是否有大量的重复代码,能否抽出共同点?
引出切入点,减少代码复用
public class AspectJ { @Pointcut(value = "execution(public double com.Al_tair.proxy.calculatorAOP.Add.calculatorResult(double,double))") public void myPointCut(){} @Before(value = "myPointCut()") public static void log1(JoinPoint joinPoint){ System.out.println(joinPoint.getSignature() + ": 前置通知~"); } @AfterReturning(value = "myPointCut()",returning = "res") public static void log2(JoinPoint joinPoint,Object res){ System.out.println(res.toString()+ ": 后置通知~"); } }- 1
- 2
- 3
- 4
- 5
- 6
- 7
- 8
- 9
- 10
- 11
- 12
- 13
- 14
多个切面类的执行顺序
优先级别:value的值越小,反而前置通知优先级别越高(类似Fileter过滤的规则)
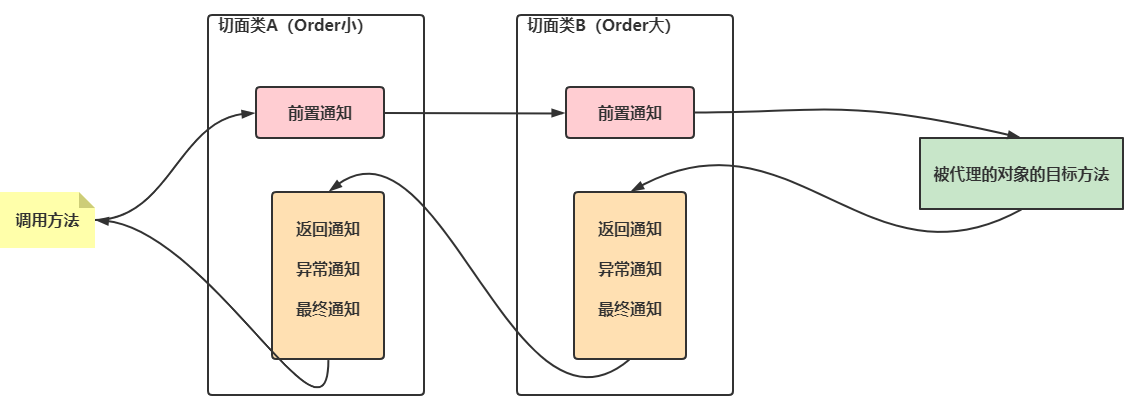
结果分析 (order1 > order2) double com.Al_tair.proxy.calculatorAOP.Calculator.calculatorResult(double,double): 前置通知2~ double com.Al_tair.proxy.calculatorAOP.Calculator.calculatorResult(double,double): 前置通知1~ 5.0: 后置通知1~ 5.0: 后置通知2~ double com.Al_tair.proxy.calculatorAOP.Calculator.calculatorResult(double,double): 前置通知2~ double com.Al_tair.proxy.calculatorAOP.Calculator.calculatorResult(double,double): 前置通知1~ com.Al_tair.proxy.calculatorAOP.Sub@22e357dc: 后置通知1~ com.Al_tair.proxy.calculatorAOP.Sub@22e357dc: 后置通知2~- 1
- 2
- 3
- 4
- 5
- 6
- 7
- 8
- 9
-
相关阅读:
前后端交互—Ajax基础
初识Java
java计算机毕业设计企业固定资产信息管理系统源码+系统+数据库+lw文档+mybatis+运行部署
SpringMvc的工作流程是怎样的
JS-全局dom对象的使用---使用htm样式和js函数动作的完全分离
python爬虫面试题集锦及答案
22-08-18 西安 尚医通(07)支付流程、rabbitmq的使用
【证明】线性空间的基本性质
牛客小白月赛54
项目管理之系统交付
- 原文地址:https://blog.csdn.net/Al_tair/article/details/125895797
