-
【深度学习】【caffe】【python】【docker】微信 二维码检测,手写数字识别
了解caffe,使用caffe,做个小例子熟悉caffe。
介绍
caffe Github: https://github.com/BVLC/caffe
caffe Tutorial :https://docs.google.com/presentation/d/1UeKXVgRvvxg9OUdh_UiC5G71UMscNPlvArsWER41PsU/edit#slide=id.gc2fcdcce7_216_498
why caffe: only for vision; very simple。caffe不用懂程序都能写出模型。
拥有一个docker环境:https://github.com/BVLC/caffe/tree/master/docker
caffe mnist Tutorial :https://caffe.berkeleyvision.org/gathered/examples/mnist.html
微信二维码opencv模型文件:https://github.com/WeChatCV/opencv_3rdparty
微信二维码opencv源码:https://github.com/opencv/opencv_contrib/blob/master/modules/wechat_qrcode/src/wechat_qrcode.cpp#L156
微信二维码技术介绍:https://zhuanlan.zhihu.com/p/348412200docker环境
cpu:
cd ~ mkdir caffetest docker run -ti -v ~/caffetest/:/app bvlc/caffe:cpu bash- 1
- 2
- 3
MNIST 数据(废弃)
代码下载下来,宿主机执行:
cd $CAFFE_ROOT ./data/mnist/get_mnist.sh ./examples/mnist/create_mnist.sh- 1
- 2
- 3
我没编译安装caffe,执行create_mnist.sh报错,lmdb数据格式何方神圣?:
caffe直接处理的数据分为两种格式: lmdb和leveldb,两者关系: 它们都是键/值对嵌入式数据库管理系统编程库
虽然lmdb的内存消耗是leveldb的1.1倍,但是lmdb的处理速度比leveldb快10%到15%,另外lmdb允许多种训练模型同时读取同一组数据集。
lmdb取代了leveldb成为了caffe默认的数据集生成格式。docker 内的Linux发行版查看
cat /etc/issue,Ubuntu 16.04.4 LTS \n \l- 1
dockerfile:https://github.com/BVLC/caffe/blob/9b891540183ddc834a02b2bd81b31afae71b2153/docker/cpu/Dockerfile
ubuntu安装教程:http://caffe.berkeleyvision.org/install_apt.htmlubuntu的update太慢了,这条路以后再走。
微信二维码
微信二维码
我想在python里面调用起二维码检测的代码,不用识别二维码,只进行目标检测。

在线可视化prototxt模型:http://ethereon.github.io/netscope/#/editor

看源码:
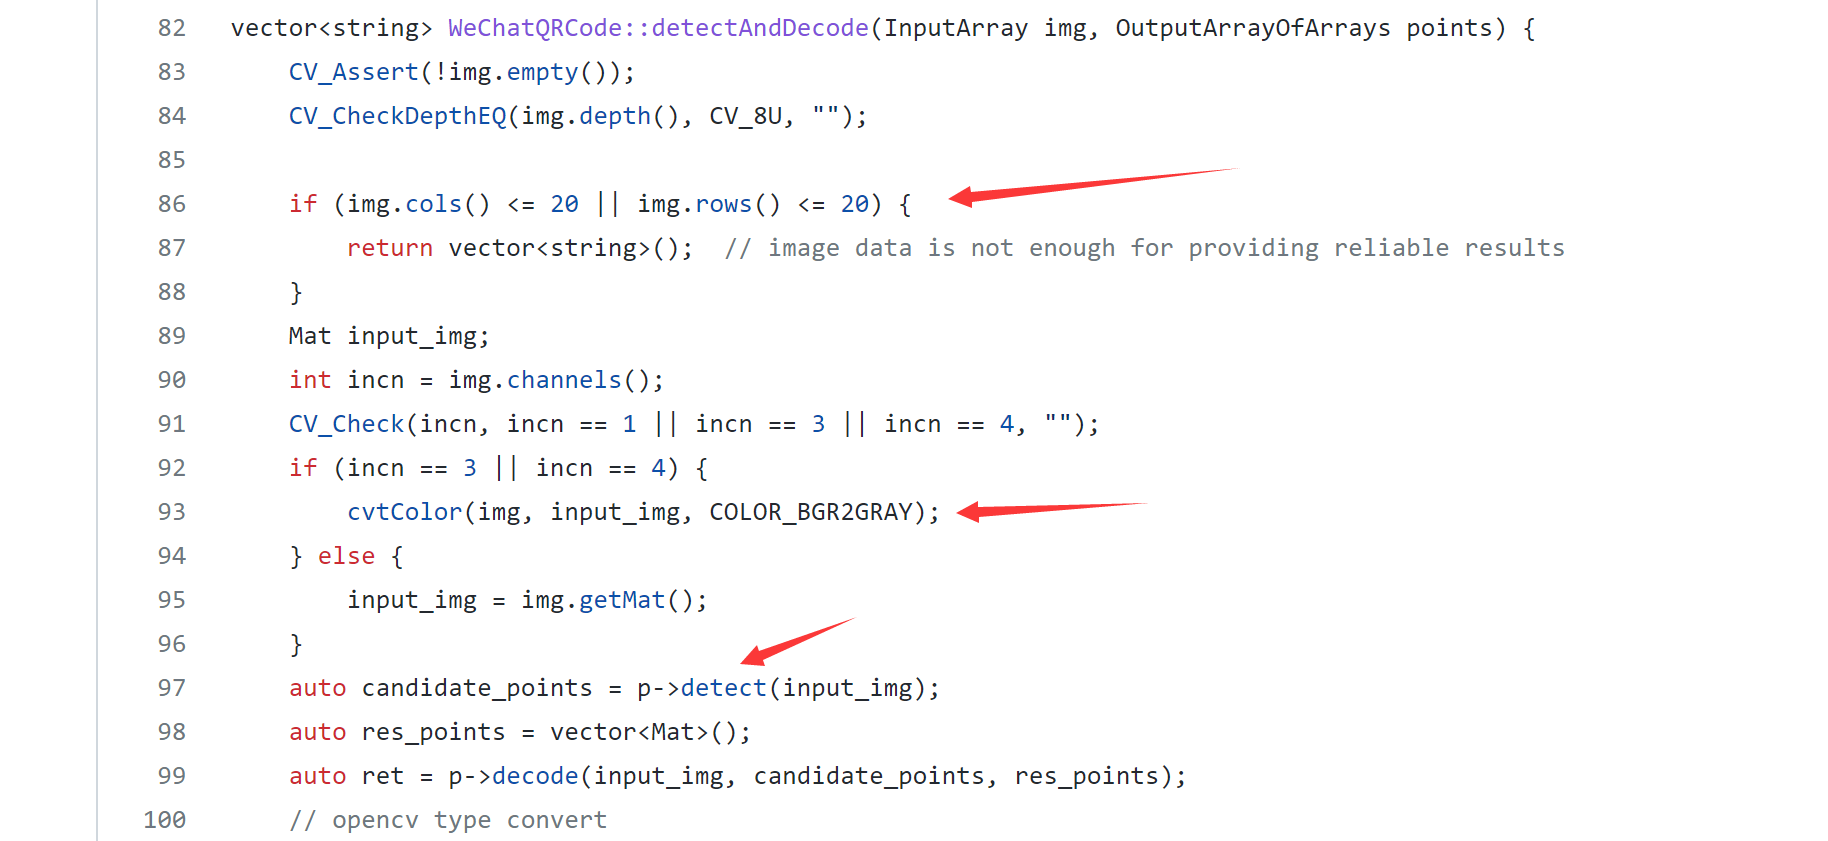
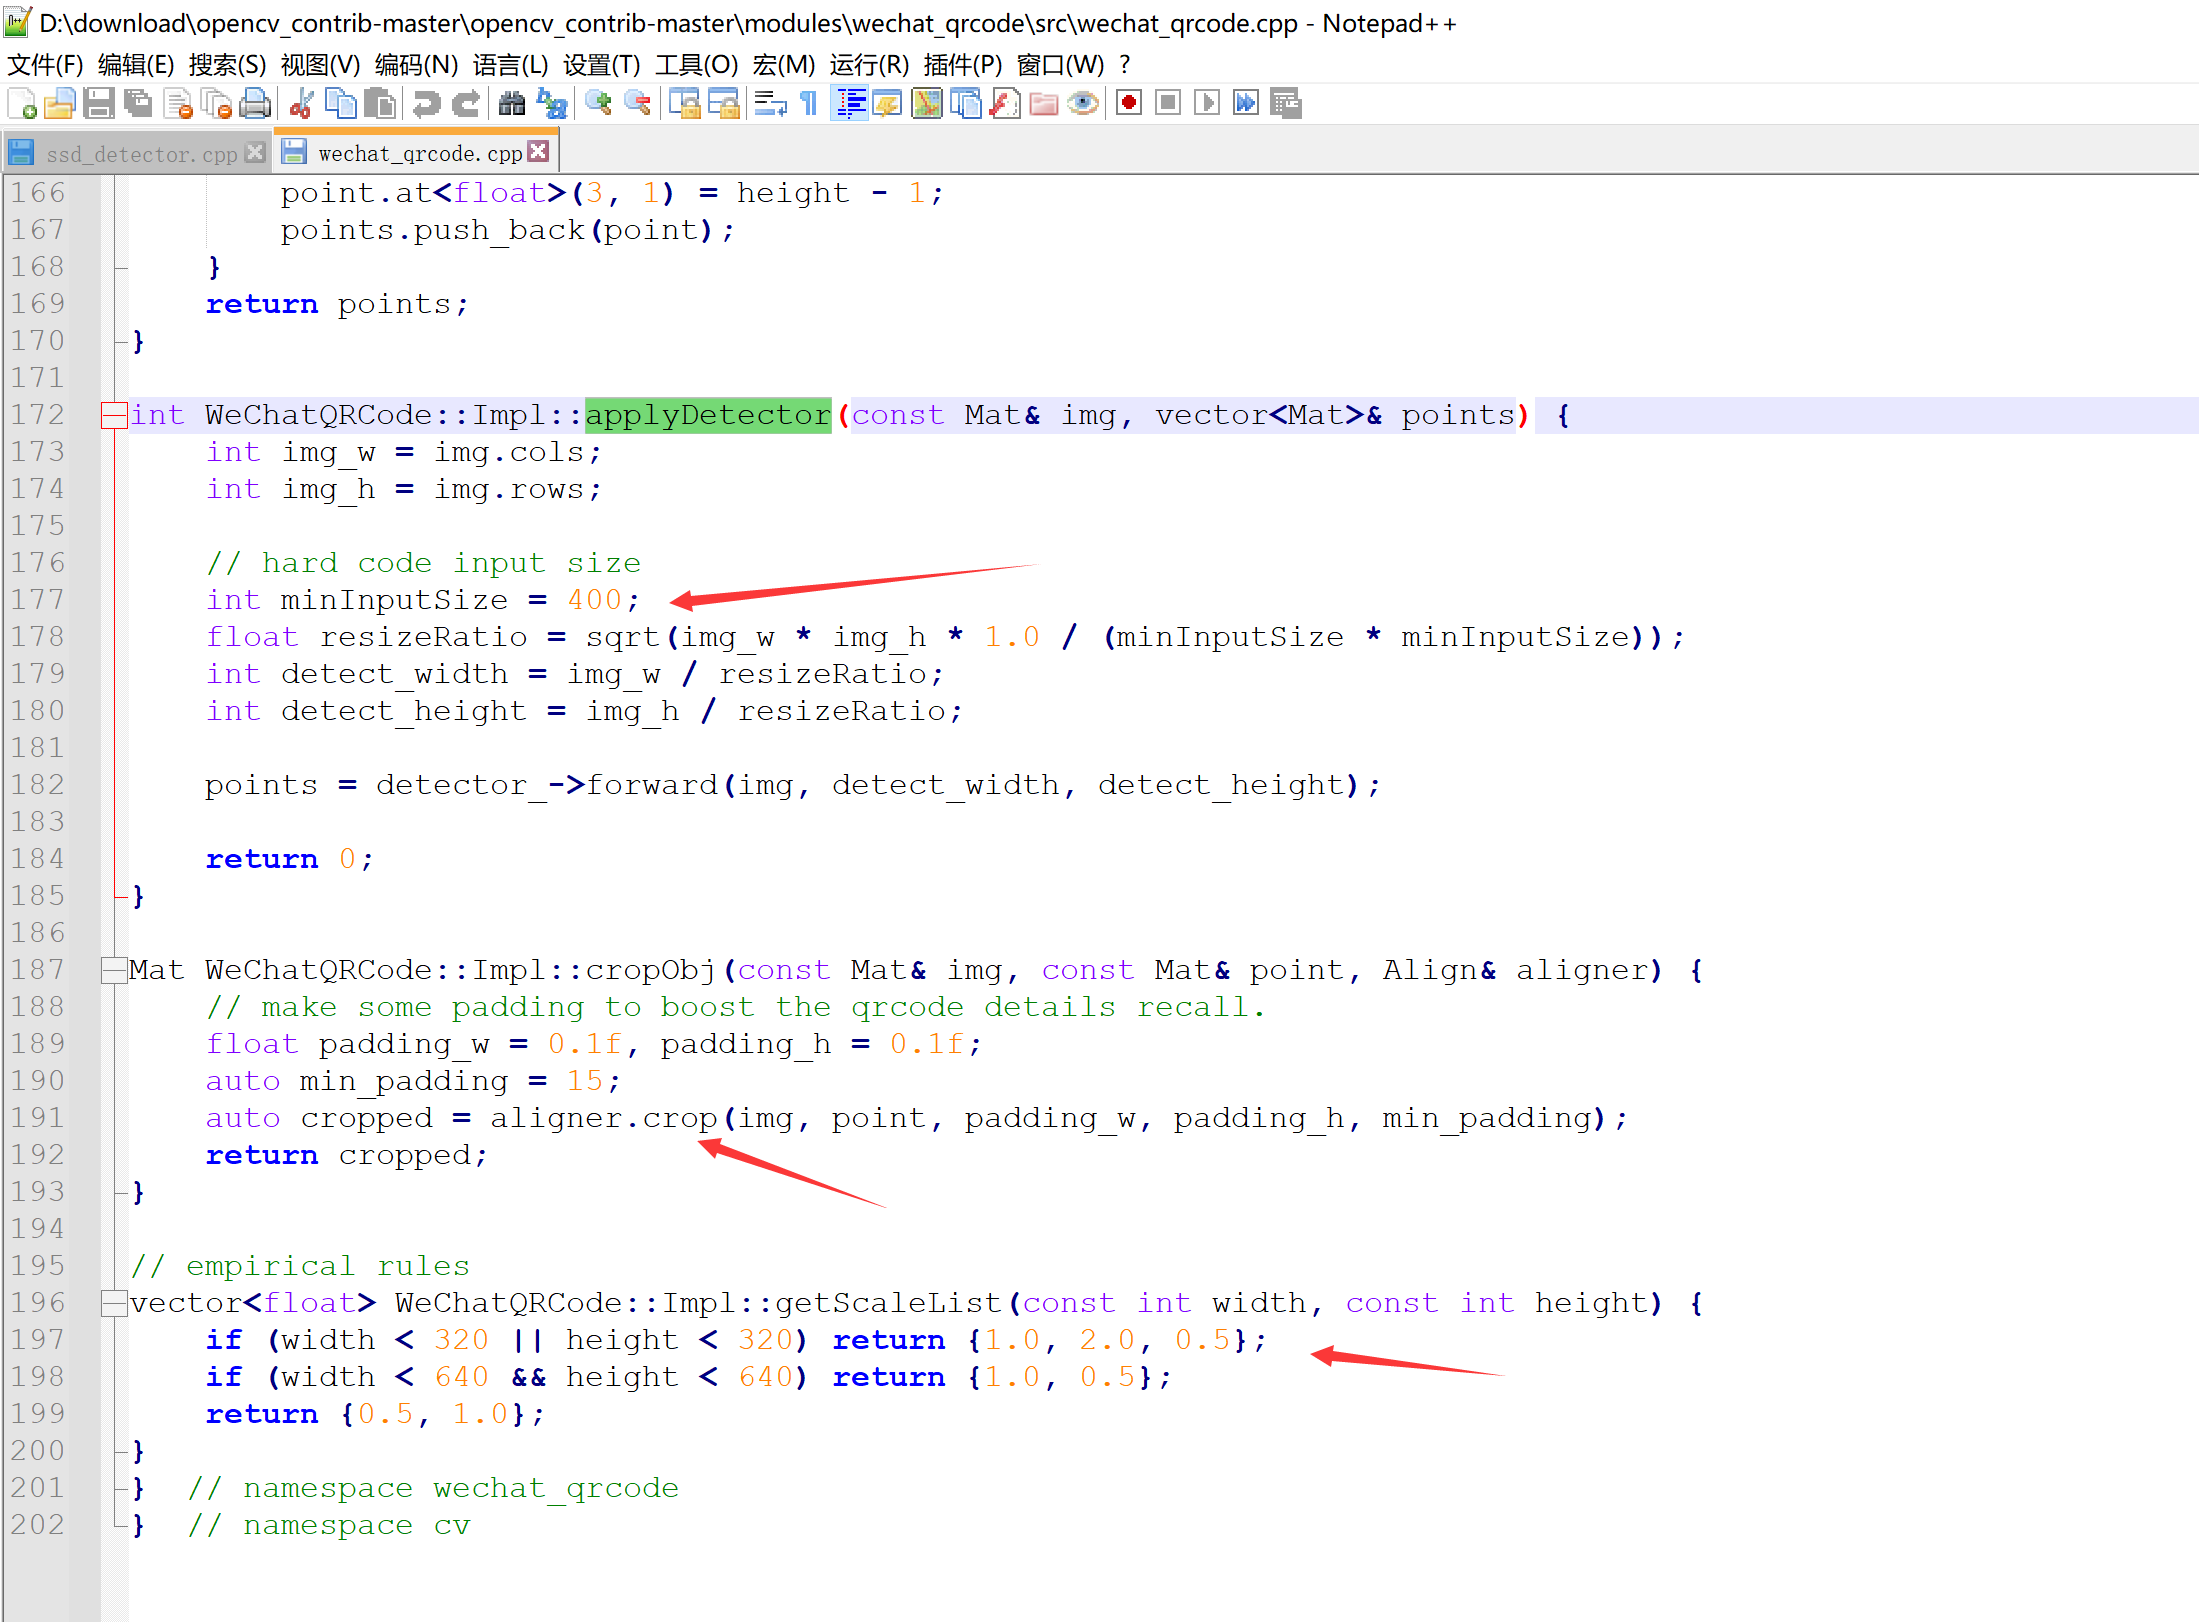

输入图像的处理需要:
(1)太小就不要了,他这是为了二维码解码,这步不管。
(2)灰度化图片。
(3)归一化图片。
(4)得输出。python代码试试
import math import cv2 import numpy as np cvNet = cv2.dnn.readNetFromCaffe('detect.prototxt', 'detect.caffemodel') image_path = r'C:\Users\dong.xie\Desktop\workcode\kevintest\google_crawler_for_linux\src\生活 二维码_1\img000001.jpg' img2 = cv2.imdecode(np.fromfile(image_path, dtype=np.uint8), 1) # img是矩阵 img = cv2.cvtColor(img2, cv2.COLOR_BGR2GRAY) img_w = img.shape[1] img_h = img.shape[0] minInputSize = 400 resizeRatio = math.sqrt(img_w * img_h * 1.0 / (minInputSize * minInputSize)) target_width = int(img_w / resizeRatio) target_height = int(img_h / resizeRatio) input = cv2.resize(img, (target_width, target_height), interpolation=cv2.INTER_CUBIC) blob = cv2.dnn.blobFromImage(input, scalefactor=1.0 / 255, size=(input.shape[1], input.shape[0]), mean=(0, 0, 0), swapRB=False, crop=False) cvNet.setInput(blob, name="data") prob = cvNet.forward() print(prob.shape) # define CLIP(x, x1, x2) max(x1, min(x, x2)) def CLIP(x, x1, x2): return int(max(x1, min(x, x2))) # theshape is (1, 1, 100, 7) = > (batch, channel, count, dim) for row in range(0, prob.shape[2]): prob_score = prob[0][0][row] # prob_score[0] is not used. # prob_score[1]==1 stands for qrcode # add a safe score threshold due to https://github.com/opencv/opencv_contrib/issues/2877 # prob_score[2] is the probability of the qrcode, which is not used. if prob_score[1] == 1 and prob_score[2] > 1E-5: x0 = CLIP(prob_score[3] * img_w, 0.0, img_w - 1.0) y0 = CLIP(prob_score[4] * img_h, 0.0, img_h - 1.0) x1 = CLIP(prob_score[5] * img_w, 0.0, img_w - 1.0) y1 = CLIP(prob_score[6] * img_h, 0.0, img_h - 1.0) cv2.rectangle(img2, (x0, y0), (x1, y1), (0, 0, 255), 2) cv2.imshow("1", img2) cv2.waitKey() cv2.destroyAllWindows()- 1
- 2
- 3
- 4
- 5
- 6
- 7
- 8
- 9
- 10
- 11
- 12
- 13
- 14
- 15
- 16
- 17
- 18
- 19
- 20
- 21
- 22
- 23
- 24
- 25
- 26
- 27
- 28
- 29
- 30
- 31
- 32
- 33
- 34
- 35
- 36
- 37
- 38
- 39
- 40
- 41
- 42
- 43
- 44
- 45
- 46
- 47
- 48
- 49
- 50
- 51
- 52
还是挺成功的:

用于造yolov5的目标检测数据
# pip install opencv-contrib-python import math import os import traceback import cv2 import numpy as np dataFile = r'''C:\Users\dong.xie\Desktop\12312''' dst = r'E:\detection\02二维码\images' dst1 = r'E:\detection\02二维码\labels' cnt = 3000 def listPathAllfiles(dirname): result = [] for maindir, subdir, file_name_list in os.walk(dirname): for filename in file_name_list: apath = os.path.join(maindir, filename) result.append(apath) return result if __name__ == '__main__': files = listPathAllfiles(dataFile) cvNet = cv2.dnn.readNetFromCaffe('detect.prototxt', 'detect.caffemodel') for file in files: try: if file.endswith(".jpg") or file.endswith(".png"): img2 = cv2.imdecode(np.fromfile(file, dtype=np.uint8), 1) # img是矩阵 img = cv2.cvtColor(img2, cv2.COLOR_BGR2GRAY) img_w = img.shape[1] img_h = img.shape[0] minInputSize = 400 resizeRatio = math.sqrt(img_w * img_h * 1.0 / (minInputSize * minInputSize)) target_width = int(img_w / resizeRatio) target_height = int(img_h / resizeRatio) input = cv2.resize(img, (target_width, target_height), interpolation=cv2.INTER_CUBIC) blob = cv2.dnn.blobFromImage(input, scalefactor=1.0 / 255, size=(input.shape[1], input.shape[0]), mean=(0, 0, 0), swapRB=False, crop=False) cvNet.setInput(blob, name="data") prob = cvNet.forward() # print(prob.shape) # define CLIP(x, x1, x2) max(x1, min(x, x2)) def CLIP(x, x1, x2): return int(max(x1, min(x, x2))) resDet = [] # theshape is (1, 1, 100, 7) = > (batch, channel, count, dim) for row in range(0, prob.shape[2]): prob_score = prob[0][0][row] # prob_score[0] is not used. # prob_score[1]==1 stands for qrcode # add a safe score threshold due to https://github.com/opencv/opencv_contrib/issues/2877 # prob_score[2] is the probability of the qrcode, which is not used. if prob_score[1] == 1 and prob_score[2] > 1E-5: x0 = CLIP(prob_score[3] * img_w, 0.0, img_w - 1.0) y0 = CLIP(prob_score[4] * img_h, 0.0, img_h - 1.0) x1 = CLIP(prob_score[5] * img_w, 0.0, img_w - 1.0) y1 = CLIP(prob_score[6] * img_h, 0.0, img_h - 1.0) resDet.append([x0, y0, x1, y1]) if len(resDet) >= 1: cv2.imencode('.jpg', img2)[1].tofile(os.path.join(dst, "qrcode_" + str(cnt).zfill(6) + ".jpg")) txtfile = os.path.join(dst1, "qrcode_" + str(cnt).zfill(6) + ".txt") res = [] for x0, y0, x1, y1 in resDet: x = round((x0 + x1) / 2 / img.shape[1], 6) y = round((y0 + y1) / 2 / img.shape[0], 6) w = round((x1 - x0) / img.shape[1], 6) h = round((y1 - y0) / img.shape[0], 6) res.append(" ".join(["1", str(x), str(y), str(w), str(h)])) open(txtfile, "w").write("\n".join(res)) cnt += 1 except: traceback.print_exc()- 1
- 2
- 3
- 4
- 5
- 6
- 7
- 8
- 9
- 10
- 11
- 12
- 13
- 14
- 15
- 16
- 17
- 18
- 19
- 20
- 21
- 22
- 23
- 24
- 25
- 26
- 27
- 28
- 29
- 30
- 31
- 32
- 33
- 34
- 35
- 36
- 37
- 38
- 39
- 40
- 41
- 42
- 43
- 44
- 45
- 46
- 47
- 48
- 49
- 50
- 51
- 52
- 53
- 54
- 55
- 56
- 57
- 58
- 59
- 60
- 61
- 62
- 63
- 64
- 65
- 66
- 67
- 68
- 69
- 70
- 71
- 72
- 73
- 74
- 75
- 76
- 77
- 78
- 79
- 80
- 81
- 82
- 83
- 84
- 85
- 86
- 87
- 88
- 89
- 90
-
相关阅读:
超详细的JUnit单元测试介绍
简单宠物网页设计作业 静态HTML动物介绍网页作业 DW宠物网站模板下载 大学生简单野生动物网页作品代码
知道数字孪生发展的四个阶段,你就能明白数字孪生的真正价值了
jstack问题定位分析
Linux内核与驱动面试经典“小”问题集锦(7)
虚拟DOM的发展趋势和潜在创新
微信小程序
javaweb(四)-会话跟踪
cJSON.c 在mfc中编译失败报 lnk2005错误
【AI】深度学习——人工智能、深度学习与神经网络
- 原文地址:https://blog.csdn.net/x1131230123/article/details/125775026
