-
使用 Rust 与 WebAssembly 进行图形开发
项目初始化
要求需要先安装好 Node.js,和 Rust 环境。
- 建一个新的文件夹,将工作目录切换到该目录下
npm init rust-webpack- 1
如果能看到下面的图案就是成功了:
🦀 Rust + 🕸 WebAssembly + Webpack = ❤- 1
- 安装依赖
npm install- 1
- 安装 wasm-pack
Linux 和 Mac OSX 的操作系统可以使用 cURL 进行安装:
curl https://rustwasm.github.io/wasm-pack/installer/init . sh -sSf | sh- 1
Windows 可以下载单独的 exe,进行安装:下载地址
- 运行服务器
npm run start- 1
会自动安装 Rust 所需的依赖包,如果成功的话,开发者工具中终端界面可以看到 Hello, World

- 更新 Rust 版本
目前模板的 Rust 版本为
2018(2022年7月5日时),在cargo.toml将版本改成2021:edition = "2021"- 1
- 更新依赖的版本
cargo.toml中的依赖也不是最新的,可以更新到新的版本。
Visusal Studio Code 中有 Crates 插件,可以获取依赖的版本信息。
[dev-dependencies] wasm-bindgen-test = "0.3.31" futures = "0.3.21" js-sys = "0.3.22" wasm-bindgen-futures = "0.4.31"- 1
- 2
- 3
- 4
- 5
- 更新
console_error_panic_hook
这是个非常有用的库,一看名字就知道是用来 Debug 的,目前最新是
0.1.7。[target."cfg(debug_assertions)".dependencies] console_error_panic_hook = "0.1.7"- 1
- 2
绘制图形到 Canvas
可以使用
<canvas>将图形绘制到浏览器窗口中,在static\index.html中<body>后添加<canvas>:<body> <canvas id="canvas" tabindex="0" height="600" width="600">Your browser does not support the canvas.</canvas> <!-- ... 不要删除后面的 <script> ... -->- 1
- 2
- 3
终于到了写 Rust 代码的时候了!
在
lib.rs引入依赖use wasm_bindgen::JsCast;- 1
原有代码里的
#[cfg(debug_assertions)]可以删除。use wasm_bindgen::prelude::*; use wasm_bindgen::JsCast; use web_sys::console; // When the `wee_alloc` feature is enabled, this uses `wee_alloc` as the global // allocator. // // If you don't want to use `wee_alloc`, you can safely delete this. #[cfg(feature = "wee_alloc")] #[global_allocator] static ALLOC: wee_alloc::WeeAlloc = wee_alloc::WeeAlloc::INIT; // This is like the `main` function, except for JavaScript. #[wasm_bindgen(start)] pub fn main_js() -> Result<(), JsValue> { // This provides better error messages in debug mode. // It's disabled in release mode so it doesn't bloat up the file size. console_error_panic_hook::set_once(); let window = web_sys::window().unwrap(); let document = window.document().unwrap(); let canvas = document .get_element_by_id("canvas") .unwrap() .dyn_into::<web_sys::HtmlCanvasElement>() .unwrap(); let context = canvas .get_context("2d") .unwrap() .unwrap() .dyn_into::<web_sys::CanvasRenderingContext2d>() .unwrap(); context.move_to(300.0, 0.0); context.begin_path(); context.line_to(0.0, 600.0); context.line_to(600.0, 600.0); context.line_to(300.0, 0.0); context.close_path(); context.stroke(); context.fill(); Ok(()) }- 1
- 2
- 3
- 4
- 5
- 6
- 7
- 8
- 9
- 10
- 11
- 12
- 13
- 14
- 15
- 16
- 17
- 18
- 19
- 20
- 21
- 22
- 23
- 24
- 25
- 26
- 27
- 28
- 29
- 30
- 31
- 32
- 33
- 34
- 35
- 36
- 37
- 38
- 39
- 40
- 41
- 42
- 43
- 44
- 45
- 46
需要注意的是,
web_sys使用了features来减小大小。所以使用的时候,必须查看文档,看属于哪个features。在
console后添加所需要的features:[dependencies.web-sys] version = "0.3.22" features = ["console", "Window", "Document", "HtmlCanvasElement", "CanvasRenderingContext2d"]- 1
- 2
- 3

Rust 作为静态语言,确实要比 JavaScript 更加繁杂。如果这个图形纯粹使用 JavaScript 的话,看起来就就简单多了:
-
JavaScript 中,
window有可能是null或者undefined,对于 Rust 来讲,就是Option<Window>,可以使用unwrap来获取window。 -
使用
get_element_by_id获取canvas后,得到的是Option<Element>,但Element并没有函数关联到canvas。JavaScript 中,可以使用get_context去尝试获取,如果没有的话,会抛出异常。对于 Rust,则需要使用dyn_into强制转换到HtmlCanvasElement。 -
get_context("2d")之后使用了两个unwrap,这是因为它返回的是Result<Option<Object>, JsValue>。
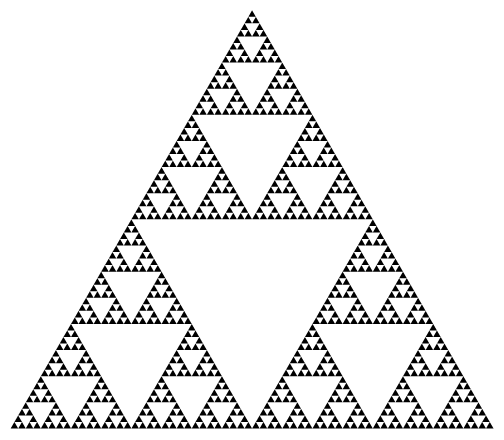
绘制谢尔宾斯基三角形
谢尔宾斯基(Sierpiński)三角形是分形中的经典图形之一,用递归来实现其实非常简单的。
先把绘制三角形的代码抽象为一个函数,便于多次调用:fn draw_triangle(context: &web_sys::CanvasRenderingContext2d, points: [(f64, f64); 3]) { let [top, left, right] = points; context.move_to(top.0, top.1); context.begin_path(); context.line_to(left.0, left.1); context.line_to(right.0, right.1); context.line_to(top.0, top.1); context.close_path(); context.stroke(); }- 1
- 2
- 3
- 4
- 5
- 6
- 7
- 8
- 9
- 10
那么就只需要调用函数进行三角形的绘制,
draw_triangle(&context, [(300.0, 0.0), (0.0, 600.0), (600.0, 600.0)]);- 1

由于函数没有加上
context.fill(),所以图案并没有填充成为黑色。谢尔宾斯基三角形非常简单,只要 取边长中点 (两个坐标之和除以 2)继续进行相同的绘制过程。
draw_triangle(&context, [(300.0, 0.0), (0.0, 600.0), (600.0, 600.0)]); draw_triangle(&context, [(300.0, 0.0), (150.00, 300.0), (450.0, 300.0)]); draw_triangle(&context, [(150.0, 300.0), (0.0, 600.0), (300.0, 600.0)]); draw_triangle(&context, [(450.0, 300.0), (300.0, 600.0), (600.0, 600.0)]);- 1
- 2
- 3
- 4

我们将上述过程作为谢尔宾斯基三角形绘制的基础,使用递归绘制图案:
fn midpoint(point_1: (f64, f64), point_2: (f64, f64)) -> (f64, f64) { ((point_1.0 + point_2.0) / 2.0, (point_1.1 + point_2.1) / 2.0) } fn sierpinski(context: &web_sys::CanvasRenderingContext2d, points: [(f64, f64); 3], depth: u8) { draw_triangle(&context, points); let depth = depth - 1; let [top, left, right] = points; if depth > 0 { // 计算中点 let left_middle = midpoint(top, left); let right_middle = midpoint(top, right); let bottom_middle = midpoint(left, right); sierpinski(&context, [top, left_middle, right_middle], depth); sierpinski(&context, [left_middle, left, bottom_middle], depth); sierpinski(&context, [right_middle, bottom_middle, right], depth); } }- 1
- 2
- 3
- 4
- 5
- 6
- 7
- 8
- 9
- 10
- 11
- 12
- 13
- 14
- 15
- 16
- 17
- 18
- 19
- 20
- 21
调用这个函数,并且设置
depth为 4:sierpinski(&context, [(300.0, 0.0), (0.0, 600.0), (600.0, 600.0)], 4);- 1

如果想要跟最开始图案一样填充黑色,只需要在最后一层进行填充颜色。可以考虑加入一个
bool值作为是否填充的判断:fn draw_triangle(context: &web_sys::CanvasRenderingContext2d, points: [(f64, f64); 3], fill: bool) { let [top, left, right] = points; // ... if fill { context.fill(); } }- 1
- 2
- 3
- 4
- 5
- 6
- 7
- 8
- 9
之后判断是否是最后一层,
let depth = depth - 1; let fill = if depth == 0 { true } else { false };- 1
- 2

小结
通过本文的铺垫,我们就可以考虑使用 Rust 开发 Web 游戏了(思考)。
-
相关阅读:
【华为机试真题JavaScript】分班
ABP - 模块加载机制
11月千言最新评测推荐,覆盖中文对话、视频语义理解、可信AI等前沿方向
Python语义分割与街景识别(2):环境搭建
Python实现人脸识别检测,对主播进行颜值排行
cmake 学习 cmake-package(7)
Python in Visual Studio Code 2023年10月发布
Nginx 反向代理,负载均衡,动静分离和高可用 实操
mysql 递归查询
最大路径和——给定一个二叉树的头节点head,路径规定不同问题下的解法
- 原文地址:https://blog.csdn.net/guyu2019/article/details/125628361