-
【Vue实战】使用elementui实现表格的增加、删除、跳转详情页功能
1. 环境配置
1.1 安装并引入elementui
- 安装
npm i element-ui -S
- 在main.js中引入(全局引入)
import ElementUI from 'element-ui'; import 'element-ui/lib/theme-chalk/index.css'; Vue.use(ElementUI);- 1
- 2
- 3
- 4
1.2 安装并引入axios
- 安装
npm install axios@0.21.1 -S
- 在main.js中引入
import axios from "axios"; // 在全局配置 axios // axios.defaults.baseURL = 'https://www.escook.cn' axios.defaults.baseURL = "http://localhost:3000"; Vue.prototype.$http = axios;- 1
- 2
- 3
- 4
- 5
- 6
接口用的黑马的,现在还可以用。
由于存在跨域问题,所以还要配置一下vue.config.js文件,使用proxy跨域代理解决跨域问题。
1.3 配置vue.config.js
在vue项目的根目录中创建,与src平级。
module.exports = { devServer: { port: 3000, open: true, proxy: "https://www.escook.cn", }, };- 1
- 2
- 3
- 4
- 5
- 6
- 7
- 8
- port是端口;
- open是终端运行结束后直接弹出浏览器;
- proxy是接口的真实根路径,解决跨域问题
2.配置路由模块
2.1 src/router/index.js配置
在安装完vue-router以后,在index.js中引入、使用VueRouter、创建路由实例并配置路由规则,最后将router导出,这样就可以在main.js中导入路由了。
import Vue from "vue"; import VueRouter from "vue-router"; // 导入需要的组件 import UserList from "@/components/UserList"; import UserDetail from '@/components/UserDetail' Vue.use(VueRouter); const router = new VueRouter({ // 声明路由规则 routes: [ { path: "/", redirect: "/users", }, { path: "/users", component: UserList, }, { path: '/users/:id', component: UserDetail, props: true, } ], }); export default router;- 1
- 2
- 3
- 4
- 5
- 6
- 7
- 8
- 9
- 10
- 11
- 12
- 13
- 14
- 15
- 16
- 17
- 18
- 19
- 20
- 21
- 22
- 23
- 24
- 25
- 26
- 27
- 28
- 29
2.2 main.js有关的路由配置
import router from "./router"; new Vue({ router, render: (h) => h(App), }).$mount("#app");- 1
- 2
- 3
- 4
- 5
- 6
- 7
3. 代码实现
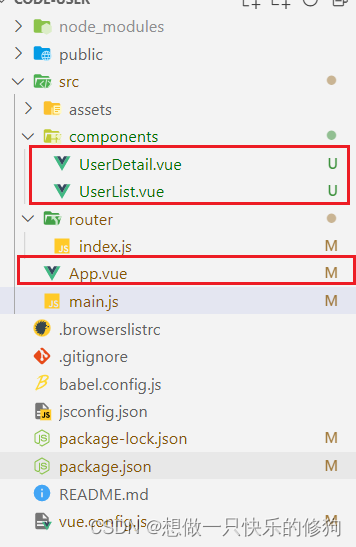
3.1 目录结构

主要有三个组件,根组件App.vue,两个自定义组件:UserList.vue是表格组件;UserDetail.vue是点击表格组件中的“详情”链接后跳转到的详情页面。3.2 App.vue代码
<template> <div> <!-- 路由占位符 --> <router-view></router-view> </div> </template> <script> export default { name: 'MyApp', } </script> <style lang="less" scoped> </style>- 1
- 2
- 3
- 4
- 5
- 6
- 7
- 8
- 9
- 10
- 11
- 12
- 13
- 14
- 15
- 16
- 根组件主要配置路由占位符,以将自定义组件的内容动态渲染到路由占位符的位置。
3.3 UserList.vue代码
<template> <div> <!-- 添加用户按钮 --> <el-button type="primary" @click="dialogVisible = true">添加用户</el-button> <!-- 用户表格 --> <el-table :data="userList" stripe border> <!-- 索引列 --> <el-table-column label="#" type="index"></el-table-column> <!-- 用户名 --> <el-table-column label="姓名" prop="name"> </el-table-column> <!-- 年龄 --> <el-table-column label="年龄" prop="age"></el-table-column> <!-- 头衔 --> <el-table-column label="头衔" prop="position"></el-table-column> <!-- 创建时间 --> <el-table-column label="创建时间"> <template v-slot="scope"> {{ scope.row.addtime | dateFormat }} </template> </el-table-column> <!-- 操作 --> <el-table-column label="操作"> <template v-slot="scope"> <div> <router-link :to="'/users/' + scope.row.id">详情</router-link> <a href="#" @click.prevent="onRemove(scope.row.id)">删除</a> </div> </template> </el-table-column> </el-table> <!-- 添加用户的对话框 不占标准流--> <el-dialog title="提示" :visible.sync="dialogVisible" width="30%" @close="onDialogClosed" > <!-- 添加用户的表单 --> <el-form :model="form" label-width="80px" :rules="Formrules" ref="myaddForm" > <el-form-item label="姓名" prop="name"> <el-input v-model="form.name"></el-input> </el-form-item> <el-form-item label="年龄" prop="age"> <el-input v-model.number="form.age"></el-input> </el-form-item> <el-form-item label="头衔" prop="position"> <el-input v-model="form.position"></el-input> </el-form-item> </el-form> <span slot="footer" class="dialog-footer"> <el-button @click="dialogVisible = false">取 消</el-button> <el-button type="primary" @click="onAddUser">确 定</el-button> </span> </el-dialog> <!-- 删除对话框 --> </div> </template> <script> export default { name: "UserList", data() { // 声明校验年龄的函数 let checkAge = (rule, value, cb) => { if (!Number.isInteger(value)) { return cb(new Error("请填写整数!")); } if (value > 100 || value < 1) { return cb(new Error("年龄必须在1到100之间!")); } cb(); }; return { userList: [], dialogVisible: false, form: { name: "", age: "", position: "", }, Formrules: { name: [ { required: true, message: "请输入姓名", trigger: "blur", }, { min: 1, max: 15, message: "长度在1到15个字符", trigger: "blur", }, ], age: [ { required: true, message: "请输入年龄", trigger: "blur" }, // 自定义验证规则 { validator: checkAge, trigger: "blur", }, ], position: [ { required: true, message: "请输入头衔", trigger: "blur" }, { min: 1, max: 10, message: "长度在1到10个字符", trigger: "blur", }, ], }, }; }, methods: { async getUserList() { const { data: res } = await this.$http.get("/api/users"); console.log(res); if (res.status !== 0) { console.log("获取用户信息失败!"); } this.userList = res.data; }, onDialogClosed() { // 重置表单 this.$refs.myaddForm.resetFields(); }, // 用户点击添加按钮 onAddUser() { this.$refs.myaddForm.validate(async (valid) => { // console.log(valid); if (!valid) return; // 需要执行添加业务处理 const { data: res } = await this.$http.post("/api/users", this.form); console.log(res); if (res.status !== 0) return this.$message.error("添加失败!"); this.$message.success("添加成功!"); this.dialogVisible = false; this.getUserList(); }); }, // 点击删除链接 async onRemove(id) { const confirmResult = await this.$confirm("此操作将永久删除该用户, 是否继续?", "提示", { confirmButtonText: "确定", cancelButtonText: "取消", type: "warning", }).catch(err => err) if(confirmResult !== 'confirm') return this.$message.info('取消了删除!'); const {data:res} = await this.$http.delete('/api/users/' + id) if(res.status !==0) return this.$message.error('删除失败!'); this.$message.success('删除成功!'); this.getUserList(); }, }, created() { this.getUserList(); }, }; </script> <style lang="less" scoped> .el-table { margin-top: 15px; } </style>- 1
- 2
- 3
- 4
- 5
- 6
- 7
- 8
- 9
- 10
- 11
- 12
- 13
- 14
- 15
- 16
- 17
- 18
- 19
- 20
- 21
- 22
- 23
- 24
- 25
- 26
- 27
- 28
- 29
- 30
- 31
- 32
- 33
- 34
- 35
- 36
- 37
- 38
- 39
- 40
- 41
- 42
- 43
- 44
- 45
- 46
- 47
- 48
- 49
- 50
- 51
- 52
- 53
- 54
- 55
- 56
- 57
- 58
- 59
- 60
- 61
- 62
- 63
- 64
- 65
- 66
- 67
- 68
- 69
- 70
- 71
- 72
- 73
- 74
- 75
- 76
- 77
- 78
- 79
- 80
- 81
- 82
- 83
- 84
- 85
- 86
- 87
- 88
- 89
- 90
- 91
- 92
- 93
- 94
- 95
- 96
- 97
- 98
- 99
- 100
- 101
- 102
- 103
- 104
- 105
- 106
- 107
- 108
- 109
- 110
- 111
- 112
- 113
- 114
- 115
- 116
- 117
- 118
- 119
- 120
- 121
- 122
- 123
- 124
- 125
- 126
- 127
- 128
- 129
- 130
- 131
- 132
- 133
- 134
- 135
- 136
- 137
- 138
- 139
- 140
- 141
- 142
- 143
- 144
- 145
- 146
- 147
- 148
- 149
- 150
- 151
- 152
- 153
- 154
- 155
- 156
- 157
- 158
- 159
- 160
- 161
- 162
- 163
- 164
- 165
- 166
- 167
- 168
- 169
- 170
- 171
- 172
- 173
- 174
3.4 UserDetail.vue
<template> <div> <el-card class="box-card"> <div slot="header" class="clearfix"> <span>用户详情</span> <el-button style="float: right; padding: 3px 0" type="text" @click="goBack" >返回</el-button > </div> <div class="text item"> <p>姓名:{{ userInfo.name }}</p> <p>年龄:{{ userInfo.age }}</p> <p>头衔:{{ userInfo.position }}</p> </div> </el-card> </div> </template> <script> export default { name: "UserDetail", props: ["id"], data() { return { userInfo: {}, }; }, created() { this.getUserInfo(); }, methods: { async getUserInfo() { const { data: res } = await this.$http.get("/api/users/" + this.id); if (res.status !== 0) return this.$message.error("获取详情数据失败!"); this.userInfo = res.data; console.log(this.userInfo); }, goBack() { // 编程式导航 this.$router.go(-1); }, }, }; </script> <style lang="less" scoped> </style>- 1
- 2
- 3
- 4
- 5
- 6
- 7
- 8
- 9
- 10
- 11
- 12
- 13
- 14
- 15
- 16
- 17
- 18
- 19
- 20
- 21
- 22
- 23
- 24
- 25
- 26
- 27
- 28
- 29
- 30
- 31
- 32
- 33
- 34
- 35
- 36
- 37
- 38
- 39
- 40
- 41
- 42
- 43
- 44
- 45
- 46
- 47
- 48
- 49
- 50
3.5 在main.js中使用全局过滤器对表格中的日期数据进行格式化
// 声明全局过滤器 Vue.filter("dateFormat", (dtStr) => { const dt = new Date(dtStr); const y = dt.getFullYear(); const m = padZero(dt.getMonth() + 1); const d = padZero(dt.getDate()); const hh = padZero(dt.getHours()); const mm = padZero(dt.getMinutes()); const ss = padZero(dt.getSeconds()); return `${y}-${m}-${d} ${hh}:${mm}:${ss}`; }); // 为日期补零的函数 function padZero(n) { return n > 9 ? n : "0" + n; }- 1
- 2
- 3
- 4
- 5
- 6
- 7
- 8
- 9
- 10
- 11
- 12
- 13
- 14
- 15
- 16
- 17
- 18
4. 效果
4.1 用户信息表格
- 页面

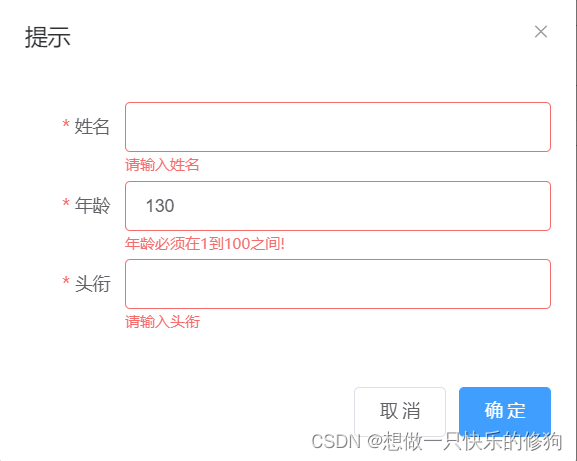
- 点击添加按钮

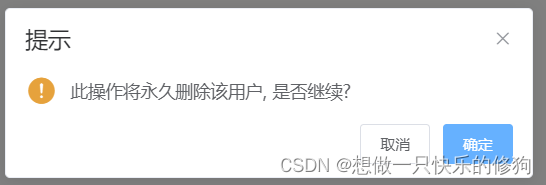
- 点击删除按钮

- 点击详情

- 点击详情页的“返回”,回到表格页
5. 参考
黑马vue视频,感谢llb老师。
-
相关阅读:
crsctl stop crs -f 停止不成功 (SYSTEMDG in QUIESCING state)
图书馆座位预约系统管理/基于微信小程序的图书馆座位预约系统
索引生命周期管理ILM看完不懂你锤我
Azure Terraform(十三)提升 Azure Web App Plan 的性能
习题:选择结构(二)
Git commit规范
在编译源码的环境下,搭建起Discuz!社区论坛和WordPress博客的LNMP架构
剑指offer.在排序数组中查找数字
vue3 Driver.js 页面分步引导
多维时序 | MATLAB实现WOA-CNN-GRU-Attention多变量时间序列预测(SE注意力机制)
- 原文地址:https://blog.csdn.net/weixin_44109827/article/details/125624946