-
pix2pix学习系列(1):预训练模型测试pix2pix
pix2pix学习系列(1):预训练模型测试pix2pix
参考文献:
[Pytorch系列-66]:生成对抗网络GAN - 图像生成开源项目pytorch-CycleGAN-and-pix2pix - 使用预训练模型测试pix2pix模型
运行环境
win 10
1、代码下载
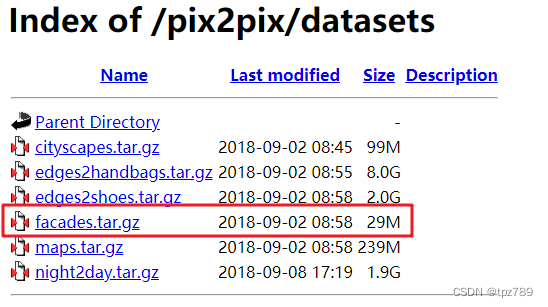
2、下载pix2pix数据集
- 通过URL手工下载:地址

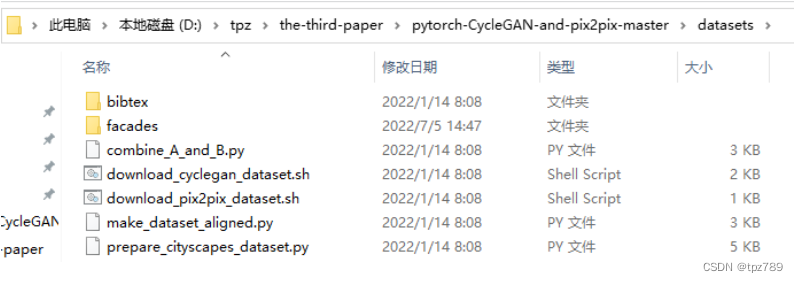
- 存放路径:pytorch-CycleGAN-and-pix2pix\datasets

3、下载预训练模型
- 下载链接

- 存放路径
需要把模型的名称改为latest_net_G.pth,并存放在./checkpoints/facades_label2photo_pretrained目录中。

4. 使用Anaconda进行调试
-
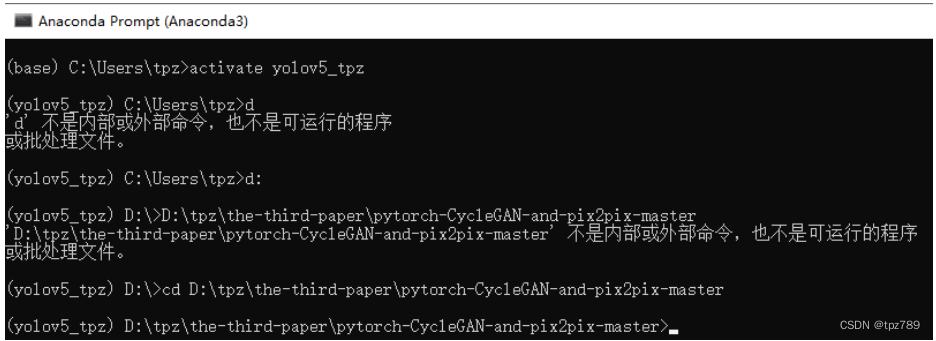
打开Anaconda Prompt (Anaconda3)

-
激活环境
activate yolov5_tpz -
切换到d盘
输入: d:

-
切换到 D:\tpz\the-third-paper\pytorch-CycleGAN-and-pix2pix-master
输入: cd D:\tpz\the-third-paper\pytorch-CycleGAN-and-pix2pix-master

-
运行命令
输入:
python test.py --dataroot ./datasets/facades --direction BtoA --model pix2pix --name facades_label2photo_pretrained -
运行效果
----------------- Options --------------- aspect_ratio: 1.0 batch_size: 1 checkpoints_dir: ./checkpoints crop_size: 256 dataroot: ./datasets/facades [default: None] dataset_mode: aligned direction: BtoA [default: AtoB] display_winsize: 256 epoch: latest eval: False gpu_ids: 0 init_gain: 0.02 init_type: normal input_nc: 3 isTrain: False [default: None] load_iter: 0 [default: 0] load_size: 256 max_dataset_size: inf model: pix2pix [default: test] n_layers_D: 3 name: facades_label2photo_pretrained [default: experiment_name] ndf: 64 netD: basic netG: unet_256 ngf: 64 no_dropout: False no_flip: False norm: batch num_test: 50 num_threads: 4 output_nc: 3 phase: test preprocess: resize_and_crop results_dir: ./results/ serial_batches: False suffix: use_wandb: False verbose: False ----------------- End ------------------- dataset [AlignedDataset] was created initialize network with normal model [Pix2PixModel] was created loading the model from ./checkpoints\facades_label2photo_pretrained\latest_net_G.pth ---------- Networks initialized ------------- [Network G] Total number of parameters : 54.414 M ----------------------------------------------- creating web directory ./results/facades_label2photo_pretrained\test_latest D:\Anaconda3\envs\yolov5_tpz\lib\site-packages\torchvision\transforms\transforms.py:280: UserWarning: Argument interpolation should be of type InterpolationMode instead of int. Please, use InterpolationMode enum. warnings.warn( processing (0000)-th image... ['./datasets/facades\\test\\1.jpg'] processing (0005)-th image... ['./datasets/facades\\test\\103.jpg'] processing (0010)-th image... ['./datasets/facades\\test\\12.jpg'] processing (0015)-th image... ['./datasets/facades\\test\\17.jpg'] processing (0020)-th image... ['./datasets/facades\\test\\21.jpg'] processing (0025)-th image... ['./datasets/facades\\test\\26.jpg'] processing (0030)-th image... ['./datasets/facades\\test\\30.jpg'] processing (0035)-th image... ['./datasets/facades\\test\\35.jpg'] processing (0040)-th image... ['./datasets/facades\\test\\4.jpg'] processing (0045)-th image... ['./datasets/facades\\test\\44.jpg']- 1
- 2
- 3
- 4
- 5
- 6
- 7
- 8
- 9
- 10
- 11
- 12
- 13
- 14
- 15
- 16
- 17
- 18
- 19
- 20
- 21
- 22
- 23
- 24
- 25
- 26
- 27
- 28
- 29
- 30
- 31
- 32
- 33
- 34
- 35
- 36
- 37
- 38
- 39
- 40
- 41
- 42
- 43
- 44
- 45
- 46
- 47
- 48
- 49
- 50
- 51
- 52
- 53
- 54
- 55
- 56
- 57
- 58
- 59
- 60
- 查看结果
图片位置: \results\facades_label2photo_pretrained\test_latest\images


5. 也可以使用pycharm进行调试
- 设置 options/base_options.py
parser.add_argument('--dataroot', default='datasets/facades', help='path to images (should have subfolders trainA, trainB, valA, valB, etc)') parser.add_argument('--name', type=str, default='facades_label2photo_pretrained', help='name of the experiment. It decides where to store samples and models') parser.add_argument('--model', type=str, default='pix2pix', help='chooses which model to use. [cycle_gan | pix2pix | test | colorization]') parser.add_argument('--direction', type=str, default='BtoA', help='AtoB or BtoA')- 1
- 2
- 3
- 4
- 设置 options/test_options.py
parser.set_defaults(model='pix2pix')- 1
注意:
如果不将 parser.set_defaults(model='test ') 更改为 parser.set_defaults(model=‘pix2pix’),将会出现以下错误:
AttributeError: ‘Sequential’ object has no attribute ‘model’

解决方案参考- 运行 test.py
-
相关阅读:
Python数据分析与机器学习4-Matplotlib
百度实习一面(知识图谱部门)
ASH是否可以生成备库的ASH
无货源操作方式
基于Python实现的SVM实验
python 基础练习题
2022年全球市场超宽带电容器总体规模、主要生产商、主要地区、产品和应用细分研究报告
提高效率的vscode插件推荐
非转基因保护品种覆盖南北 北方旱作国稻种芯-517功能苦瓜稻
蔚来汽车智能座舱Java面经(23 秋招提前批)
- 原文地址:https://blog.csdn.net/tpz789/article/details/125622595