-
JDBC入门和API详解
JDBC入门
1.导入对应的jar包

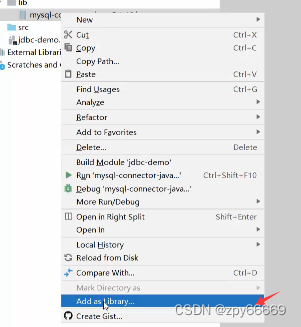
2.设置当前生效的范围,选择模块有效即可
3.代码示例import java.sql.Connection; import java.sql.DriverManager; import java.sql.SQLException; import java.sql.Statement; /** * JDBC快速入门 */ public class JDBCDemo { public static void main(String[] args) throws ClassNotFoundException, SQLException { //1.注册驱动 Class.forName("com.mysql.jdbc.Driver"); //2.获取连接 String url = "jdbc:mysql://127.0.0.1:3306/jdbc_demo?useSSL=false"; String username = "root"; String password = "2020"; Connection conn = DriverManager.getConnection(url, username, password); //3.定义sql String sql = "UPDATE account SET qian = 2000 WHERE id = 1"; //4.获取执行sql对象Statement Statement stmt = conn.createStatement(); //5.执行sql int count = stmt.executeUpdate(sql);//受影响行数 //6.处理结果 System.out.println(count); //释放资源 stmt.close(); conn.close(); } }- 1
- 2
- 3
- 4
- 5
- 6
- 7
- 8
- 9
- 10
- 11
- 12
- 13
- 14
- 15
- 16
- 17
- 18
- 19
- 20
- 21
- 22
- 23
- 24
- 25
- 26
- 27
- 28
- 29
- 30
- 31
- 32
- 33
- 34
- 35
- 36
- 37
API详解
DriverManager(驱动管理)的作用
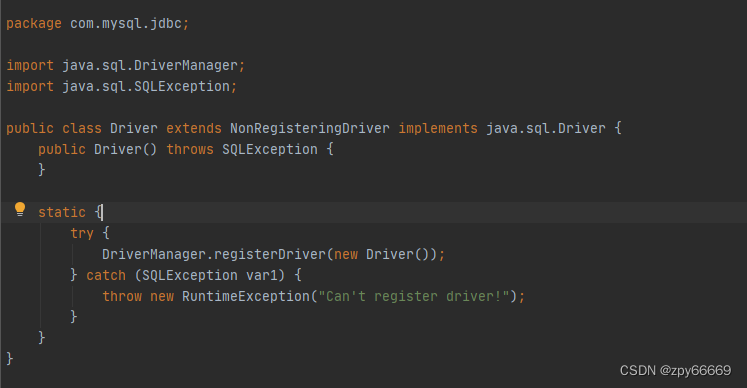
1.注册驱动
Class.forName(“com.mysql.jdbc.Driver”);查看Driver源码
2.获取数据库链接
语法:jdbc:mysql://ip地址(域名):端口号/数据库名称?参数键值对1&参数键值对2…

Connection(数据库连接对象)作用
1.获取执行SQL的对象
- 普通执行SQL对象
Statement createStatement
- 预编译SQL的执行SQL对象:防止SQL注入
PreparedStatement prepareStatement(sql)
- 执行存储过程的对象
CallableStatement prepareCall(sql)
2.管理事务
- MySQL事务管理
开启事务:BEGIN;/START TRANSACTION
提交事务:COMMIT;
回滚事务:ROLLBACK;
MySQL默认自动提交事务
- JDBC事务管理:Connection接口定义了3个对应的方法
开启事务:setAutoCommit(boolean autoCommit);true为自动提交事务;flase为手动提交事务,即为开启事务
提交事务:commit()
回滚事务:rollback()
public class JDBCDemo1 { public static void main(String[] args) throws ClassNotFoundException, SQLException { //1.注册驱动 Class.forName("com.mysql.jdbc.Driver"); //2.获取连接 String url = "jdbc:mysql://127.0.0.1:3306/jdbc_demo?useSSL=false"; String username = "root"; String password = "2020"; Connection conn = DriverManager.getConnection(url, username, password); //4.获取执行sql对象Statement Statement stmt = conn.createStatement(); //3.定义sql String sql1 = "UPDATE account SET qian = 4000 WHERE id = 1"; String sql2 = "UPDATE account SET qian = 2000 WHERE id = 2"; try { //开启事务 conn.setAutoCommit(false); int count1 = stmt.executeUpdate(sql1);//受影响行数 System.out.println(count1); int i = 3/0; //5.执行sql int count2 = stmt.executeUpdate(sql2);//受影响行数 System.out.println(count2); //提交事务 conn.commit(); //6.处理结果 } catch (Exception throwables) { //回滚事务 conn.rollback(); throwables.printStackTrace(); } //释放资源 stmt.close(); conn.close(); } }- 1
- 2
- 3
- 4
- 5
- 6
- 7
- 8
- 9
- 10
- 11
- 12
- 13
- 14
- 15
- 16
- 17
- 18
- 19
- 20
- 21
- 22
- 23
- 24
- 25
- 26
- 27
- 28
- 29
- 30
- 31
- 32
- 33
- 34
- 35
- 36
- 37
- 38
- 39
- 40
- 41
- 42
- 43
- 44
- 45
Statement(执行SQL语句)的作用
int executeUpdate(sql):执行DML,DDL语句
DDL:对表和库的增删改查操作
DML:对数据的增删改操作
DQL:对数据的查询操作
返回值:(1)DML语句影响的行数(2) DDL语句执行后,执行成功也可能返回0/** * 执行DML语句 * @throws Exception */ @Test public void testDML() throws Exception { //1.注册驱动 Class.forName("com.mysql.jdbc.Driver"); //2.获取连接 String url = "jdbc:mysql://127.0.0.1:3306/jdbc_demo?useSSL=false"; String username = "root"; String password = "2020"; Connection conn = DriverManager.getConnection(url, username, password); //3.定义sql String sql = "UPDATE account SET qian = 2000 WHERE id = 1"; //4.获取执行sql对象Statement Statement stmt = conn.createStatement(); //5.执行sql int count = stmt.executeUpdate(sql);//受影响行数 //6.处理结果 if(count > 0){ System.out.println("修改成功"); }else { System.out.println("修改失败"); } //释放资源 stmt.close(); conn.close(); }- 1
- 2
- 3
- 4
- 5
- 6
- 7
- 8
- 9
- 10
- 11
- 12
- 13
- 14
- 15
- 16
- 17
- 18
- 19
- 20
- 21
- 22
- 23
- 24
- 25
- 26
- 27
- 28
- 29
- 30
- 31
- 32
- 33
- 34
- 35
- 36
- 37
/** * 执行DML语句 * @throws Exception */ @Test public void testDDL() throws Exception { //1.注册驱动 Class.forName("com.mysql.jdbc.Driver"); //2.获取连接 String url = "jdbc:mysql://127.0.0.1:3306/jdbc_demo?useSSL=false"; String username = "root"; String password = "2020"; Connection conn = DriverManager.getConnection(url, username, password); //3.定义sql String sql = "drop database demo2"; //4.获取执行sql对象Statement Statement stmt = conn.createStatement(); //5.执行sql int count = stmt.executeUpdate(sql);//受影响行数 //6.处理结果 if(count > 0){ System.out.println("修改成功"); }else { System.out.println("修改失败"); } //释放资源 stmt.close(); conn.close(); }- 1
- 2
- 3
- 4
- 5
- 6
- 7
- 8
- 9
- 10
- 11
- 12
- 13
- 14
- 15
- 16
- 17
- 18
- 19
- 20
- 21
- 22
- 23
- 24
- 25
- 26
- 27
- 28
- 29
- 30
- 31
- 32
- 33
- 34
- 35
- 36
- 37
ResultSet(结果集对象)的作用
封装了DQL查询语句的结果
ResultSet stmt.executeQuery(sql):执行DQL语句,返回ResultSet对象
获取查询结果
1.
boolean next():(1)将光标从当前位置向前移动一行(2)判断当前行是否为有效行
返回值:
true:有效行,当前行有数据
false:无效行,当前行没用数据
2.xxx getXxx(参数):获取数据
xxx:数据类型;如:int getint(参数) String getString(参数)参数:
- int:列的编号,从1开始
- String:列的名称
/** * 执行DQL语句 * @throws Exception */ @Test public void testDQL() throws Exception { //1.注册驱动 Class.forName("com.mysql.jdbc.Driver"); //2.获取连接 String url = "jdbc:mysql://127.0.0.1:3306/jdbc_demo?useSSL=false"; String username = "root"; String password = "2020"; Connection conn = DriverManager.getConnection(url, username, password); //3.定义sql String sql = "select * from account"; //4.获取statment Statement stmt = conn.createStatement(); //5.执行sql ResultSet rs = stmt.executeQuery(sql); //6.处理结果,遍历rs中的数据 /* while (rs.next()){ int id = rs.getInt(1); String name = rs.getString(2); String qian = rs.getString(3); System.out.println(id); System.out.println(name); System.out.println(qian); System.out.println("-------------------"); }*/ while (rs.next()){ int id = rs.getInt("id"); String name = rs.getString("name"); String qian = rs.getString("qian"); System.out.println(id); System.out.println(name); System.out.println(qian); System.out.println("-------------------"); } //7.释放资源 rs.close(); stmt.close(); conn.close(); }- 1
- 2
- 3
- 4
- 5
- 6
- 7
- 8
- 9
- 10
- 11
- 12
- 13
- 14
- 15
- 16
- 17
- 18
- 19
- 20
- 21
- 22
- 23
- 24
- 25
- 26
- 27
- 28
- 29
- 30
- 31
- 32
- 33
- 34
- 35
- 36
- 37
- 38
- 39
- 40
- 41
- 42
- 43
- 44
- 45
- 46
- 47
- 48
- 49
- 50
- 51
- 52
- 53
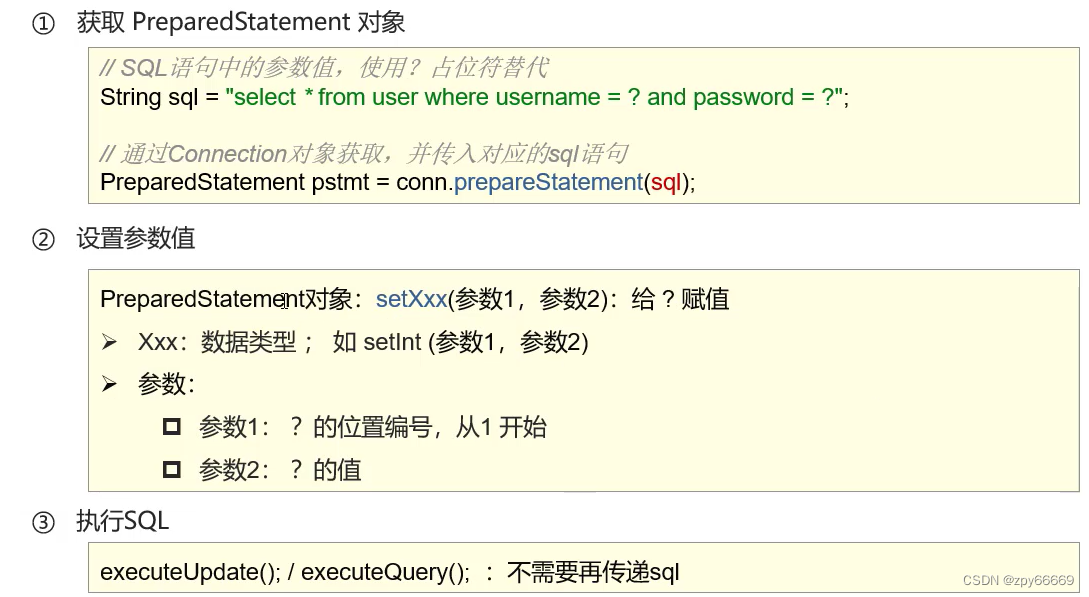
PreparedStatement
预编译SQL语句并执行:预防SQL注入问题
SQL注入
SQL注入是通过操作输入来修改事先定义好的SQL语句,用以达到执行代码对服务器进行攻击达到方法
以下图片摘抄自黑马程序员

/** * SQL注入 * @throws Exception */ @Test public void testSQL() throws Exception { //1.注册驱动 Class.forName("com.mysql.jdbc.Driver"); //2.获取连接 String url = "jdbc:mysql://127.0.0.1:3306/jdbc_demo?useSSL=false&useServerPrepStmts=true"; String username = "root"; String password = "2020"; Connection conn = DriverManager.getConnection(url, username, password); String name = "zhangsan"; String qian = "123456"; //定义sql String sql = "select * from account where name = ? and qian = ?"; //获取pstmt对象 PreparedStatement pstmt = conn.prepareStatement(sql); //设置?的值 pstmt.setString(1,name); pstmt.setString(2,qian); //执行sql ResultSet rs = pstmt.executeQuery(); if(rs.next()){ System.out.println("登陆成功"); }else { System.out.println("登陆失败"); } //释放资源 rs.close(); pstmt.close(); conn.close(); }- 1
- 2
- 3
- 4
- 5
- 6
- 7
- 8
- 9
- 10
- 11
- 12
- 13
- 14
- 15
- 16
- 17
- 18
- 19
- 20
- 21
- 22
- 23
- 24
- 25
- 26
- 27
- 28
- 29
- 30
- 31
- 32
- 33
- 34
- 35
- 36
- 37
- 38
- 39
- 40
- 41
- 42
- 43
- 44
- 45
- 46
- 47
-
相关阅读:
【xv6操作系统】Lab systems calls
【数据结构】栈和队列
基于Python和mysql开发的看图猜成语微信小程序(源码+数据库+程序配置说明书+程序使用说明书)
谁说程序员不懂浪漫,表白代码来啦~
Python内置函数12——map
VSCode-更改系统默认路径
Zone 和 Zoneset 是什么关系
家具vr虚拟交互展示外包制作
NFT平台开发:NFT数字馆藏平台开发
每日汇评:黄金形态确认牛市,再次尝试上行2000美元
- 原文地址:https://blog.csdn.net/weixin_48747706/article/details/125614572