-
VUEX版数字求和案例,附带vuex工作执行顺序图

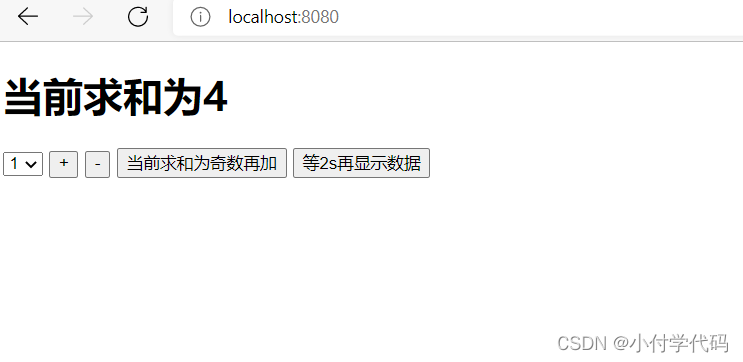
Demo还是这个。但是本次使用vuex的方式来写: run一下代码大概就能清楚执行的流程顺序了。
store文件夹一般单独来写,在main中引入时 ./store 会自动寻找到/index目录,如果有index。

Count.vue:
- <template>
- <div>
- <h1>当前求和为{{ $store.state.sum }}</h1>
- <select v-model="number">
- <option :value="1">1</option>
- <option :value="2">2</option>
- <option :value="3">3</option>
- </select>
- <button @click="add">+</button>
- <button @click="reduce">-</button>
- <button @click="odd_add">当前求和为奇数再加</button>
- <button @click="wait">等2s再显示数据</button>
- </div>
- </template>
- <script>
- export default {
- name: "Count",
- data() {
- return {
- number: 1, //用户选择的数字
- };
- },
- methods: {
- add() {
- this.$store.commit("JIA", this.number);
- },
- reduce() {
- this.$store.commit("JIAN", this.number);
- },
- odd_add() {
- this.$store.dispatch("jishujia", this.number);
- },
- wait() {
- setTimeout(() => {
- this.$store.dispatch("waitjia", this.number);
- }, 3000);
- },
- },
- };
- </script>
- <style lang="css" scoped>
- button {
- margin-left: 5px;
- }
- </style>
index.js代码:
- //改文件用于创建Vuex中最为核心的store
- //引入Vue
- import Vue from 'vue'
- //引入Vuex
- import Vuex from 'vuex'
- //准备actions - 用于响应组件中的动作
- const actions = {
- // add与reduce的调用也仅此为了传递commit给mutations。
- // 所以我们前边直接使用了 this.$store.commit 根本不需要经过actions
- // add(context, value) {
- // context.commit('ADD', value)
- // },
- // reduce(context, value) {
- // context.commit('SUB', value)
- // },
- jishujia: function (context, value) {
- if (context.state.sum % 2 == 1) {
- console.log("actions里的jia调用");
- context.commit('JIUSHUJIA', value)
- }
- },
- waitjia: function (context, value) {
- setTimeout(() => {
- console.log("actions里的jia调用");
- context.commit('WAITJIA', value)
- }, 500);
- }
- }
- //准备mutations- 用于操作数据(state)
- const mutations = {
- JIA(state, value) {
- state.sum += value
- console.log("commit中的JIA调用")
- },
- JIAN(state, value) {
- state.sum -= value
- console.log("commit中的JIAN调用")
- },
- JIUSHUJIA(state, value) {
- state.sum += value
- console.log("commit中的JIUSHUJIA调用")
- },
- WAITJIA(state, value) {
- state.sum += value
- console.log("commit中的WAITJIA调用")
- },
- }
- //准备state - 用于存储数据
- const state = {
- sum: 2,//初始数据为0
- }
- //使用插件
- Vue.use(Vuex)
- //创建并暴露store
- export default new Vuex.Store({
- actions,
- mutations,
- state
- })
App.vue代码:
- <template>
- <div>
- <Count />
- </div>
- </template>
- <script>
- import Count from "./components/Count";
- export default {
- name: "App",
- components: { Count },
- };
- </script>
main.js代码:
- //引入Vue
- import Vue from 'vue'
- //引入App
- import App from './App.vue'
- //关闭Vue的生产提示
- Vue.config.productionTip = false
- //引入Vuex
- import Vuex from 'vuex'
- //引入store
- import store from './store/index'
- //创建vm
- new Vue({
- el: '#app',
- render: h => h(App),
- store,
- beforeCreate() {
- Vue.prototype.$bus = this
- },
- })
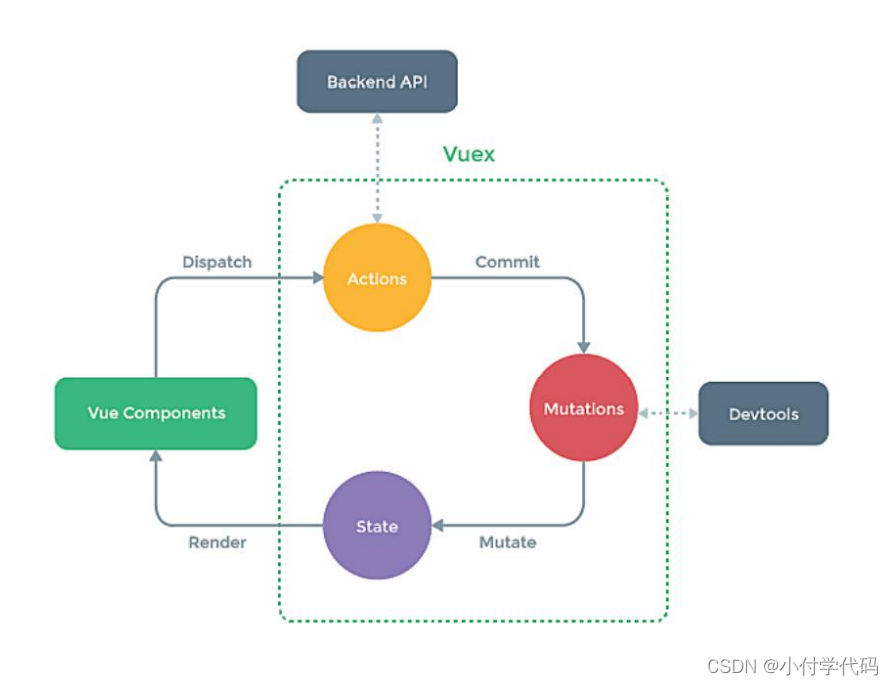
原理图:
通过store中有三个内置方法 Actions,Mutations,State。
使用时一般会通过 $store.dispatch ——> Actions(用来响应动作) ——> 然后再用commit的方式找到 mutations ——> (用于操作数据[state]) ——> state用来存储数据
但如果使用Actions只是为了声明一下,并没有实际意义,就可以绕过这一步直接调用commit来操作数据。就比如我在调用add方法的时候,仅此为了传递commit给mutations。所以可以直接使用 this.$store.commit 根本不需要经过actions。

一些细节问题:
2022年2月7日,vue3成为了默认版本,如果执行npm i vue则直接安装vue3,同时vuex4随之变成默认版本,如果执行npm i vuex则直接安装vuex4,但vuex4只能在vue3中使用,如果当前使用的是vue2,则必须使用:
vuex3:npm i vuex@3
安装:npm i vuex ——> 创建store文件夹 ——> 在store文件夹下创建index.js,该js文件用于创建vuex中最为核心的store ——> 在index.js里引入vue和vuex ——> 使用Vue.use(Vuex) ——> 在main.js里引入store。
还有就是一个import的问题,为什么使用插件要在index.js里,而不是在main.js中
Vue.use(Vuex)vue会不按照顺序,先全部import你导入的东西,所以就会遇到一个这样的错误,要先使用use(Vuex)才能Store。

所以这样写,就能自己控制执行顺序:
- //1.使用插件
- Vue.use(Vuex)
- //2.创建并暴露store
- export default new Vuex.Store({
- actions,
- mutations,
- state
- })
-
相关阅读:
数据结构题目收录(三)
Dataset 的基础知识和RDD转换为DataFrame
Android 获取SIM卡号码权限申请
axios和Ajax
1217. 玩筹码-数学推导法
VSCode+mingw/VSCode+CMake+mingw windows VSCode c++环境搭建
java基于微信小程序的校园服务平台 uniapp 小程序
需要在html中加CSS,怎么加
零时科技 || EGD被黑客攻击损失超3.6万 BUSD,事件分析
关于电路的输入阻抗与输出阻抗的理解
- 原文地址:https://blog.csdn.net/ONLYSRY/article/details/125604676
